
Manual of Drill and Ceremonial | Chapter 4 Basic Arms Drill
A-DH-201-000/PT-000
How squad members should stand, move and fire in a rifle drill or ceremony. Diagrams show correct positions and movements of both the member and the rifle.
- Section 1 Basic arms drill 4-1-1
- Introduction 4-1-1
- C7A2 rifle 4-1-2
- C8 Carbine 4-1-2
- Attention 4-1-3
- Stand at ease from attention 4-1-4
- Stand easy from stand at ease 4-1-4
- Stand at ease from stand easy 4-1-4
- Attention from stand at ease 4-1-4
- Ground Arms from the Shoulder 4-1-5
- Take up arms 4-1-6
- Dressing a Squad 4-1-7
- Ordering a Squad with Weapons on Parade 4-1-7
- Present Arms 4-1-8
- Shoulder Arms from the Present 4-1-9
- Fix Bayonets 4-1-10
- Unfix Bayonets 4-1-11
- Examine Arms 4-1-13
- Ease Springs 4-1-14
- Shoulder Arms from the Examine 4-1-15
- Salute at the Shoulder 4-1-16
- Port Arms from the Shoulder 4-1-17
- Shoulder Arms from the Port 4-1-18
- Change Arms at the Shoulder 4-1-19
- Section 2 Ceremonial rifle drill 4-2-1
- Recover arms from the shoulder 4-2-1
- Shoulder arms from the recover 4-2-2
- Rest on your arms reversed from the present 4-2-2
- Present arms from rest on your arms reversed 4-2-3
- Firing cartridges from the shoulder 4-2-4
- Firing volleys – Military funerals 4-2-6
- Reverse arms from the shoulder 4-2-7
- Shoulder arms from the reverse 4-2-8
- Change arms at the reverse 4-2-9
- Figure 4-1-1 C7A2 rifle 4-1-2
- Figure 4-1-2 C8 Carbine 4-1-2
- Figure 4-1-3 Attention position 4-1-3
- Figure 4-1-4 Position of Stand at Ease 4-1-4
- Figure 4-1-5 Ground Arms from the Shoulder 4-1-5
- Figure 4-1-6 Take up arms 4-1-6
- Figure 4-1-7 Present Arms 4-1-8
- Figure 4-1-8 Shoulder Arms from the Present 4-1-9
- Figure 4-1-9 Fix Bayonets 4-1-10
- Figure 4-1-10 Unfix Bayonets 4-1-11
- Figure 4-1-11 Examine Arms 4-1-13
- Figure 4-1-12 Ease Springs 4-1-14
- Figure 4-1-13 Shoulder Arms from the Examine 4-1-15
- Figure 4-1-14 Salute at the Shoulder 4-1-16
- Figure 4-1-15 Port Arms from the Shoulder 4-1-17
- Figure 4-1-16 Shoulder Arms from the Port 4-1-18
- Figure 4-1-17 Change Arms at the Shoulder 4-1-19
- Figure 4-2-1 Recover Arms from the Shoulder 4-2-1
- Figure 4-2-2 Rest on our Arms Reversed from the Present 4-2-2
- Figure 4-2-3 Present Arms from the Rest on your Arms Reversed 4-2-3
- Figure 4-2-4 Firing Cartridges from the Shoulder 4-2-4
- Figure 4-2-5 Reverse Arms from the Shoulder 4-2-7
SECTION 1 BASIC ARMS DRILL
INTRODUCTION
- Preliminary Instruction. Before commencing instruction, it is important that members of the squad receive instruction in the names of the parts of the weapon (and bayonet) and its care and maintenance (Figure 4-1-1 and 4-1-2). Safety precautions shall be carried out at the commencement of arms drill lessons.
- Drill Instruction. Initial instruction shall be by numbers following the method outlined in Chapter 1. The squad should be in hollow square or single rank.
- Words of Command. All weapon movements on the march are made on successive beats of the left foot. Words of command are given as the left foot is forward and on the ground. Movements start the next time the left foot comes to the ground.
- Fundamental Movements. The most common fault in weapon exercises is lack of control over the weapon causing movement of the body and head. Unless stated otherwise, during the execution of weapon movements:
- the weapon is moved as quickly as possible between positions and kept close to the body;
- the head, body and legs are maintained in the position of attention;
- the fingers are kept close together;
- the elbows are kept close to the body;
- the disengaged hand is brought to the weapon by the shortest route and as quickly as possible and the same principle applies when returning the disengaged hand to the position of attention; and
- the standard pause between all weapon and foot drill movements is observed.
- Faults. Constant checking for and correction of faults is essential. Errors will be corrected immediately when they occur.
- Arms Drill. Movements for weapons (C7A2 – C8) drill have been coordinated to ensure units armed with both carry out actions together.
- Historical rifle movement. Unit can perform historical movement during unit ceremonies. Unit should contact DHH for approval the usage of the specific movement.
- Replace Head Dress. This movement should be completed as per the sequences for Unfix bayonet Figure 4-1-10. With the exception that the weapon is brought between the knees with the right hand only. DHH recommend, with respect to inclusivity and the complexity of the movement, that the parade commander analyze the requirement of this movement during a ceremony.
- Buttstock. Sliding buttstocks should be placed in the shortest position.
- Exception: Firing Cartridges from the shoulder and rest on your arms reversed from the present: the sliding buttstock can be extended for all movements.
- When the C8 carbine is used on drill, the sliding buttstock shall be extended.
- Bayonet position: Bayonet shall be worn on the waist belt, on the left hip not too far forward on the body.
- Sling. Slings are not allowed during performance of drill movement.
- Weapon. Weapons must be fitted with a magazine and the bolt should be in the weapon. Optical sights will stay on the rifle but forward pistol grip, triad and rear battle sight should be removed as not to hinder drill movements. Optical sights will not be used as carrying handles.
C7A2 RIFLE
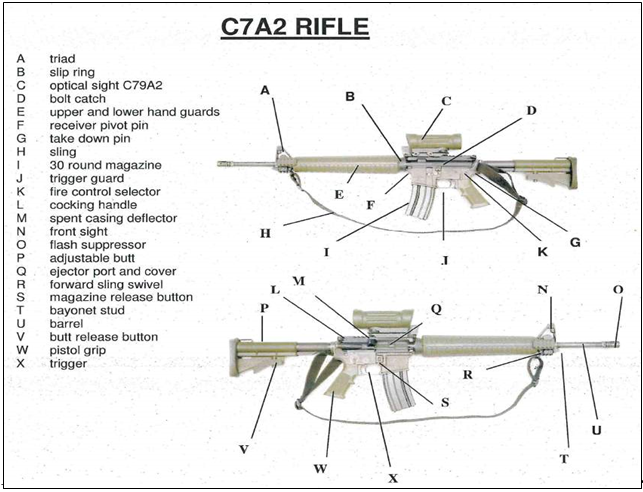
Figure 4-1-1 C7A2 Rifle
C8 CARBINE
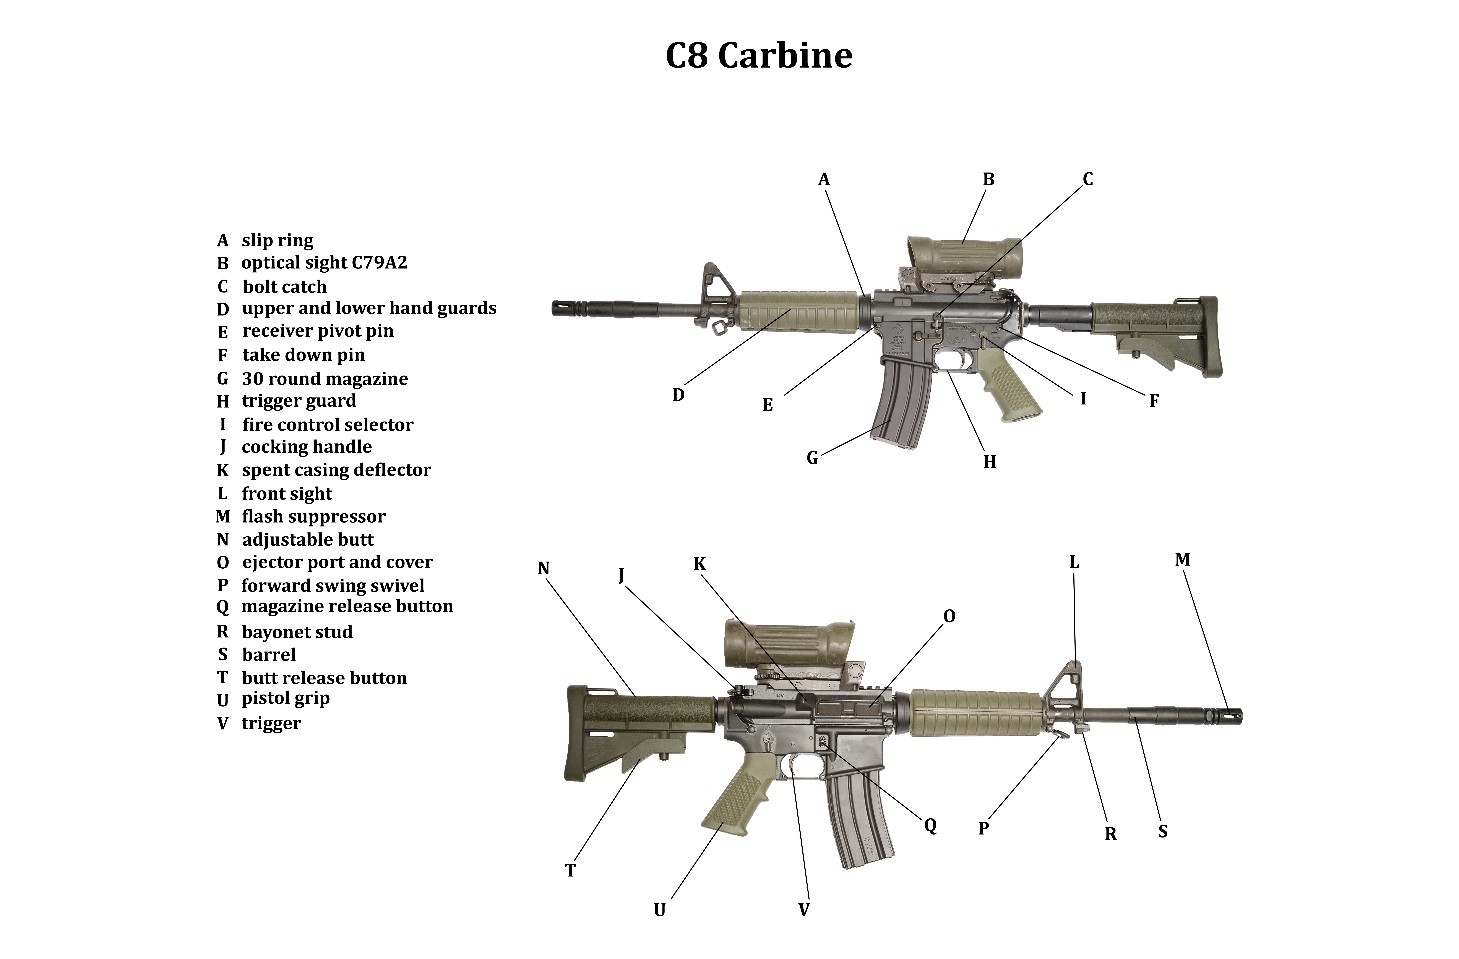
Figure 4-1-2 C8 Carbine
ATTENTION
Figure 4-1-3 Attention position
- The position of attention with the weapon is the same as detailed in Chapter 2, paragraph 4-7, except that the weapon is held with the right hand at the right side of the body, forcing the rifle back until the thumb of the right hand is in line with the trouser seam. That position is also referred as the SHOULDER ARMS position. In order to complete a drill movement, you need to be standing at the ATTENTION position. If squad members are at the STAND EASY position, they need to receive the word of command ATTENTION. Word of command SHOULDER ARMS can only be given after certain drill movements. (Figure 4 1-3).
STAND AT EASE FROM ATTENTION
Figure 4-1-4 Position of Stand at Ease
- On the command STAND AT – EASE, squad members shall:
- bend the left knee
- and simultaneously, with the right hand, bring the weapon to a diagonal position in front of the body with the butt toward the left knee, the muzzle towards the right shoulder and the magazine to the left (Figure 4 1-4);
- place the left hand over the right so the back of the right hand is in the palm of the left; and place the left foot on the ground 25 cm to the left
STAND EASY FROM STAND AT EASE
- On the command STAND – EASY, the body is relaxed in the stand at ease position and no other movement takes place.
STAND AT EASE FROM STAND EASY
- On the command SQUAD, the position of stand at ease is assumed.
ATTENTION FROM STAND AT EASE
- On the command ATTEN – TION, squad members shall:
- bend the left knee and bring the left foot at the position of attention; and
- simultaneously, force the weapon to the right side and cut the left hand to the side and assume the position of attention.
GROUND ARMS FROM THE SHOULDER
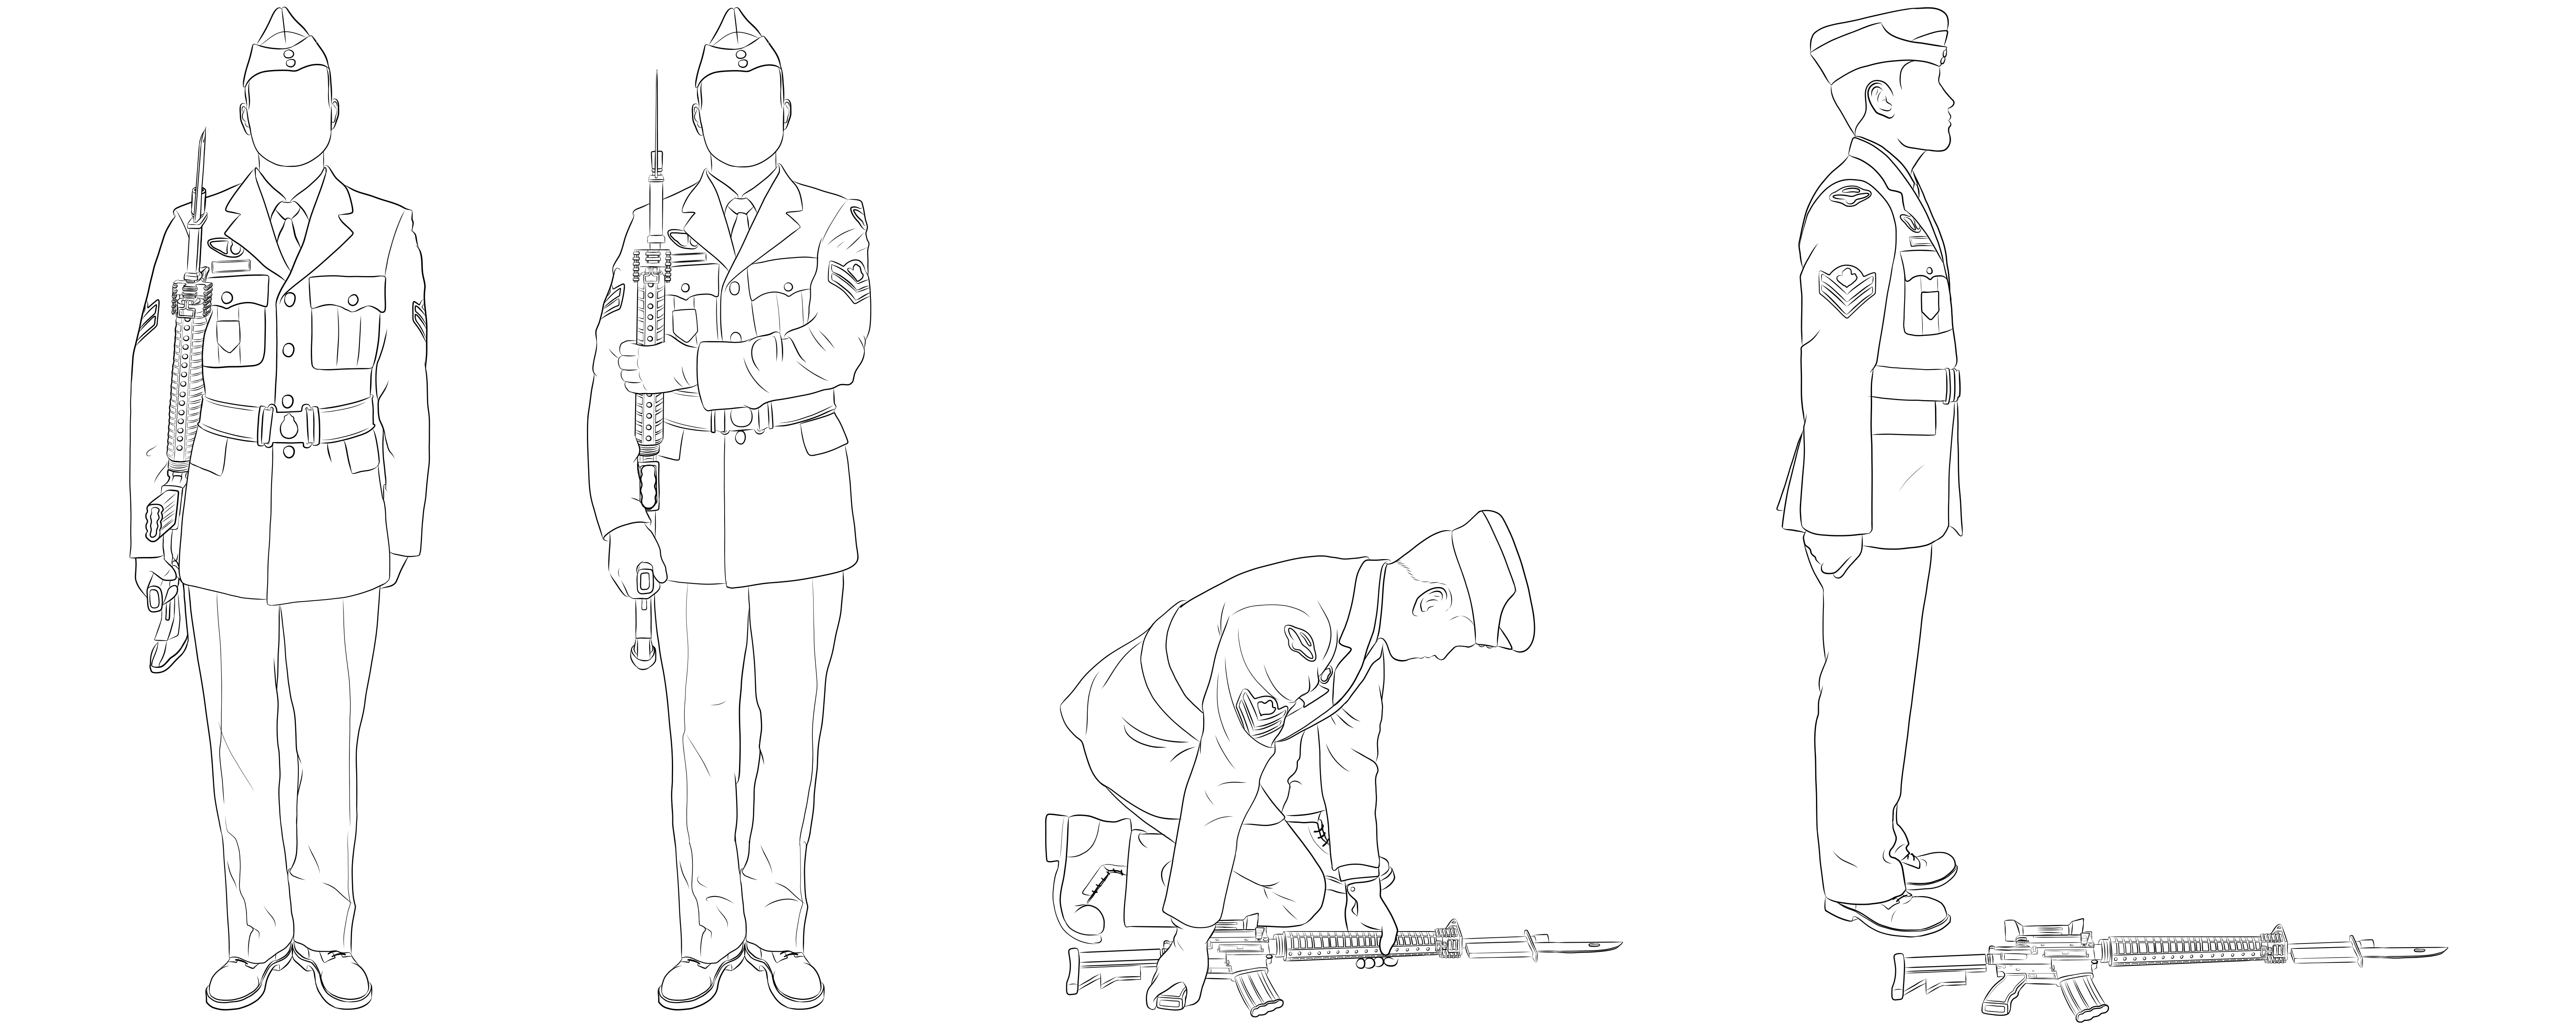
Figure 4-1-5 Ground Arms from the Shoulder
- On the command GROUND ARMS BY NUMBERS, SQUAD – ONE, squad members shall:
- With the left hand, strike and grasp the weapon at the handguard, the fingers all-around the handguard, with the left forearm close to the body and parallel to the ground, and
- Keep the weapon parallel to the body
- On the command SQUAD – TWO, squad members shall:
- Take a half pace forward with the left foot and, by bending the knees, adopt a lunging position. Simultaneously, lay the weapon on the ground at the right side with the magazine to the right and the muzzle pointing straight to the front, keeping the right arm vertical and the left hand grasping the handguard so the heel of the butt is aligned with the small toe of the right foot; and
- Keep the shoulders square to the front and look down at the weapon
- On the command SQUAD – THREE, squad members shall:
- Release the weapon; and
- Assume the position of attention by standing erect, bending the left knee and bringing the left foot back to the right foot, simultaneously cut the left hand to the side.
- On the command GROUND – ARMS, the three movements are combined. A standard pause is observed between the movements.
TAKE UP ARMS
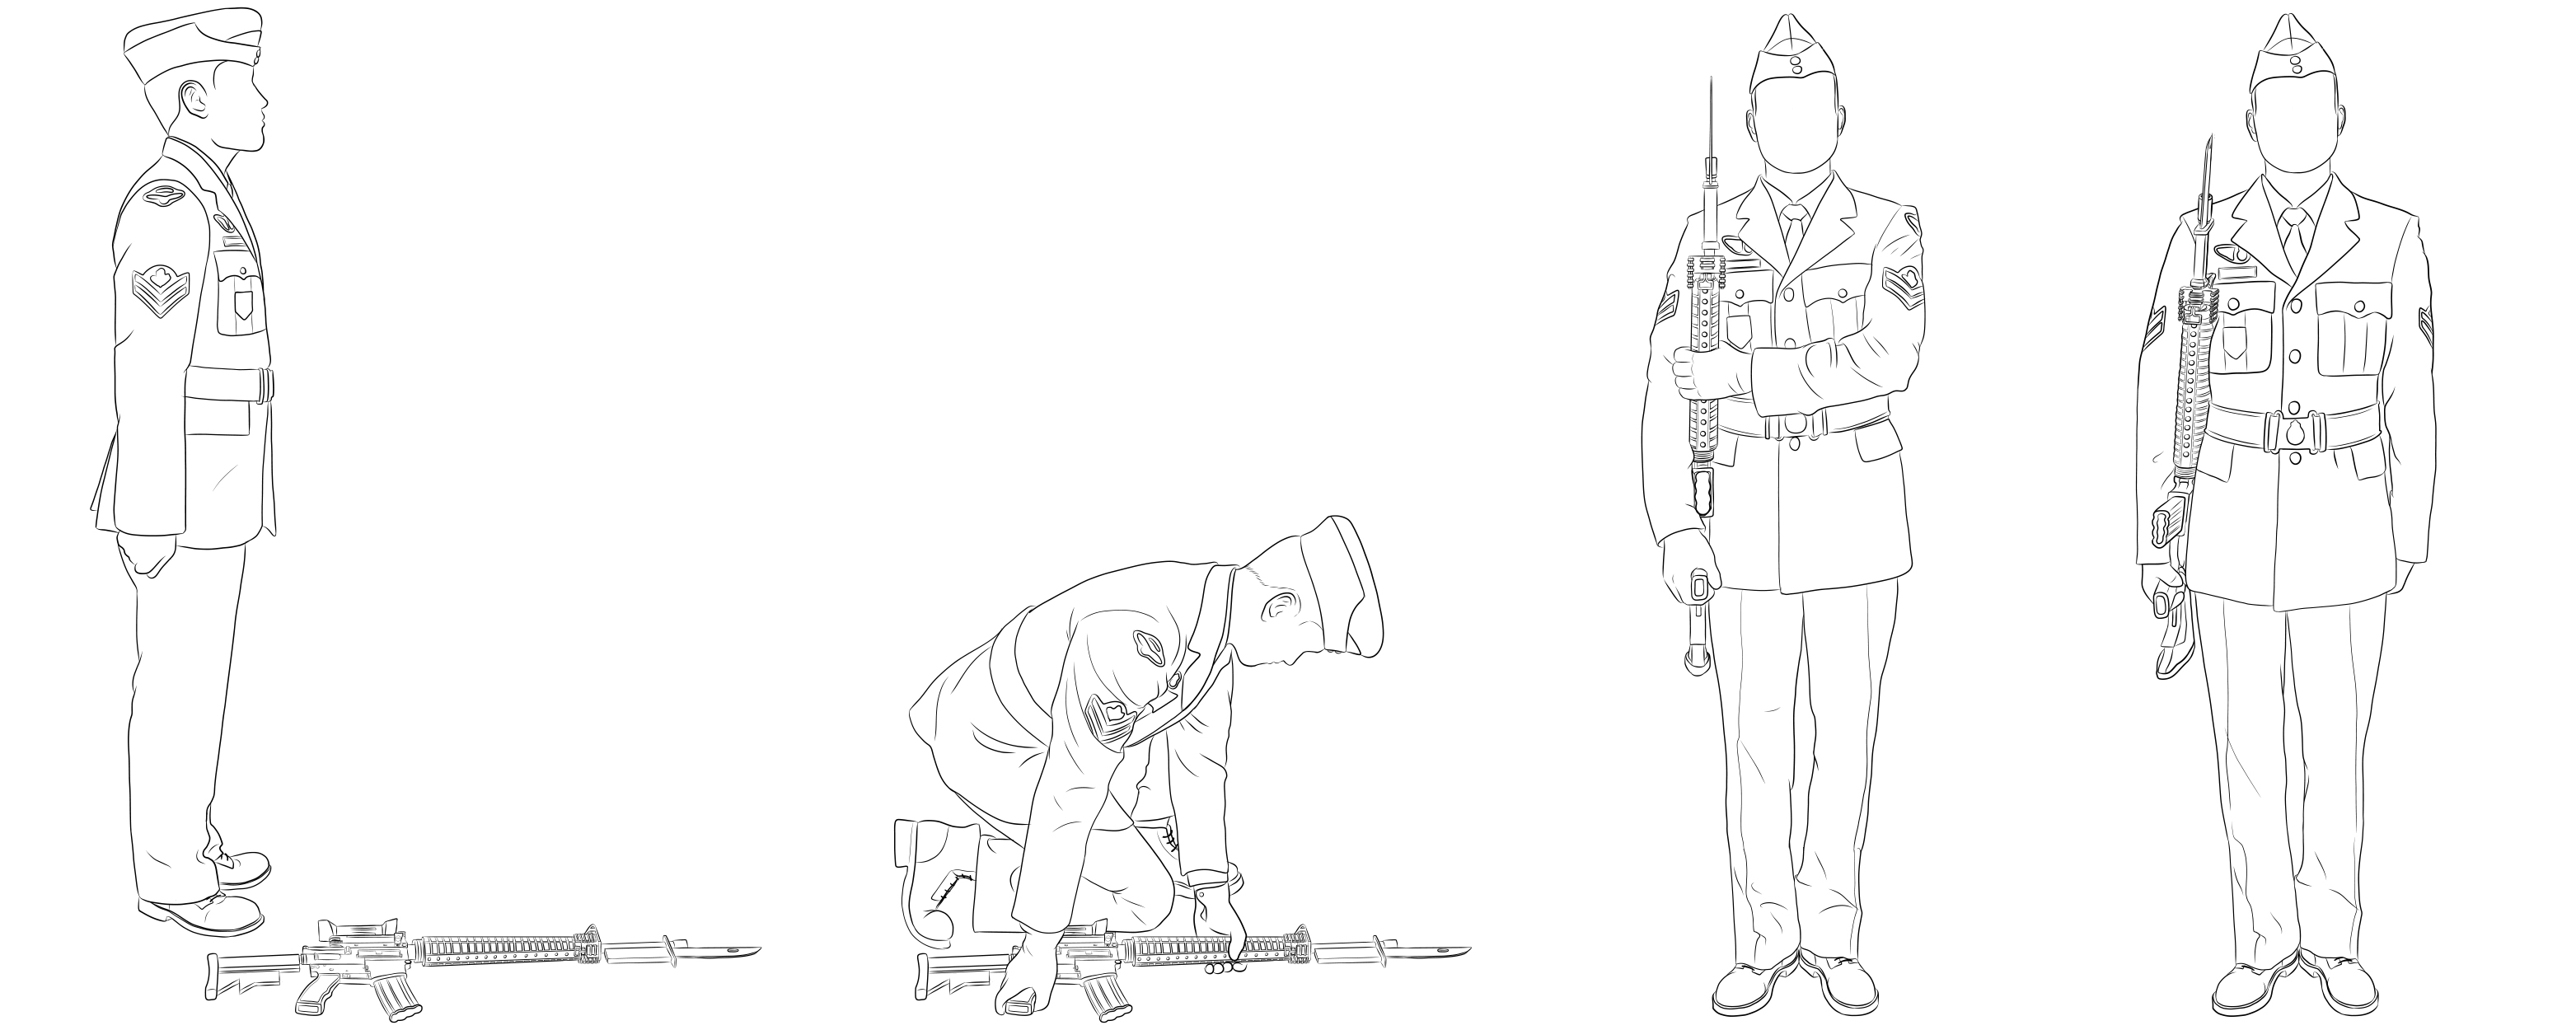
Figure 4-1-6 Take up arms
- On the command TAKE UP ARMS BY NUMBERS, SQUAD – ONE, squad members shall;
- Take a half pace forward with the left foot and, by bending the knees, adopt a lunging position;
- looking down, grasp the weapon at the pistol grip with the right hand; and
- grasp the handguard with the left hand with an all-around grip 10 cm above the slip ring.
- On the command SQUAD – TWO, squad members shall:
- bend the left knee and bring the left foot back to the right foot to assume the position of attention ; and
- Simultaneously, with the left hand grasping the handguard with the arm horizontally across the body forcing the weapon into the right shoulder at vertical position, parallel to the body.
- On the Command SQUAD – THREE, squad members shall complete the position of attention by:
- Cutting the left hand to the side, and
- Simultaneously move the weapon back until the thumb of the right hand is in line with the trouser seam.
- On the command TAKE UP – ARMS, the three movements are combined. A standard pause shall be observed between movements.
DRESSING A SQUAD
- When dressing a squad on parade with weapons, the squad shall be at attention position.
- On the command RIGHT (LEFT) – DRESS or ELBOW DRESSING RIGHT (LEFT) – DRESS, the movement is executed normally except that the left arm or elbow is raised as the head is turned in the required direction as explained in the chapter 2, paragraph 90.
- On the command SHOULDER DRESSING, RIGHT (LEFT) – DRESS, the movement is executed normally.
ORDERING A SQUAD WITH WEAPONS ON PARADE
- The squad shall assemble in three ranks at the edge of the parade ground and stand at ease. The marker detailed by the instructor shall take up position as the right hand person of the front rank and stand at ease.
- On the command MARKER, the marker shall:
- come to attention and observe the standard pause;
- march to a position three paces in front of and facing the instructor and halt; and
- remain at attention.
- After the marker has halted, the instructor shall turn right and move to a position three paces front and centre of where the squad will be fallen in.
- On the command FALL – IN the squad shall:
- come to attention and observe the standard pause;
- march onto the parade ground and halt on the left of and in line with the marker; and
- remain at attention.
- The instructor shall then proceed as required, i.e., right dress, eyes front, stand at ease.
PRESENT ARMS
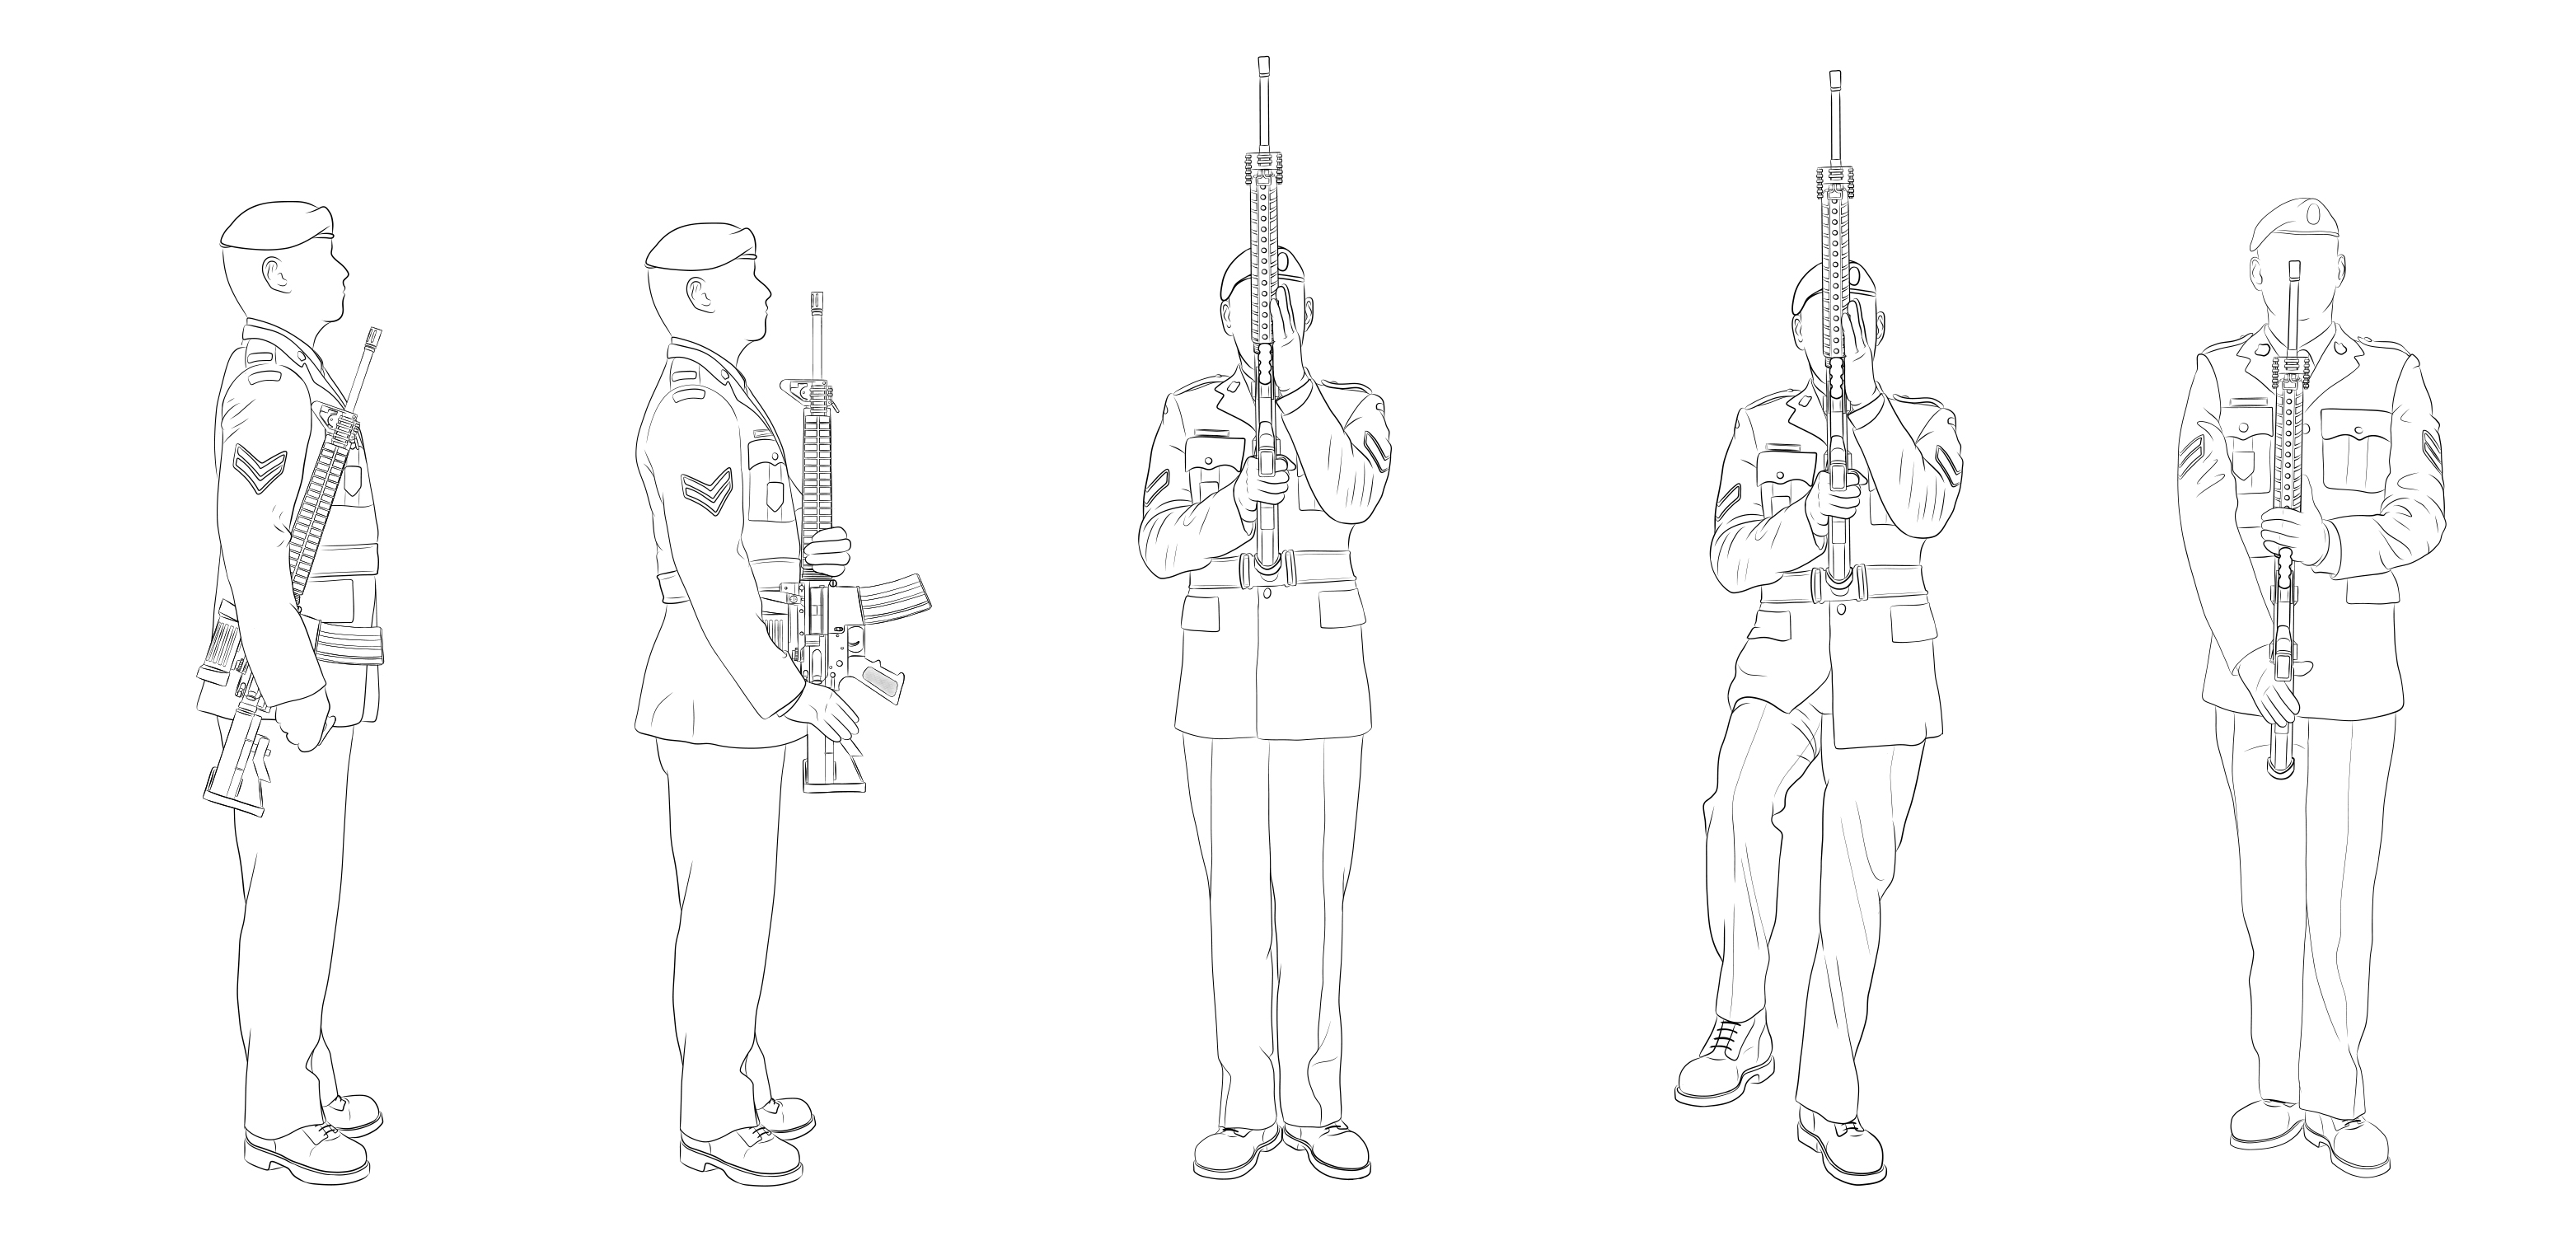
Figure 4-1-7 Present Arms
- The present arms is a ceremonial salute (Figure 4 1-7). On the command PRESENT ARMS BY NUMBERS, SQUAD – ONE, squad members shall:
- with the right hand, flick the weapon up vertically 10 cm and then strike and grasp the small of the butt with the thumb on the left and the fingers together on the right;
- at the same time, with the left hand, strike and grasp the weapon at the hand guard the fingers curled around the handguard, and the left forearm close to the body and parallel to the ground; and
- keep the right shoulder from moving backwards and move both hands simultaneously.
- On the command SQUAD – TWO, squad members shall:
- close the fingers and thumb of the right hand around the small of the butt and force the weapon up to a vertical position in the centre of the body with the magazine facing the front. The top of the magazine is level with the throat and the rear sight is 10 cm from the body;
- at the same time as the weapon reaches the central position, remove the left hand from the handguard, straighten the fingers and thumb and strike the forearm, wrist, palm and fingers against the weapon so that the slip ring rests in the palm, the elbow is forced into the side of the butt and the tip of the thumb is in line with the mouth; and
- keep the weapon vertical on its way up, the left forearm into the weapon and the right elbow against the waist.
- On the command SQUAD – THREE, squad members shall:
- straighten the right arm down the centre of the body thus lowering the weapon to a vertical position 10 cm from the body. The right forearm rests in the groin, the fingers of the right hand straightened down the right side of the butt and the thumb down the left;
- at the same time, remove the left forearm from the weapon and with the left elbow into the side, strike and grasp the handguard, with the forearm horizontal, fingers closed around the front of the weapon, thumb vertical up the left side, wrist straight and little finger touching the magazine housing; and
- at the same time, bend the right knee and place the right foot smartly on the ground with the instep against the heel of the left foot; feet at an angle of 30 degrees.
- Common faults to watch for are:
- Pushing the weapon upward before starting downwards.
- Left hand too high on the handguard.
- Weight of the body going back on the right foot.
- Increasing the angle between the feet, thereby dragging the shoulder backwards.
- Weapon too close to the body.
- On the command PRESENT – ARMS, the three movements are combined. A standard pause shall be observed between the movements.
SHOULDER ARMS FROM THE PRESENT
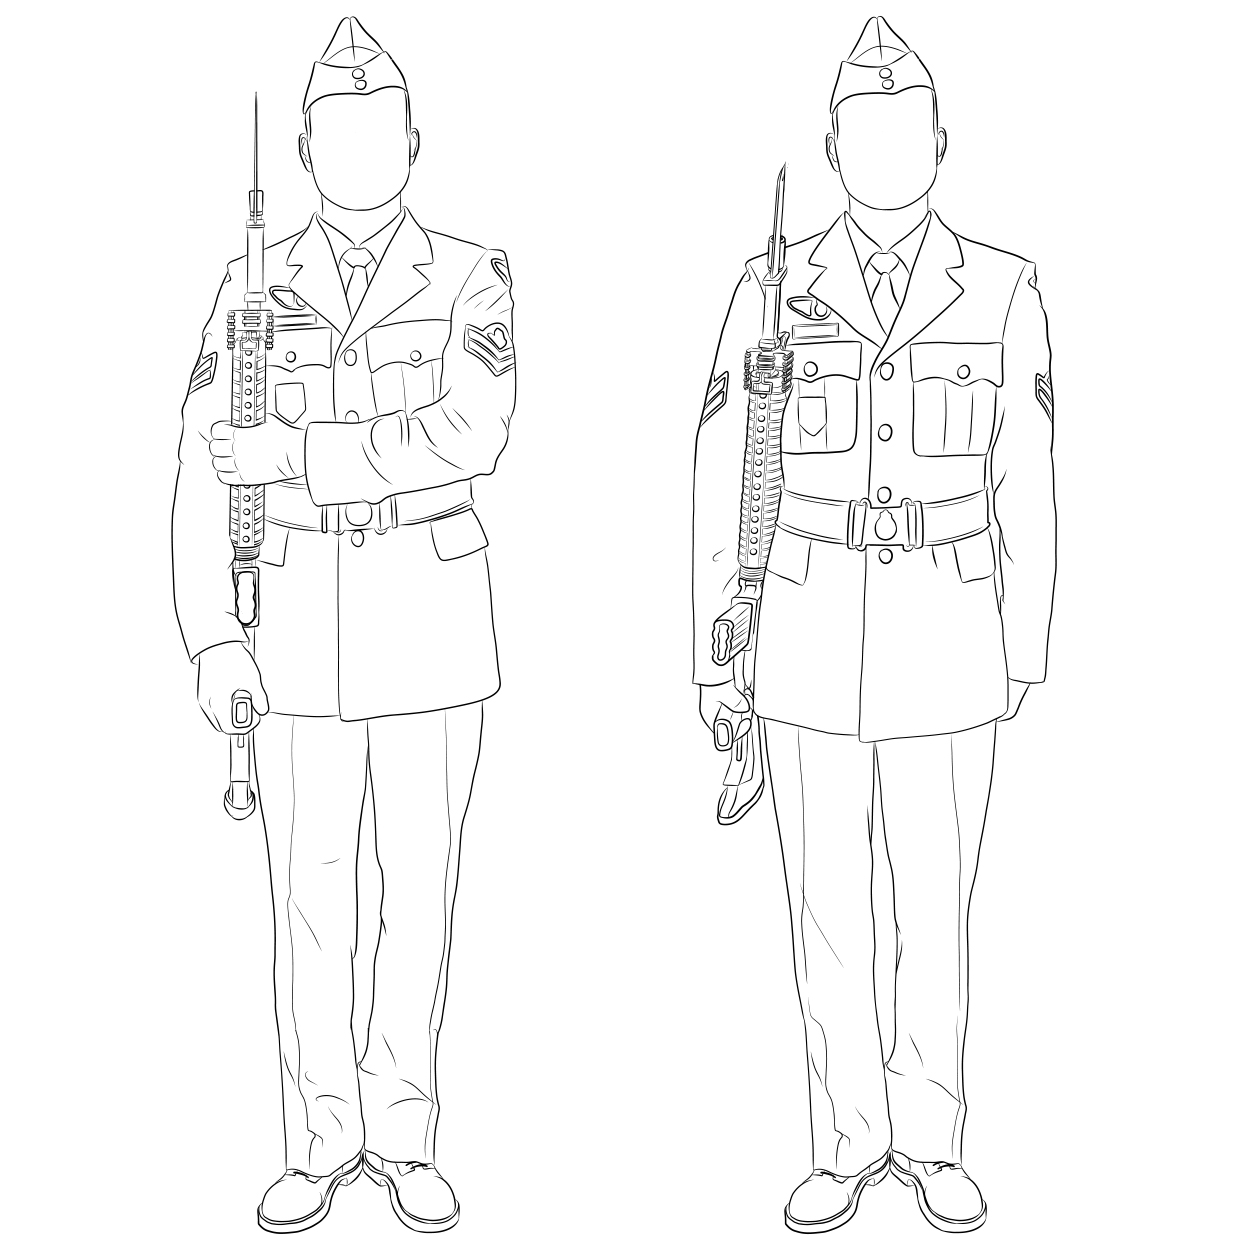
Figure 4-1-8 Shoulder Arms from the Present
- On the command SHOULDER ARMS BY NUMBERS, SQUAD – ONE, squad members shall:
- force the weapon to the right side of the body, keeping the weapon vertical, parallel to the body with an all-around grasp of the left hand around the handguard and with the left arm placed horizontally across the body as for the second position of the take up arms movement (Figure 4 1-8); and
- at the same time, strike and grasp the pistol grip with the right hand.
- On the command SQUAD – TWO, squad members shall:
- bend the right knee and bring the right foot to the position of attention;
- at the same time, cut the left hand to the side; and
- move the weapon back until the thumb of the right hand is in line with the trouser seam.
- On the command SHOULDER – ARMS, the two movements are combined. The standard pause shall be observed between the movements.
FIX BAYONETS
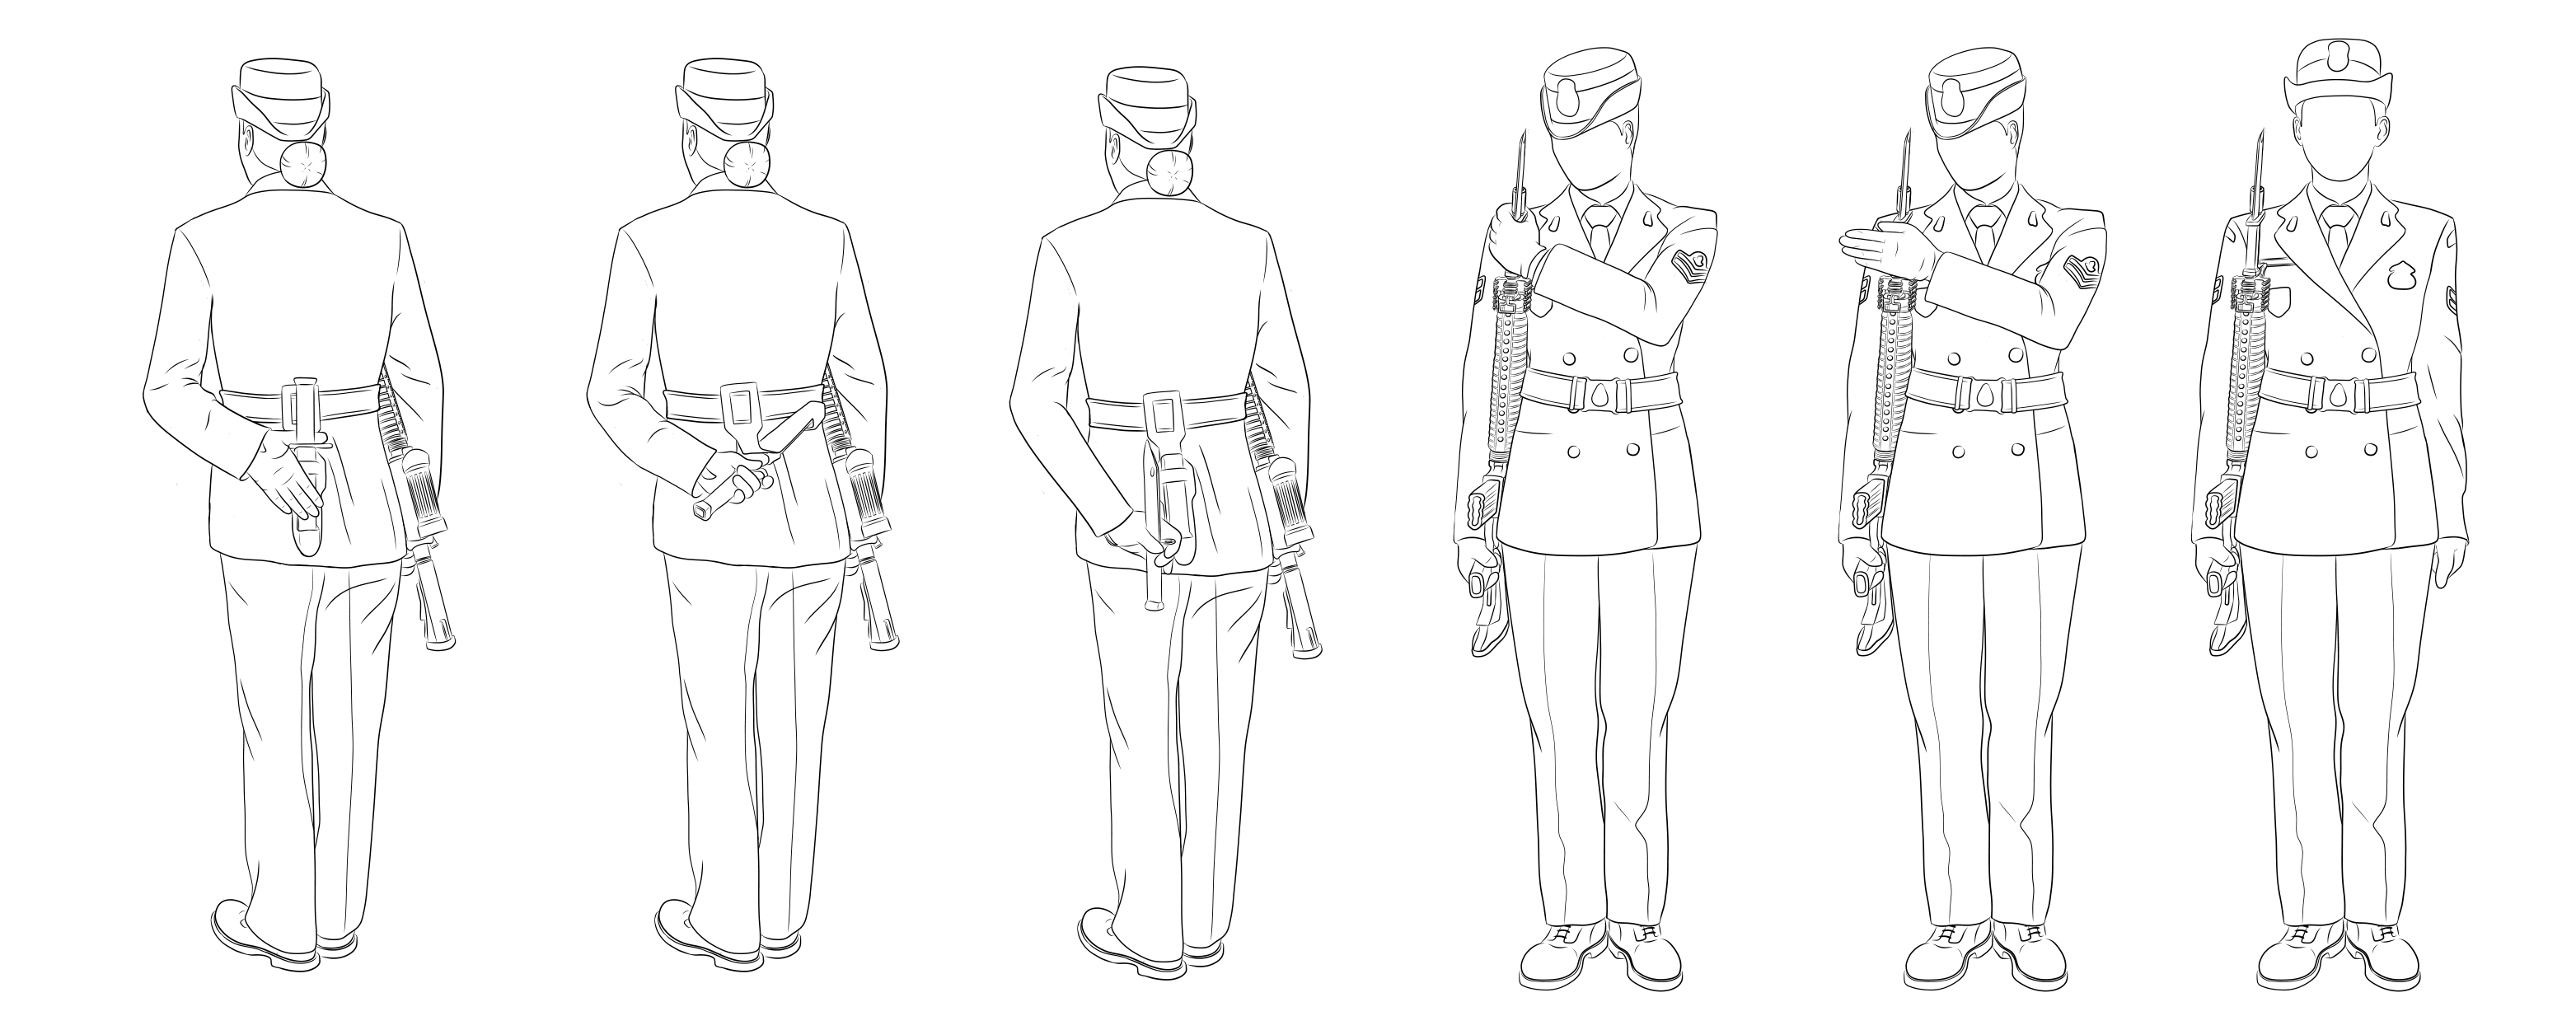
Figure 4-1-9 Fix Bayonets
- The squad shall be in the open order when fixing bayonets.
- On the command SQUAD WILL FIX BAYONETS, BY NUMBERS, SQUAD – ONE, squad members shall grasp the bayonet handle with the thumb around the ring and fingers around the handle. C8: With the C8, members will simultaneously tilt the carbine forward with the right hand to an angle of 45 degrees.
- On the command SQUAD – TWO, squad members shall:
- rotate the bayonet anti clockwise; and
- withdraw the bayonet by straightening the left arm with the bayonet being held along the left buttock, not visible from the front and with the fingers extended down the side of the bayonet handle.
- On the command SQUAD WILL FIX BAYONETS – FIX, the two movements are combined.
- On the command BAYONETS BY NUMBERS, SQUAD – ONE, squad members shall:
- lower the head to look directly at the muzzle of the weapon; and
- simultaneously, bring the bayonet between the body and the arm and fix the bayonet on the weapon by first fitting the bayonet ring over the muzzle and then fitting the groove in the bayonet handle over the bayonet stud on the weapon.
- On the command SQUAD – TWO, squad members shall push the bayonet down until the catch engages.
- On the command SQUAD, BAYONETS, the two movements are combined. A standard pause shall be observed between movements.
- On the command SQUAD, squad members shall open the palm of the left hand and strike the handle of the bayonet with the fingers and thumb together and extended in continuation of the line of the arm and the thumb below the cross piece (guard) of the bayonet.
- On the command SQUAD, ATTEN – TION, squad members shall cut the left arm to the left side and raise the head to assume the position of attention. C8: Simultaneously pull the carbine to the right side and assume the shoulder arms position.
NOTE
Units of The Royal Regiment of Canadian Artillery and the Royal Canadian Medical Service do not fix bayonets when on guard or other routine parades. On such occasions bayonets will be carried, but will not be fixed. In the case of special ceremonial parades, e.g., Guards of Honour for Royal personages, separate instructions will be issued by the chain of command.
UNFIX BAYONETS
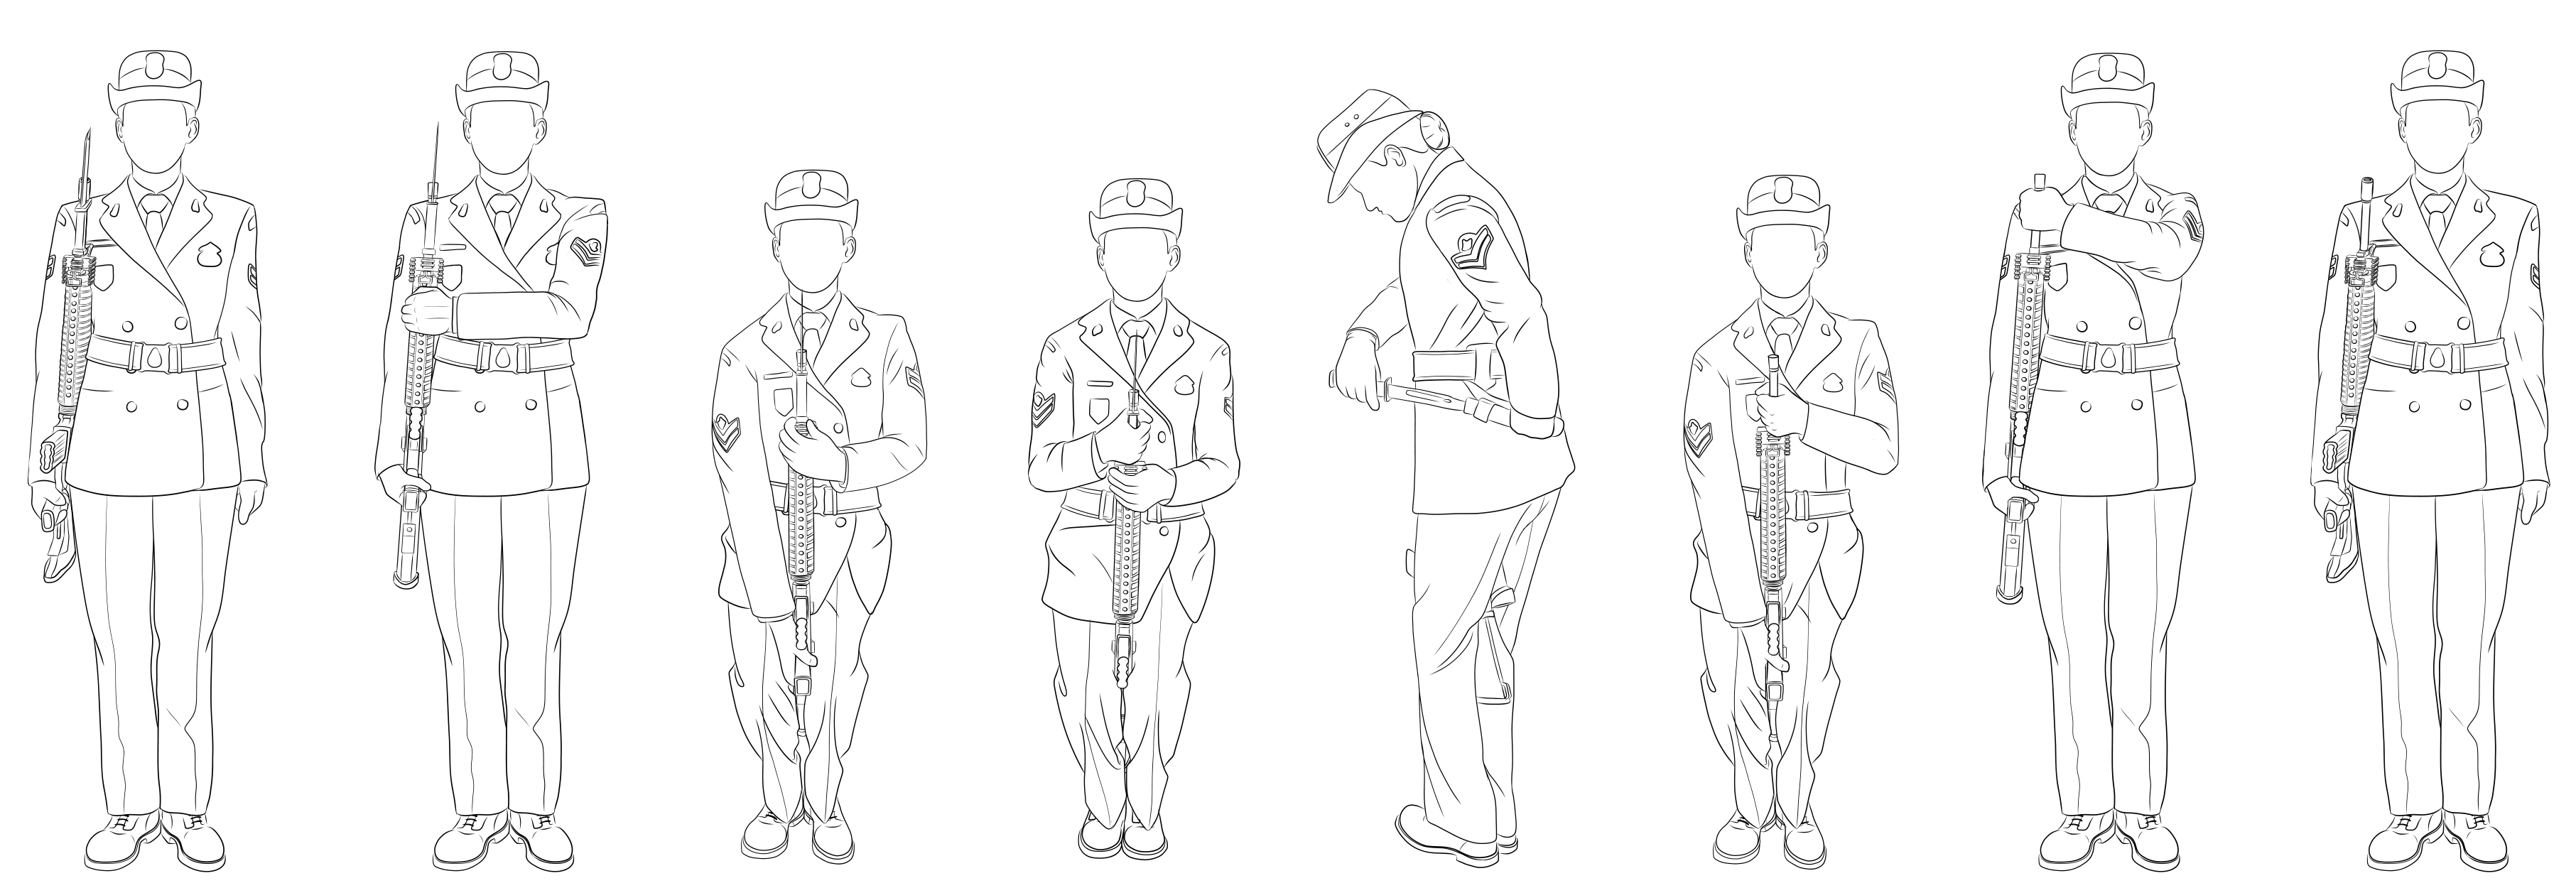
Figure 4-1-10 Unfix Bayonets
- On the command SQUAD WILL UNFIX BAYONETS BY NUMBERS, SQUAD – ONE, squad members shall:
- strike and grasp the weapon with the left hand immediately below the bayonet handle, bringing the weapon vertical along the right side of the body.
- On the command SQUAD – TWO
- with the right and left hand, carry the weapon to the front centre of the body (Figure 4-1-10);
- bending the knees slightly, grip the weapon between the knees; knees gripping the weapon at a point between the pistol grip and the magazine; and
- On the command SQUAD – THREE, release the weapon with the right hand and grasp the bayonet handle with an upward movement while pressing the bayonet catch with the left forefinger, forcing the bayonet ring just clear of the weapon barrel with the blade edge to the front, the bayonet in line with the weapon barrel.
- On the command SQUAD WILL UNFIX BAYONETS – UNFIX, the movements are combined. A standard pause shall be observed between the movements.
- On the command BAYONETS BY NUMBERS, SQUAD – ONE, squad members shall:
- with a flick of the right wrist, turn the bayonet over to the left so that the flat of the blade strikes the belt;
- grasp the scabbard with the left hand, tilting the scabbard and inserting the point of the bayonet into the mouth of the scabbard; and
- simultaneously, bend the head downward and to the left to look at the scabbard.
- On the command SQUAD – TWO, squad members shall:
- force the bayonet fully home in the scabbard;
- keep the left elbow straight to the rear;
- keep the right elbow close to the body; and
- keep the fingers of the right hand closed and extended downward over the bayonet handle.
- On the command SQUAD, BAYONETS, the two movements are combined. A standard pause shall be observed between the movements.
- On the command ATTENTION BY NUMBERS, SQUAD – ONE, squad members shall:
- strike and grasp the weapon at the pistol grip with the right hand;
- simultaneously, release the scabbard with left hand, strike and grasp the weapon at the barrel below the flash suppressor; and
- turn the head and eyes to the front.
- On the command SQUAD – TWO, squad members shall:
- force the weapon to the shoulder arms position with both hands, guiding the weapon into the shoulder with the left hand; and
- simultaneously, straighten the knees to the position of attention.
- On the command SQUAD – THREE, squad members shall cut the left hand and arm to the side assuming the position of attention.
- On the command SQUAD, ATTEN – TION, the three movements are combined. A standard pause shall be observed between the movements.
EXAMINE ARMS FROM THE SHOULDER
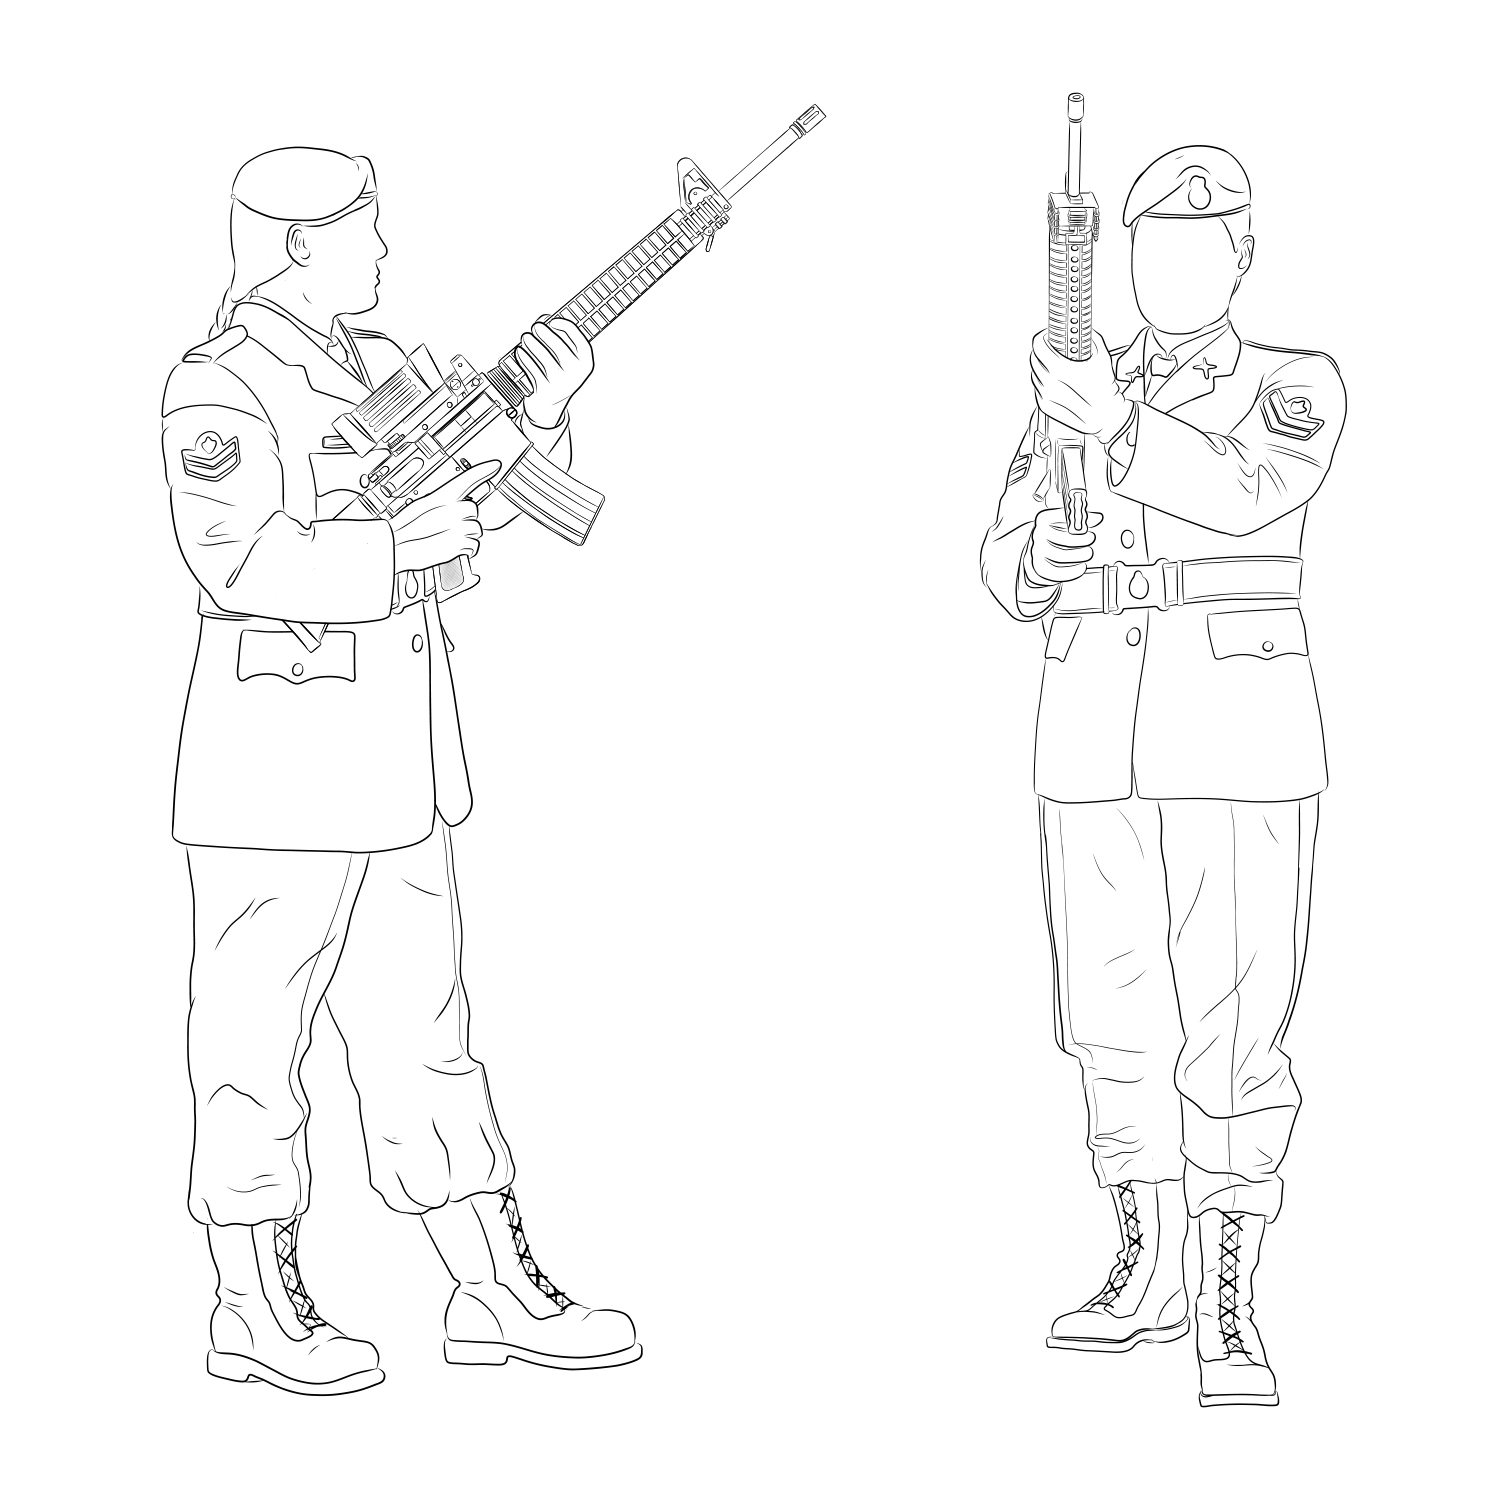
Figure 4-1-11 Examine Arms
- On the command FOR INSPECTION, EXAMINE ARMS BY NUMBERS, SQUAD – ONE, squad members shall:
- keeping the head and body square to the front, take a half pace forward with the left foot (Figure 4 1-11); and
- thrust the weapon forward with the right hand to an angle of 45 degrees and strike and grasp the handguard immediately in front of the magazine with the left hand, the slip ring in the palm of the left hand while the right hand pivots on the pistol grip with the right forefinger along the trigger guard.
- On the command SQUAD – TWO, squad members shall remove the right hand from the Pistol Grip and grasp the cocking handle with the index and middle fingers.
- On the command SQUAD – THREE, squad members shall, with the right hand:
- pull the working parts to the rear; and
- On the command SQUAD – FOUR, squad members shall, with the right hand:
- return the cocking handle to its normal position.
- On the command SQUAD – FIVE, squad members shall return the right hand to the pistol grip, right forefinger along the trigger guard.
- On the command SQUAD – SIX, squad members shall remove the left hand from the handguard, ensure the fire control selector is on “S”
- On the command SQUAD – SEVEN squad members shall return the left hand to the handguard.
- On the command FOR INSPECTION, EXAMINE – ARMS, the seven movements are combined. The standard pause shall be observed between the movements.
EASE SPRINGS
- On the command EASE SPRINGS BY NUMBERS, SQUAD – ONE, squad members shall:
- remove the left hand from the handguard; and
- strike the side of the magazine with the fingers around the forward edge of the magazine and the left thumb over the bolt catch.
- On the command SQUAD – TWO, squad members shall push the bolt in the bolt catch with the thumb of the left hand.
- On the command SQUAD – THREE, squad members shall move the fire control selector to “R” with the thumb and forefinger of the left hand.
- On the command SQUAD – FOUR, squad members shall return the left hand to the handguard.
- On the command SQUAD – FIVE, squad members shall press the trigger and release it.
- On the command SQUAD – SIX, squad members shall, with the right hand, strike the right side of the magazine housing with fingers together and extended and immediately, with the index finger, close the ejection port cover (Figure 4-1-12).
- On the command SQUAD – SEVEN, squad members shall return the right hand to the pistol grip, the right index finger along the trigger guard.
- On the command EASE – SPRINGS, the seven movements are combined. The standard pause shall be observed between the movements.
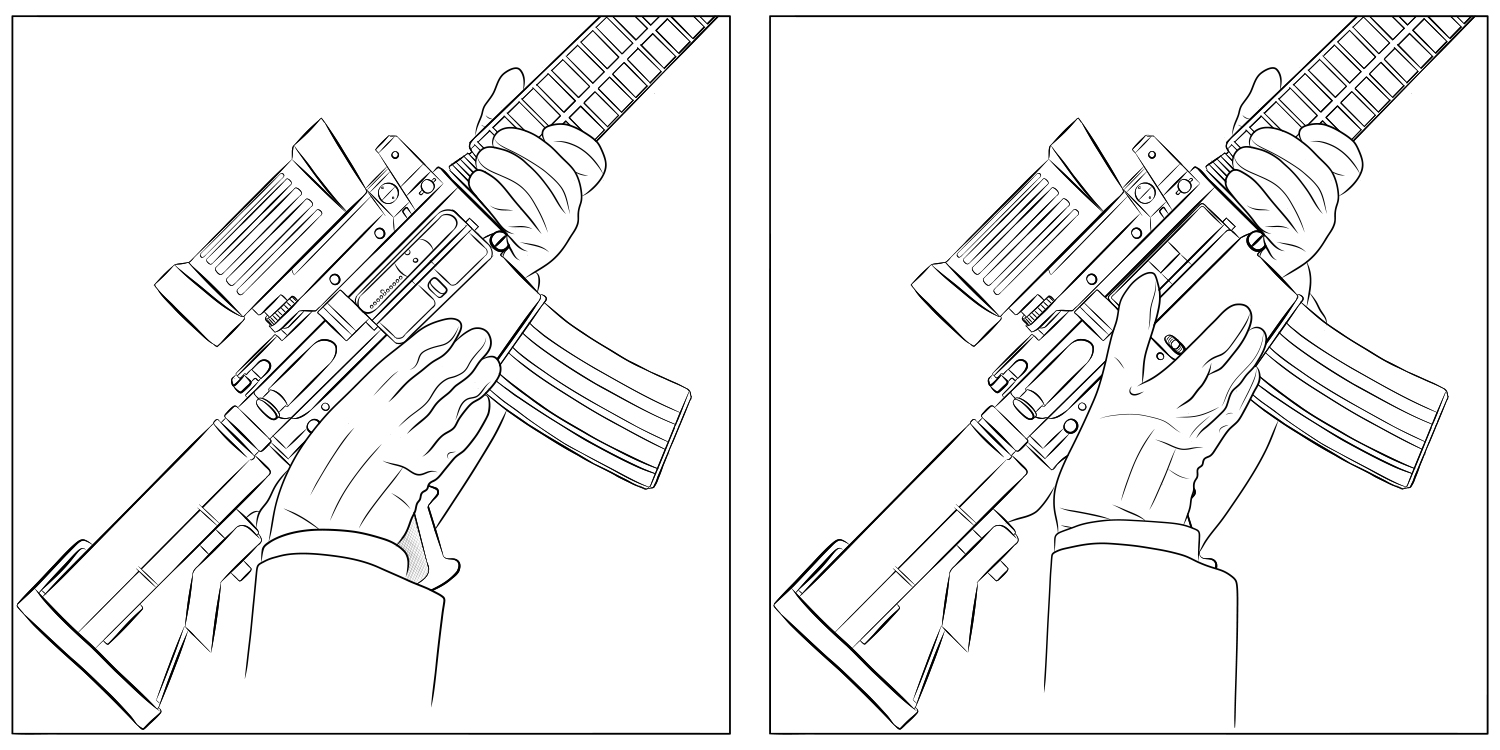
Figure 4-1-12 Ease Springs – Six
SHOULDER ARMS FROM THE EXAMINE
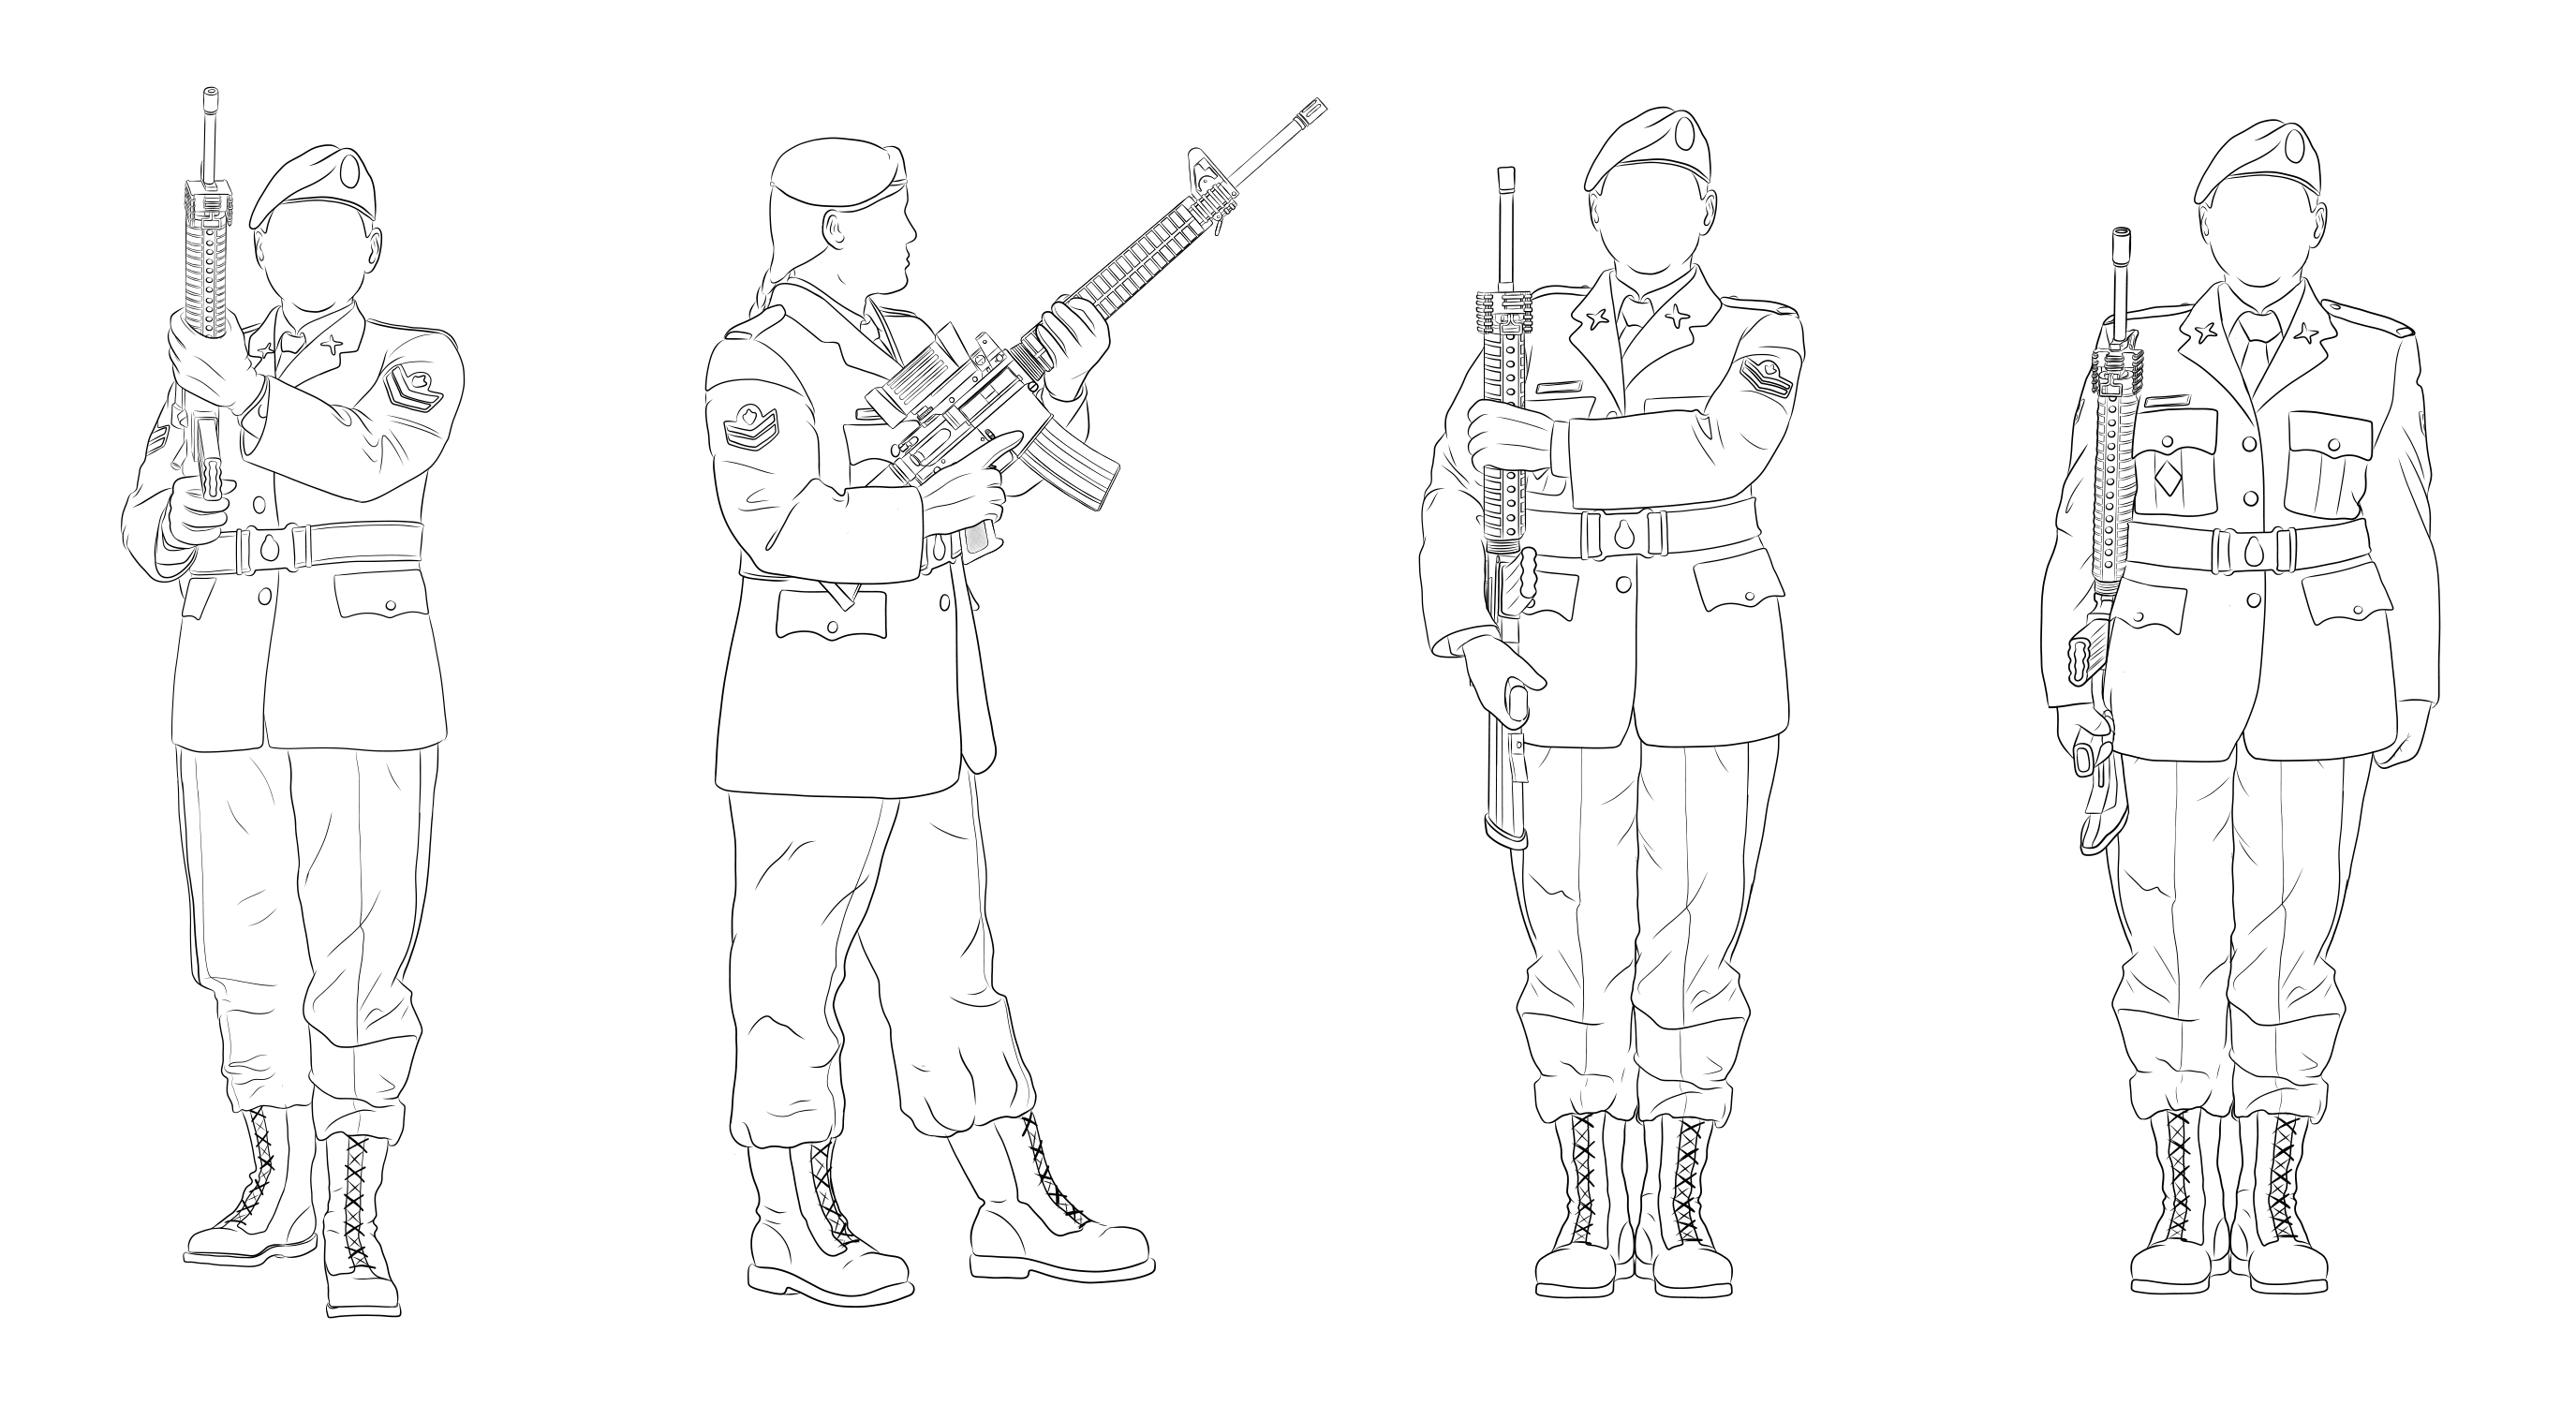
Figure 4-1-13 Shoulder Arms from the Examine
- On the command SHOULDER ARMS BY NUMBERS, SQUAD – ONE, squad members shall:
- bend the left knee and assume the position of attention with the feet (Figure 4 1-14);
- with the right hand, pull the weapon down on the right side to the attention position while pivoting the right hand in order to have an all-around grip around the pistol grip;
- simultaneously, with the left hand force the weapon into the right shoulder, maintaining an all round grasp of the handguard with the left hand; and
- keep the weapon vertical to the ground.
- On the command SQUAD – TWO, squad members shall:
- cut the left hand to the side by the shortest route; and
- force the weapon back until the thumb of the right hand is in line with the trouser seam.
- On the command SHOULDER – ARMS, the two movements are combined. The standard pause shall be observed between the movements.
- On other than a ceremonial parade, it is normal for each individual to ease springs, shoulder arms and stand at ease after the inspecting officer has reached the second file to the left. The last two members of the rank act together.
SALUTE AT THE SHOULDER
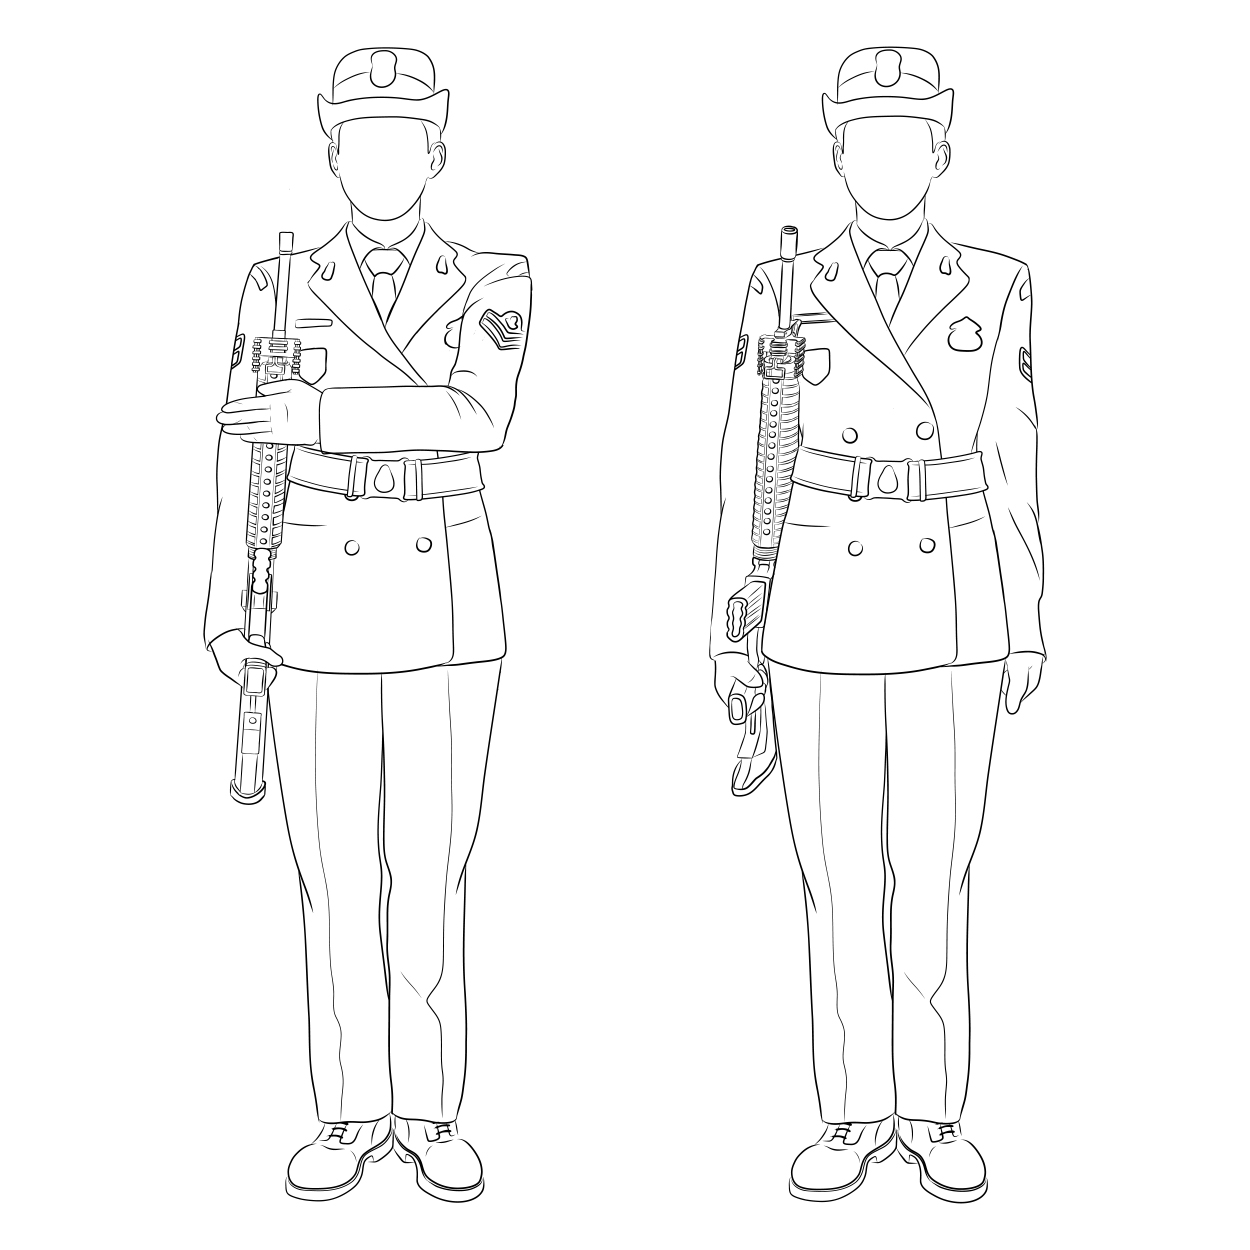
Figure 4-1-14 Salute at the Shoulder
- The salute with the weapon is executed at the shoulder. The movement of the hand is the same whether saluting to the front or to a flank. The head and eyes are turned in the required direction when the salute is to a flank.
- On the command TO THE FRONT (LEFT) (RIGHT) SALUTE BY NUMBERS, SQUAD – ONE, squad members shall:
- with the right hand, force the weapon forward to a vertical position and at the same time move the left hand across the body with the forearm parallel to the ground (Figure 4-1-14); and
- strike the handguard with the fingers and thumb together and extended, with the back of the hand to the front and the elbow close to the body.
- On the command SQUAD – TWO, squad members shall cut the left hand to the side and force the weapon back and assume the position of shoulder arms.
- On the command TO THE FRONT, (LEFT) (RIGHT) – SALUTE, the two movements are combined. The standard pause is observed between the movements.
- When an armed individual is saluting on the march, the head and eyes are turned in the required direction, and the salute shall commence and terminate as detailed in Chapter 3, paragraph 80.
PORT ARMS FROM THE SHOULDER
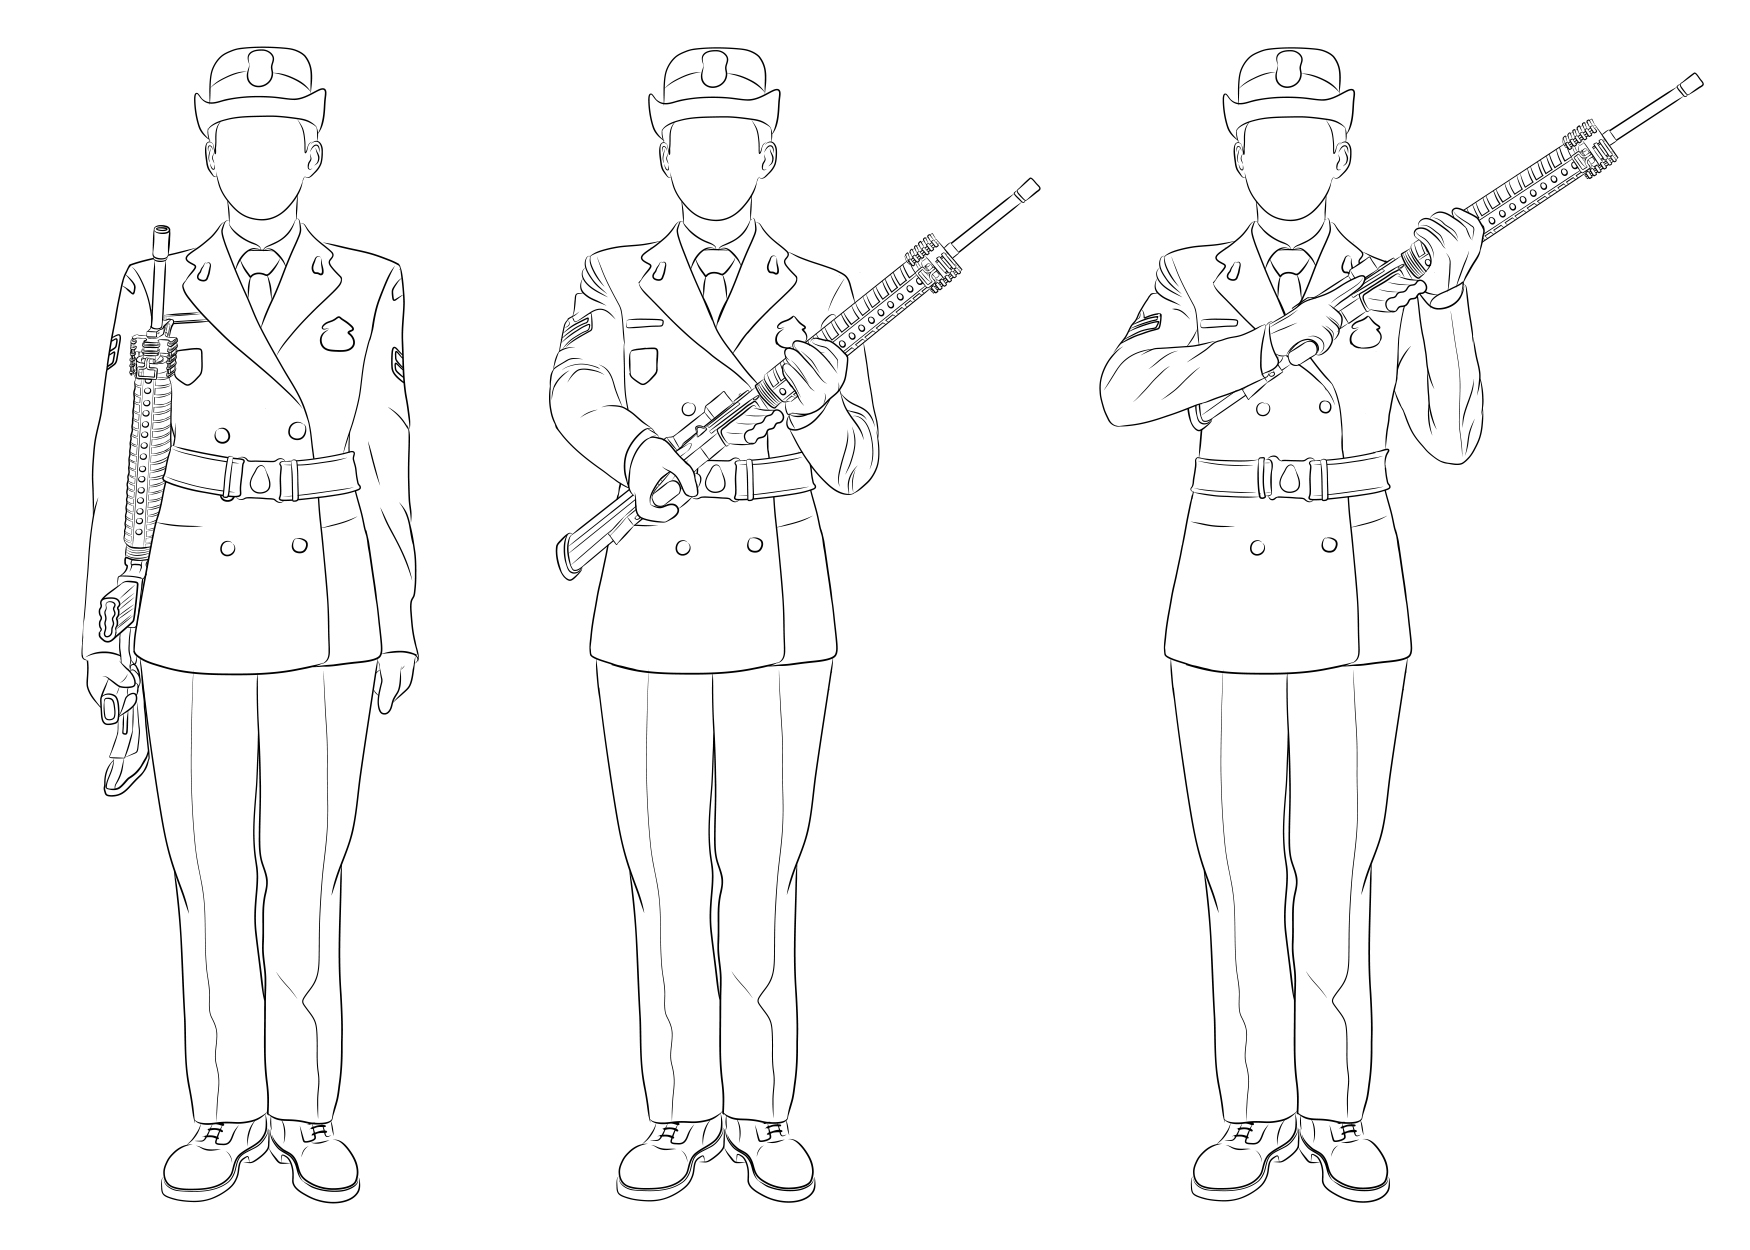
Figure 4-1-15 Port Arms from the Shoulder
- On the command PORT ARMS BY NUMBERS, SQUAD – ONE, squad members shall:
- with the right hand, force the weapon diagonally across the body with the muzzle upwards, the magazine to the front and the barrel crossing opposite the point of the left shoulder (Figure 4-1-15): and
- at the same time, strike and grasp the handguard with the left hand 10 cm above the slip ring, with the thumb around the weapon and the hand at the point of the left shoulder.
- On the command SQUAD – TWO, squad members shall remove the right hand from the pistol grip and strike and grip the pistol grip using an overhand grasp. Elbows shall be held close to the body and the weapon shall be held 10 cm from the body.
- On the command PORT – ARMS, the two movements are combined. The standard pause is observed between the movements.
- This position is automatically assumed when changing from quick to double time.
SHOULDER ARMS FROM THE PORT
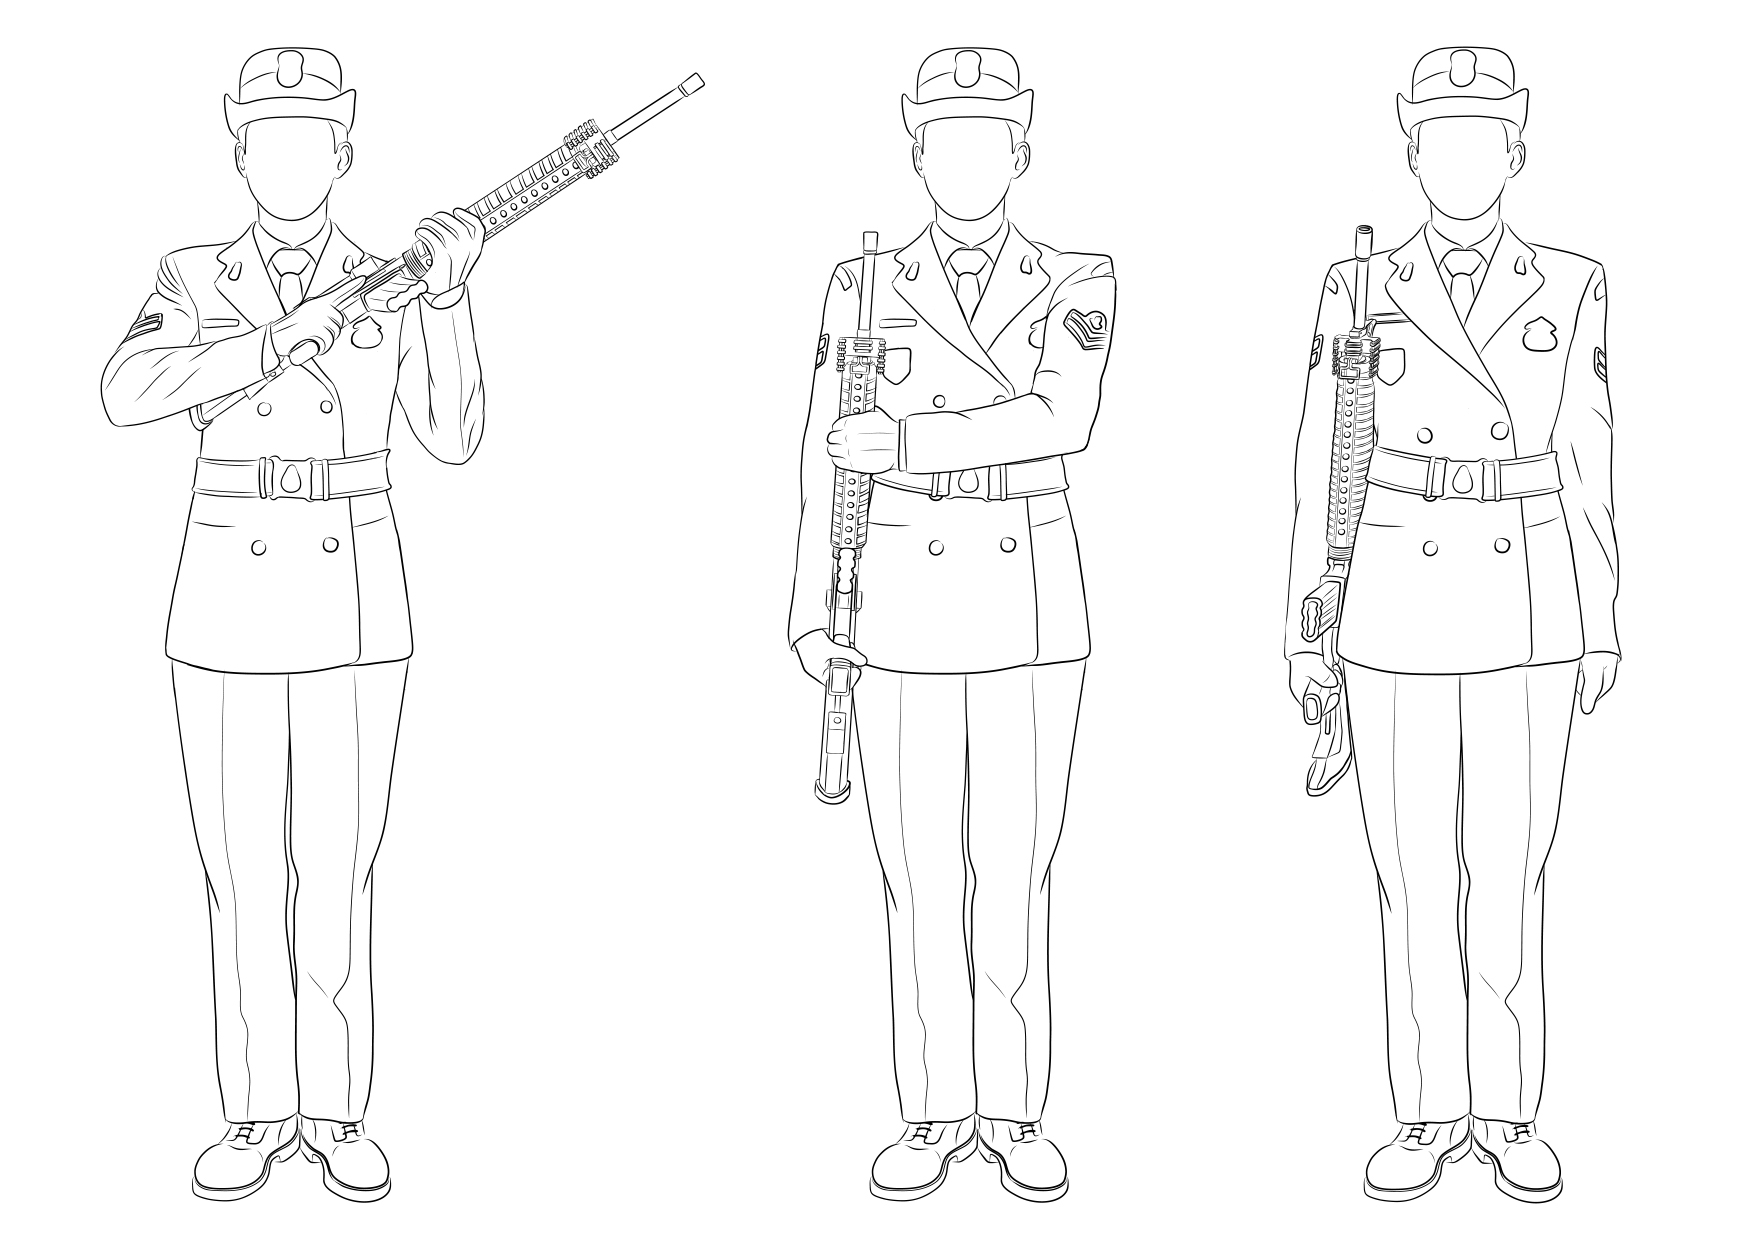
Figure 4-1-16 Shoulder Arms from the Port
- On the command SHOULDER ARMS BY NUMBERS, SQUAD – ONE, squad members shall:
- force the weapon to the shoulder arms position with the left hand (Figure 4 1-16); and
- at the same time, change the position of the right hand from the pistol grip to strike and grasp the pistol grip.
- On the command SQUAD – TWO, squad members shall cut the left hand to the side and assume the position of attention.
- On the command SHOULDER – ARMS, the two movements are combined. The standard pause is observed between the movements.
- This position is automatically assumed when changing from double to quick time.
CHANGE ARMS AT THE SHOULDER
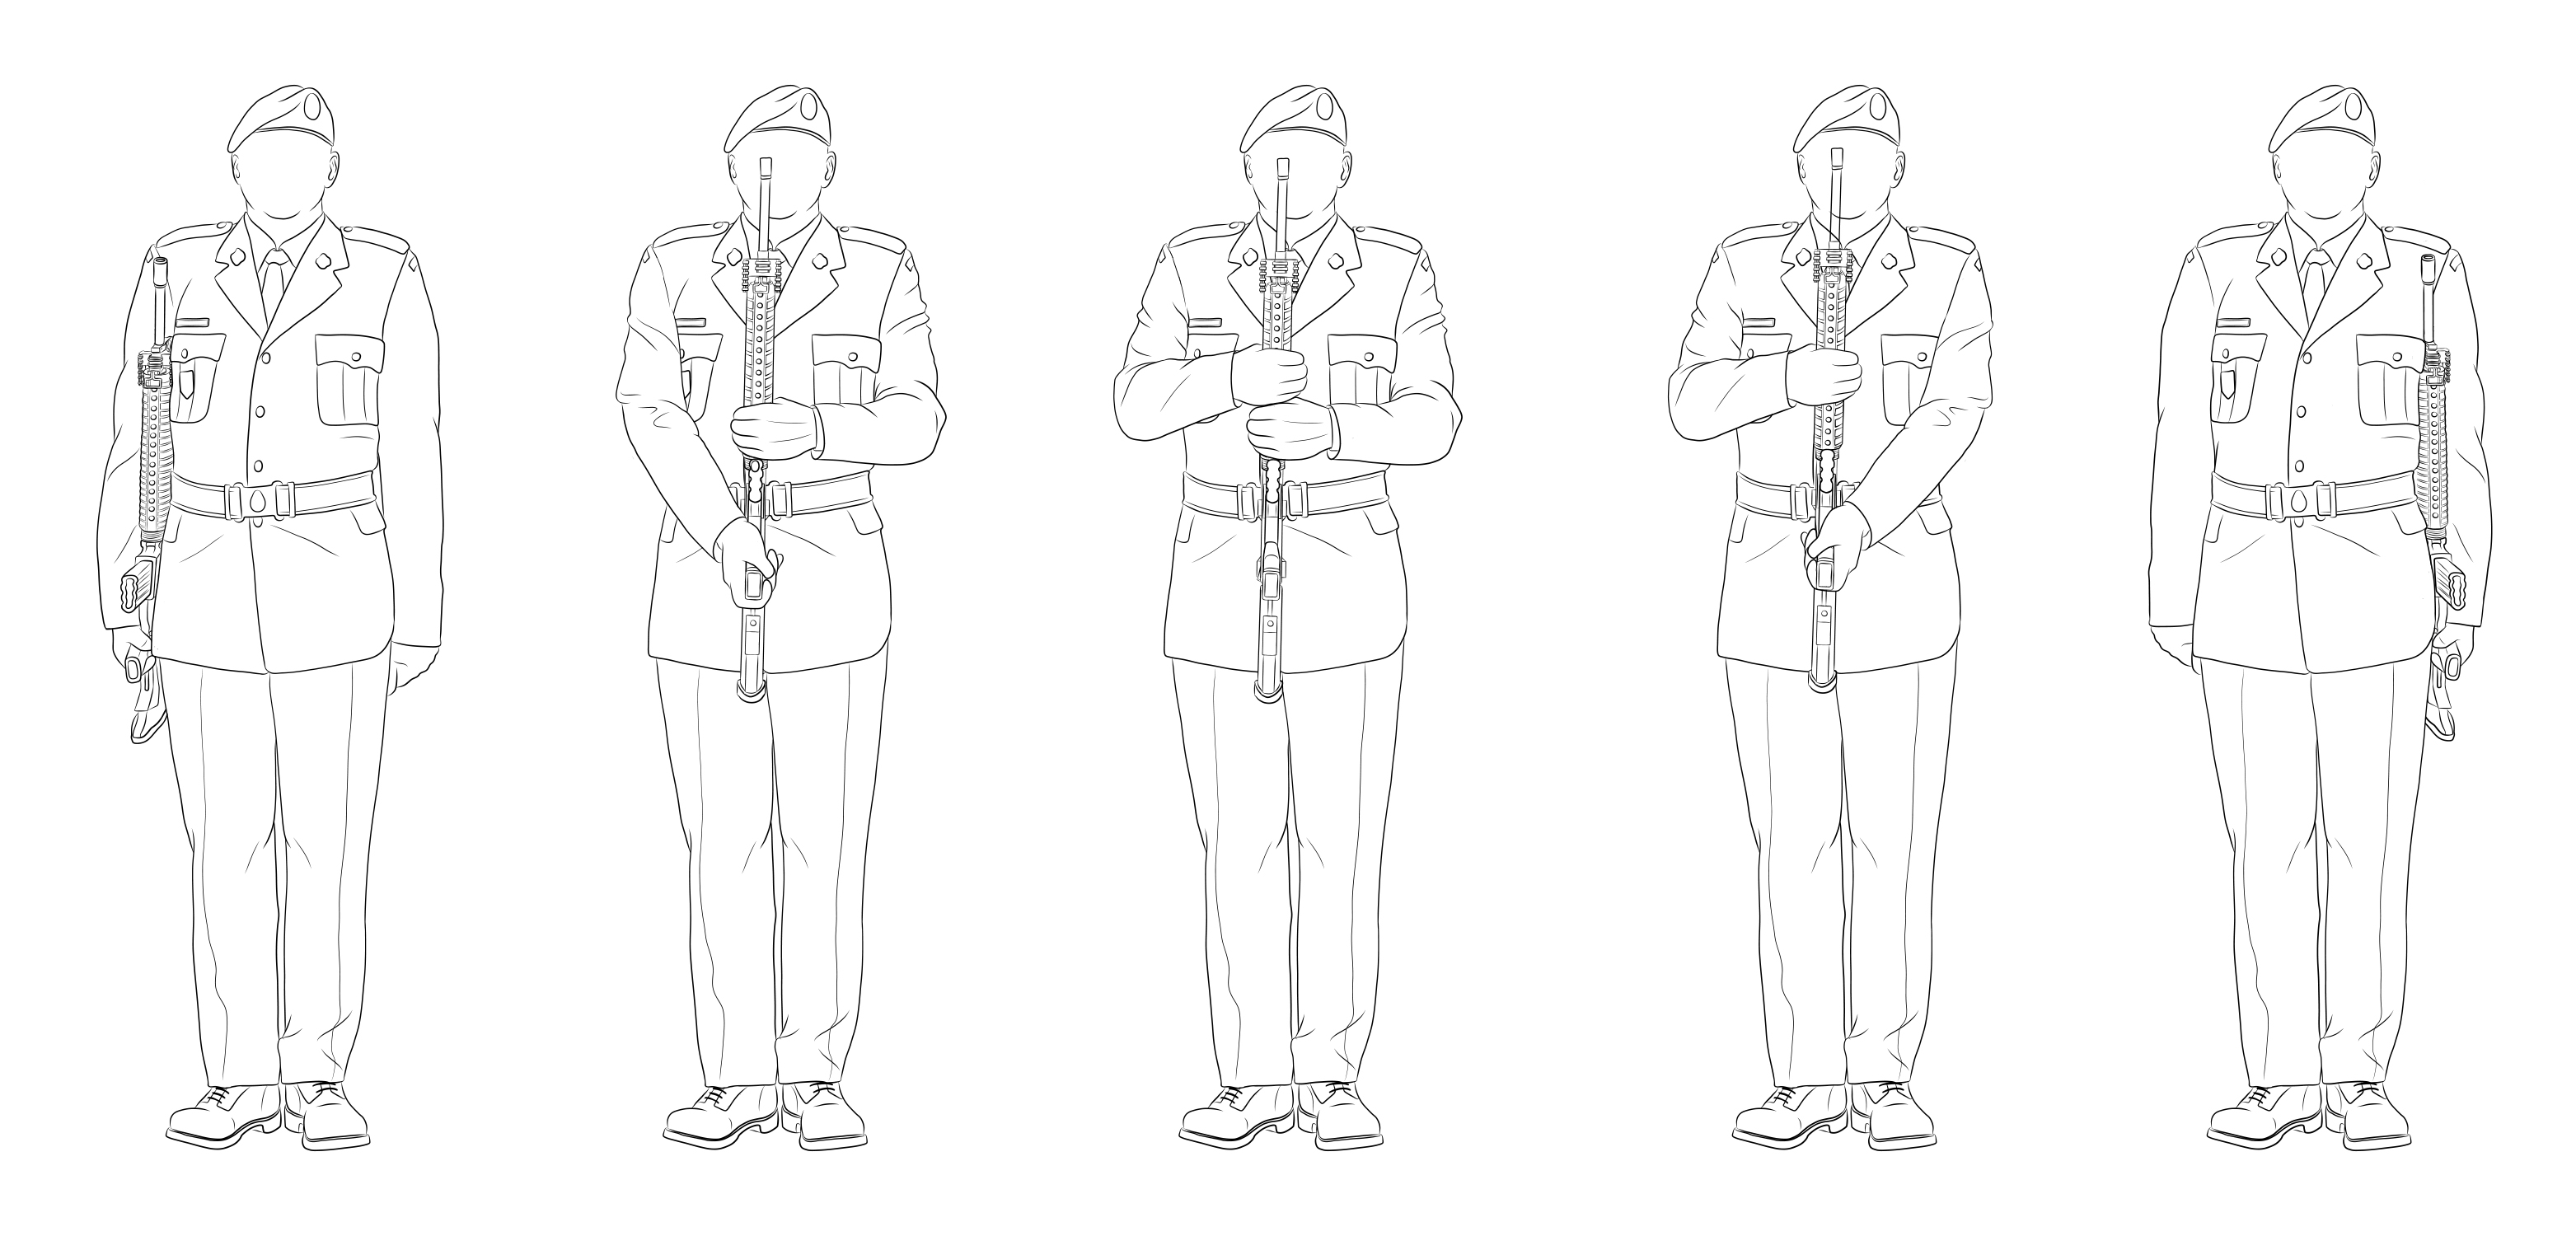
Figure 4-1-17 Change Arms at the Shoulder
- On the command CHANGE ARMS BY NUMBERS, SQUAD – ONE, squad members shall:
- with the right hand, force the weapon to a vertical position 10 cm front and centre of the body with the magazine to the front (Figure 4 1 17); and
- strike and grasp the weapon at the handguard immediately above the magazine with an all-round grip of the left hand and the left forearm parallel to the ground.
- On the command SQUAD – TWO, squad members shall release the pistol grip with the right hand and strike and grasp the handguard immediately above the left hand.
- On the command SQUAD – THREE, squad members shall strike and grasp the pistol grip with the left hand.
- On the command SQUAD – FOUR, squad members shall:
- force the weapon to the left side to the shoulder arms position; and
- cut the right hand to the side.
- On the command CHANGE – ARMS, the four movements are combined. The standard pause is observed between the movements.
- To change arms from the left to the right, the movement is executed as detailed above, substituting “left” for “right” and vice versa.
- The elbows are kept in contact with the body during all these movements.
SECTION 2 CEREMONIAL RIFLE DRILL
RECOVER ARMS FROM THE SHOULDER
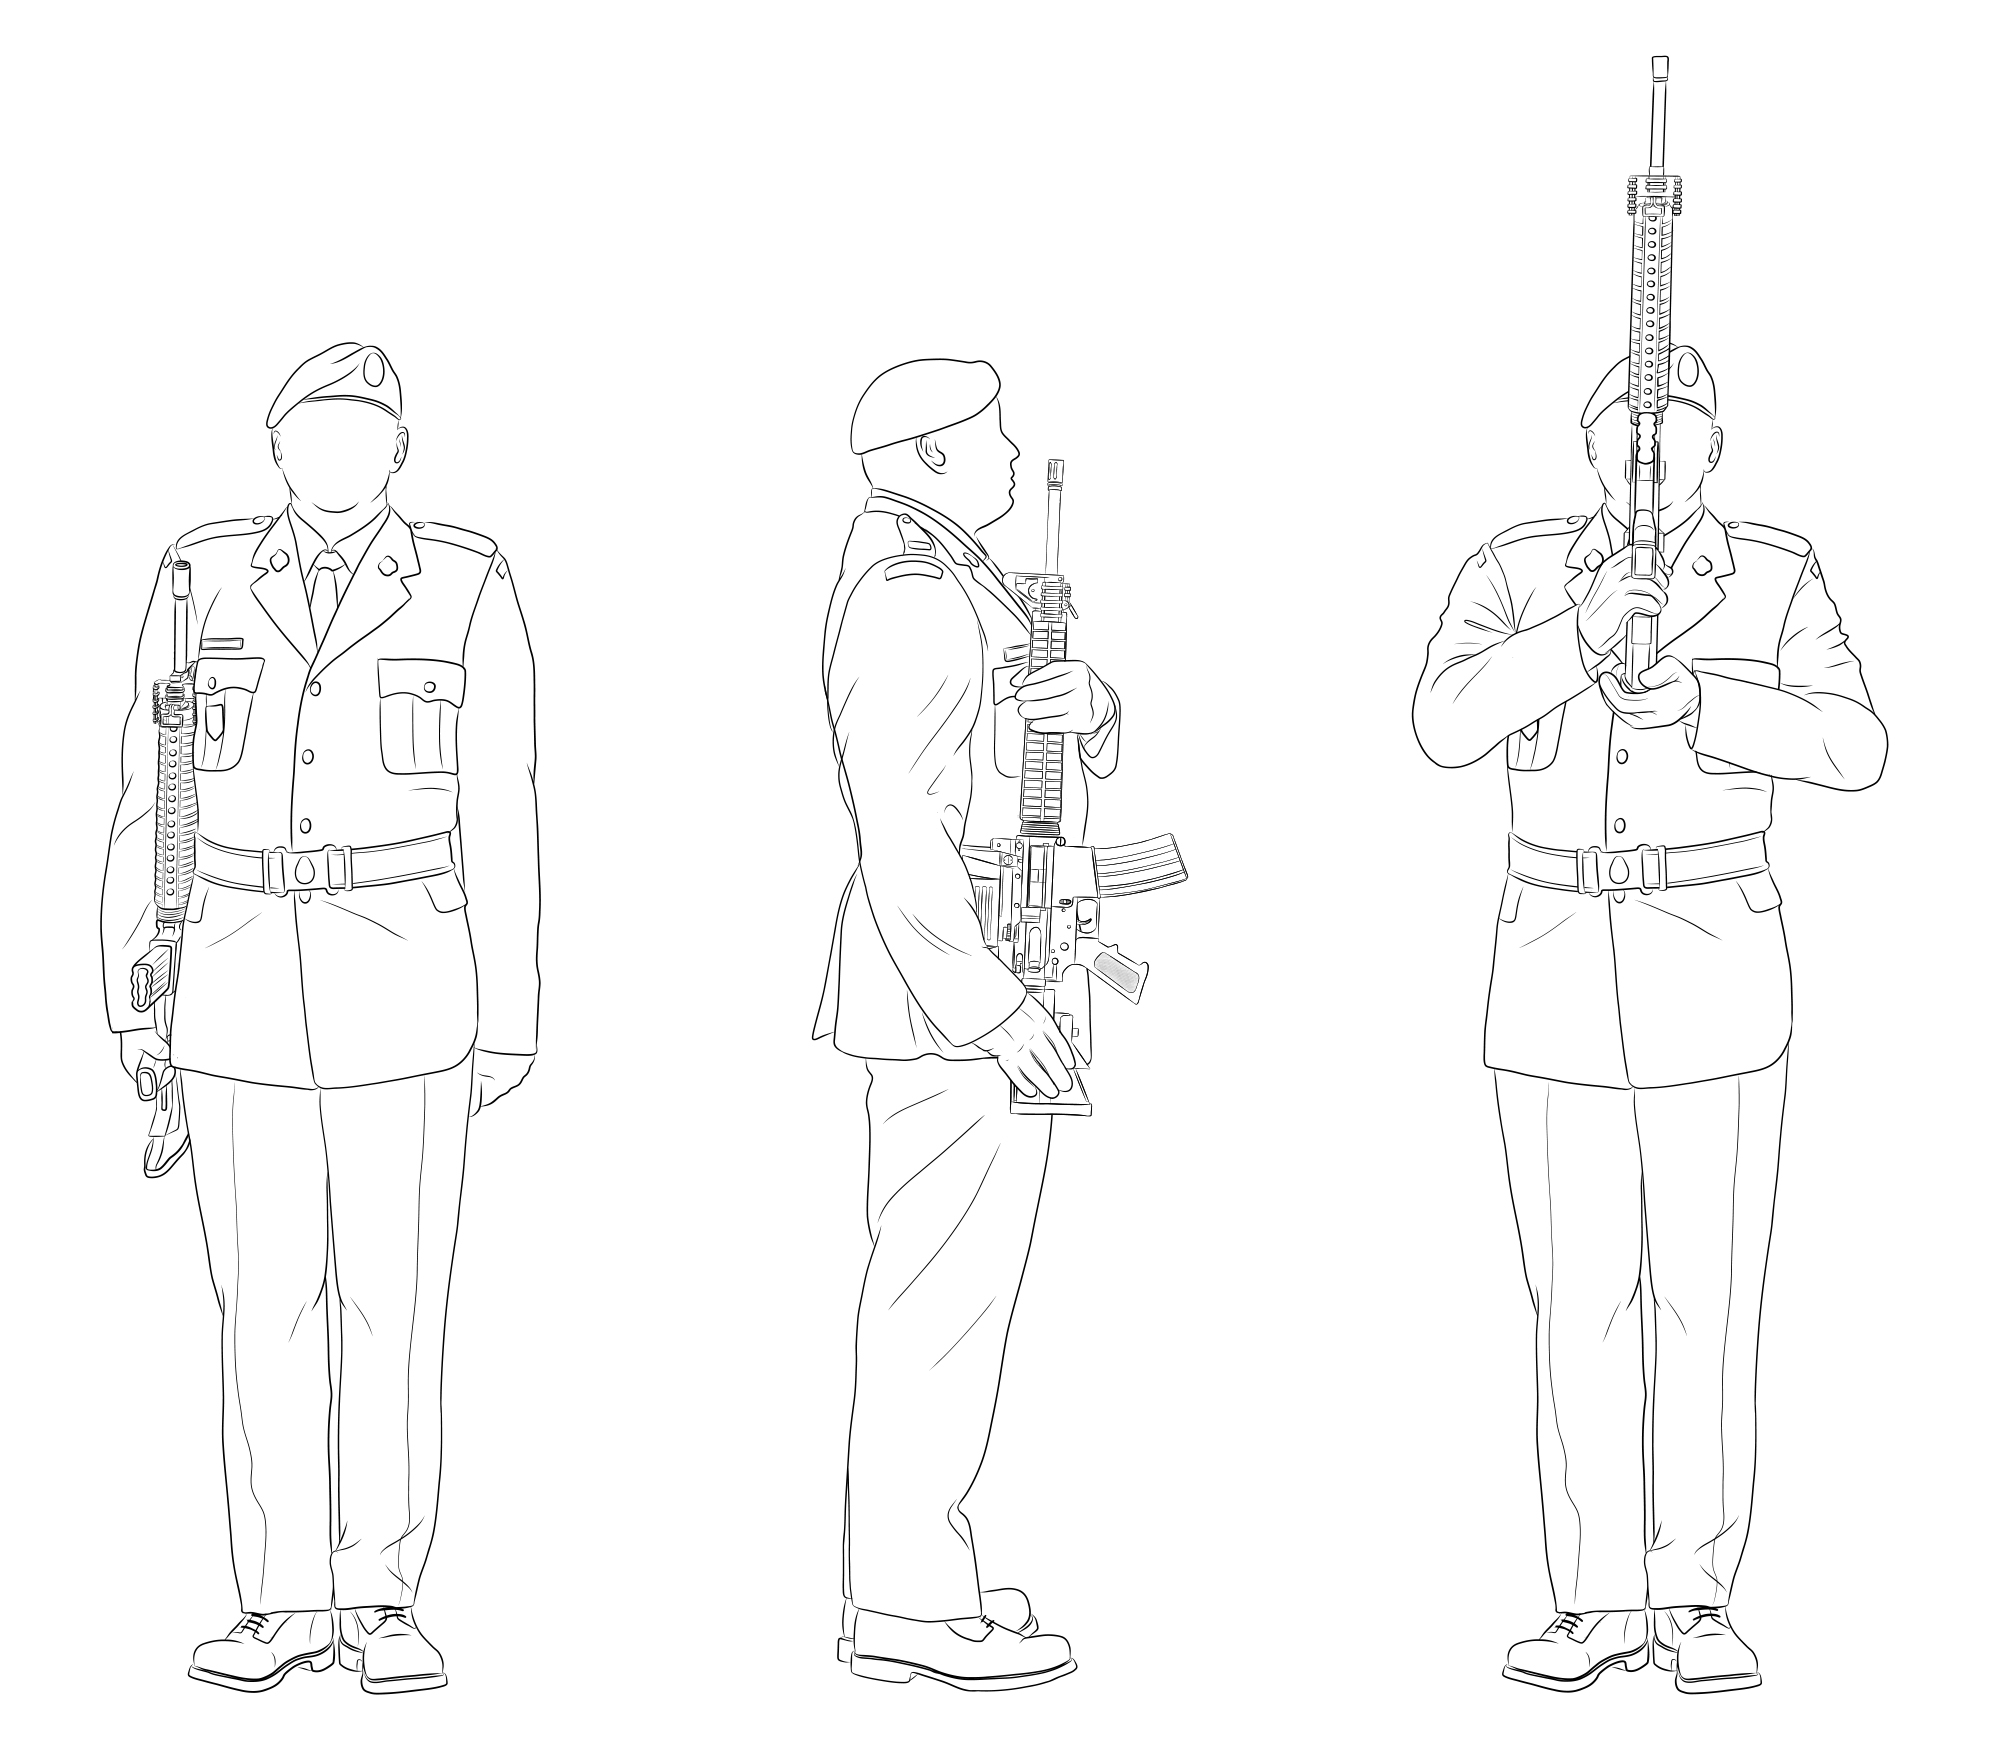
Figure 4-2-1 Recover Arms from the Shoulder
- This movement is used when dressing and covering markers and guides on ceremonial parades. On the command RECOVER ARMS BY NUMBERS, SQUAD – ONE, squad members shall:
- with the right hand, flick the weapon up vertically 10 cm and strike and grasp the small of the butt with the thumb on the left and the fingers together on the right (Figure 4-2-1); and
- at the same time, with the left hand, strike and grasp the weapon at the hand guard with the fingers curled around the handguard and the left forearm close to the body and parallel to the ground.
- On the command SQUAD – TWO, squad members shall:
- with the right hand, force the weapon to a vertical position in the centre of the body, the magazine to the front, the slip ring in line with and 10 cm from the nose, the right hand assuming an all-round grasp and the back of the hand to the right; and
- at the same time, strike and grasp the butt plate with the left hand so that it is resting in the palm of the hand, thumb to the front and around the toe of the butt and fingers together and up the right side of the butt.
- On the command RECOVER – ARMS, the two movements are combined. A standard pause shall be observed between the movements.
SHOULDER ARMS FROM THE RECOVER
- On the command SHOULDER ARMS BY NUMBERS, SQUAD – ONE, squad members shall:
- force the weapon down the right side of the body, without changing the grip of the right hand on the weapon; and
- at the same time, release the left hand from the butt plate, strike and grasp the hand guard with the left hand 10 cm above the slip ring with fingers curled around the hand guard, left forearm parallel to the ground, and maintain the weapon in a vertical position.
- On the command SQUAD – TWO, squad members shall lower the weapon slightly to its normal height at the shoulder arms position and strike and grasp the pistol grip with the right hand.
- On the command SQUAD – THREE, squad members shall cut the left hand to the side and force the weapon back and assume the position of attention.
- On the command SHOULDER – ARMS, the three movements are combined. A standard pause shall be observed between the movements.
REST ON YOUR ARMS REVERSED FROM THE PRESENT
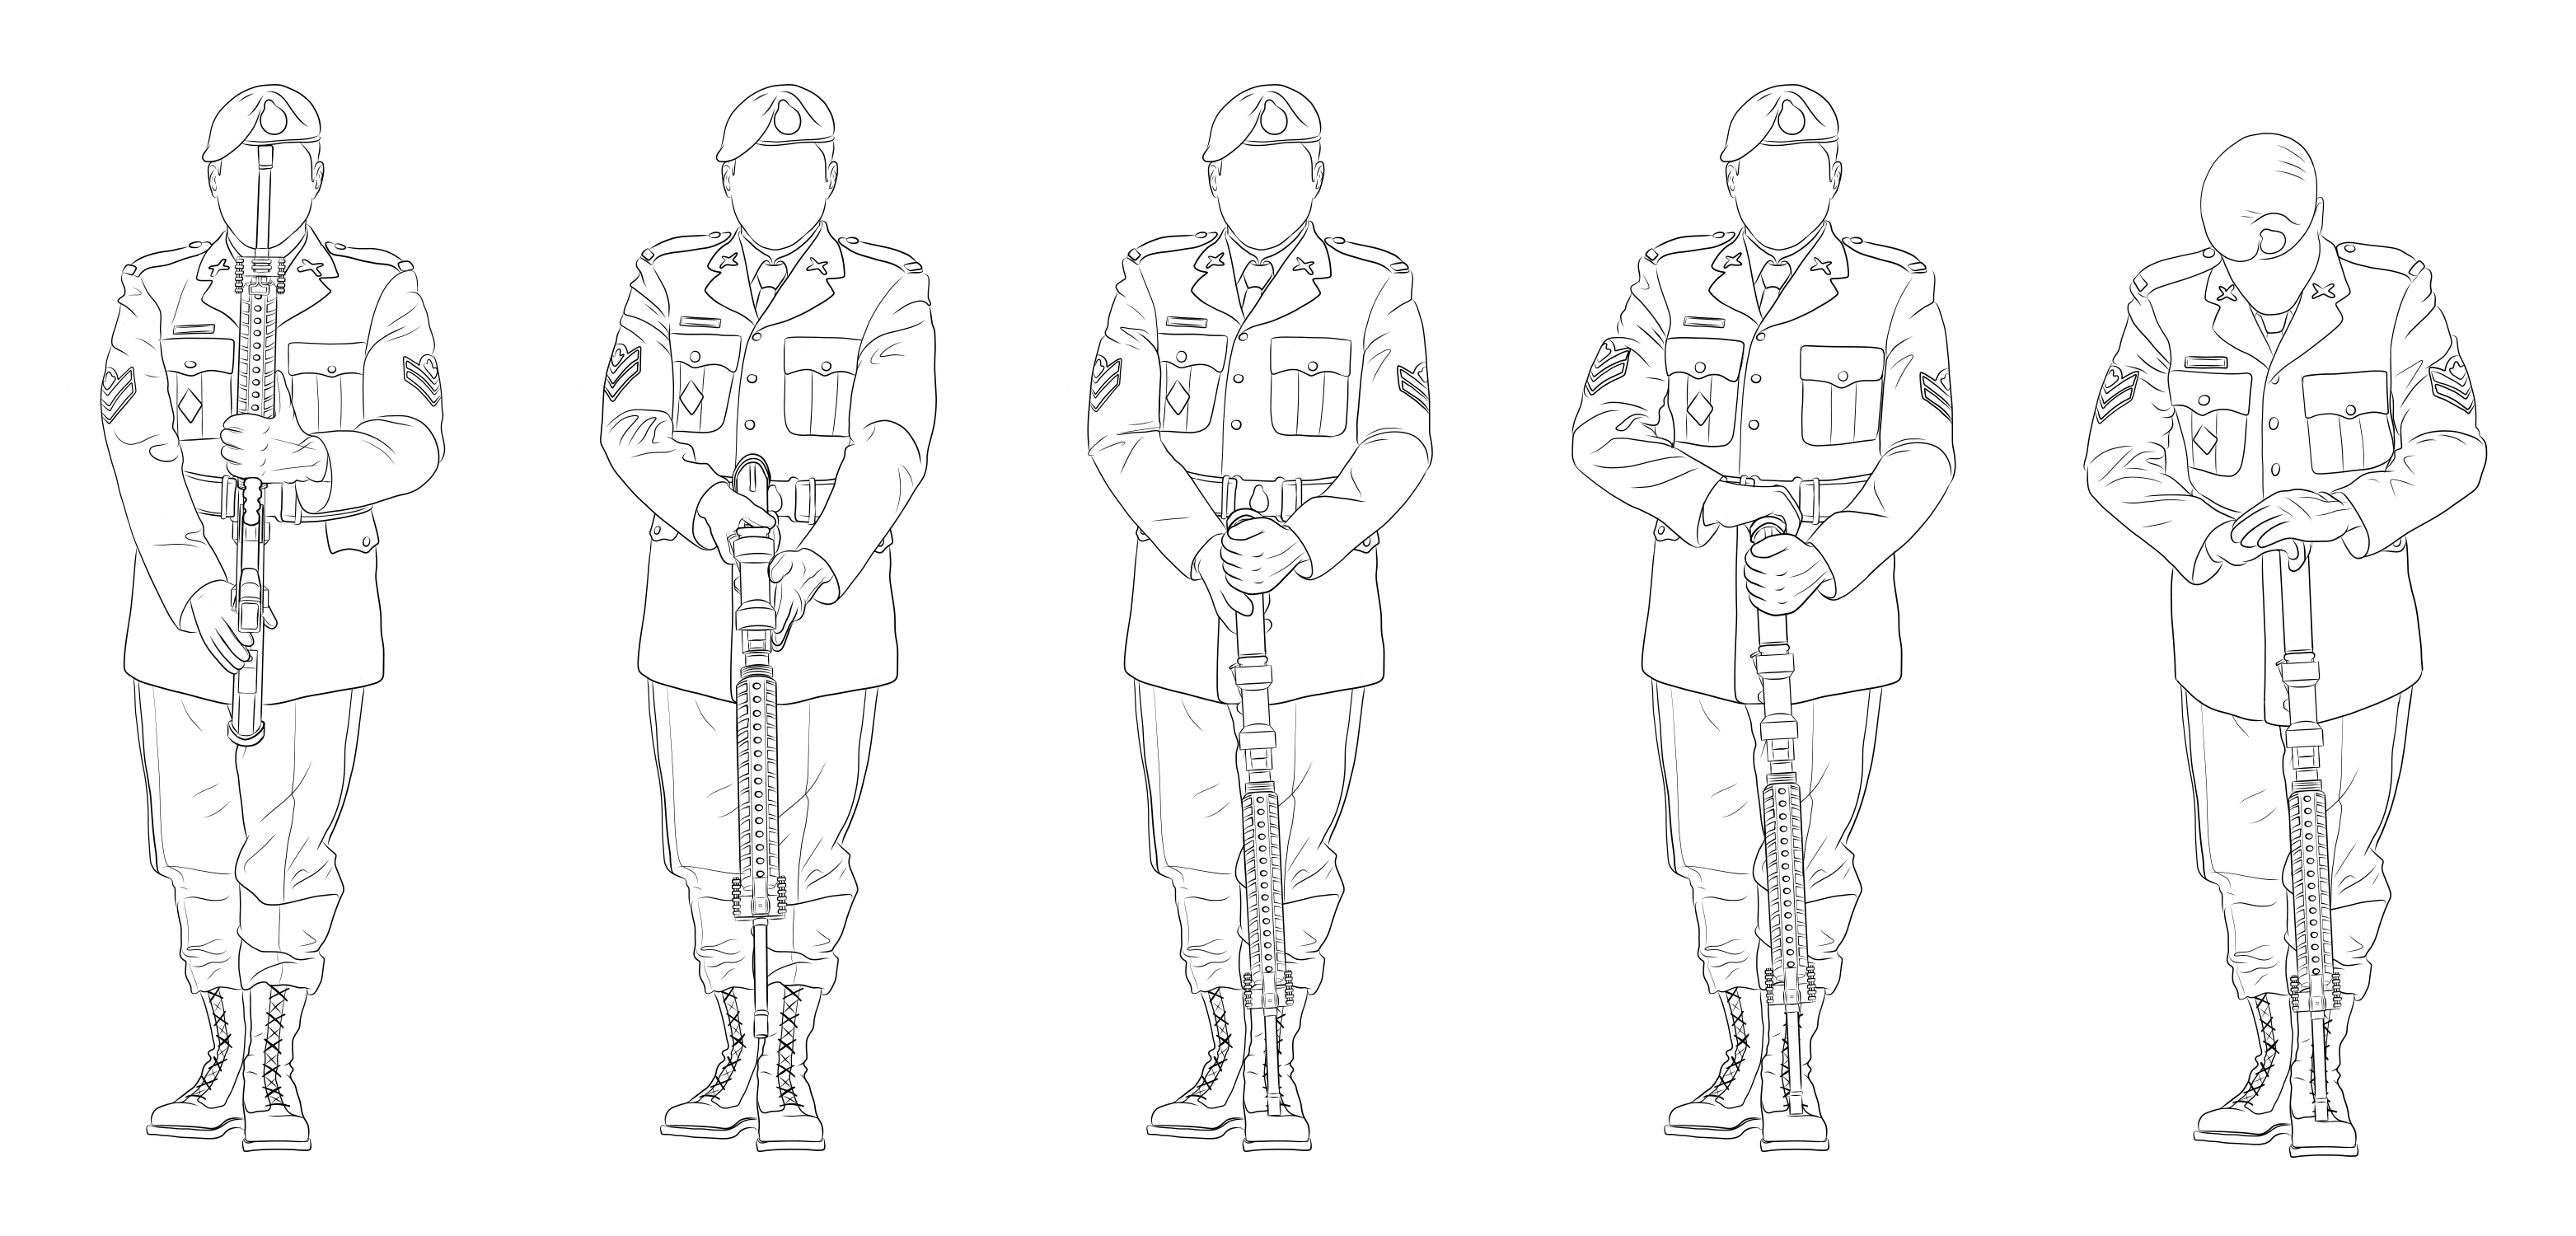
Figure 4-2-2 Rest on our Arms Reversed from the Present
- On the command REST ON YOUR ARMS REVERSED BY NUMBERS, SQUAD – ONE, squad members shall force the weapon forward to the full extent of the arms and simultaneously rotate the butt under the right arm pit, lower the barrel forward and downward onto the left boot while the left hand slides with fingers fully extended slowly until it grasp the butt below the heel. The muzzle shall be placed on the toe crease of the left boot with the weapon vertical and the magazine resting against the inner portion of the left leg (Figure 4 2-2).
- On the command SQUAD – TWO, squad members shall place the right hand on the butt plate with the thumb around the toe of the butt and the fingers together.
- On the command SQUAD – THREE, squad members shall place the left hand over the right, drop the elbows to the sides and lower the head until the chin touches the chest.
- On the command REST ON YOUR ARMS – REVERSED, the three movements are combined. All movements shall be executed without pause and with smooth and solemn dignity. A count of 10 seconds shall be used to complete the entire sequence as follows:
- 8 seconds, SQUAD ONE completed,
- 9 seconds, SQUAD TWO completed, and
- 10 seconds, SQUAD THREE completed.
PRESENT ARMS FROM REST ON YOUR ARMS REVERSED
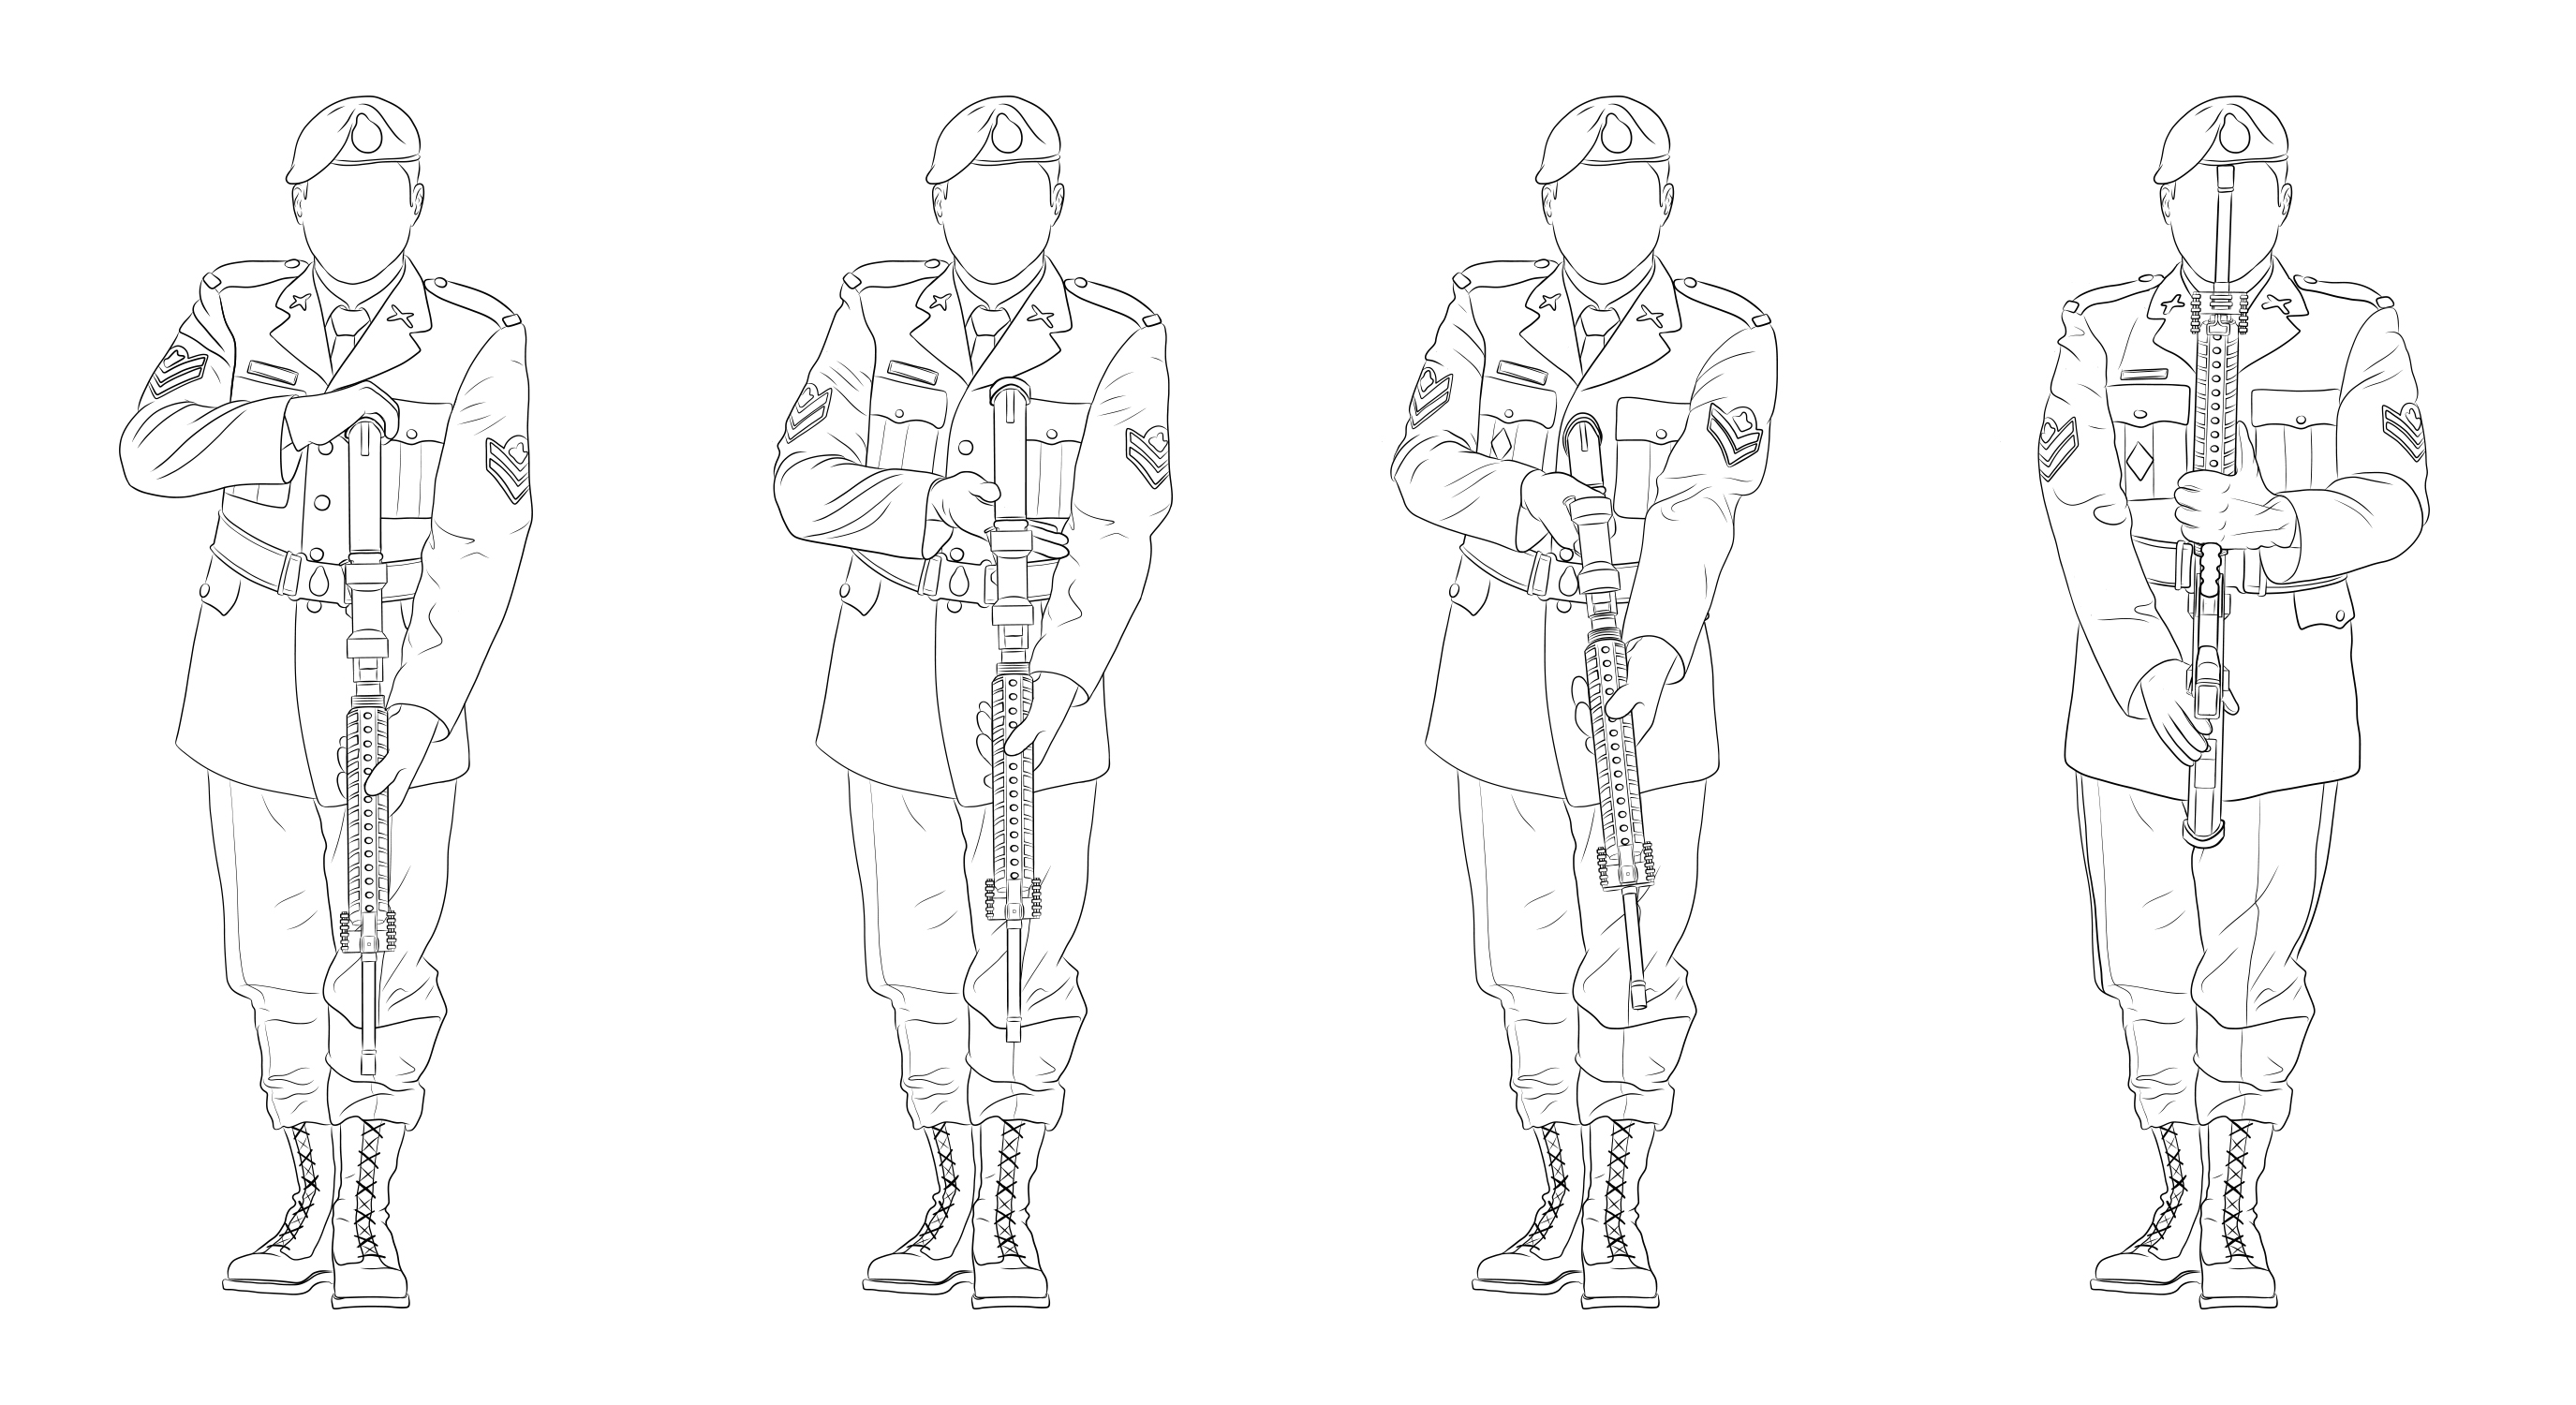
Figure 4-2-3 Present Arms from the Rest on your Arms Reversed
- On the command PRESENT ARMS BY NUMBERS, SQUAD – ONE, squad members shall raise the head and eyes and look to the front.
- On the command SQUAD – TWO, squad members shall lift the weapon 10 cm outwards from the body with the right hand until the left hand grasps the hand guard, the back of the left hand to the rear with the thumb pointing down the hand guard and the left arm kept straight (Figure 4 2-3).
- On the command SQUAD – THREE, squad members shall place the right hand between the butt release button and the pistol grip with the palm up and the first knuckle of the index finger at the small of the butt.
- On the command SQUAD – FOUR, squad members shall move the butt between the body and the right arm and rotate the weapon to the present arms position.
- On the command PRESENT – ARMS, the four movements are combined. A standard pause shall be observed between each movement.
FIRING CARTRIDGES FROM THE SHOULDER
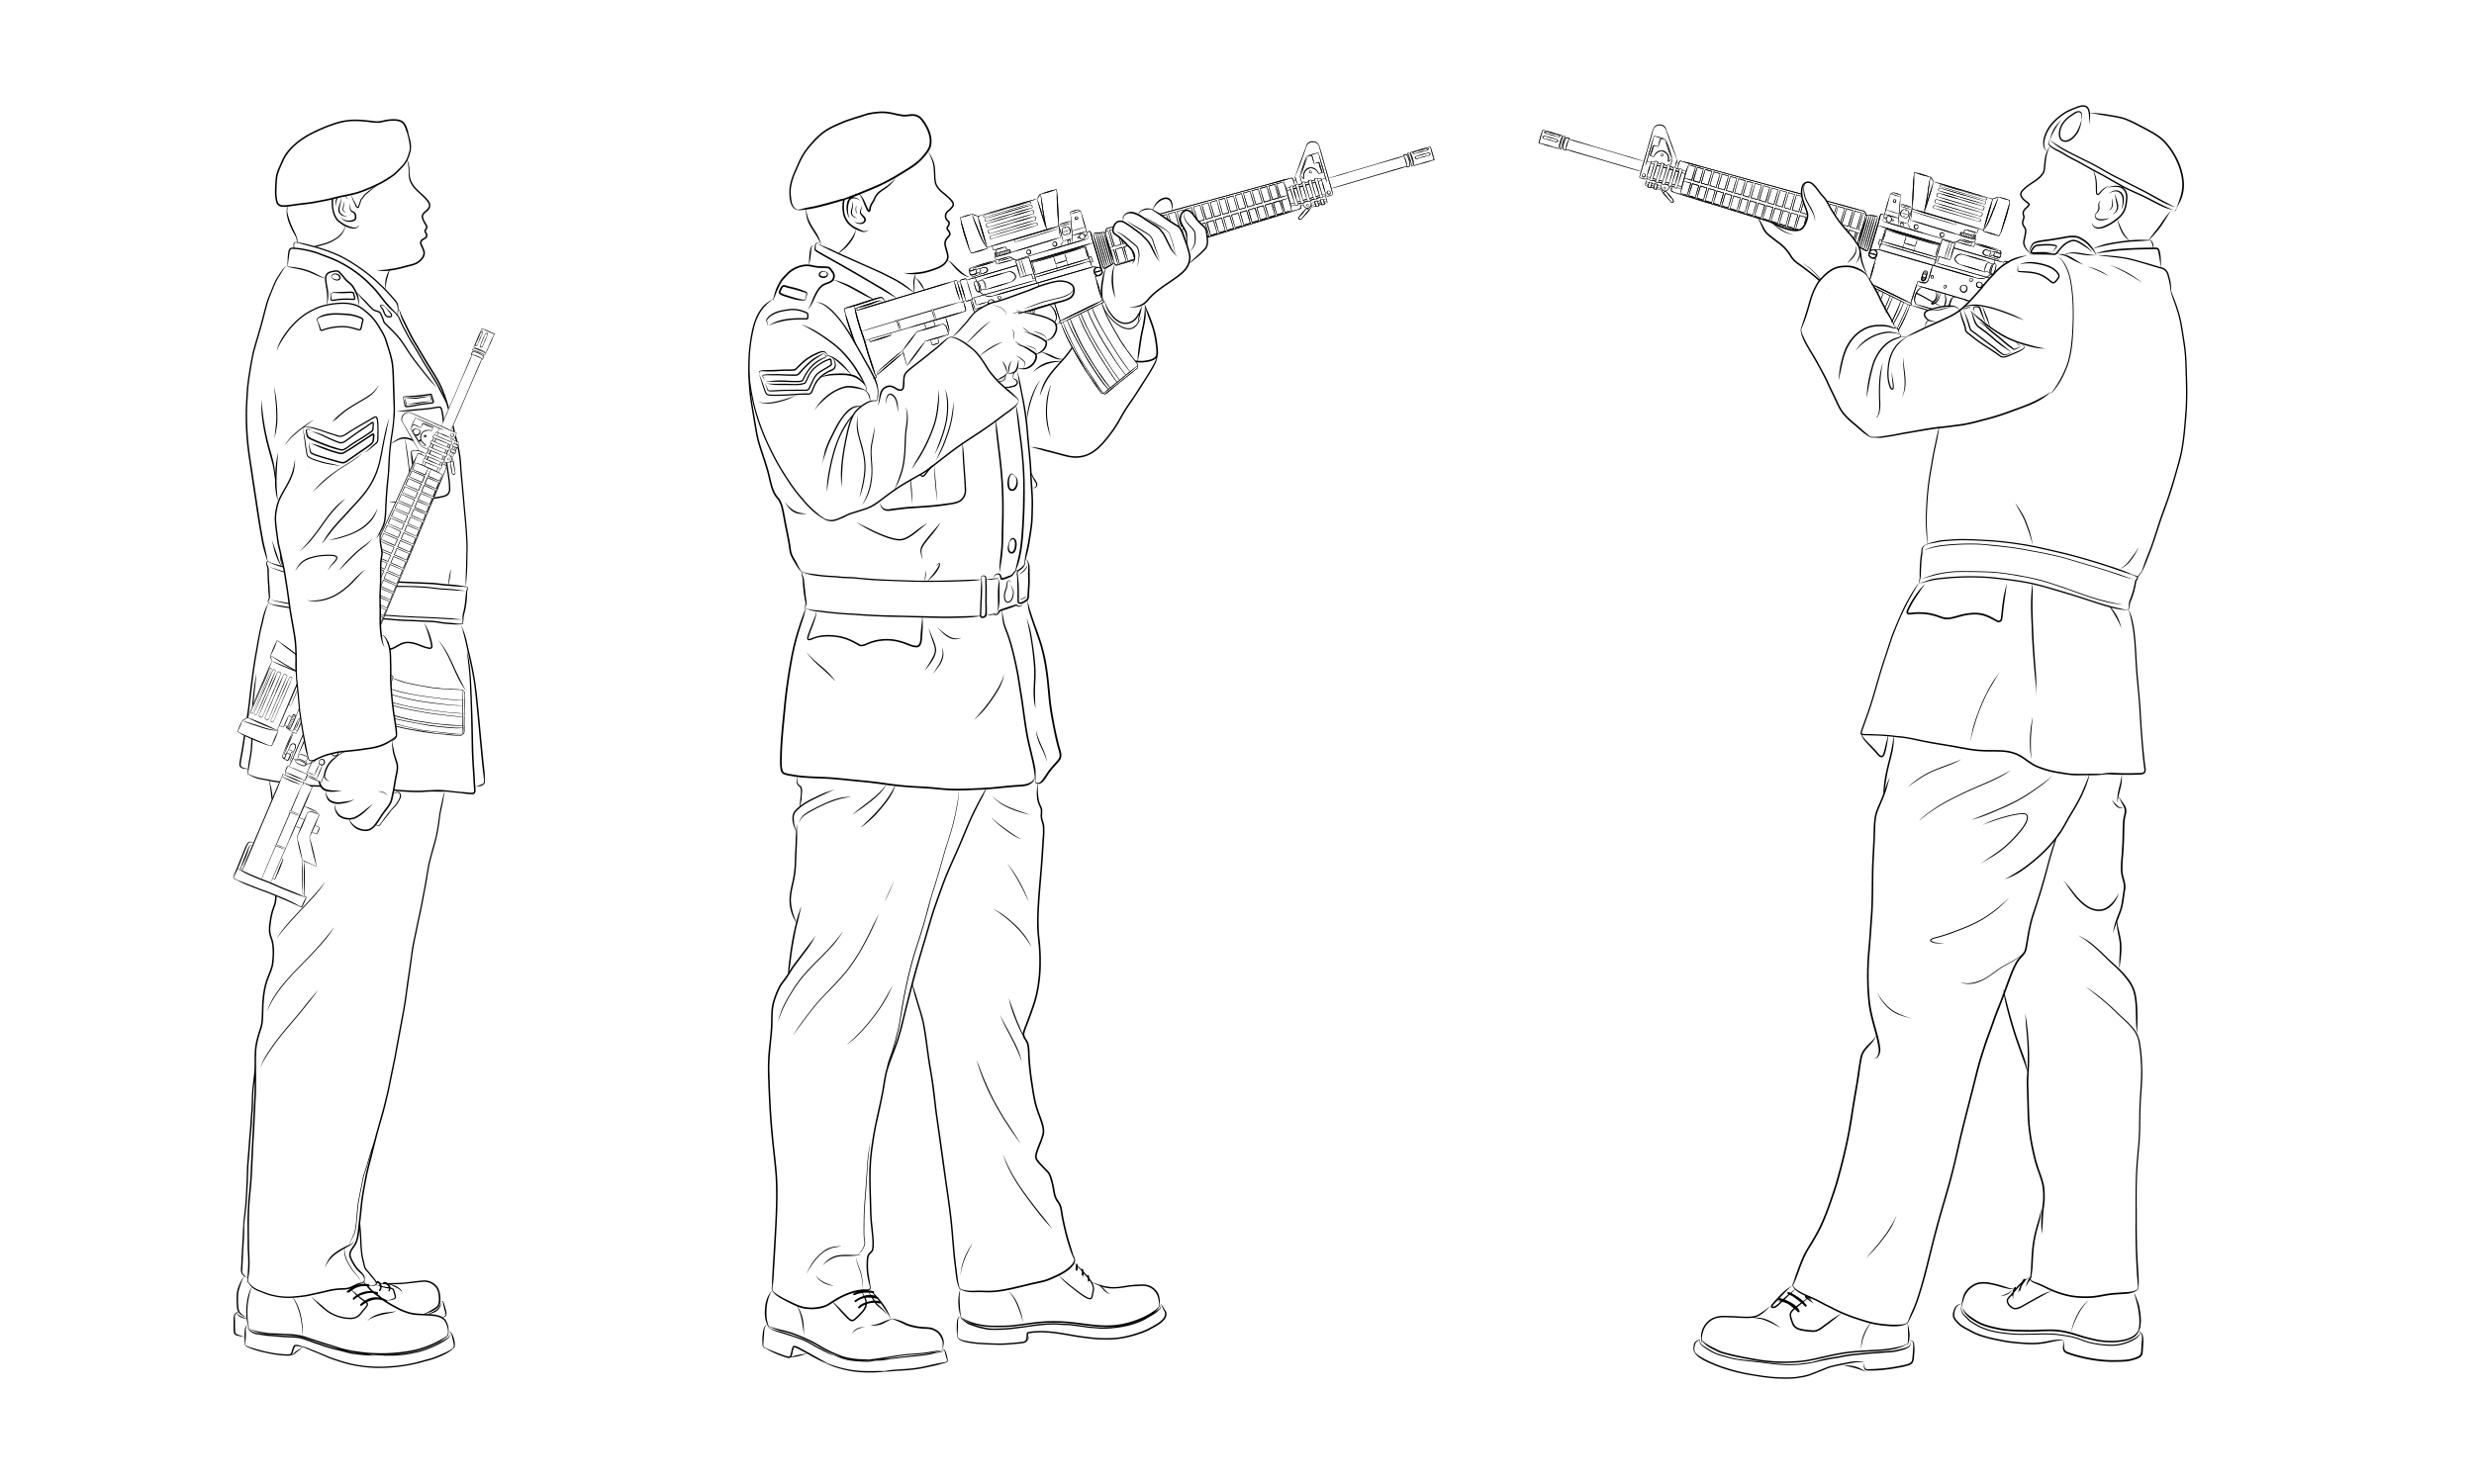
Figure 4-2-4 Firing Cartridges from the Shoulder
- This movement is executed at the open order. In the falling in area, the necessary number of blank rounds are loaded in the magazine and, with the working parts forward and the fire control selector at “S”, the magazine is placed on the weapon.
- With squad members at the attention position, on the command WITH BLANK CARTRIDGES, STANDING LOAD BY NUMBERS, SQUAD – ONE, squad members shall:
- keeping the head and body square to the front, take a half pace forward with the left foot (Figure 4 2-4); and
- thrust the weapon forward with the right hand to an angle of 45 degrees and strike and grasp the handguard immediately in front of the magazine with the left hand.
- with the right hand, grasp the pistol grip, the right forefinger outside the trigger guard, and the butt forced into the side between the right forearm and the body.
- On the command SQUAD – TWO, squad members shall:
- remove the hand from the pistol grip; and
- grasp the cocking handle with the index and middle finger.
- On the command SQUAD – THREE, with the right hand, pull the cocking handle to the rear and release it.
- On the command SQUAD – FOUR, return the right hand to the pistol grip.
- On the command SQUAD – FIVE, squad members shall move the fire control selector to “R” with the thumb and forefinger of the left hand.
- On the command SQUAD – SIX, squad members shall return the left hand to the hand guard.
- On the command WITH BLANK CARTRIDGES, STANDING – LOAD, the six movements are combined. A standard pause is observed between the movements.
- On the command PRESENT, squad members shall bring the weapon to the right shoulder at an angle of 45 degrees and place the right forefinger inside the trigger guard.
- On the command FIRE, squad members shall press the trigger and release it.
- On the command RELOAD BY NUMBERS, SQUAD – ONE, squad members shall return the weapon to the position of squad one, with blank cartridges, standing – load.
- On the command SQUAD – TWO, squad members shall grasp the cocking handle with the index and middle fingers of the right hand.
- On the command SQUAD – THREE, squad members shall pull the cocking handle to the rear and release it.
- On the command SQUAD – FOUR, squad members shall return the right hand to the pistol grip.
- On the command RELOAD, the four movements are combined. A standard pause is observed between the movements.
- On the command MAKE SAFE BY NUMBERS, SQUAD – ONE, squad members shall return the weapon to the position of squad one, with blank cartridges, standing-load.
- On the command SQUAD – TWO, squad members shall move the fire control selector to “S” with the thumb and forefinger of the left hand.
- On the command SQUAD – THREE, squad members shall return the left hand to the hand guard.
- On the command SQUAD – FOUR, squad members shall, with the right hand, strike the right side of the magazine housing with fingers together and extended and immediately, with the index finger, close the ejection port cover.
- On the command SQUAD – FIVE, squad members shall return the right hand to the pistol grip, the right forefinger outside the trigger guard.
- On the command MAKE – SAFE, the five movements are combined. A standard pause is observed between the movements.
- On the command SHOULDER – ARMS, the squad shall act as for shoulder arms from the examine arms position.
- When making safe, it is essential to move the fire control selector to “S” in case not all of the rounds have been fired.
- The squad, on completion of the firing party drill, will be marched to a safe area where the unload drill will be ordered.
FIRING VOLLEYS – MILITARY FUNERALS
- A firing party is authorized to fire volleys at a military funeral if specifically requested by the next-of kin. The firing party shall be formed from the funeral guard commanded by the funeral guard commander and will comprise:
- for a colonel and below, the funeral guard as detailed in A-AD-200-000/AG-000, The Honours, Flags and Heritage Structure of the CF(soon to become A-DH-200-000/AG-000; The Heritage Structure of the CAF), Chapter 13; and
- for a brigadier general and above, the funeral guard commander and the first 12 corporals/privates of the front rank of the funeral guard.
- If a brigadier general or above is to be accorded military honours by gun salute as detailed in A-AD-200-000/AG-000, The Honours, Flags and Heritage Structure of the CF (soon to become A-DH-200-000/AG-000; The Heritage Structure of the CAF), Chapter 13, volleys shall not be fired in addition to the salute of guns.
- For weapon volleys, three blank rounds shall be fired.
- On the completion of the service the funeral guard/firing party commander shall give the following commands:
- GUARD/FIRING PARTY PRESENT – ARMS;
- FIRING PARTY :
- SHOULDER – ARMS,
- WITH BLANK CARTRIDGES STAN-DING – LOAD,
- PRESENT,
- FIRE,
- RELOAD,
- MAKE – SAFE;
- FIRING PARTY SHOULDER – ARMS, PRESENT – ARMS; and
- GUARD SHOULDER – ARMS.
- If the guard is for a colonel or below; the orders at subparagraphs c. and d. are omitted since the guard and firing party are the same and the latter has no larger group to rejoin.
- After the volleys have been fired, the funeral service will continue as noted in Chapter 11.
NOTE
A five seconds pause shall be observed between volleys, otherwise orders at sub-subparagraphs (3), (4) and (5) are repeated until three blank rounds have been fired.
NOTE
All blank firings are to be in accordance with B-GL-381-001/TS-001, Training Safety, Chapter 1, Section 5, paragraph 24 (safety distance) and Chapter 1, Section 6, paragraph 5 (hearing protection).
REVERSE ARMS FROM THE SHOULDER

Figure 4-2-5 Reverse Arms from the Shoulder
- Reversed arms may be used as a sign of mourning in a funeral procession by marching troops who are armed with swords/weapons.
- Weapons should be reversed before stepping off.
- When changing to quick time on the processional route, the rear hand shall be removed from the weapon and the arm swung. The sword hilt or weapon butt shall be dropped to bring the weapon to a horizontal position under the armpit. In the final movement, the weapon shall be pushed up from the rear by the disengaged arm which is then cut and swung.
- When for any reason the procession is halted unexpectedly, weapons shall be carried in the reverse arms position, except that if a long delay is anticipated, weapons shall be ordered to the shoulder arms (carry position for swords) position. Weapons should again be reversed before stepping off.
- Pistols shall remain in holsters.
- On the command REVERSE ARMS BY NUMBERS, SQUAD – ONE, squad members shall:
- with the right hand, flick the weapon up vertically 10 cm and then strike and grasp the small of the butt with the thumb on the left and the fingers together on the right; and
- simultaneously, with the left hand, strike and grasp the weapon at the handguard with the fingers curled around the handguard, and the left forearm close to the body and parallel to the ground.
- On the command SQUAD – TWO, squad members shall:
- force the barrel forward and downwards, with the left hand changing the grip of the left hand on the handguard so that the back of the hand is to the front and the thumb is curled round the back (the left arm will be held in close to the body); and
- simultaneously, bring the butt up between the elbow and the body, changing the grip of the right hand on the small of the butt, fingers and thumb curled around the small of the butt, fingers around the front and thumb to the side so that the right hand is in line with the right shoulder, back of the hand to the right, the weapon now being in a vertical position, barrel down.
- On the command SQUAD – THREE, squad members shall force the weapon under the right armpit with the left hand, magazine just in front of the right shoulder, toe of the butt in line with the right eye. The weapon will be at an angle of 45 degrees.
- On the command SQUAD – FOUR, squad members shall quit the handguard with the left hand and transfer the left hand behind the back, grasping the handguard behind the front sight, the back of the hand towards the ground.
- On the command REVERSE – ARMS, the four movements are combined. The standard pause shall be observed between the movements.
NOTE
This movement is the same as the first movement for the recover arms and the present arms (Figure 4 2-5).
SHOULDER ARMS FROM THE REVERSE
- On the command SHOULDER ARMS – ONE, squad members shall:
- allow the barrel to swing forward until the weapon is vertical; and
- simultaneously, change the position of the left hand so as to grasp the handguard, back of the hand to the rear, thumb to the left and fingers to the right.
- On the command SQUAD – TWO, squad members shall return the weapon to the shoulder arms position by forcing the butt down between the elbow and the body and rotating the weapon between the fingers until the barrel is pointing upwards.
- On the command SQUAD – THREE, strike and grasp the pistol grip with the right hand.
- On the command SQUAD – FOUR, squad members shall cut the left hand to the side and simultaneously force the weapon back until the thumb of the right hand is in line with the trouser seam.
- On the command SHOULDER – ARMS, the four movements are combined. The standard pause shall be observed between the movements.
CHANGE ARMS AT THE REVERSE
- On the command CHANGE ARMS BY NUMBERS, SQUAD – ONE, squad members shall:
- release the weapon with the left hand and return the left arm to the side; and
- simultaneously, holding the weapon at the small of the butt with the right hand, allow the barrel to swing forward so that the weapon is vertical. Keep the right hand level with the top of the breast pocket.
- On the command SQUAD – TWO, squad members shall transfer the weapon across the body and grasp it at the small of the butt with the left hand level with the top of the breast pocket.
- On the command SQUAD – THREE, squad members shall cut the right hand to the side.
- On the command SQUAD – FOUR, squad members shall:
- force the weapon under the left armpit with the left hand; and
- simultaneously, shoot the right hand across the body, forcing the handguard under the armpit.
- On the command SQUAD – FIVE, squad members shall force the right arm around and behind the body, the right hand grasping the handguard behind the front sight, the back of the hand toward the ground.
- On the command CHANGE – ARMS, the five movements are combined. The standard pause shall be observed between the movements.
- To change back to the right side, the process is reversed.
Page details
- Date modified: