
ROE Web – Registration and account management
Access ROE Web
In order to access ROE Web, you must go on the ROE Web page under the Service Canada Website and choose to open a session.
In order to login, you will be asked to choose between 2 login methods, Sign-In Partner or GCKey. Whether you choose to log in using a Sign-In Partner or GCKey, no personal information held by your financial institution will be provided to Service Canada during your login process. Similarly, Service Canada will not share with your financial institution any personal information about the government services you access.
Access ROE Web with Sign In Partner
SecureKey Technologies Inc. is under contract with the Government of Canada to provide a Credential Broker Service called SecureKey Concierge. This service will allow you to access ROE Web using your existing User ID and password or "credential" that you may have with one of the Sign-in Partners.
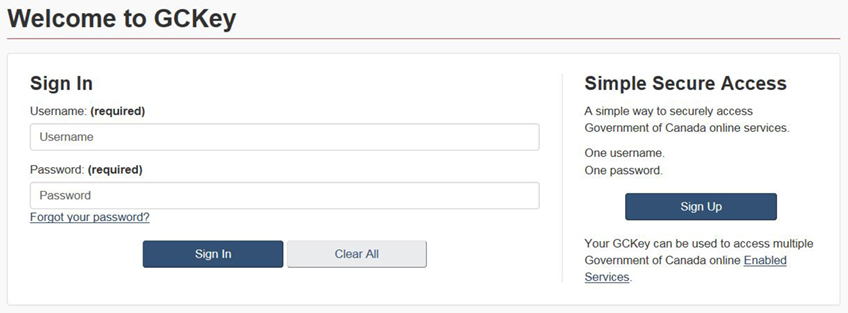
Access ROE Web with GCKey
This option allows you to log in using a Government of Canada user ID and password. GCKey will allow you to securely conduct online transactions with multiple Government of Canada programs and services.
In order to access the ROE Web application through GCKey, you must first create a GCKey. From the GCKey login page, you will have the option to either:
- register for a new GCKey, or
- login with an existing GCKey if you already have one
Login with your existing GCKey
If you already have a GCKey you can enter your User ID and Password information in the GCKey Log In screen. If you forget your password, please select Forget Your Password? and provide the information required to create a new password.
Register a new GCKey
Prior to creating a new GCKey, you will need to accept the Terms and Conditions of Use.
If you are registering a new GCKey, you must accept the Terms and Conditions of Use in order to continue in the registration process.
In order to create a GC Key, you will need to create a user ID (user name), password and recovery security questions and answers to be used in the event that you forget your password. You must complete all the mandatory fields at this step of registration in order to proceed in the process. When completing the user ID and password information please take into consideration the formatting requirements of each field according to the checklists on the right side of the page.
ROE Web Profile
Once you have logged in with your Sign In partner or acquired your GCKey you will also need to create an ROE Web Profile. In order to do so, you must read the ROE Web Privacy Statement and accept the ROE Web terms of Use. Please ensure to select the “New User” option in order to create your ROE Web profile.
Create your ROE Web Profile
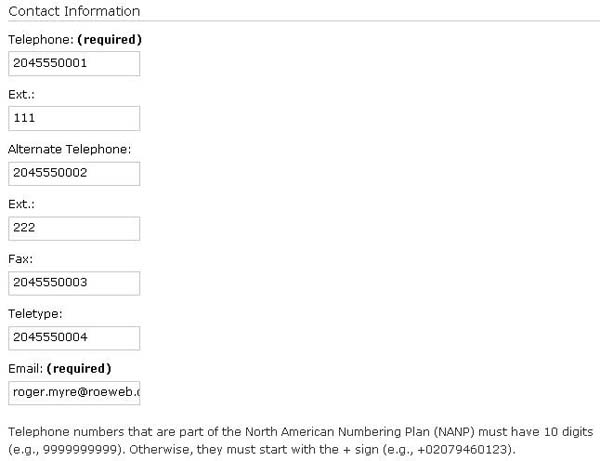
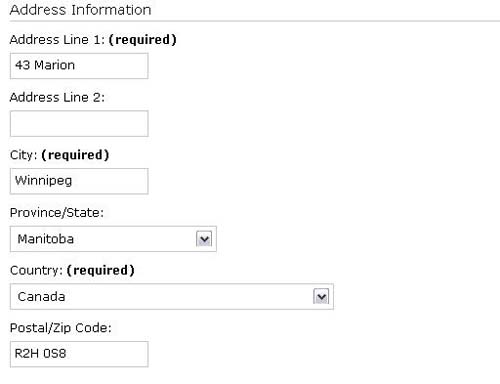
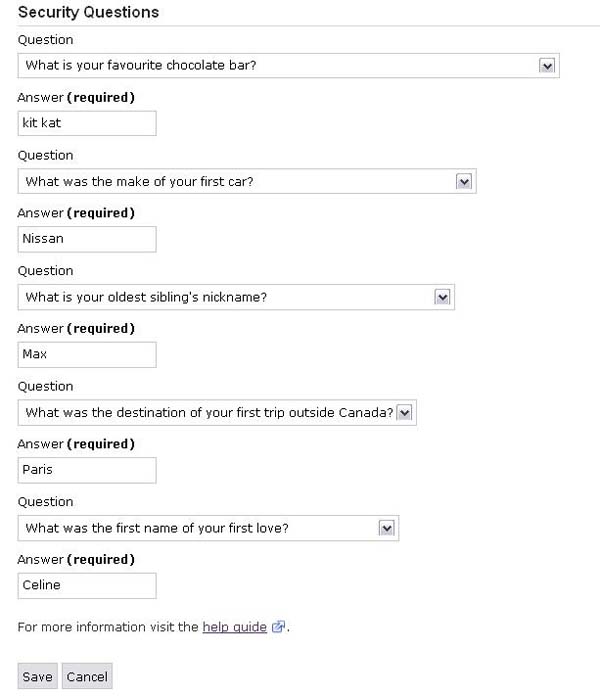
In order to create your ROE Web profile, you will need to provide the following information:
- your first name and last name
- your professional telephone number and email address
- your professional mailing address including the country, city, province/state and postal/zip code, and
- 5 security questions and answers (this will help identify you as an ROE Web user and can be used to help you recover your access if you misplace your username and password to access ROE Web)
After submitting the information on the Create my profile screen, you will be presented with a confirmation screen which will allow you to ensure that you are satisfied with the information before finalizing your profile.
After successfully creating your ROE Web profile, you will be given a User Reference Number. The User Reference Number is a unique number assigned to every ROE Web user. This number can be useful to uniquely identify a user online or over the phone.
Edit your ROE Web Profile (1000)
Once you are logged into ROE Web we can edit your ROE Web profile at any time by selecting My Information from the left hand menu. Note that your User Reference Number will never change. The information that you are able to modify includes:
All fields related to Contact Information
All fields related to Address Information, and
Your Security Questions and Answers
Recover Access to your ROE Web Profile
To recover your access to ROE Web, the following 2 options are available:
- select the first option if you wish to recover access to your ROE Web profile by providing your previous GC Key or Sign-In Partner username and password. Please note that this option only allows you to go from a GC Key to a Sign In Partner or from a Sign In Partner to a GC Key
- select the second option if you wish to recover access to your profile by providing your User Reference Number and answering 3 of your ROE Web security questions
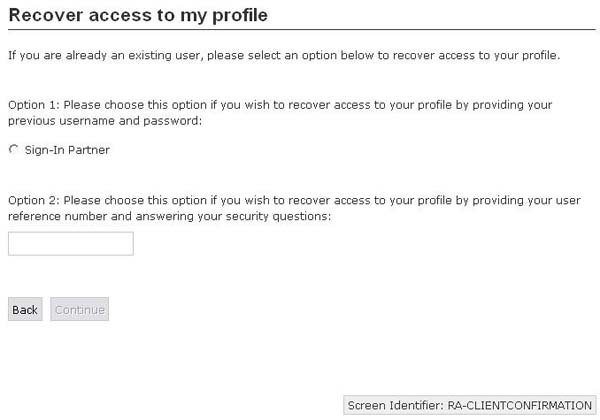
If you select the second option, you will be required to provide answers to your security questions.
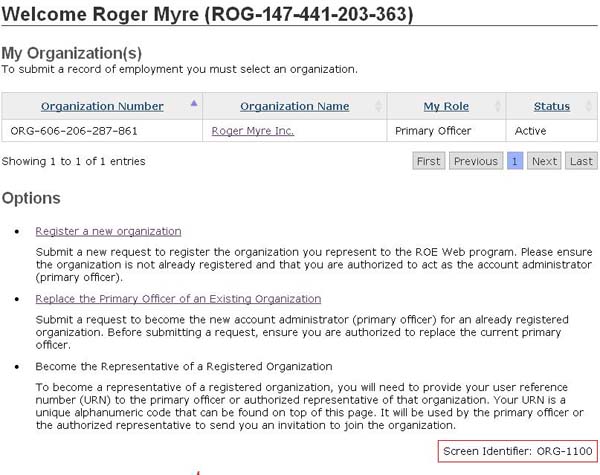
Welcome Page (1100)
The Welcome Page allows you to view the organizations to which you currently have access as well as the pending requests for new registrations or changes of primary officer. This page also allows you to accept an invitation sent to you from a user representing an organization that is already registered to ROE Web. The first time you access your ROE Web Welcome Page, you will not have access to any organization.
Register a new organization
Steps for Registering (1104)
This page includes instructions on how to register a new organization to ROE Web and to become the Primary Officer of this organization. These steps include:
- create your organization profile
- validate your organization
- validate and authenticate your identity
- confirm your authority to act as Primary Officer on behalf of your organization
- accept the online agreement on behalf of your organization

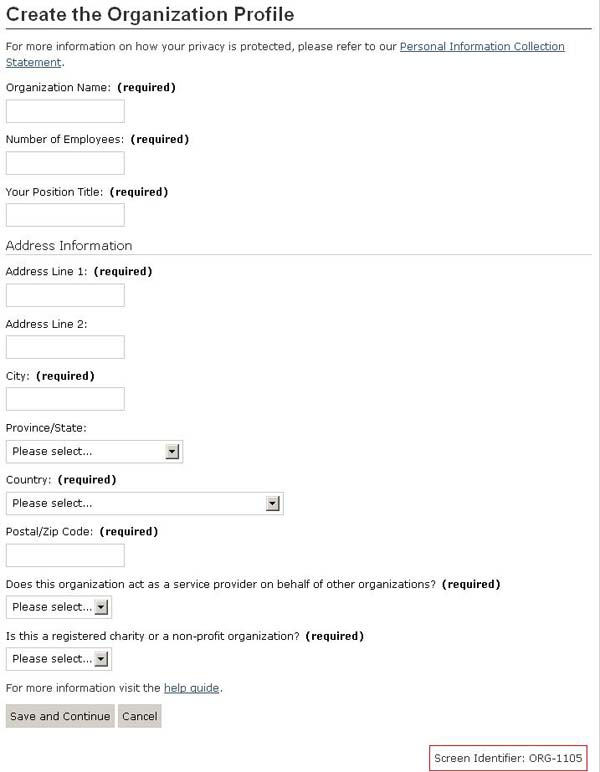
Create the organization profile (1105)
To create the organization profile, the primary officer must complete all the required fields and select “Save and Continue”
On this page, you must enter the information pertaining to the organization you are registering such as the organization’s name. You must also include the number of employees in your organization and your title in the organization, as well as the address of the organization.
On this page you can also identify your organization as a Service Provider (SP) if you will be submitting records of employment on behalf of your clients. Typically a SP would be a small or large payroll processing organization or an accounting/bookkeeping organization.
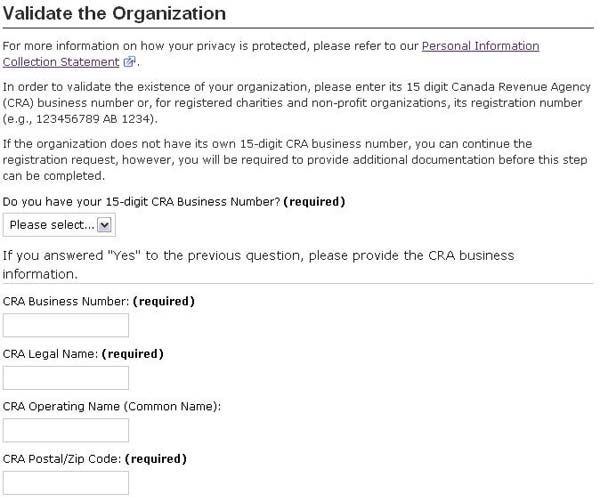
Validate the organization (1106)
In order to ensure the organization being registered is valid, you will need to provide information regarding a valid CRA Business Number. If you have a 15-digit CRA Business Number, please specify “Yes” in response to the question “Do you have your CRA 15-digit Business Number?” and provide the following information:
- CRA Business Number
- CRA Legal Name
- CRA Operating Name (optional)
- CRA Postal/Zip Code associated with this business at CRA
Note:
If you provide a CRA Operating name, it will appear as the name of your business on the ROEs that you will be issuing. If you do not provide an Operating Name, the CRA Legal Name will appear on your ROEs.
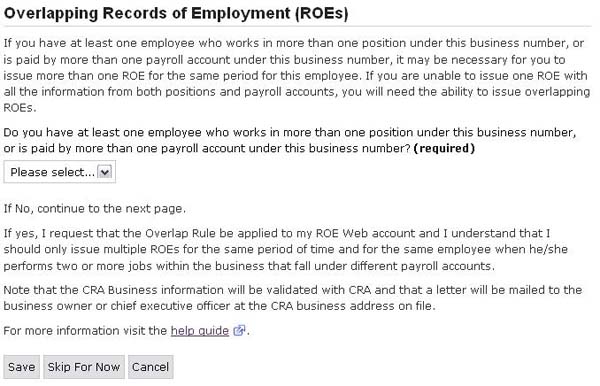
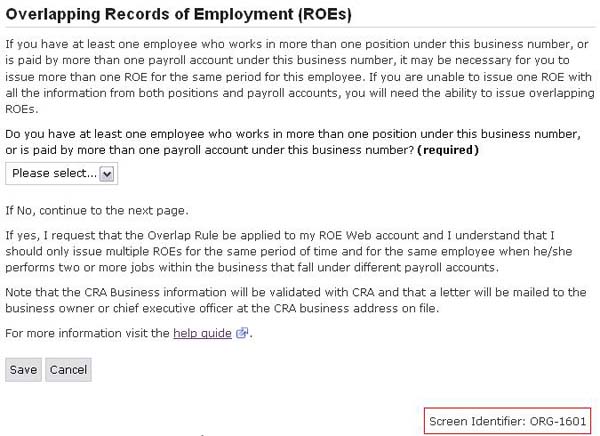
Overlapping records of employment
If you have at least 1 employee who works in more than one position under your business number, or is paid by more than 1 payroll account under your business number then you may need to request that the Overlap Rule be applied to the relevant Business Number in ROE Web.
If, after your Organization and Business Number have been successfully registered, you determine that you need to have the overlap rule applied to your Business Number, please call the Employee Contact Centre Toll-free within Canada and the United States at 1-800-367-5693 (TTY: 1-855-881-9874).
Once all information is completed, please select "Save". Providing incorrect information regarding the CRA Business Number may result in a call for additional information from a Service Canada representative.
Validate and authenticate your identity (1001)
In order to register a new organization and become its Primary Officer, you must validate and authenticate your identity with Service Canada.
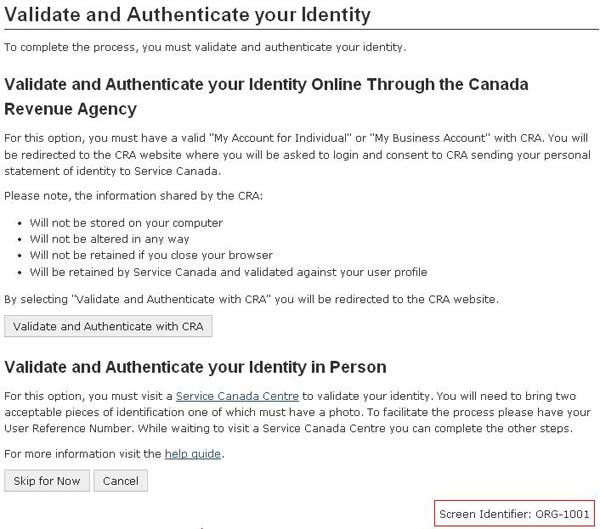
There are currently two options to do this:
Validate and authenticate your identity online through the Canada Revenue Agency
For this option, you must have a valid “My Account for Individual” or “My Business Account” with CRA. Choosing this option will send you to the CRA Website where you will be asked to login with your CRA username and password and consent to CRA sharing your identifying information through a personal statement of identity with Service Canada.
If you have not already registered for the CRA My Account, the registration process could take 5 to10 business days, after which time you will be required to sign back in to ROE Web to finalize the authentication process.
The name you have used to create your ROE Web profile should be the same as the one you have at CRA. Please note that a Service Canada representative may contact you in case of a discrepancy between the first and last name returned from CRA and the first and last name as they appear in your ROE Web profile.

Validate and authenticate your identity in person
Your identity can be validated in person by visiting a Service Canada Centre. You will need to bring a valid passport or 2 pieces of identification (one of which must have a photo). The name you have used to create your ROE Web profile should be the same as the one that appears on your pieces of identification. To expedite the process please have your ROE Web User Reference Number with you.
A valid Canadian or Foreign Passport, or two (2) government issued identification documents are required (at least 1 must have a photo). For example:
- Provincial or territorial driver's licence
- Provincial or territorial health card
- Provincial or territorial birth certificate
- Provincial or territorial identification card (that is a photo card with the same security features as a driver's licence)
- Permanent resident card
- Record of landing
- Canadian citizenship certificate
- Certificate of registration of birth abroad
- Certificate of Indian Status issued by the Government of Canada
- Refugee Protection Claimant Document
- Work permit
Note:
If you have been previously validated and authenticated as the Primary Officer of another organization in ROE Web you will not be required to complete this step a second time.
A proof of identity with one of the following disclaimers (or similar language) is not acceptable for the purposes of authenticating your identity for Service Canada programs and services:
- "not to be used for identification purposes"
- "this is not an official form of provincial identification"
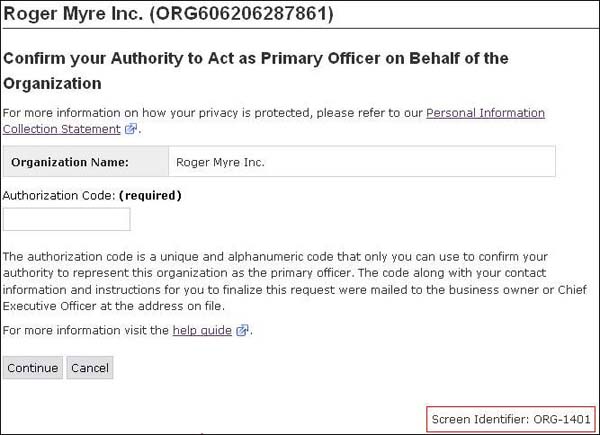
Confirm your authority to act as Primary Officer on behalf of the organization (1401)
You must confirm your authority to act as Primary Officer on behalf of your organization by entering the authorization code that was mailed to the attention of the Chief Executive Officer (or business owner) of your organization during the registration process. The authorization code, which will only be mailed after you have successfully validated the organization as well as your identity, will allow you to finalize the registration process.
Please note that a Service Canada representative may contact you regarding your authority to act as the Primary Officer.
Accept the ROE Web agreement on behalf of the organization
Once your authority to act as the Primary Officer on behalf of the organization has been confirmed, you must then accept the ROE Web agreement on behalf of the organization in order to be able to begin creating and submitting ROE transactions to Service Canada for your organization.
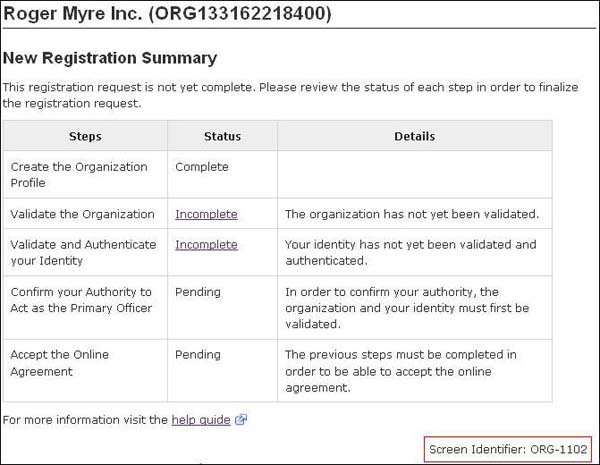
New registration Summary (1102)
The new registration summary allows you to see the details relative to your pending request. From this page, you may view the status of the steps necessary to complete your registration. This page will provide information such as steps that were not completed or that are currently being reviewed by a Service Canada representative. This page will remain viewable so long as there are steps that remain to be completed.
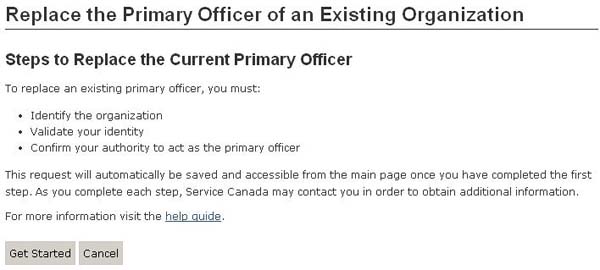
Replace Primary Officer - Getting Started
If the Primary Officer of your organization has left or is no longer in a role suitable to act as Primary Officer, your organization should assign a new Primary Officer. This is done through the “Replace the Primary Officer of an existing Organization” function found on your ROE Web Welcome Page. Below are the steps you must take in order to replace the Primary Officer of an existing organization:
Steps to replace the current Primary Officer (1400)
- Identify the organization
- Validate and authenticate your identity
- Summary – Confirm New Primary Officer Information
- Confirm your authority to act as Primary Officer on behalf of the organization
Identify the Organization (1402)
On this page, you must enter the organization number or Canada Revenue Agency (CRA) BN of the organization whose Primary Officer you are seeking to replace. Furthermore, you must also include the title that you are seeking to maintain within that organization.
To identify the registered organization, you must enter the 15-digit CRA Business Number associated with the organization (for example, 123456789 AB 1234) or, provide the organization number (for example, ORG-123-456-789-123).
- CRA Business Number
- Organization number
- Your position title
You as the user desiring to replace a Primary Officer must first identify the organization for which you will be the replacement Primary Officer. This action can be completed from this page.

Validate and authenticate your identity (1001)
In order to replace the Primary Officer of an existing organization, you must validate and authenticate your identity with Service Canada.

There are currently 2 options to do this:
Validate and authenticate your identity online through the Canada Revenue Agency
For this option, you must have a valid “My Account for Individual” or “My Business Account” with CRA. Choosing this option will send you to the CRA Website where you will be asked to login with your CRA username and password and consent to CRA sharing your identifying information through a personal statement of identity with Service Canada.
If you have not already registered for the CRA My Account, the registration process could take 5 to10 business days, after which time you will be required to sign back in to ROE Web to finalize the authentication process.
The name you have used to create your ROE Web profile should be the same as the one you have at CRA. Please note that a Service Canada representative may contact you in case of a discrepancy between the first and last name returned from CRA and the first and last name as they appear in your ROE Web.

Validate and authenticate your identity in person
If you decide not to use your CRA account to validate and authenticate your identity online, you can validate your identity in person by visiting a Service Canada Centre. You will need to bring a valid passport or 2 pieces of identification (one of which must have a photo). The name you have used to create your ROE Web profile should be the same as the one that appears on your pieces of identification. To expedite the process please have your ROE Web User Reference Number with you.
A valid Canadian or Foreign Passport, or two (2) government issued identification documents are required (at least 1 must have a photo). For example:
- Provincial or territorial driver's licence
- Provincial or territorial health card
- Provincial or territorial birth certificate
- Provincial or territorial identification card (that is a photo card with the same security features as a driver's licence)
- Permanent resident card
- Record of landing
- Canadian citizenship certificate
- Certificate of registration of birth abroad
- Certificate of Indian Status issued by the Government of Canada
- Refugee Protection Claimant Document
- Work permit
Note:
If you have been previously validated and authenticated as the Primary Officer of another organization in ROE Web you will not be required to complete this step a second time.
A proof of identity with one of the following disclaimers (or similar language) is not acceptable for the purposes of authenticating your identity for Service Canada programs and services:
- "not to be used for identification purposes"
- "this is not an official form of provincial identification"
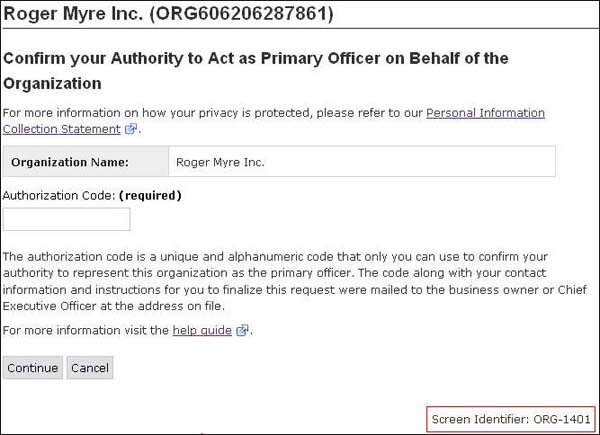
Confirm your authority to act as Primary Officer on behalf of the organization (1401)
You must confirm your authority to act as Primary Officer on behalf of your organization by entering the authorization code that was mailed to the attention of the Chief Executive Officer (or business owner) of your organization during the change of Primary Officer process. The authorization code, which will only be mailed after you have successfully identified the organization as well as validated your identity, will allow you to finalize the change of Primary Officer process.
Please note that a Service Canada representative may contact you regarding your authority to act as the Primary Officer.
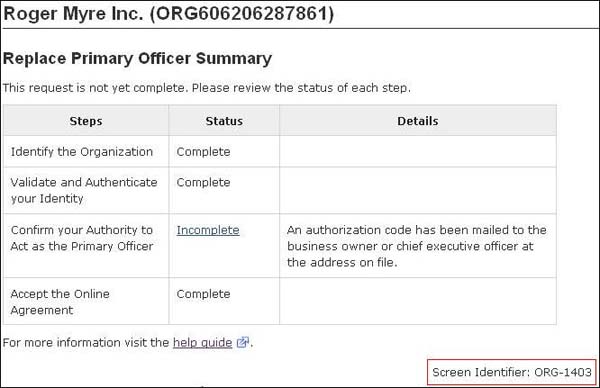
Change of Primary Officer Summary (1403)
The Change of Primary Officer summary allows you to see the details relative to your pending request. From this page, you may view the status of the steps necessary to complete your request. This page will provide information such as steps that were not completed or that are currently being reviewed by a Service Canada representative. This page will remain viewable so long as there are steps that remain to be completed.
Organizations home (1101)
After selecting an organization from the “Welcome Page” you will be taken to the “Organizations home” page. The “Organizations home” page allows you to view further details of an organization to which you currently have access, along with the functions that you may execute relative to that organization. At any point in time you can return to the “Welcome Page” by selecting your user name in the upper left tab.
My Role (1108)
Use this option to view your role and user rights for an organization. You can also change the title of the position you hold now.
Note that you are not allowed to modify your own rights. If you wish to modify your rights you must contact an authorized representative or the primary officer for this organization.
Edit Organization Profile (1103)
Should you desire to modify certain details pertaining to the organization’s information, you may do so from this page, editable fields include:- Number of employees
- Address line 1
- Address line 2
- City
- Province/State
- Country
- Postal/Zip Code
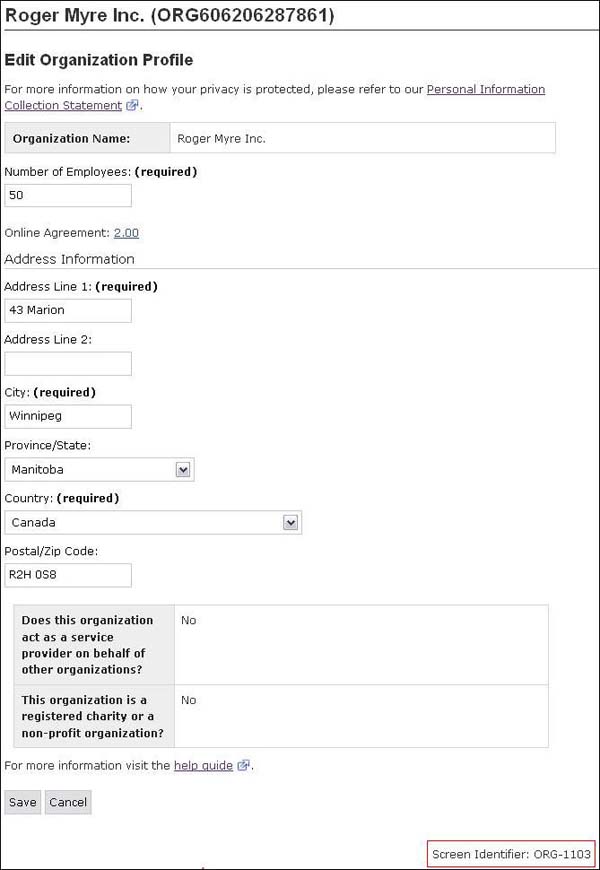
Once the appropriate changes have been made, click “Save” to keep all modifications.
Organization Agreement: Agreement Version (1801)
This page lets you view the latest agreement that the organization has accepted. The agreement elaborates the terms and conditions of use to which the organization is subjected to while using the ROE Web application.
Manage CRA Businesses (1600)
This page displays the list of current businesses registered under the respective. Displayed information about businesses on this page includes:
- CRA Business Number
- CRA Legal Name of the Business
- Current Status of the Business
- active
- pending
- suspended

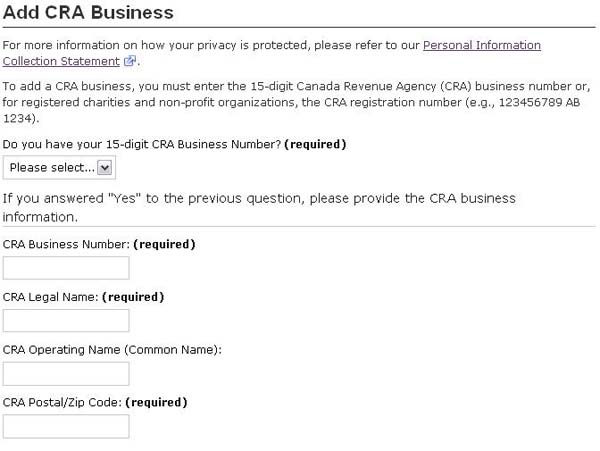
Add CRA Business Number (1600)
An organization in ROE Web can have multiple Business Numbers associated with it. You can add another CRA Business Number to your organization from the ‘Add CRA Business’ page. The Business Number that you add will be validated against the business information held by CRA.
In order to ensure the Business Number is valid, you will need to provide the following information:
- CRA Business Number
- CRA Legal Name
- CRA Operating Name (optional)
- CRA Postal/Zip Code associated with this business at CRA
Note:
When adding a Business Number to an existing Organization, you must also complete the ‘Overlapping Records of Employment (ROEs)’ section of this page. If you have at least 1 employee who works in more than 1 position under the business number, or is paid by more than 1 payroll account under then business number then you may need to request that the Overlap Rule be applied to this Business Number in ROE Web.
If, after your Business Number has been successfully added to the organization, you determine that you need to have the overlap rule applied to your Business Number, please call the Employee Contact Centre Toll-free within Canada and the United States at 1-800-367-5693 (TTY: 1-855-881-9874).
If you provide a CRA Operating name, it will appear as the name of your business on the ROEs that you will be issuing. If you do not provide an Operating Name, the CRA Legal Name will appear on your ROEs.
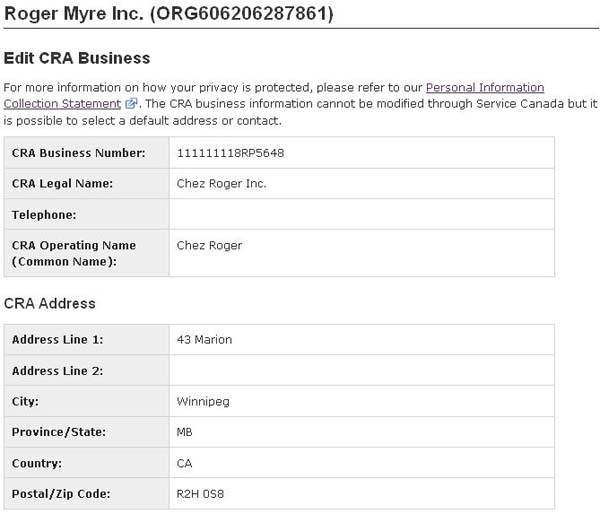
Edit CRA Business (1602)
The CRA business information cannot be modified through Service Canada but it is possible to make changes to the following information on this page:
The fields include the operating name and all the regular address fields as well as Default Address, which allows a user to select a default address for this CRA business. Selecting a default address will pre-populate the address on the ROE (Block 4 - Employer Address and Block 7 - Postal Code) when issuing an ROE using this Business Number. Please note that selecting a default address will not update the information recorded at CRA.
Default Contact, which allows a user to select a default contact for this CRA business. Selecting a default contact will pre-populate the contact on the ROE (Block 16 - Reason for separation) when issuing an ROE using this Business Number. Please note that selecting a default contact will not update the information recorded at CRA.
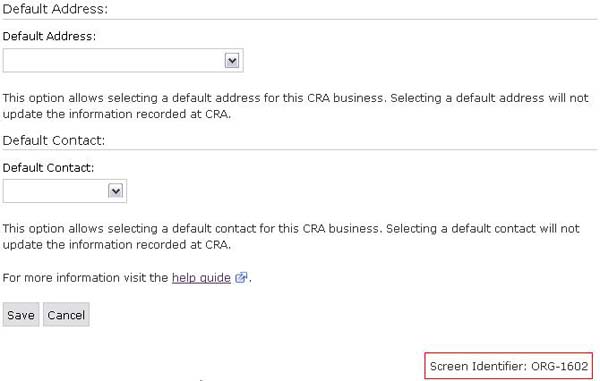
Once the appropriate changes have been made, click “Save” to keep all modifications.
Manage Addresses (1200)
From this page, you may add, delete or edit 1 or more addresses associated with your organization.

Add Address (1201)
From the ‘Add Address’ page you can add multiple addresses to your Organization. You must set 1 of the given addresses as the “Main Address”.
Adding additional addresses is particularly helpful when creating ROEs for employees of an organization which has multiple locations. When completing an ROE you will be able to select from this list of addresses to specify the appropriate employer address on the ROE.
Required fields when adding an address include:
- Address line 1
- City
- Province/State
- Country
- Postal/Zip Code
- Set as main organization address?

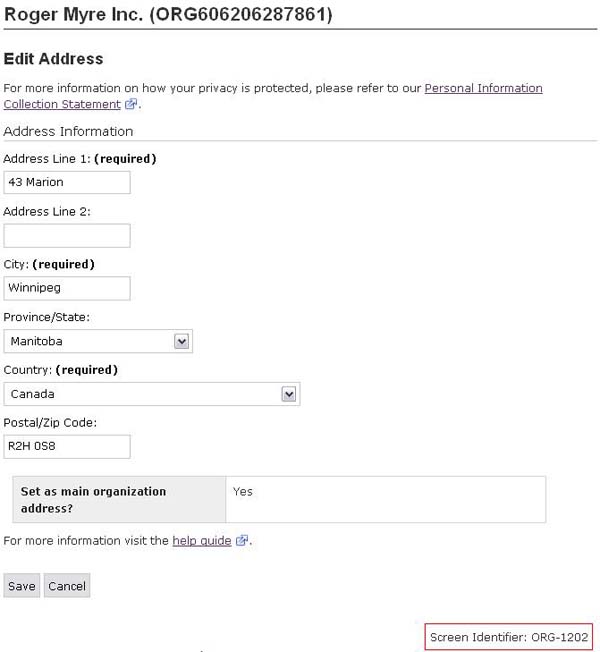
Edit Address (1202)
The Primary Officer can edit addresses belonging to an organization. From this page, the Primary Officer also has the option to change the “Main Address” or to delete any addresses that are no longer needed. Editable fields include:
- Address line 1
- Address line 2
- City
- Province/State
- Country
- Postal/Zip Code
- Set as main organization address?
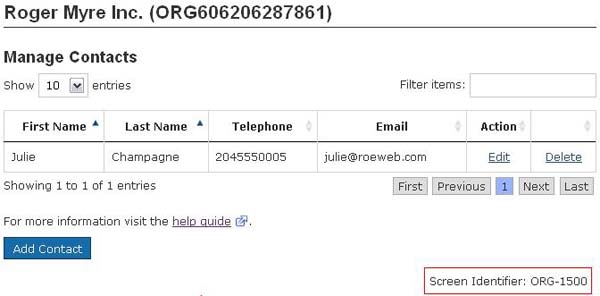
Manage Contacts (1500)
The Primary Officer and authorized representatives can manage the contacts for your organization in ROE Web. Contacts are useful when completing an ROE and will appear in a drop-down list to be easily added in Block 16 of the ROE. Maintaining an up-to-date list of Contacts will allow you to quickly complete the contact information on the ROE and save time manually entering the information each time an ROE is created. The functions available on this page include:
- add a new contact
- edit an existing contact
- delete an existing contact
Note:
Contacts can only be managed by the Primary Officer or authorized representatives for the organization.
Add Contacts (1501)
A new contact can be added to your organization from this page. A contact does not necessarily need to be a representative of your organization but simply a person Service Canada may contact if there are questions concerning the information on the ROE. Please note that actual ROE Web representatives can be selected as contacts for Block 16 when producing an ROE.
Only the Primary Officer, or representatives authorized by the Primary Officer to edit an organization, may add contacts on this page. Required fields on this page include:
- First Name
- Last Name
- Preferred Language
- Telephone
- Address Line 1
- City
- Country
Edit Contacts (1502)
Should you need to modify information pertaining to the organization’s contacts, you may do so from this page. Only the Primary Officer, or representatives authorized by the Primary Officer to edit an organization, may edit contact information on this page. Editable fields include:
- Edit Contact
- Contact Information
- Address Information
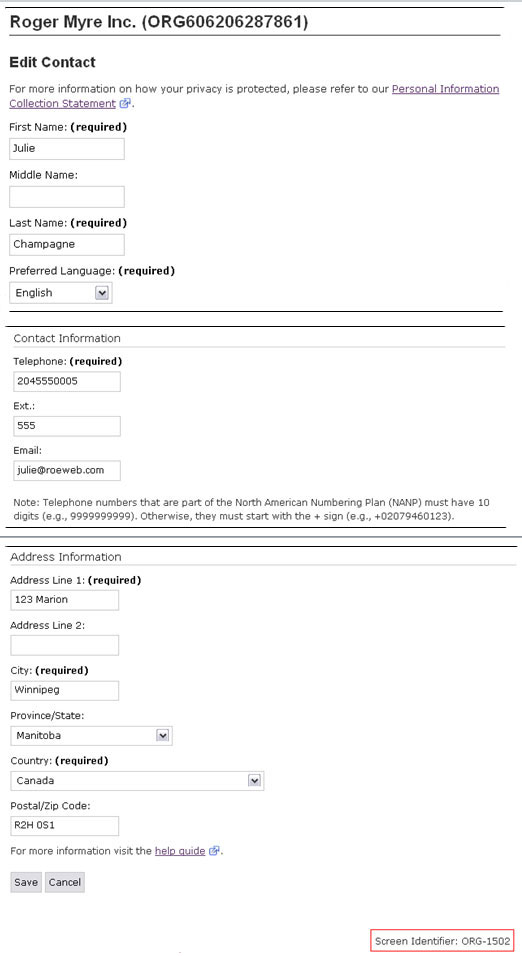
Once the appropriate changes have been made to the contact information, click “Save” to keep all modifications.
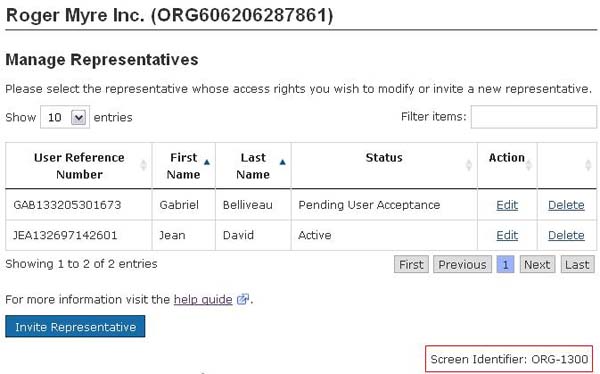
Manage Representatives (1300)
From this page, the Primary Officer and representatives authorized to manage other representatives may view all the representatives belonging to the organization. From this page the Primary Officer can invite new representatives, edit the rights of those representatives within the organization and remove representatives from the organization.
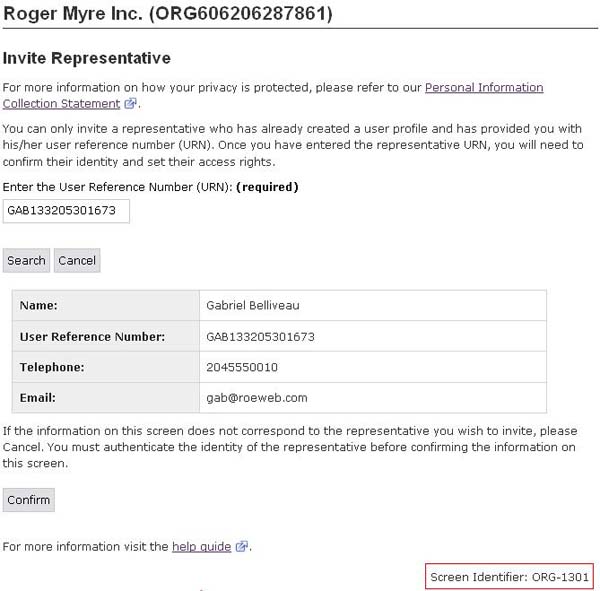
Invite Representative (1301)
To invite a new representative to an organization:- the representative must have a User Reference Number. The User Reference Number is given to a user after they have successfully created their ROE Web profile. After logging in to ROE Web, the User Reference Number can be found on the top of the ‘Welcome Page (1100)
- before you can invite a representative you must first locate the representative in ROE Web, by searching for the representative’s User Reference Number in the search box on the Invite Representative page below

If the user is found you must then select the representative from the search results by pressing “Confirm” on that selection. If the user is not found, you may want to verify with the representative that they have provided you with the correct User Reference Number.
Note:
The Primary Officer, or representatives authorized by the Primary Officer to manage other representatives, is responsible for confirming the identity of each representative added to the organization. You should never invite a representative to your organization who is unfamiliar to you or, or whose identity you have not confirmed.
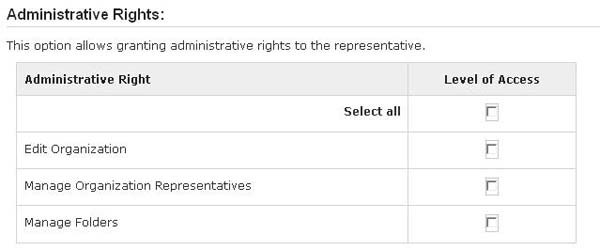
New Representative Rights
After confirming the identity of the representative to be invited, you will then be prompted to establish the Representative’s rights within the organization. During this process, a position title for the new representative must also be provided.
To designate the authority of the new representative, you must select 1 or more of the following rights:
Administrative Rights
- Edit Organization
This option allows the representative to manage the organization profile, address book, contacts and to add or remove CRA businesses. - Manage Organization Representatives
This option allows the representative to invite or remove representatives from the organization and to modify their access rights. Representatives will only have the ability to delegate or remove rights they already possess. - Manage Folders
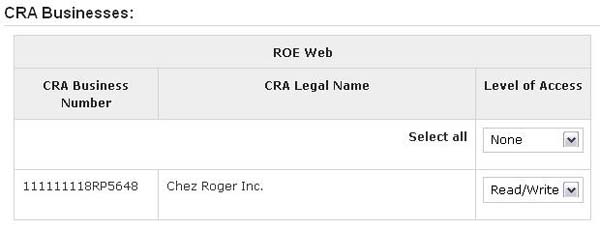
This option allows the representative to create, modify or delete folders. Folders allow organizing to documents and forms submitted online or restricting access to ROEs. How the folders are used can be determined by the PO or other representatives given access rights to manage folders. - Canada Revenue Agency (CRA) businesses
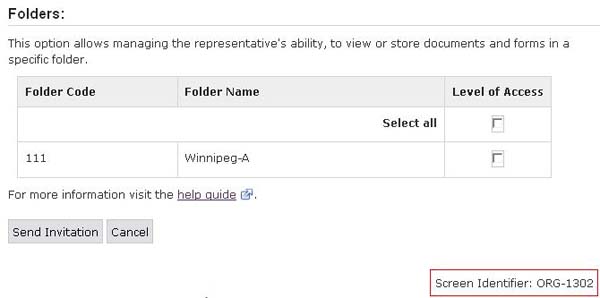
Selected options allow the representative to either “read” or “read and write” ROEs under the selected business number. - Viewing and storing ROEs in folders
This option allows managing the representative’s ability to view or store documents and forms in a specific folder.
CRA Businesses
In this section you determine the representative’s level of access for each given Business Number. The following are the options available for the Business Number:
- None - The representative will have no access to this BN and will not see any information related to the BN while using their ROE Web account.
- Read - The representative will have read only access to any ROEs associated to this Business Number (Exception: if there are ROEs stored in a Folder to which the user is not given access they will not be able to view these ROEs).
- Read/Write - The representative will have full access to view, issue and amend ROEs associated to this Business Number (Exception: if there are ROEs stored in a Folder to which the user is not given access, they will not be able to view these ROEs).
Folders
Folders can be created and used to store sensitive ROEs, or to organize ROEs by geographic region, business divisions, etc. In this section you can select which folders the representative should have access to. If no folders are selected in this section, then all ROEs created by this representative will be viewable by any representative who has ‘Read’ or ‘Read/Write’ access to the Business Number associated with the ROE. For information on creating and editing folders see ‘Manage Folders (1700)'.
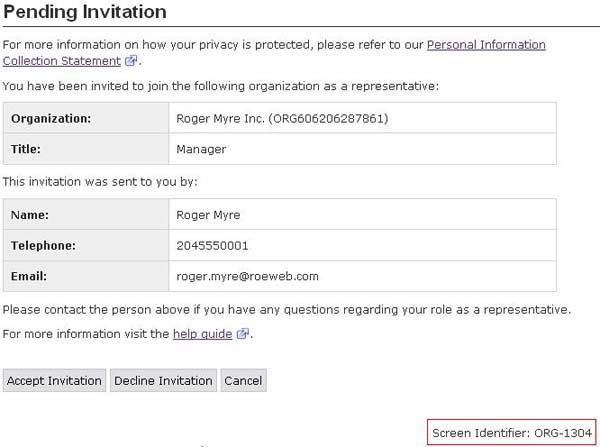
Pending Invitation (1304)
This page will be displayed for the representative after an invitation to join an organization is sent. In order to act on behalf of that organization, with rights prescribed by the inviter, the user must accept the invitation.
Modify Representative Rights (1303)
To edit a representative’s rights within an organization, you must select a representative from the "Manage representatives" list and click "Edit". From the following page, you will be able to modify the following fields:
- Position Title
- Administrative Rights:
- Edit Organization
- Manage Organization Representatives
- Manage Folders
- CRA Businesses:
- None
- Read
- Read/Write
- Folders
Note:
For further information on the above Administrative Rights consult the section on new representative rights in ‘Invite Representative (1301)'. Once all of the required information has been provided, click “Save” to keep the new modifications.
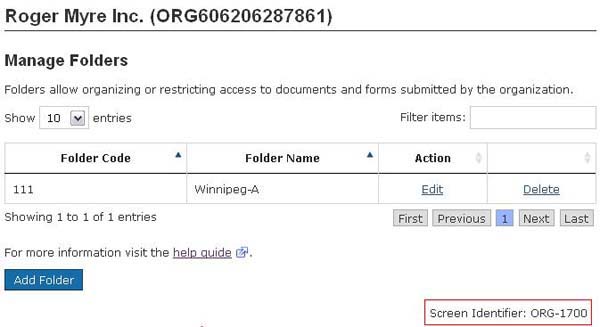
Manage Folders (1700)
From this page representatives who have been given administrative rights to manage folders can create new folders, edit existing folders or delete folders.
Folders allow you to organize, or restrict access to, ROEs submitted within your own organization. For example: your organization may have ROEs that it issues for regular staff and ROEs for executive level staff. By creating a folder for regular staff ROEs and a folder for executive staff ROEs your organization will be able to control which ROE Web representatives have access to either of these folders. This is especially useful if the earnings information on those ROEs is sensitive in nature.
Folders provide flexibility for you to manage and store ROEs in a way that best suits the needs of your organization. If your organization is spread across various locations it may make sense for you to create folders for each of your business locations and restrict access to representatives (or payroll staff) based on their location of work, or based on the locations of the employees in your organization.
Add Folder (1701)
To add a new folder, click “Add Folder” on the “Manage Folders” page. Certain fields will need to be filled out, these fields include:
- Folder Name
- Folder Code
- Description
- Default Address
- Default Contact
Note:
When creating a folder, the Folder Name or Code cannot be the same as an existing Folder Name or Code within the Organization. Folder Names and Codes must be unique.
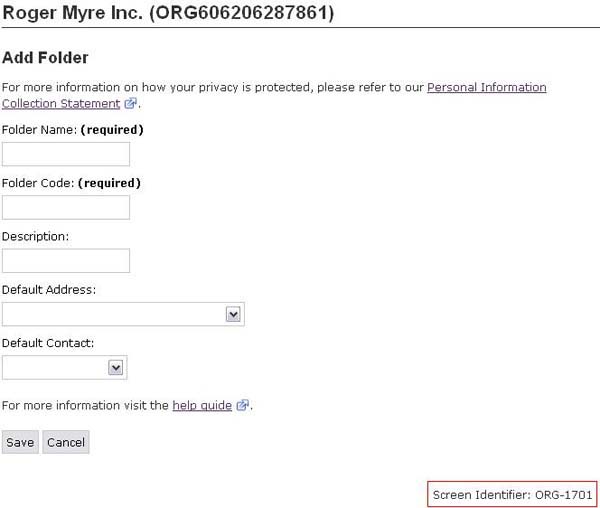
Once all the required information has been provided, click “Save” to create the new folder.
Edit Folder (1702)
Should you need to modify information pertaining to an existing folder, you may do so from this page. To do so you must click "Edit" on the "View folders" page. Certain fields will be editable, these fields include:
- Folder Name
- Description
- Default Address
- Default Contact
Note:
When creating a folder, the Folder Name or Code cannot be the same as an existing Folder Name or Code within the Organization. Folder Names and Codes must be unique.
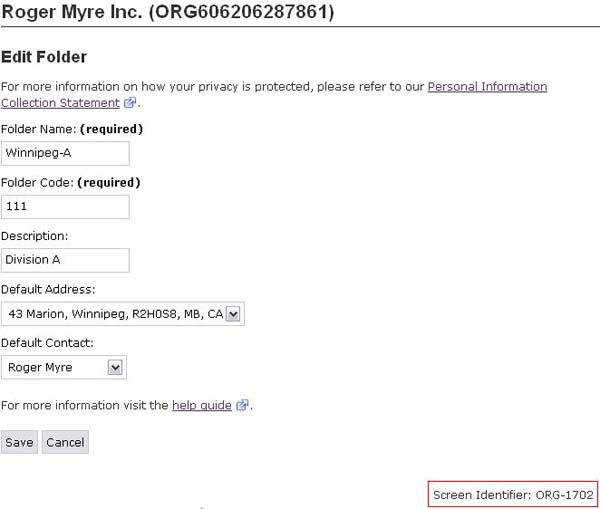
Once all the required information has been provided, click “Save” to keep the new modifications.
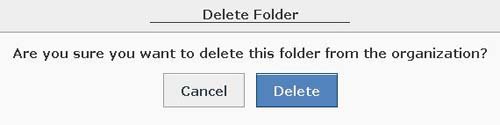
Delete Folder
The “Manage Folder” page also allows you to delete individual folders. Folders that contain ROEs cannot be deleted from ROE Web.
Page details
- Date modified: