
Permanent resident photos
Find out the photo requirements, such as format and size, if you’re applying for
- permanent residence in Canada or
- a permanent resident card
Digital photo requirements (online applications)
- number of digital photos you need
- digital photo specifications
- back of photo: information to include
- help with common issues uploading your photo
- additional instructions for child photos
- medical considerations
- examples of acceptable and unacceptable photos
Print the photo specifications for your photographer
Print specifications (PDF, 256 KB)
Number of digital photos you need
You’ll need to submit 1 digital photo with your application in the Permanent Residence Portal.
Digital photo specifications
Go to a commercial photographer or studio to have your photo taken.
The specifications for a digital photo are different from those for a paper photo.
You can submit either
- a professional digital photo or
- a scanned copy of a printed professional photo
We do not accept a photo of a paper photo taken with your digital camera or phone. You can scan the photo using a professional scanner or a scanner app on your computer, phone or tablet.
Make sure your photo
- is the right format and size
- is of the quality we need
- captures a neutral facial expression and reflects how you look now (taken no more than 12 months before you apply)
Format and size
- Photo dimensions: between 715 x 1000 and 2000 x 2800 pixels
- File size: 4 MB or less
- File format: .jpeg or .jpg
Image quality
- Photo colour: colour or black and white
- Focus: clear, sharp and not blurry
- Lighting: uniform with no shadows, glare, or flash reflections
- Contrast: showing a clear difference between your face and the white background
- Avoid wearing white clothing or white religious head coverings because these may blend into the background and cause shadowing.
- Skin tone: same as your natural skin tone
- Originality: original photo not taken from an existing photo or altered in any way
What is an altered photo?
An altered photo is a photo that has been edited or changed in any way, by any means.
Altering includes
- making technical corrections or enhancements, such as changes to
- colour
- brightness
- contrast
- sharpness
- cropping around the head and shoulders, including
- cutting and pasting your image against a white background
- editing your facial features, such as
- changing the size or shape of your eyes, nose, mouth or ears
- editing to improve your appearance, such as
- removing glare
- removing red-eye
- changing hair colour
- removing wrinkles, blemishes or birthmarks
- editing clothing, including changing colours
- changing the background, including removing shadows
Facial expression and appearance
- Expression: neutral, mouth closed, eyes open, looking directly at the camera
- Appearance: how you look now (photo taken no more than 12 months before you apply)
- Posture: face and shoulders centred and squared to the camera
- Background: plain, untextured and white
- Accessories and headwear:
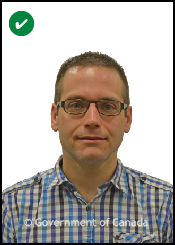
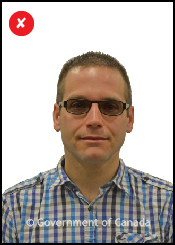
- Glasses: eyes clearly visible behind your glasses, with no glare on the lenses
- Hair: off your face so that the edges of your face are visible
- Head covering: allowed if worn daily for religious or medical reasons, but your face, including around your ears, background and shoulders, must be clearly visible and not cast shadows or distort the image
- Other: We recommend that you
- remove any facial jewellery, particularly around the mouth and eyes, to ensure a clear and compliant photo
- avoid wearing turtlenecks, bulky jackets, or tops that cover the neck, because these may obscure the outline of your face and affect the clarity of your silhouette
Tips for taking a good photo
Make sure
- you’re standing at least 1 to 2 metres away from the background to avoid shadows
- your face is fully visible, with even lighting and a neutral expression
Avoid
- dark, patterned or textured backgrounds
- shadows on your face or in the background
- uneven lighting that causes glare or overexposure
- smiling, frowning, or titling your head
- sunglasses or tinted prescription eye glasses reflecting light or obstructing your eyes
- red-eye effect or red-eye alterations
- face partially covered by hair, shadows or accessories
Back of photo: information to include
You need to add the following information in the “Upload your photo (back)” field of the online application.
If you have a digital copy of your photo
If your photographer gave you a digital copy of your photo, upload a document with your photo that includes
- the information that would normally be listed on the back of the photo
- the name and date of birth of the person in the photo
- the date the photo was taken
- the name and complete address of the photo studio
- a confirmation from the photo studio (for example, a receipt)
If you’ve scanned a professional photo
The back of your photo must show
- the name and date of birth of the person in the photo
- the date the photo was taken
- the name and complete address of the photo studio
You don’t need to sign the photo or have it signed by a guarantor.
Get help with common issues
Find out what to do if you’re having issues uploading your photo.
Uploading the front of your photo
- You must fill out the digital “Application for a Permanent Resident Card”(IMM 5444) form before you upload your photo.
- Once the form is complete, you can go to the “Photos” table.
- Go to the “Upload your photo (front)” row and click on the “Add/Edit” button.
- Your photo can be either
- a professional digital photo in JPEG or PNG format
- a scanned professional photo (but not a picture of a paper photo taken with your digital camera or phone)
- Your photo can be either
- Follow the directions in the photo editor window to position and crop your photo.
- Click on the “apply” button to validate your photo.
- Your photo will show in black and white. (This is not a technical issue.)
- You can edit and replace your photo with another photo up until the time you submit it.
- You don’t have to delete the previous photo to upload a new one (because the previous photo will automatically be replaced by the new photo).
- Check the “Declaration” box and click on “Next” to upload your photo.
The “Add/Edit” photo button is greyed out
You must fill out the digital “Application for a Permanent Resident Card”(IMM 5444) form before you upload your photo. Once the form is complete, you can click on the “Add/Edit” button.
Uploading the back of your photo or the photographer’s receipt
If your photographer gave you a digital copy of your photo
Upload a document that includes
- the information that would normally be listed on the back of the photo
- the name and date of birth of the person in the photo
- the date taken and the name and complete address of the photo studio
- a confirmation from the photo studio (for example, a receipt)
Upload this document in the “Upload your photo (back)” row of the photo table.
If you scanned a professional photo your photographer gave you (but not a picture of a paper photo taken with your digital camera or phone)
The back of your photo must show
- the name and date of birth of the person in the photo
- the date taken and the name and complete address of the photo studio
Upload your scanned copy in the “Upload your photo (back)” row of the photo table.
Your colour photo turns black and white
This is not a technical issue. Once uploaded, your photo will become black and white.
You get a warning in the portal about your photo
The photo checker may warn you that your photo does not meet requirements for
- brightness
- background
- pixel range requirements
You have 3 choices:
- try to resize your photo
- upload a new photo
- continue using the photo you’ve already submitted
Note: Even if you get a warning message that your photo doesn’t meet requirements, you can submit it anyway. An officer will review the photo and let you know if you need to submit a new one.
To continue using the photo you’ve already uploaded:
- check the “Declaration” box and click on “Next” to upload your photo
- check the “Acknowledgement” box and click on “Next” to continue
- click “Submit your application” (once you’ve submitted the application, the photo can no longer be changed)
The “Your photo is being validated” message won’t go away
Clear your browser cache and make sure your photo meets the photo requirements.
Your photo gets returned
If we return your photo, you can submit a new one. Make sure the new photo meets all the requirements before you upload it.
We may return your photo if
- it’s too dark.
- the background is not white.
- your facial features are not visible.
- there is too much glare in the photo.
- the measurements are not between 715 × 1000 and 2000 × 2800 pixels.
- the file size is above 4 MB.
- it does not meet the photo requirements.
Additional instructions for child photos
Child photos must follow the same specifications indicated above.
Also, photos must not show
- more than the child’s head and shoulders
- the parent’s or child’s hands
- hair accessories
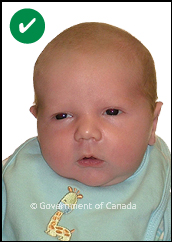
Newborn babies
Photos of newborn babies
- may be taken while the child is sitting in a car seat
- A white blanket must be placed over the seat behind the child’s head.
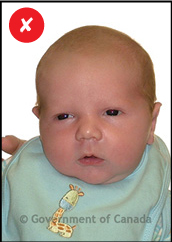
- must not show shadows on the face or shoulders, around the ears, or in the background
Newborns may have a range of facial expressions.
Medical considerations
If you’re in a wheelchair
Permanent resident photos must be taken against a plain white background. We recommend placing a plain white blanket over the wheelchair behind your head so that your facial features and the edges of your face are clearly visible.
If you have headwear or a nasal cannula
You can wear headwear or a nasal cannula in your photo if required for medical reasons.
If you wear headwear or a nasal cannula
- your eyes must remain clearly visible
- we recommend that you include a signed explanation with your application
- we may request that you submit a letter from your doctor
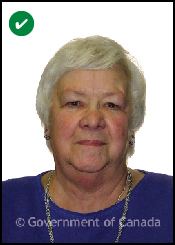
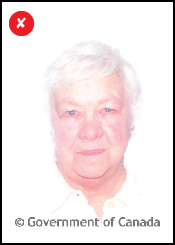
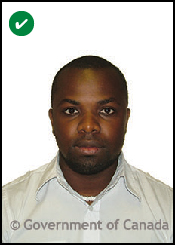
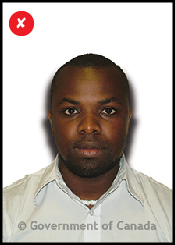
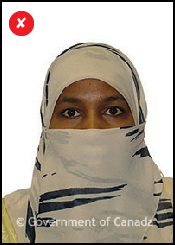
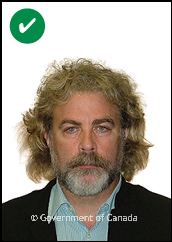
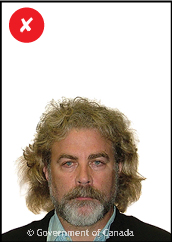
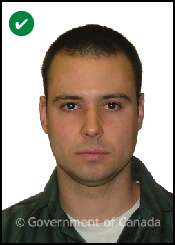
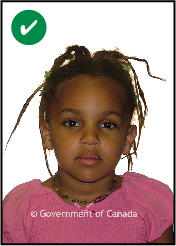
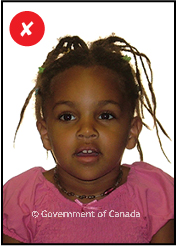
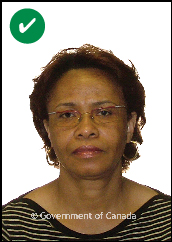
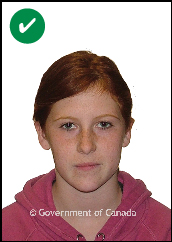
Examples of acceptable and unacceptable photos
These photos do not represent the actual size of a permanent resident photo.
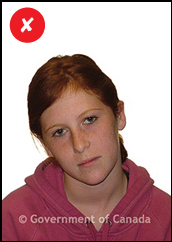
Unacceptable photos show you what to avoid when having your photo taken.
Acceptable
Unacceptable


Printed photo requirements (paper applications)
- Number of photos you need
- Photo specifications
- Information to include on the back of the photo
- Additional instructions for child photos
- Medical considerations
- Examples of acceptable and unacceptable photos
Print the photo specifications for your photographer
Number of photos you need
You’ll need to send 2 identical photos with your application.
Photo specifications
Passport photo size information
Go to a commercial photographer or studio to have your photo taken.
Make sure your photo
- is the right dimension and head size
- is of the quality we need
- captures a neutral facial expression and reflects how you look now (taken no more than 12 months before you apply)
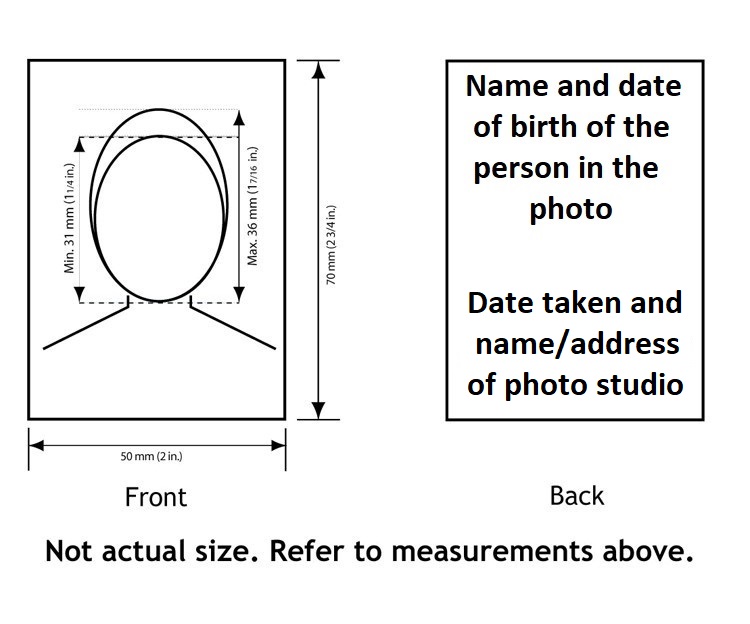
Photo Dimensions and Head Size
- Photo size: 50 mm wide by 70 mm high (2 inches wide by 2¾ inches long).
- Head size (chin to crown): the bottom of your chin to the top of your head (not including hair) measuring between 31 mm (1¼ inches) and 36 mm (1⁷⁄₁₆ inches).
- Positioning: head centred and proportional to the photo dimensions (see diagram)
Image quality
- Photo colour: colour or black and white
- Focus: clear, sharp and not blurry
- Lighting: uniform with no shadows, glare, or flash reflections
- Contrast: showing a clear difference between your face and the white background
- Avoid wearing white clothing or white religious head coverings because these may blend into the background and cause shadowing.
- Skin tone: same as your natural skin tone
- Print quality: professionally printed on plain, high-quality photo paper
- We don’t accept photos printed at home on heavyweight paper.
- Originality: original photo not taken from an existing photo or altered in any way
What is an altered photo?
An altered photo is a photo that has been edited or changed in any way, by any means.
Altering includes
- making technical corrections or enhancements, such as changes to
- colour
- brightness
- contrast
- sharpness
- cropping around the head and shoulders, including
- cutting and pasting your image against a white background
- editing your facial features, such as
- changing the size or shape of your eyes, nose, mouth or ears
- editing to improve your appearance, such as
- removing glare
- removing red-eye
- changing hair colour
- removing wrinkles, blemishes or birthmarks
- editing clothing, including changing colours
- changing the background, including removing shadows
Facial expression and appearance
- Expression: neutral, mouth closed, eyes open, looking directly at the camera.
- Appearance: how you look now (photo taken no more than 12 months before you apply)
- Posture: face and shoulders centred and squared to the camera
- Background: plain, untextured and white
- Accessories and headwear:
- Glasses: eyes clearly visible behind the glasses, with no glare on the lenses
- Hair: off your face so that the edges of your face are visible
- Head covering: allowed if worn daily for religious or medical reasons, but your face, including around your ears, background and shoulders, must be clearly visible and not cast shadows or distort the image
- Other: We recommend that you
- remove any facial jewellery, particularly around the mouth and eyes, to ensure a clear and compliant photo
- avoid wearing turtlenecks, bulky jackets, or tops that cover the neck, because these may obscure the outline of your face and affect the clarity of your silhouette
Tips for taking a good photo
Make sure
- your head size is within the required range
- you’re standing at least 1 to 2 metres away from the background to avoid shadows
- your face is fully visible, with even lighting and a neutral expression
- your face is centred in the frame
Avoid
- your head being too small or too big in the photo
- dark, patterned or textured backgrounds
- shadows on your face or in the background
- uneven lighting causing glare or overexposure
- smiling, frowning, or titling your head
- sunglasses or tinted prescription eye glasses reflecting light or obstructing your eyes
- red-eye effect or red-eye alterations
- face partially covered by hair, shadows or accessories
Information to include on the back of the photo
The back of 1 photo must include
- your name and date of birth
- the name and complete address of the photography studio
- the date the photo was taken
The photographer may use a stamp or write this information by hand. We do not accept stick-on labels.
You don’t need to sign the back of the photo or have it signed by a guarantor.
Additional instructions for child photos
Child photos must follow the same specifications indicated above.
Photos must also:
- show the child's head and shoulders only
- not show the parent’s or child’s hands
- avoid hair accessories
Newborn babies
Photos of newborn babies
- may be taken while the child is sitting in a car seat
- a white blanket must be placed over the seat behind the child's head
- must not show shadows on the face or shoulders, around the ears or in the background
Newborns may have a range of facial expressions.
Medical considerations
If you’re in a wheelchair
PR photos must be taken against a plain white background. We recommend placing a plain white blanket over the wheelchair behind your head. This makes your facial features and the edges of your face clearly visible.
If you have headwear or nasal cannula
You can wear headwear or a nasal cannula in your photo, if required for medical reasons.
If you do
- Your eyes must remain clearly visible.
- We recommend that you include a signed explanation with your application.
- We may request that you submit a letter from your doctor.
Examples of acceptable and unacceptable photos
These photos do not represent the actual size of a permanent resident photo.
Unacceptable photos show you what to avoid when having your photo taken .
Acceptable
Unacceptable