Care of Plastic Film-based Negative Collections – Technical Bulletin 35
Greg Hill
CCI Technical Bulletins
Technical Bulletins are published at intervals by the Canadian Conservation Institute (CCI) in Ottawa as a means of disseminating information on current techniques and principles of conservation of use to curators and conservators of Canada’s cultural artifacts and to collection care professionals worldwide. The author welcomes comments.
Abstract
This Technical Bulletin provides a comprehensive look at photographic negatives on plastic film bases made up of cellulose nitrate, cellulose acetate and polyester, and covers issues related to material composition, mechanisms of deterioration, access, handling and storage.
Author
Greg Hill was the Senior Conservator of Archival and Photographic Records at CCI from 2006 until 2020. Prior to this, he worked at Library and Archives Canada (LAC) as a conservator, conservation manager and preservation advisor. Greg has presented numerous workshops and has spoken and published on a range of conservation activities, including photograph preservation, storage of cellulose nitrate-based negatives, disaster preparedness, treatment and research. He has also supervised many interns from Europe, North America and the East. He has been the president of the Canadian Association of Professional Conservators, a board member of the Canadian Association for Conservation, the chair of the Photographic Materials Group of the American Institute of Conservation of Historic and Artistic Works and the coordinator of the Photographic Materials Working Group of ICOM-CC.
Disclaimer: The information provided here is based on the current understanding of the issues presented. The guidelines given in this Technical Bulletin will not necessarily apply to all possible scenarios related to the long-term preservation or stability of plastic film-based negatives.
Table of contents
- List of abbreviations
- Introduction
- History and chronology of photographic negatives
- Understanding plastic film-based negatives
- Identifying and differentiating plastic film-based negatives
- Health and safety concerns related to degrading plastics
- Treating plastic film-based negatives
- Storing plastic film-based negatives
- Condition monitoring
- Preparing collections for cold or sub-zero storage
- 1. Survey the collection
- 2. Segregate plastics
- 3. Implement a copying plan
- Value of the collection
- Condition of the collection
- Intended use of the collection
- Existence of high-quality duplicates or digital copies
- Seven critical considerations for copying or scanning projects
- 3.1. Use high scanning standards
- 3.2. Consider digital scanning before making physical copies
- 3.3. Develop a plan before copying or scanning
- 3.4. Prioritize the collection before copying or scanning
- 3.5. Use the copying or scanning project as an opportunity for re-housing negatives
- 3.6. Consider surface cleaning and/or treatment of cellulose acetate films before copying or scanning
- 3.7. Follow resources and guides on the planning of copying or scanning projects
- 4. Evaluate enclosures
- Options for cold or sub-zero storage
- Humidity control in sub-zero storage
- Preparing collections for cold or sub-zero storage
- Conclusion
- Acknowledgements
- Bibliography
- Endnotes
List of abbreviations
- µm
- micrometre
- CCQ
- Centre de conservation du Québec
- HEPA
- high efficiency particulate air
- RSAPAQ
- Regroupement des services d’archives privées agréés du Québec
- Tg
- glass breaking point
- w/w
- weight to weight
Introduction
Photographic film negatives represent the artist’s or photographer’s intent and are a very significant part of our visual history. Their value is generally based on historical significance, though monetary value and donor agreements can also play a significant role in the decision to accept and preserve these collections. This Technical Bulletin will look at numerous aspects of the conservation and care of plastic-based negatives made from cellulose nitrate, cellulose acetate and polyester, with the intent of guiding curators, custodians and non-photograph conservation professionals to the successful preservation of their collections over the long term.
Collections of photographic negatives on plastic film bases, large and small, present many challenges for their custodians. Inherent vice, mishandling and adverse storage materials and environments all contribute to the degradation and destruction of plastic negatives, but all of these issues can be managed with the proper tools, as outlined in this Bulletin. Whatever the reason for holding a negative collection, preserving it can require a serious commitment. For example, facilities storing large quantities of negatives made of cellulose nitrate film may be required to comply with the National Fire Prevention Association Standard 40 (NFPA 40), Standard for the Storage and Handling of Cellulose Nitrate Film, a universally adopted American standard for storage and handling of nitrate film, which can be costly.
Identifying and understanding the mechanisms of deterioration for these materials is the first step to preserving them, followed by the segregation of the plastic types. Deteriorating collections can also contribute to the destruction of other collections and objects located in proximity to them. Surveying for numbers and condition, developing copying strategies and securing appropriate housing and storage environments all contribute to managing a collection for both access and preservation. Information on the preservation of negative collections is available in a variety of published sources; this publication brings together the salient points on the topic for the benefit of conservation professionals, collections managers, curators and archivists responsible for the care of negative collections.
History and chronology of photographic negatives
Pre-plastic film bases
Throughout the latter half of the 17th century and the early 18th century, numerous scientists and researchers across Europe investigated the potential of light-sensitive materials to permanently capture images. Though Louis Daguerre’s 1839 introduction of the daguerreotype process to the scientific community is most often touted as the official launch date of photography, much investigation preceded it. It was, in fact, French scientist Joseph Nicéphore Niépce who, in 1826, successfully captured the first photographic image by placing a polished pewter plate coated with bitumen of Judea (an asphalt derivative of petroleum) within a camera obscura. After an eight-hour exposure, he washed the plate with a solvent mixture that dissolved away parts of the bitumen that had not been hardened by the action of light, which rendered visible the latent image of the view from his window. The result was a permanent direct positive picture.
Light-sensitive metallic salts, specifically silver halides, proved to be the most viable option for capturing images and was the basis for the work of Daguerre and most subsequent innovations, resulting in the mass of photographic technologies developed throughout the 19th and 20th centuries. Daguerre’s invention was closely followed by William Henry Fox Talbot’s negative/positive process, which, again, was the culmination of many years of experimentation. Talbot is also credited with the introduction of the calotype (Figures 1a and 1b), generally known as waxed paper negatives, which is a more complex paper negative process, later refined by photographers in France.
From the moment the negative/positive process was introduced to the community at large by Talbot in the mid-19th century, it was embraced as the dominant method of capturing images and formed the basis of the vast majority of the photographic technologies that followed, up to the present day. By the end of the 19th century, mass-produced pre-sensitized negatives that could be easily inserted into a camera behind its lens, exposed, removed from the camera, processed and then made permanent were commercially available. An unlimited number of prints could then be printed from the negative at a relatively low cost.
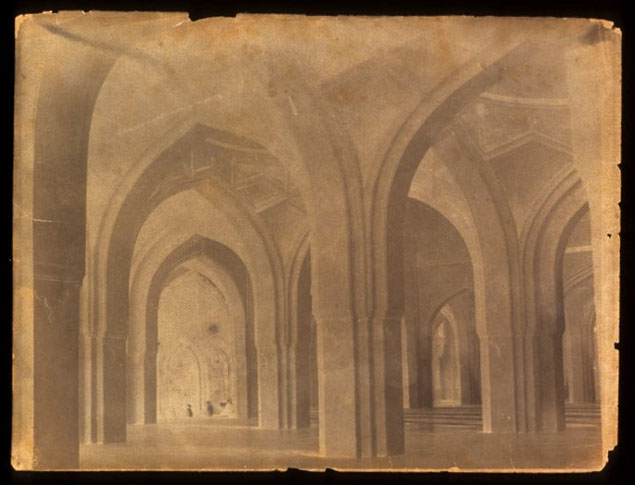
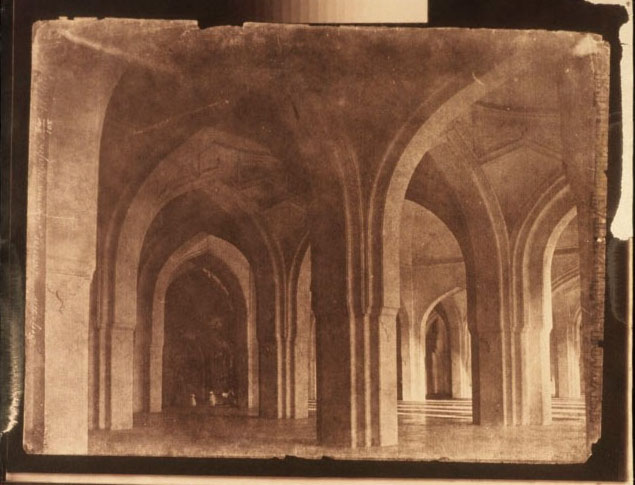
Paper was initially used as a substrate for negatives because it is easy to handle, coat and process. In order to increase its translucency and to facilitate the subsequent printing of the positive image, it was often oiled or waxed. Yet, its lack of transparency and the loss of detail due to the presence of the paper fibre prompted the search for a clear substrate. Glass was the most obvious choice for its absolute clarity, dimensional stability and chemical inertness, although its weight and fragility posed great challenges. Though many different image binders were experimented with on glass, wet collodion plates were the first negatives that employed glass as a substrate on a very large scale, with millions in production throughout the world (Figure 2).
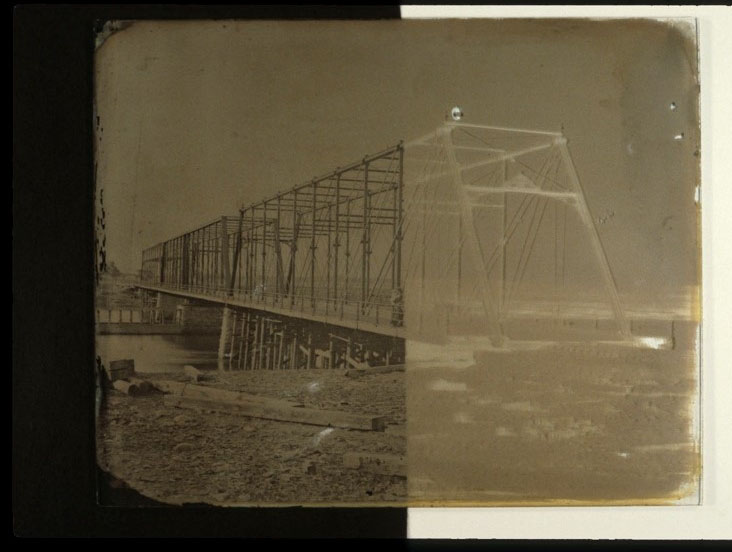
© Greg Hill
Figure 2. A collodion wet glass plate negative under reflected light with a black paper underlay beneath the left half to show the conversion of the negative image to a positive image.
Introduction of plastic film bases
In the 1830s, the development of the cellulose-based plastics industry began in France with the discovery by chemist Henri Braconnot that cellulose in the form of starch or wood fibre combined with nitric acid could produce a lightweight combustible material. Others, looking to exploit the explosive nature of this mix, experimented with a range of cellulose fibres and different formulations of nitric and sulfuric acids. In 1846, the German-Swiss chemist Christian Friedrich Schönbein developed a somewhat more stable product called “gun cotton,” using cotton fibre with a more precise formulation. It was suitable for use in blasting since it was more powerful and produced less smoke and heat than traditional powders. However, it remained too volatile and unstable a material to be put into practical use.
Gun cotton, which at the time was also known as either cellulose nitrate, flash paper or pyroxylin, continued to be experimented with, and by the early 1850s, collodion was produced by dissolving the gun cotton in a mix of ether and alcohol. A British sculptor and photographer named Frederick Scott Archer, in his quest for a suitable binder for photographic silver salts, successfully created the collodion wet plate by pouring the freshly prepared collodion onto a piece of glass, allowing it to set and then sensitizing it with silver nitrate. Using collodion meant that the negative had to be prepared on-site just prior to exposure and be processed immediately following exposure in order to minimize exposure times. Photographers were obliged to carry their entire darkroom with them wherever they chose to capture images, which was an arduous task. Nevertheless, the collodion wet plate was widely popular until the end of the 19th century. The same materials were exploited for use in the production of ambrotypes and tintypes—in-camera positive images often found in small cases. Collodion was used as a binder for silver salts on photographic positive print papers called “collodio-chloride prints” from the 1880s and continuing through to the 1920s. It competed with gelatin for supremacy in the photographic binder market until it was discontinued in the 1930s.
In 1871, Richard Leach Maddox, a physician and photography enthusiast, developed an emulsion using gelatin as the binder. Subsequent refinements by Charles Bennett greatly increased the light sensitivity of the emulsion, allowing exposure times of well under a second. Although experimented with beforehand by others, gelatin was not widely used until this time. It became the predominant binder for glass plate negatives, positive printing papers and plastic-based negatives. Its benefits were many: it was chemically stable, non-reactive with image silver, water clear and colourless; it conformed readily to any textured surface; and it swelled in aqueous solutions without dissolving immediately, allowing processing chemicals to reach silver salts, followed by drying down to a tough compact surface. The emulsion was industrially coated onto glass plates and commercially available by 1879 (Figure 3). Protected from light, the plates could be processed much later, thus eliminating the need to have a dark room and chemicals on hand when taking pictures. Photographers could now purchase the plates and expose them up to months later.
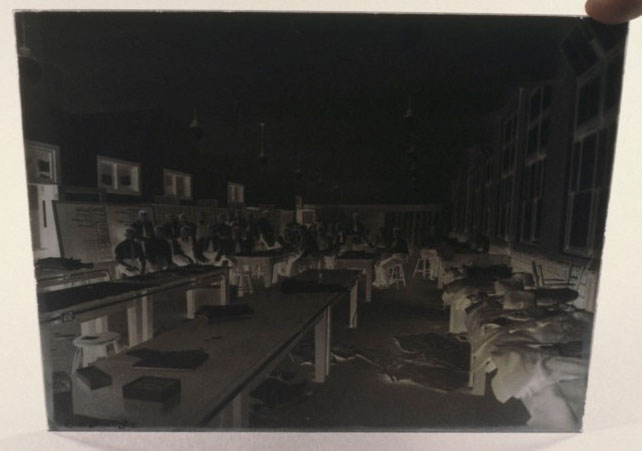
© Greg Hill
Figure 3. A gelatin dry plate under transmitted light.
In 1873, again following much investigation of cellulose nitrate by British and American scientists, the product Celluloid was trademarked by John Wesley Hyatt of the Celluloid Manufacturing Company in New Jersey. Celluloid, or cellulose nitrate, was plasticized with camphor, which proved to be the critical component. The plasticized cellulose nitrate, often referred to as French ivory, is considered the first industrially produced and marketed plastic. Employed as a substitute material for ivory and tortoiseshell, it was widely used in the production of combs, billiard balls, shirt collar stays and many other household items.
English photographer John Carbutt is generally recognized as the first to produce a film base that was lightweight and flexible. He founded the Keystone Dry Plate Works in 1879, although he was unable to standardize his process until 1887. Plasticized with camphor, large blocks of cellulose nitrate acquired from Hyatt’s Celluloid Manufacturing Company were cut into thin sheets, 1/100th of an inch (0.25 mm) thick. The sheets were then heated and pressed between metal plates to eliminate cut marks, followed by the application of a photographic emulsion to one side using gelatin as the binder. Though limited in size and not very flexible, the sheets were successfully used as photographic negatives (Figures 4a and 4b). In fact, the name “Celluloid” became widely used as the popular or generic term for motion picture film in the early years of the movie industry.

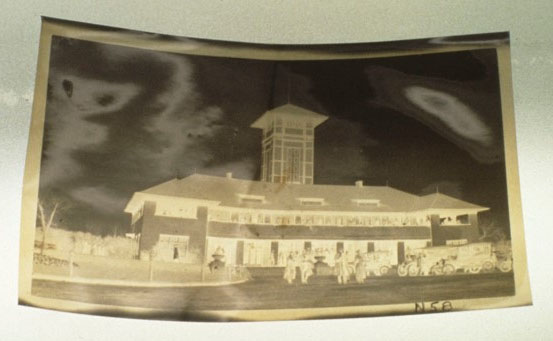
Shortly thereafter, Eastman Kodak Company obtained a patent to produce cellulose nitrate negatives by casting the nitrate onto large glass tables, forming long sheets of film that were strong and extremely flexible. This coincided with a patent obtained by Hannibal Goodwin for the same process. The Ansco Company acquired Goodwin’s patent upon his death and was able to successfully fight copyright infringement against Kodak in 1905. Long before this, though, in 1889, Kodak became the first to market a roll film, revolutionizing the photographic industry. With this innovation came the birth of the motion picture industry and an explosion of the amateur still photographic market. Photographers and non-photographers alike were able to take pictures under a much greater variety of conditions. Kodak wisely manufactured cameras, sold the film and processed and printed the negatives all for a price that was affordable to the middle class. Photography became ubiquitous.
The production of cellulose nitrate was finally discontinued in 1951 because of its chemical instability issues and in light of the development of new plastic film bases. Cellulose acetate film bases came into production in the mid-1920s, followed by polyester in the mid-1950s, both of which remain in production today.
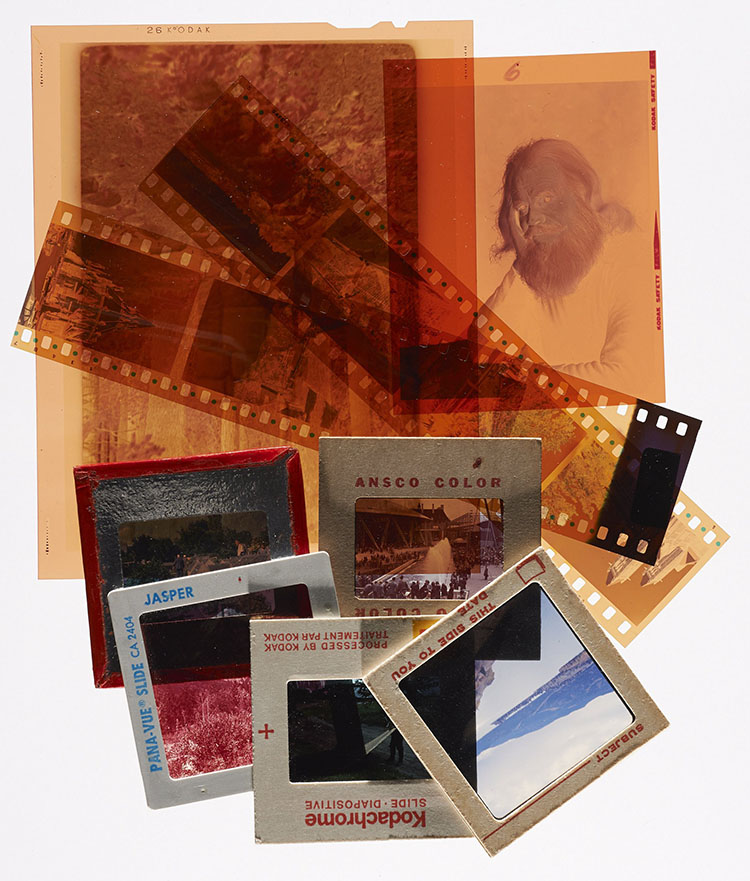
The photographic industry has continued to employ the silver-based chemistry and the technology that started it. The vast majority of black and white or monochrome materials in the early years of the industry were silver-based. Chromogenic colour materials, which became the predominant colour technology of the 20th and 21st centuries, exploited silver halide chemistry as well, though the final negatives and prints contain only dye layers. The first chromogenic negative material was produced by Agfa in 1939, followed by Kodak in 1942, but the cost was prohibitive until the late 1960s and early 1970s. However, by the mid-1990s, it accounted for over 80% of all film sales. Chromogenic films have a characteristic orange base tone and their images contain very muted blues, greens and reds. Chromogenic technology was employed in the production of positive images on clear film bases, referred to as reversal films, slides and transparencies, widely used in the 1980s and 1990s (Figure 5). They were initially produced on cellulose acetate, but polyester was eventually employed for use in more technical photography and the professional market due to its greater dimensional stability.
© Government of Canada, Canadian Conservation Institute. CCI 122361-0088
Figure 5. A composite of negatives (above) and chromogenic slides (below).
Negative retouching
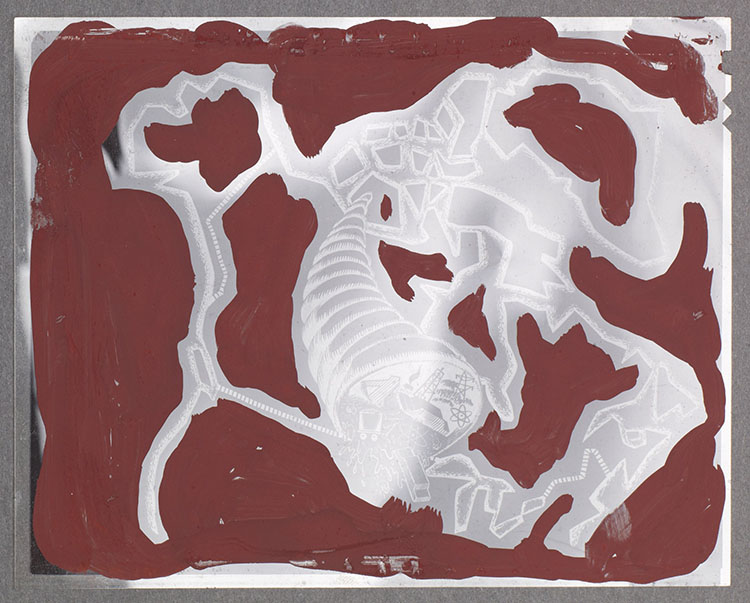
Retouching of photographic negatives was a common practice in the early and mid-20th century, employed primarily to enhance studio portraits (Figure 6). One can often find oiled or waxed areas on the emulsion side of a negative onto which the retouch medium has been delicately applied. Graphite pencil was the predominant medium for black and white negative retouching, requiring great skill in its application in order to ensure that it would not be detectable on the final print. Occasionally, one finds opaquing applied to the emulsion, designed to completely block out extraneous information; it is usually black or red (Figure 7). All retouch media tends to be somewhat water soluble.

© Government of Canada, Canadian Conservation Institute. CCI 122361-0038
Figure 6. A retouched studio portrait negative. Graphite pencil was applied to the emulsion, appearing as hand-drawn marks on the faces of the sitters.
© Government of Canada, Canadian Conservation Institute. CCI 122361-0031
Figure 7. Large parts of this negative have been blocked out using an opaque added to the emulsion.
Until the advent of digital output media, where inkjet printers are used to produce negative images on clear plastic sheets, non–silver-based technologies were never used for negatives. Overall, throughout the late 19th century to now, paper, glass and a variety of plastic-based negatives have all been commercially available, each with specific desirable properties. Paper, being flexible and very lightweight, was used at various times from the first in-camera image to remote field work. Glass, with its great clarity and dimensional stability, was later employed in the sciences, particularly astronomy. Plastics, the most widely employed for their light weight and flexibility, allowed a myriad of formats and great convenience in both the professional and amateur markets.
Understanding plastic film-based negatives
Cellulose nitrate film base
| Cellulose nitrate film formats | Available sizes |
|---|---|
Film packs
|
Various sizes up to 5 in. × 7 in. |
| Microfilm | 35mm film (available from 1930 to 1940) |
Motion picture film
|
35mm film Amateur film stocks (such as 17.5mm cut down from 35mm film) |
| Roll film | 70mm Many different amateur film stocks cut down from 70mm |
| Sheet film | 4 in. × 5 in. 5 in. × 7 in. 8 in. × 10 in. 11 in. × 14 in. |
X-ray film
|
Various large formats |
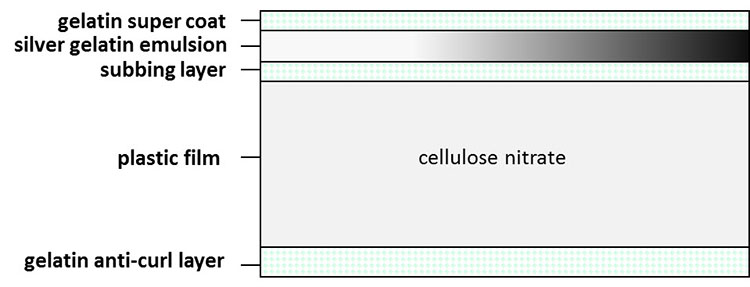
Cellulose nitrate film can be found in a large range of formats. The basic structure of the film (Figure 8) includes the plastic film base, an emulsion of gelatin and silver halides adhered to the base with a subbing layer and, in later films, an anti-curl layer on the opposite side of the base from the emulsion, stabilizing the sheet against curling up. Early nitrate sheet film contained no anti-curl layer, often resulting in the sheet curling into a very tight roll (Figure 9). Beginning in 1935, with the introduction of Kodak’s Technicolor process, colour emulsions were also applied to cellulose nitrate film bases, followed by chromogenic emulsions in the 1940s.
© Government of Canada, Canadian Conservation Institute. CCI 122361-0111
Figure 8. Typical structure of cellulose nitrate film.

© Government of Canada, Canadian Conservation Institute. CCI 97858-0008
Figure 9. Curled nitrate film (from the Annie McDougal collection, McCord Museum).
Degradation of cellulose nitrate film base
In spite of the great conveniences afforded by nitrate flexible film bases, there was a monumental problem: they proved to be chemically unstable. As there were no standards organizations or quality controls at the time to dictate minimal acceptable standards for the production of nitrate film, there was, consequently, a broad range of stabilities. Some survived only a few years, while others remain viable to this day. The stability is dictated partly by the manufacturing process and partly by the environments in which the negatives have been stored across their life span. Most highly unstable cellulose nitrate film has already deteriorated and no longer exists. Although often unidentified, cellulose nitrate film currently in public and private collections is generally stored in better preservation environments, which helps to mitigate deterioration. Table 2 provides discontinuation dates of cellulose nitrate products from the market. Though the final production date of nitrate motion picture film was 1951, it is possible that stockpiles of raw film stock resulted in its continued use through to the mid-1950s; however, this is difficult to verify.
| Type of film | Last year of cellulose nitrate manufacture |
|---|---|
| X-ray filmsTable 2 Footnote 1 | 1933 |
| Roll films in 35mmTable 2 Footnote 2 | 1938 |
| Portrait and commercial sheet filmsTable 2 Footnote 3 | 1939 |
| Aerial films | 1942 |
| Film packsTable 2 Footnote 4 | 1949 |
| Roll films in sizes 616, 620, etc.Table 2 Footnote 5 | 1950 |
| Professional 35mm motion picture filmsTable 2 Footnote 6 | 1951 |
Table 2 Notes:
|
|
As cellulose nitrate negatives age, degradation proceeds along several paths, including acid and alkaline hydrolysis, and photochemical and thermal degradation. These processes are accelerated in the presence of high humidity and temperatures. The degradation processes result in the breaking off of the nitrate groups from the cellulose nitrate molecule, which forms nitrous oxides and, in the presence of humidity, nitric acid. As the level of acidity increases, so does the rate of deterioration. This autocatalytic reaction can very quickly lead to the total destruction of the negative. This will also catalyze rapid destruction of other items in the vicinity of degrading cellulose nitrate, most notably cellulose acetate films.
Thermal degradation of cellulose nitrate involves the breaking off of nitrate groups in the cellulose nitrate molecule, which produces nitrous gases (Reilly 1991).
Another side effect of degradation is the significant lowering of its temperature of combustion. Whereas newly produced nitrate film may have a combustion temperature of around 150°C, the lowest recorded temperature of combustion of degraded film is 41°C (Cummings 1950). Storage facilities with no insulation in summer months can easily exceed this temperature, potentially leading to spontaneous combustion. When cellulose nitrate film is stored in large quantities, the results can be, and have been, devastating. Motion picture film vaults were particularly vulnerable to combustion, as were the projection booths in movie theatres.
When cellulose nitrate burns, chemically bound oxygen is released. This means that the resulting fire becomes self-sustaining and no attempts to smother and control the combustion of the film will be successful. It will continue to burn until completely consumed. With the evolution of combustion gases, it burns at approximately 15 times the rate of a wood fire (though not as hot), causing explosive-type forces. Toxic gases are released in the beginning stages of combustion; indeed, in most cases where deaths have occurred in nitrate fires, they were due to gas poisoning. Many high-profile, well-documented fires, such as the National Film Board fire in Beaconsfield, Quebec, in 1967, have informed the public of the dangers of nitrate.
Stages of deterioration
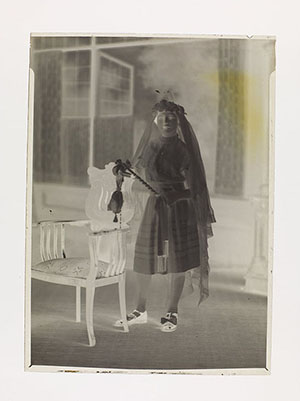
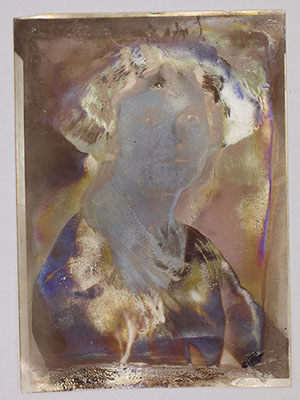
The deterioration of cellulose nitrate film is divided into six different stages, described in Table 3 and illustrated in Figures 10a, 10b, 11a and 11b. The stages are broadly agreed-upon levels of deterioration, not a universal standard classification system. However, they do allow the collections manager to characterize the degree to which their collection is degraded and to take appropriate measures for treatment and storage. The rate of deterioration is affected by temperature, humidity, storage enclosures and the current state of degradation of the film. The higher the temperature and humidity, the faster the rate of deterioration.
| Stage | Description | Recommendations |
|---|---|---|
| 0 | No deterioration. | Segregate from rest of collection. Place in cool or cold storage. |
| 1 | The film turns yellow and the image exhibits silver mirroring (Figure 10a). | Segregate from rest of collection. Place in cool or cold storage. |
| 2 | The film becomes sticky and gives off a strong nitric acid odour (Figures 10b). | Segregate from rest of collection. Place in cool or cold storage. |
| 3 | The film turns an amber colour and the silver image begins to fade (Figures 11a and 11b). | Segregate from rest of collection. Place in cool or cold storage. |
| 4 | The film becomes soft and may adhere to adjacent materials, and the image becomes indistinct. | Send for destruction by specialist. |
| 5 | The film breaks down completely, turning into a brown powder. | Send for destruction by specialist. |
Note: Any deterioration between levels 1 to 5 presents health and safety concerns.


Cellulose acetate film base
| Cellulose acetate film formats | Available sizes |
|---|---|
| Microfilm | 35mm |
| Motion picture film | 35mm 8mm Super 8 9.5mm and 16mm movie film (always manufactured on cellulose acetate base/safety base) Edison 22mm Pathé 28mm films |
Roll film
|
4 in. × 5 in. 5 in. × 7 in. 8 in. × 10 in. 11 in. × 14 in. 16 in. × 20 in. |
Sheet film
|
4 in. × 5 in. 5 in. × 7 in. 8 in. × 10 in. 11 in. × 14 in. 16 in. × 20 in. |
The chemical instability issues associated with cellulose nitrate film became evident shortly after its introduction in the late 1800s. The often rapid deterioration and associated flammability issues resulted in devastating fires and deaths. Extensive research eventually identified an alternative in the form of cellulose acetate. It was first used as a coating for airplane fabrics, but its potential for forming thin flexible sheets was investigated and, by 1909, a plastic film base was fashioned by Kodak. Wood pulp and cotton linters were the source of the cellulose fibres used in its production; the addition of acetic acid, acetic anhydride and a catalyst, such as sulfuric acid, allowed for cellulose diacetate to be derived. Technical problems delayed its commercial production until 1923, at which point Kodak produced 16mm amateur motion picture film on a cellulose diacetate base. As with cellulose nitrate film, all iterations of cellulose acetate film relied on gelatin/silver halide technology in both black and white and colour emulsions.
In 1925, Kodak became the first manufacturer of sheet film on cellulose diacetate. In contrast to nitrate, it was not highly flammable and was known as “safety film.” Beginning with Kodak, the words “Safety” or “Safety Film” were printed on the edge of most cellulose acetate sheet film and many roll films. Agfa, Defender, Dupont Defender and Hammer began manufacturing safety film on supports made from cellulose diacetate by the mid-1930s, and both Agfa-Ansco and Defender continued to use cellulose diacetate until switching to polyester in 1955 (Horvath 1987). A number of early large-format roll films from this period (1930–1940), however, contained no edge printing, which makes identification of plastic film bases difficult today.
Within a few years of the first production of cellulose diacetate, Kodak opened a research lab dedicated to the development of other cellulose esters that could optimize strength and moisture resistance as well as dimensional and chemical stability. Cellulose acetate propionate, developed in 1927, and cellulose acetate butyrate, developed in 1936, were both used throughout the following decades, with the latter still in production by Eastman Chemical Company, though not for photographic negatives.
Cellulose triacetate came into production in 1948. It was developed as a more stable alternative to earlier acetates. It is still in wide use today for all types of films. It continues to be the preferred film base above polyester in the motion picture film industry because of its working properties. For example, it has much less strength than polyester, so when projectors jam, the film breaks rather than the costly equipment. Splicing broken acetate film is also much less problematic than polyester. Currently, much of the still photographic negatives continue to be produced on cellulose triacetate, a cheaper alternative to polyester.
Table 5 shows the time frames for the production of each type of acetate, from 1925 to today.
| Acetate type | Dates | Film type | Manufacturers |
|---|---|---|---|
| Diacetate | About 1923 to about 1955 | Roll, sheet | Agfa, Ansco, Dupont, Defender, Kodak |
| Acetate propionate | 1927 to about 1949 | Roll | Kodak |
| Acetate butyrate | 1936 to today | Sheet, X-ray, aerial maps | Kodak |
| Triacetate | About 1950 to today | Roll | Almost every film manufacturer |
Degradation of cellulose acetate film
Although the flammability issue of negatives was eliminated with the introduction of cellulose acetate, significant instability issues soon became apparent. Being inherently unstable, particularly in elevated temperature and humidity, the films began to deteriorate within a matter of years in some cases.
The mechanisms of deterioration take the form of two separate reactions. The first is the de-esterification of the molecule, which means the acetyl groups attached to the cellulose molecule break off and, in the presence of moisture, create acetic acid, releasing the characteristic smell of vinegar, hence the name “vinegar syndrome.” The second reaction, due to high acidity, is the breaking of the cellulose acetate polymer bonds that reduce the base viscosity and cause brittleness and shrinkage. As the acetate deteriorates, it becomes increasingly acidic. The heightened acidity, in combination with ambient moisture in the environment, causes an ever increasing rate of deterioration. This auto-catalytic reaction is exacerbated by elevated temperatures.
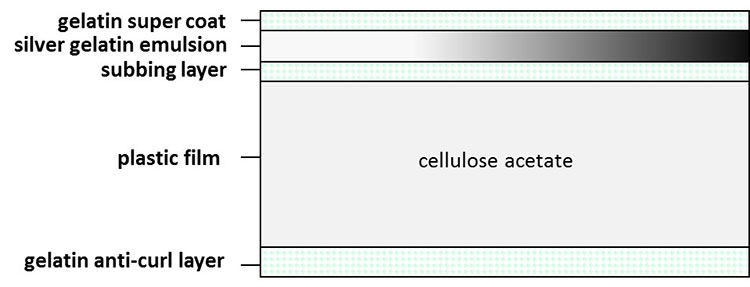
Plasticizers, such as glycol phthalate, tributyl phosphate or dibutyl phthalate, are added to cellulose acetate to increase flexibility. As the cellulose acetate ages, the plasticizers can migrate to the surface and produce an oily film. Their loss from the matrix results in dimensional changes: the plastic base shrinks, causing the attached emulsion and anti-curl layers (Figure 12) to channel and blister. The entire sheet warps and cockles, eventually obscuring the image. Any shrinkage of the base is particularly devastating for motion picture films, as sprocket holes are precisely placed to feed through projectors (Figure 13). Whitish accretions are often found along the edges and in the blisters of the film and, occasionally, the blister contains a clear liquid. Once the vinegar smell is apparent, the process of deterioration is well on its way and action must be taken to slow or stop the process.
© Government of Canada, Canadian Conservation Institute. CCI 122361-0106
Figure 12. Typical structure of cellulose acetate film.
The various stages of deterioration are outlined in Table 6 and illustrated in Figures 14 through 16. Again, this is not a universal standard but rather a guide for collections managers as to the state of their collections. Once these symptoms begin to appear, even at stage 1, there really is only one course of action. These items should be segregated from the rest of the collection, copied if at all possible and then placed in cold storage. This will be fully discussed later in the text.
| Stage | Description |
|---|---|
| 1 | Vinegar odour |
| 2 | Shrinkage |
| 3 | The film retains a curve when cupped. It will not lie flat and instead appears wavy. |
| 4 | Crazing: the emulsion cracks and the image appears as a fragmented mosaic. |
| 5 | Appearance of white powder on edges (from binder deterioration, this is the plasticizer separating from the film); occasionally liquid-filled bubbles. |
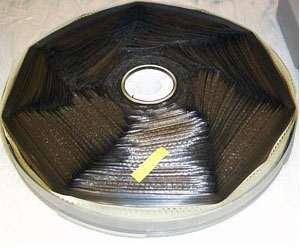
| 6 | Film embrittles and cracks, becoming square on the reel (Figure 13). Referred to as “spoking.” |
| 7 | Film is no longer flexible and the emulsion flakes off from the base. |
© Image Permanence Institute
Figure 13. Motion picture film reel becoming square on the reel (spoking).

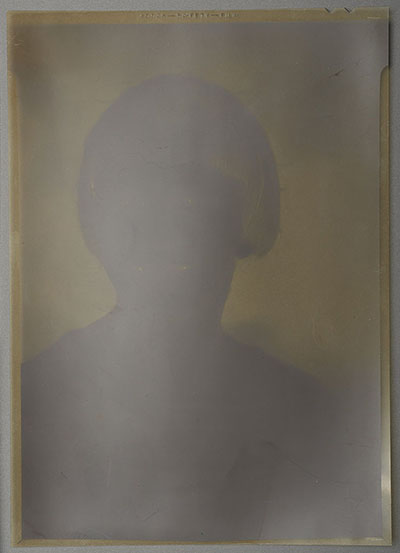

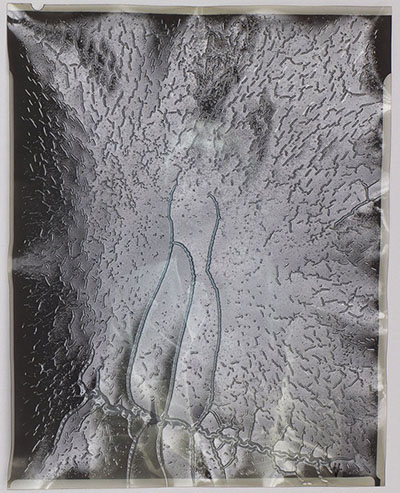
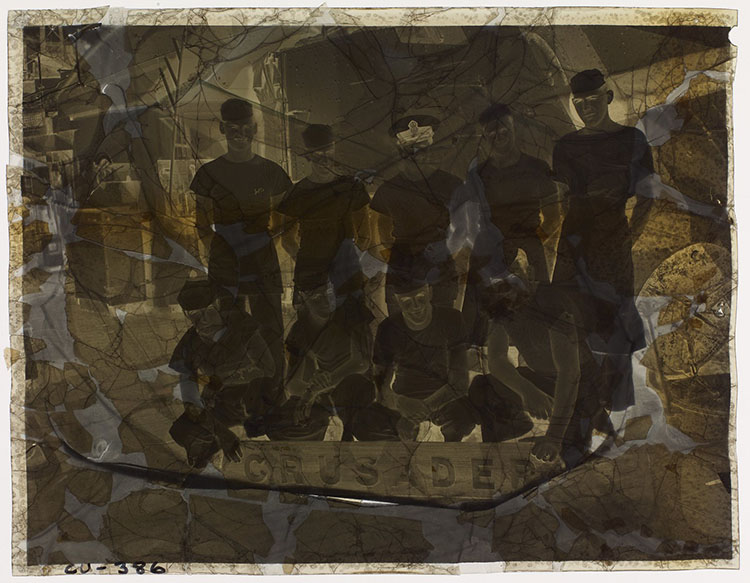
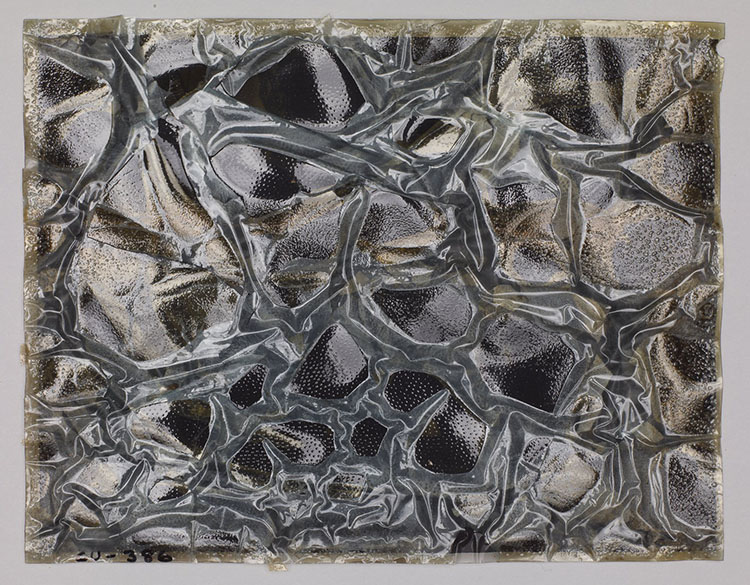
Further deterioration results in the complete loss of the film’s physical integrity. The base and the gelatin layer—the entire matrix—crumble under any physical pressure.
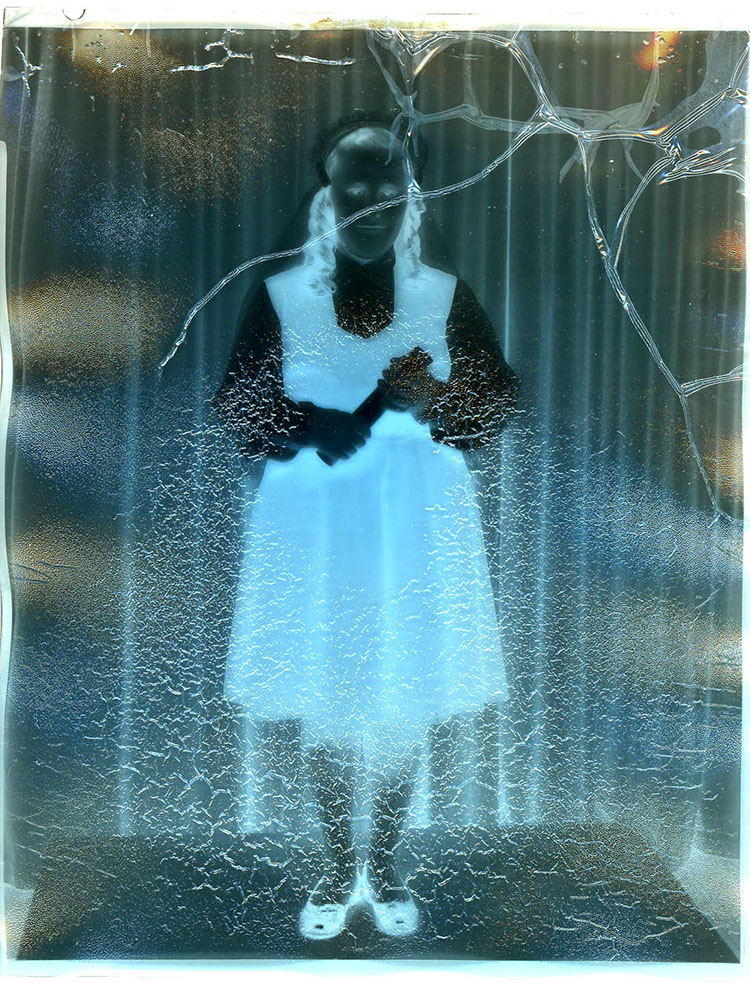
Another phenomena related to the deterioration of the film is the reforming of the anti-halation dyes. Incorporated into the anti-curl layer, anti-halation dyes absorb the light passing through the emulsion and film base so that it does not scatter back into the light-sensitive emulsion during the exposure and cause a halo effect. Rendered colourless during the processing of the negative, their presence is not evident in the final processed negative. However, their characteristic blue or red colour can reappear in the acidic environment of the degraded film (Figure 17).
© Government of Canada, Canadian Conservation Institute. CCI 122361-0107
Figure 17. Anti-halation dyes appear blue in degraded cellulose acetate film, as shown in this example.
There are techniques for re-dimensioning film (restoring it to a less-shrunken state), but these are temporary measures that can permanently damage the film and should only be done in a laboratory situation as a final recourse to enable a new negative or print to be made. Refer to Treating plastic film-based negatives for a further discussion on treating degraded cellulose acetate-based negative films.
Polyester film base
| Polyester film base formats | Available sizes |
|---|---|
Microfilm
|
35mm |
Motion picture film
|
35mm |
Roll film
|
4 in. × 5 in. 5 in. × 7 in. 8 in. × 10 in. 11 in. × 14 in. 16 in. × 20 in. |
Sheet film
|
4 in. × 5 in. 5 in. × 7 in. 8 in. × 10 in. 11 in. × 14 in. 16 in. × 20 in. |
There are many polyesters, both natural and synthetic, though the term polyester most commonly refers to poly(ethylene terephthalate) (PET). It is a clear, colourless, thermoplastic long-chain polymer developed in the late 1940s that incorporates no plasticizers. Polyester sheeting is formed by extrusion. The continuously heated polymer is extruded through a slot and stretched in a longitudinal direction while at the same time being pulled in a widthwise direction. After this, the molecules are oriented in two different directions, with different refractive indices in each of these directions. This creates a birefringent sheet, which means that when a ray of light enters the film, it decomposes into two separate rays that have different refractive indices, with perpendicular directions of polarization.
Polyester has been used for a limited number of sheet-film bases since the 1950s and, since the 1990s, for the base of release print materials in the motion picture film industry. It is strong, tear-resistant and both chemically and dimensionally stable, and it can be formed into sheets of varying thicknesses, from 1 to 350 µm. This extreme resistance to tearing makes it an ideal film base for the rigours of commercial cinema projection. However, splicing polyester film is problematic as adhesives will not hold to the surface. Heat-welding and tape splicing have addressed this problem, yet acetate films are still preferred in many cases. Due to polyester’s extreme tear strength, when jams in projectors occur, it is usually the equipment that suffers as the sprocket holes in the polyester film hold fast.
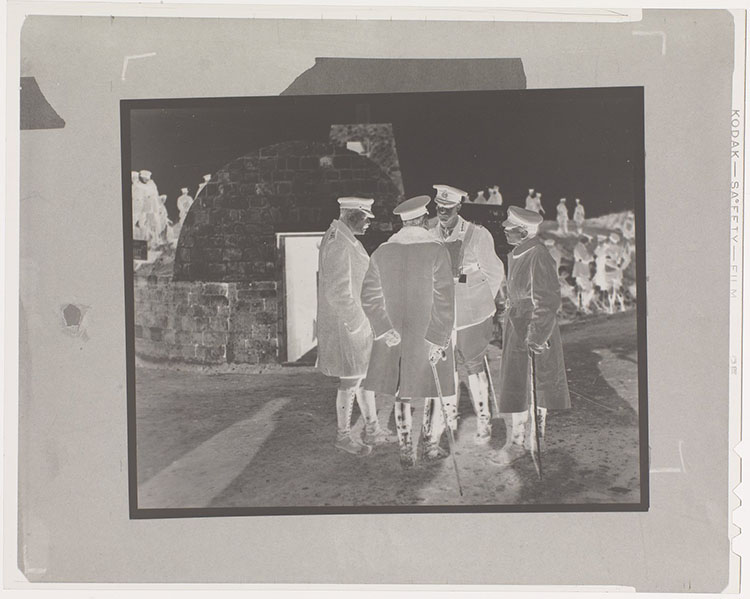
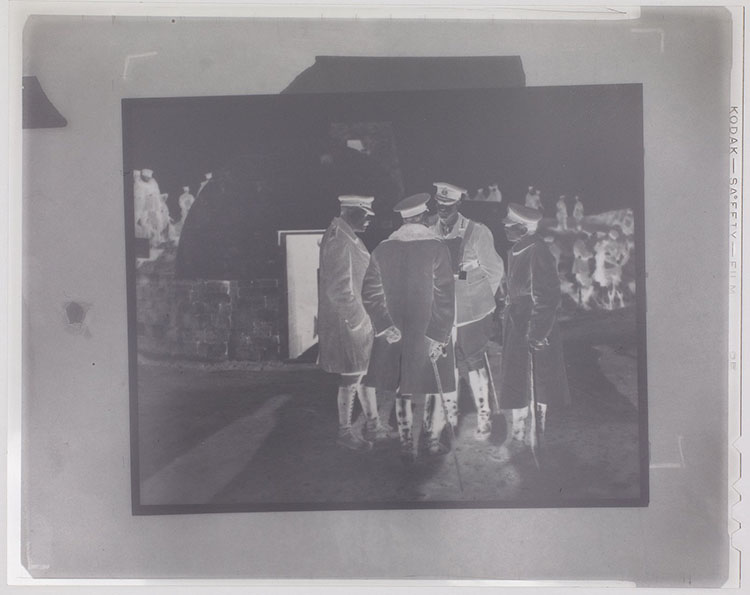
Additionally, the smooth slick surface of the polyester was cause for concern in the beginning of its use as a film base, as emulsions would not stick to the film. As a result, additives were designed to create texture or tooth to the surface in order to allow the emulsions to adhere adequately. Throughout their history, polyester-based films have depended on the use of gelatin/silver halide emulsion technology (Figures 18a, 18b and 19).

© Government of Canada, Canadian Conservation Institute. CCI 122361-0109
Figure 19. Typical structure of polyester film.
Degradation of polyester
Due to the extreme chemical stability of polyester in a broad range of test environments, few statistics are available regarding its rate of degradation. Tests carried out at the Image Permanence Institute indicate that the expected life of polyester is in excess of 1000 years; in the 60 or so years that polyester film has been on the market, there have been no documented cases of its degradation in any collections, regardless of environments (P.Z. Adelstein, J.M. Reilly, D.W. Nishimura and C.J. Erbland 1995, p. 141). Optimal storage environments would, of course, increase the projected life of the film.
Photographic gelatin has the capacity to be very chemically stable, making the image silver the weakest part of the film base as it is subject to oxidation from atmospheric pollutants. Post-processing treatments, such as selenium or sulfur toning of the image silver, will provide much greater stability, rendering the polyester negative much less susceptible to deterioration of any kind.
Identifying and differentiating plastic film-based negatives
As cellulose-nitrate- and cellulose-acetate-based films begin to deteriorate, they volatilize specific products of decomposition. The impact of the volatiles on other material stored in proximity can be devastating. This is particularly true when cellulose nitrate and cellulose acetate are stored together, as this can accelerate their deterioration. In these cases, segregation projects are essential to preservation, particularly if telltale signs of decomposition are evident, including characteristic odours followed by base shrinkage, warpage and/or discolouration.
The capacity to differentiate one type of plastic film base from another can be critical to the long-term survival of a negative collection. Many plastic film bases, when not in a deteriorated state and without visible indicators as to material type, can be very difficult to distinguish. Image and film base tone, base thickness and formats often provide few clues as to the plastic type and date.
Faced with three different types of plastic—cellulose nitrate, cellulose acetate and polyester—and a limited number of tests that can be performed in most collections, the following steps will aid in differentiating one film base from the others (each step is described in detail in the next sections):
- date the material
- examine the edge marks
- examine the notch codes
- perform a light polarization test to identify polyester
- perform a diphenylamine (DPA) test to identify cellulose nitrate
If the results for steps 4 and 5 are negative, the film base is neither polyester nor cellulose nitrate and, therefore, must be cellulose acetate.
Step 1: date the material
If the negative can be positively identified as having been produced between 1889 and 1920, it is cellulose nitrate.
If the negative can be positively identified as having been produced after 1955, it is cellulose acetate or polyester.
If the film can be positively identified as having been produced after 1920 but no other information is available, proceed to Step 2.
Step 2: examine the edge marks
Early cellulose nitrate film produced by Kodak had the word “Nitrate” printed on the edge of the negative (Figure 20a). If this appears on a negative, segregate it from film marked as “Safety” or “Safety Film” and any unmarked material.
Alternative materials to cellulose nitrate were generally edge printed with the word “Safety” or “Safety Film” (Figure 20b). Safety film edge marking can be found on both cellulose acetate and polyester. If one of these terms appears on a negative, segregate the material from known cellulose nitrate film.
If no edge marking is evident, proceed to Step 3.
Step 3: examine the notch codes
Many early roll films and sheet films from various manufacturers contained no edge marking. However, all manner of sheet film—black and white, colour, positive transparencies, etc.—regardless of the manufacturer, contain a series of notches in the upper right corner when the emulsion is facing the viewer (Figure 20a and 20b). The intent was to help the darkroom technician in identifying the type of film, in the dark, by feeling the notches and in orienting the film properly in the processing tanks so as to maximize the film’s contact with the processing chemicals and washing products.


These notches can provide clues as to the identity of the film, though it is unfortunately not entirely reliable because various notch codes were reused by manufacturers for different types of film bases. Notch codes are found only on sheet film, not negatives cut from a roll of film, and can be very useful, particularly if the manufacturer is known. Several notch code guides are included in the Bibliography (Horvath 1987, Eastman Kodak Company 2004, Morrisson 2005–2010).
If you are able to positively identify the film type from the notch code, segregate the film from the collection and store it appropriately.
If identification of the notch code is impossible or if the results are questionable, proceed to Step 4.
Step 4: perform a light polarization test to identify polyester
The light polarization test is designed to positively distinguish polyester film from cellulose nitrate and cellulose acetate films. Polyester film is known as a birefringent material, meaning that when a ray of light enters the film, it decomposes into two separate rays that have different refractive indices, with perpendicular directions of polarization. This is due to the manner in which polyester is produced. The continuously heated polymer is extruded through a slot and stretched in a longitudinal direction while at the same time being pulled in a widthwise direction. After this, the molecules are oriented in two different directions, with different refractive indices in each of these directions. This creates a birefringent sheet.
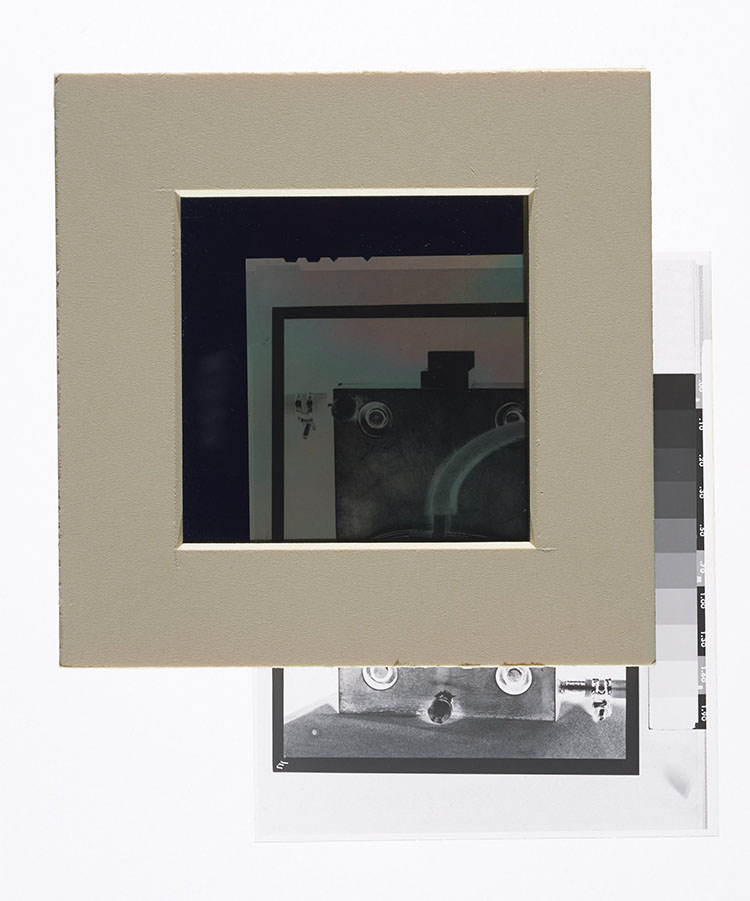
Two polarizing filters are said to be crossed when one is rotated relative to the other until no light passes through the combination (directions of polarization are perpendicular or crossed). Sandwiching a clear, transparent non-image area of the polyester film or clear film base between crossed polarizers will rotate the direction of polarization so that it is no longer perpendicular to the second polarizer, allowing light to pass through and create interference colours in the pink and green range that are visible in the non-image areas (Figure 21). The results should be unequivocal, though using a part of the negative that contains little or no image silver is essential. This phenomenon will not occur with either cellulose-nitrate- or cellulose-acetate-based films.
© Government of Canada, Canadian Conservation Institute. CCI 122361-0072
Figure 21. When polarizing filters are crossed with a piece of polyester sandwiched between the two filters, the negative becomes visible. Light is allowed to pass through and pink and green interference colours appear, illustrating birefringence.
If the material is not birefringent, proceed to Step 5.
Step 5: perform a diphenylamine (DPA) test to identify cellulose nitrate
The DPA test depends on the release of nitrate ions from the plastic by hydrolysis in a sulfuric acid solution. The reagent stains a very characteristic indigo blue colour in the presence of the nitrate ions. Non-cellulose-nitrate film material will remain colourless in the presence of the test solution. Sometimes, a greenish-brown stain will appear, but this is not a positive test result and the sample is, therefore, not nitrate.
The currently recommended test reagent for detection of cellulose nitrate in photographic materials is 0.8% diphenylamine (DPA) in 80% sulfuric acid. A ready-made stock solution of 1% diphenylamine (DPA) in concentrated sulfuric acid is available in Canada from Fisher Scientific and in the U.S. from LabChem Inc. Although the acid concentration is too high to allow the use of this stock solution directly as received, dilution of four volumes of the stock solution with one volume of water produces a test solution of 0.8%.
Prepare the test solution
This reagent is prepared from the stock solution as follows:
Add 80 mL of stock solution to 20 mL of water in a large container while stirring. Since only one drop is used per test, 100 mL will provide sufficient test reagent for hundreds of tests.
Caution
- The solution is highly corrosive and must be handled with great care and proper personal protective equipment, including gloves and goggles.
- Always add acid to water. Adding sulfuric acid to water will generate a lot of heat, so stirring is required to prevent localized boiling and spattering.
- Do not store the solution in bottles with cap liners or bulbs made of rubber, paper or metal. Store the prepared reagent in polyethylene dropper bottles, which provide a convenient method of dispensing a single drop of reagent to samples.
Prepare the test sample
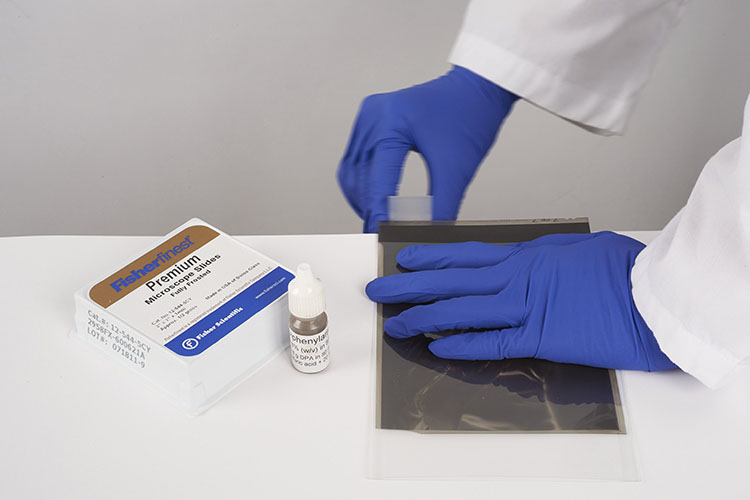
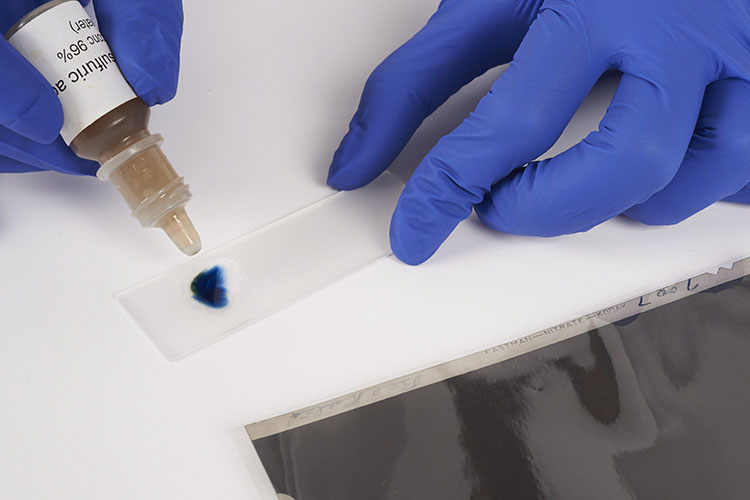
The DPA test is considered a destructive test. However, the sample amount required is very small. Using a frosted microscope slide, sand the very edge of the film sample against the slide. To do this, hold the film edge perpendicular to the slide plane and rub the slide back and forth against the film edge. The resulting loss of original material is virtually undetectable (Figures 22a, 22b and 22c).

Test the sample on the slide
Place a tiny drop of the DPA solution on the frosted microscope slide, where it made contact with the film edge. If the solution immediately turns a dark indigo blue colour, the test result is positive for cellulose nitrate. If there are other colours present (out of the blue range towards green or very pale), it should be considered a negative test result.
Testing for cellulose nitrate subbing layers on early safety films can be accomplished using a microscope. While observing the film through the microscope, deliver a small quantity of the DPA solution to the film base using a fine glass rod and look for the blue colour to appear.
The DPA test for cellulose nitrate is outlined in CCI Note 17/2 The Diphenylamine Spot Test for Cellulose Nitrate in Museum Objects.
Health and safety concerns related to degrading plastics
Adhering to trusted guidelines for storage and handling of cellulose nitrate and cellulose acetate is very important not only for the long-term preservation of the associated collections but also for the health and safety of the people handling them.
The only existing standard addressing these concerns, including proper storage of cellulose nitrate film, is NFPA 40, Standard for the Storage and Handling of Cellulose Nitrate Film. The destructive by-products of cellulose nitrate film decomposition and its high flammability rating make its immediate identification, separation from the collection and proper storage imperative. Disposal may be required, based on the level of deterioration of the film and this, too, must be done within strict guidelines. Degraded cellulose nitrate films have a very low temperature of combustion, requiring vigilance in ensuring that storage temperatures do not rise above 30°C and that environments are free from the risk of fire.
There is no equivalent standard to NFPA 40 for cellulose acetate film. Though it does not pose the same flammability risk as cellulose nitrate, it does still present a significant health risk. Chronic respiratory and dermatological ailments can result from prolonged exposure. Proper storage and handling requirements for cellulose acetate are discussed in the following International Organization for Standardization (ISO) standards:
- ISO 18901:2010, Imaging Materials – Processed Silver-Gelatin-Type Black-and-White Films – Specifications for Stability
This standard covers requirements for the film base, emulsion and backing layers, and image stability for cellulose acetate film. - ISO 18906:2000 (reviewed in 2012), Imaging Materials – Photographic Films – Specifications for Safety Film
This standard gives requirements and test methods for ignition time and the burning time of cellulose acetate film. - ISO 18911:2010, Imaging Materials – Processed Safety Photographic Films – Storage Practices
This standard includes topics related to enclosures, housings and environmental conditions for cellulose acetate film. - ISO 18916:2007, Imaging Materials – Processed Imaging Materials – Photographic Activity Test for Enclosure Materials
The photographic activity test described in this standard is a predictive test of interactions between the storage enclosure and the photographic image. It can also be used to evaluate possible photographic activity caused by components of enclosures such as adhesives, inks, paints, labels and tape. - ISO 18931:2001, Imaging Materials – Recommendations for Humidity Measurement and Control
This standard defines pertinent terms and different measuring systems for cellulose acetate film.
Products of polymer decomposition
The degradation of cellulose nitrate and cellulose acetate film bases involves the evolution of chemicals that can have serious negative health effects on the people responsible for ensuring the long-term preservation of such film.
Products of decomposition of cellulose nitrate film bases include nitrous oxides (NO, NO2). In the presence of moisture and humidity, these gases can form corrosive acid gases that will damage other materials in their proximity, including all organic and metal materials. Low odour warning properties of nitrate mean that concentrations of the gases can be high before the odour becomes apparent. The smell, when noticed, is acrid or pungent.
Degraded cellulose acetate film bases produce acetyl oxides that form acetic acid in the presence of atmospheric humidity. The volatiles are airborne and affect all materials in their proximity. The smell of decomposition resembles that of vinegar. Generally, the more pronounced the smell, the higher the levels of acidity. Decomposition of cellulose acetate is commonly referred to as “vinegar syndrome.”
Health effects of long-term exposure
Even short-term exposure to the decomposition chemicals of cellulose nitrate and cellulose acetate can provoke health issues, most notably respiratory and dermatological problems.
Chronic exposure to the decomposition products of cellulose nitrate film, especially nitrogen dioxide, can lead to headaches, blurred vision, loss of appetite, emphysema and other systemic damage. Chronic exposure can result in a heightened sensitivity to a broad range of environmental toxins, such as those found in new buildings, solvents and standard air pollutants. These effects can be serious, long-term and debilitating and are the same for both cellulose nitrate and cellulose acetate. Contact dermatitis and other skin diseases can also result from long-term exposure to cellulose nitrate and cellulose acetate and, in turn, lead to sensitivities to many other materials.
Mould
Gelatin, the primary component of photographic emulsions and anti-curl layers, is a rich source of nutrients for mould. Fingerprints in particular act as a focal point for the mould to start due to their high salt content, which makes them hygroscopic and a source of higher moisture. Mould germination and the extent of growth are dependent on relative humidity (RH), temperature, time, species of mould and the nutritious quality of the organic substrate. A precautionary limit to prevent mould is 65% RH at 20°C (Tétreault and Hagan 2012).
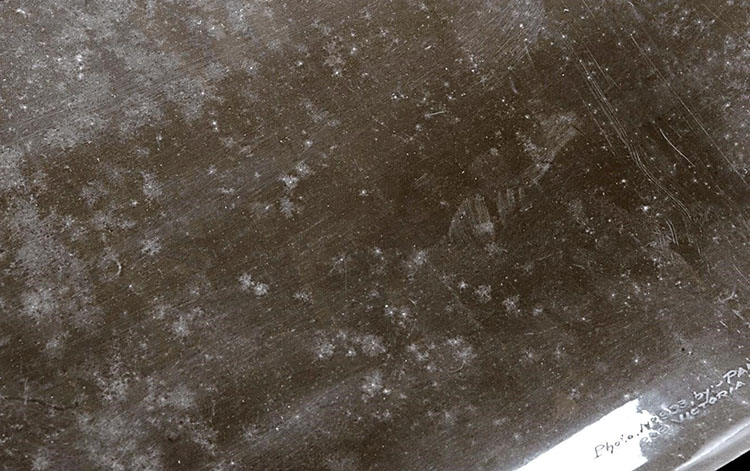
Mould will not grow in dry environments, but spores may remain viable even under extreme, dry conditions. It is not uncommon to find mould on negatives (Figure 23) since the environments in photo studios are rarely controlled. Fungicides are not recommended as they are generally detrimental to protein and collagen.
© g.samson-Hendriks
Figure 23. The white markings on this plastic-based negative are mould.
Mould is virtually everywhere and in normal background concentrations generally does not affect healthy individuals. However, prolonged exposure to higher than normal concentrations of mould can greatly increase the risk of severe illness. The degree of risk is dependent on the type of mould, the mould products and the susceptibility of the individual. Respiratory problems, compromised immune systems and allergies can be greatly exacerbated by mould exposure, and these conditions can compound the effects of the mould, resulting in severe chronic illness.
For mould infestations in heritage collections, particulate filters from the N series (N for “not-resistant to oil”) are generally appropriate. Filters described as N100 offer the greatest protection against particulate matter and are referred to as HEPA (high-efficiency particulate air) filters. Respirators, including disposable respirators, should be test-fitted by a qualified individual to ensure a proper fit.
Gloves should be worn at all times when handling mould-affected material. Disposable gloves, including nitrile, latex, nylon and polyethylene gloves, provide adequate protection. Eyewear should include goggles, even if you wear prescription eyeglasses. The appropriate, recommended goggles are not ventilated and must accommodate a disposable or half-face respirator. Outer disposable clothing that can be immediately removed following contact with mould-affected materials is recommended, such as laboratory coats, disposable aprons and sleeves.
There are no special requirements for discarding contaminated personal protective equipment, though it is important to exercise caution when handling and discarding these items. Place disposable clothing, gloves, etc. in thick (6 mil) plastic garbage bags or two layers of thin plastic garbage bags. Seal the bags and discard them in an outdoor garbage container.
Procedures for mitigating the presence of mould
- Once mould has been discovered in a collection of negatives, take defensive action immediately to protect staff. Staff with asthma or allergies should be immediately removed from the vicinity. Staff in the contaminated area or handling contaminated objects must wear the appropriate personal protective equipment.
- Isolate the affected negatives, including the envelopes and boxes in which they are housed. If the negatives are not wet or damp, put them into plastic bags and seal them thoroughly. If an entire collection is affected, the room in which it is housed should be quarantined. It is important to limit the spread of mould spores throughout the entire facility. Doorways should be covered with plastic sheeting and taped off, as should air vents and air return ducts.
- Determine the extent of the mould outbreak. Consider the available resources and determine whether the infestation can be handled in-house or if outside help is required. If the problem is extensive, professional mould remediation services should be called upon. They will have the equipment and expertise to deal with it. The area must be kept off-limits until the clean-up has been completed, whether it is extensive or small and contained.
- Determine the cause of the mould outbreak. Is it mould that developed in the distant past, when the negatives were stored in adverse conditions, or is it the current environment that needs to be fixed? Moving the material to a more appropriate space may be required if the environment cannot be brought under control.
- Control the spread of the mould. Before being removed from negatives, mould needs first to be deactivated. This may involve freezing the affected materials or thoroughly drying them by reducing the humidity, lowering the temperature and increasing air circulation. Negatives that are to be frozen must first be placed in plastic bags with tight seals that provide no air exchange. This ensures that the mould will not be spread around and that the humidity is controlled. Any condensation that forms when the bag is removed from the freezer will deposit on the plastic and not on the negatives. They therefore must be kept in the bag until the interior temperature climbs above the dew point. The dew point is described as the atmospheric temperature (varying according to pressure and humidity) below which water droplets begin to condense and dew can form. Once the object is dry, mould can be removed. Keep the dry object isolated and in a sealed container until it can be cleaned. This will prevent any inactive but still viable spores from dispersing.
- It is important that you know your capacity to manage the mould outbreak. Large-scale mould remediation projects should be carried out by companies that specialize in it. Small projects can be carried out on-site, provided the appropriate equipment is available. Class 1 biological safety enclosures are designed for cleaning mould-contaminated objects. Careful, thorough vacuuming of affected negatives is the best way to remove visible mould growth. Vacuum cleaners used indoors must contain HEPA filtration systems. Every item should be cleaned individually and new sleeves and boxes provided. Contaminated sleeves and boxes must be discarded. Further surface cleaning of negatives should be referred to a photograph conservator.
More information, including a detailed methodology for the removal of visible mould growth from objects, is provided in Technical Bulletin 26 Mould Prevention and Collection Recovery: Guidelines for Heritage Collections.
Health and safety guidelines for handling degrading plastics
Personal protective equipment
Use a respirator with chemical filters designed to remove organic solvents to protect the respiratory system. Use nitrile, polyethylene, neoprene, latex or nylon gloves when handling cellulose nitrate or cellulose acetate film bases to protect against contact dermatitis.
Ventilation
For short-term exposure, appropriate respirators can be used. For collections-processing and segregation projects where long-term, ongoing exposure is anticipated, fume extraction systems are essential, either permanently installed or portable. Extraction systems should be tested regularly to ensure their efficacy.
General
- Handle objects as little as possible, and use nylon, nitrile, neoprene or vinyl gloves.
- Keep objects in protective sleeves as much as possible to avoid contact.
- View objects in a well-ventilated area.
- When examining or surveying deteriorating collections, wear the appropriate respirator to minimize the ingestion of gases that have evolved due to the deterioration of the film base.
- If fume extraction equipment is available, make sure that it is properly positioned to maximize the removal of evolving gases.
- If the film is badly degraded, wear eye protection as the gases can become irritants to eyes. It is not advisable to wear prescription eyeglasses or contact lenses without goggles.
Safe disposal of film
Deciding on when a film should be destroyed is not always straightforward. With current, highly sophisticated digital copying technologies available, images can be resurrected from badly deteriorated films. However, there comes a point when saving the original is no longer an option as the risks posed by holding on to it outweigh its value as an artifact. If the film is badly degraded and a good copy has been made, even though cold storage may be an option, you must evaluate the long-term commitment to that negative, its value in its deteriorated state and how averse to risk your institution might be.
Disposal of deteriorated cellulose nitrate film must be done by a registered professional company that follows government-based guidelines for disposal. Cellulose nitrate film should never be discarded into ordinary garbage containers for standard disposal. Destruction must only be carried out by a certified agency, and the local fire commissioners should be consulted for information on any special regional requirements. You must handle unstable or deteriorated cellulose nitrate films much like you would handle explosives. The optimal approach is to keep such films underwater in a steel drum until disposal can be arranged.
Never attempt to burn cellulose nitrate film, even in the open. It is extremely dangerous, and burning it in an enclosed stove or furnace must never be considered. The rate of combustion of nitrate is 15 times that of wood, with the result that explosive-like forces can occur. As cellulose nitrate burns, it releases chemically bound oxygen that sustains fire. Therefore, attempting to extinguish it by depriving it of oxygen is futile as the fire will continue until the cellulose nitrate is completely consumed.
Unlike cellulose nitrate film, the disposal of cellulose acetate does not carry the same stringent requirements. Local waste disposal requirements should be consulted if large quantities are to be destroyed.
Treating plastic film-based negatives
Negatives represent the photographer’s intent. They are the camera originals and, as such, are unique, demanding very considered thought regarding their handling and treatment.
Surface cleaning
Often, negatives require surface cleaning to remove dust and accretions in order to maximize the quality of the print or scan. Dust removal is a process of little intervention, but it can result in surface damage. As tough as gelatin emulsions may appear to be, they are vulnerable to mechanical damage, such as scratching, particularly if degraded.
Prior to any re-housing or scanning projects involving negatives, provide as dust-free an environment as you possibly can. Surfaces need to be thoroughly vacuumed and wiped down to eliminate abrasive materials.
Start the cleaning process by putting on gloves. Fingerprints are very damaging to gelatin emulsions, often leading to permanent staining and etching of the gelatin. Lint-free cotton, nitrile, nylon, latex and polyethylene gloves all provide protection for the negative as well as for the operator or conservator.
Mould is occasionally found in photograph collections, whether they be prints, negatives, transparencies or glass plates. Gelatin is a rich source of nutrients and poor environments can promote the propagation of mould, which presents a significant health risk. If mould is found in a collection, the number one concern is human safety. Refer to the Mould section for more details on the presence and removal of mould in photographic negative collections.
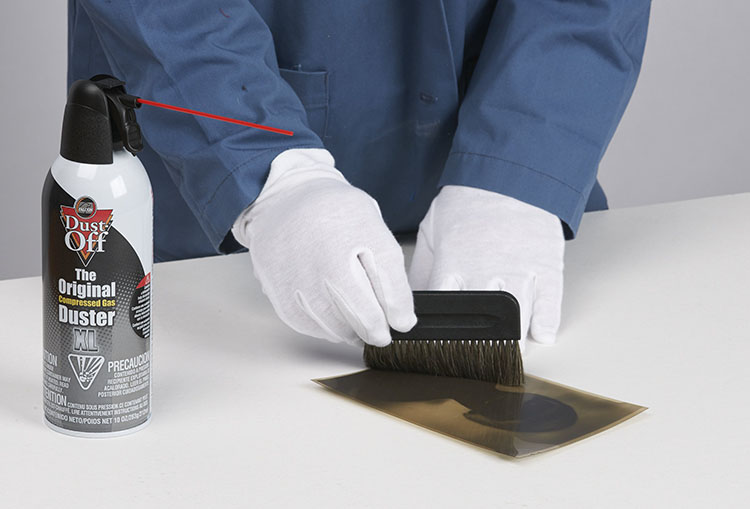
Loose surface dirt and dust can be easily removed using compressed air delivered by a bulb blower, gas duster or compressed air duster (Figure 24). Do not attempt to blow off the dirt, as it will invariably result in the dispersion of minute dots of saliva.
© Government of Canada, Canadian Conservation Institute. CCI 122361-0094
Figure 24. A conservator dusts a negative with an antistatic brush and canned air.
Some physical manipulation may be needed to dislodge more tenacious particulates adhered to the surface. One can use soft bristle brushes as employed in watercolour painting or soft micro-fibre dusting cloths, provided they are clean and only light pressure is applied.
Static electricity can cause substantial dust build-up. Anti-static cloths and brushes can work very well for dissipating static charges. They must be kept very clean, and the bristles and cloth should not be touched with bare hands to avoid transfer of skin oils.
Grease on the surface of the negative, including fingerprints, can be removed using solvent cleaning fluids considered safe with emulsions and bases. There are numerous products on the market, such as PEC-12, a waterless emulsion cleaner. It is a blend of organic hydrocarbon solvents, has a neutral pH and is free from chlorofluorocarbons and chlorinated hydrocarbons. It dries instantly, leaving no residue, and can be applied with an accompanying product, PEC*PADS, which are lint-free cotton pads, or with cotton swabs (only to be used once per application). Solvent-based cleaners need to be used in well-ventilated areas. Respirators with organic solvent filters are recommended, along with protective eyewear and chemical-resistant gloves, such as nitrile gloves.
Grease or oil was often applied to the surface of the emulsion prior to retouching. This improved the adhesion of the graphite retouch medium to the emulsion surface (Figures 25 and 26). These areas of retouch can be vulnerable to solvent and aqueous treatment and should be avoided when cleaning the surface.
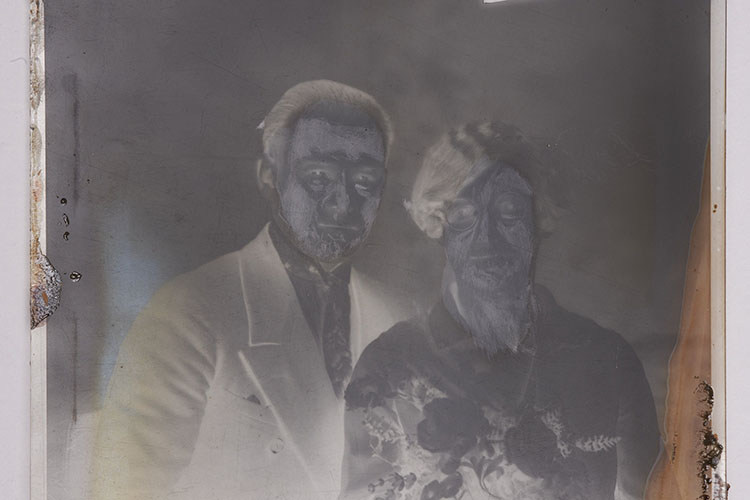
© Government of Canada, Canadian Conservation Institute. CCI 122361-0050
Figure 25. Graphite retouching media has been applied to the faces in this image. Grease has been applied to the surface of the emulsion to facilitate adhesion of the graphite.
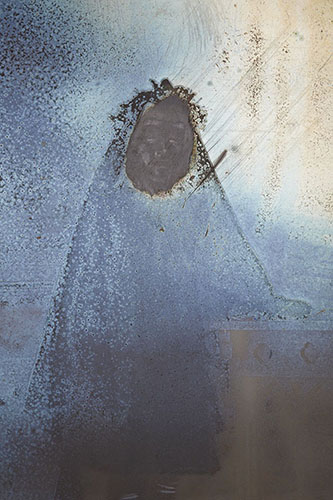
© Government of Canada, Canadian Conservation Institute. CCI 122361-0030
Figure 26. The grease applied to the face of this sitter is matte compared to the glossy surface of the rest of the negative.
Do not use water-based cleaning methods unless you are an experienced photograph conservator. Water will soften the emulsion and greatly increase the risk of damaging it. As gelatin becomes more degraded, it tends to become more water-soluble. Depending on the degree of deterioration, clean cotton swabs dampened with a mixture of ethanol and distilled water can be gently rolled across the surface to lift tenacious water-soluble accretions. This should only be carried out by a trained conservator.
Separating the emulsion from the plastic base (stripping)
The deterioration of a plastic film base will eventually lead to the destruction of the gelatin emulsion and the image will be lost. This stands true for both cellulose nitrate and cellulose acetate.
In the case of cellulose acetate, before total destruction of the image occurs, the image gradually obscures as the plastic support shrinks, causing the gelatin layers to blister and channel (Figures 27a and 27b). As the levels of acidity increase, the gelatin becomes more and more brittle, eventually crumbling to the touch. Before the gelatin is weakened and embrittled by high acidity levels, it retains considerable strength, allowing for its removal from the plastic base. The separated emulsion layer, referred to as the “pellicle,” is strong and chemically stable, as gelatin is known to be. Ideally, a trained conservator will remove the emulsion intact and flatten it, then will scan the negative and place it in permanent storage in a paper or plastic sleeve. Though some small amount of damage often occurs during this treatment, it is generally considered preferable to an image being obscured by channels and blisters or to complete image loss.

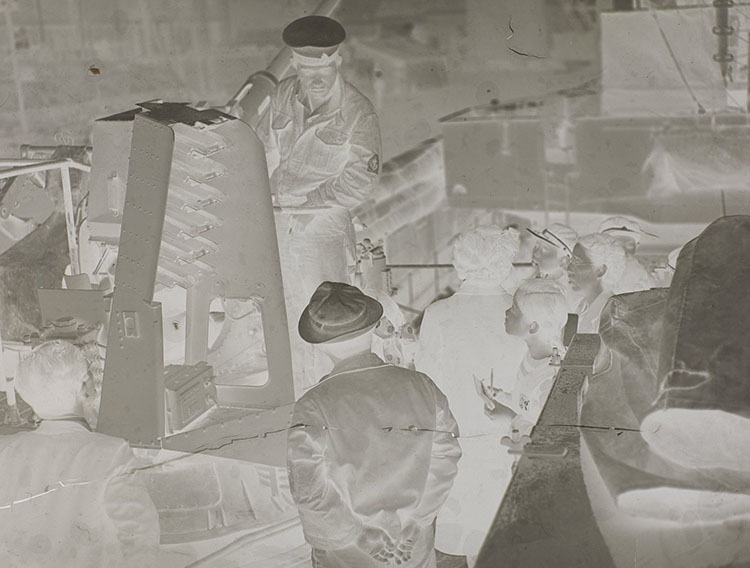
Emulsion removal, or stripping, is a labour-intensive process and should be reserved for very significant items from the collection (Figures 28, 29, 30a and 30b). If the negative is of little value, it can be sent to cold storage where the degradative process will be slowed or stopped, and it can then be treated at a later date, as required.
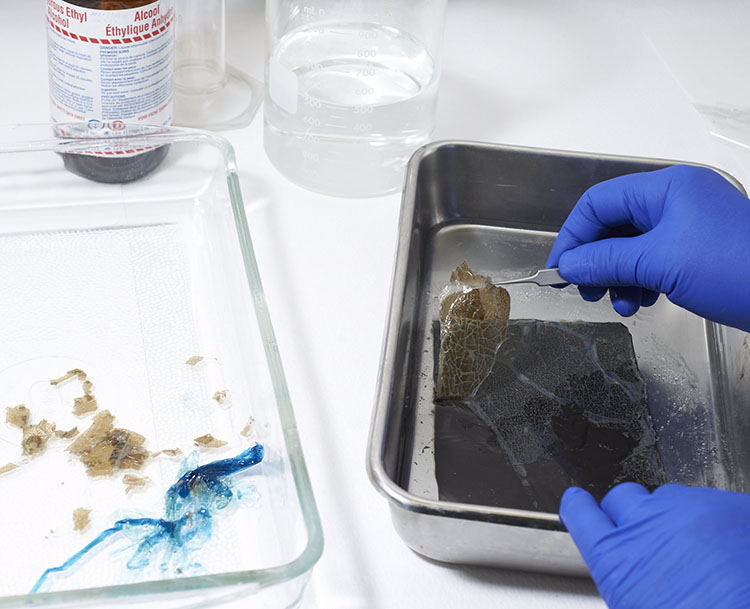
© Government of Canada, Canadian Conservation Institute. CCI 122361-0058
Figure 28. The emulsion layer is removed from a cellulose acetate-based negative. A cellulose acetate film in a late stage of deterioration is treated in a bath of water/ethanol and/or acetone, depending on the solubility of the subbing layer, in order to remove the plastic layer.

© Government of Canada, Canadian Conservation Institute. CCI 122361-0059
Figure 29. Once removed, the emulsion layer is taken out on silicone-release Mylar.
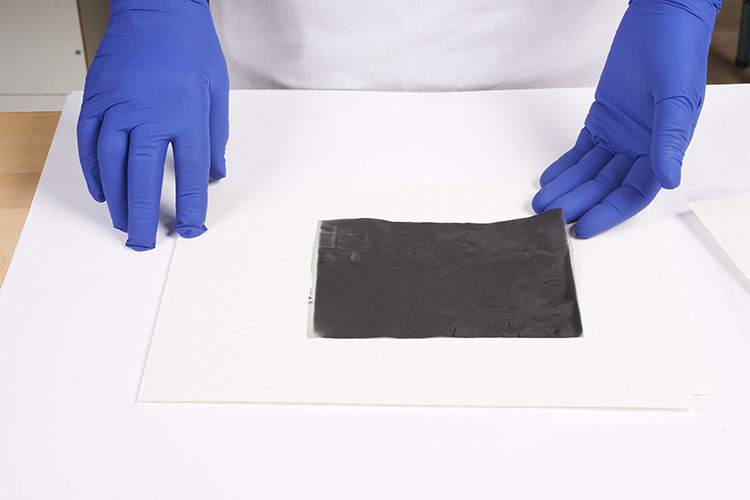
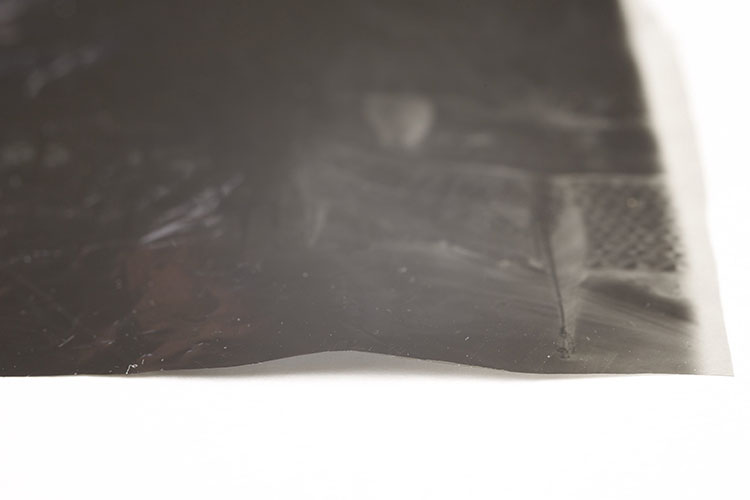
This treatment is meant for cellulose acetate material only and is not a treatment that can or should be carried out by anyone other than a professional conservator. Every negative is different. Slight variations in manufacturing techniques and materials, age as well as storage and use history require adjusting the treatment, to some extent, with each negative or batch of negatives to ensure minimal impact and reduce risks. To handle and treat an object is to put it at risk. Consequently, one must clearly understand the implication of treatment and thoroughly analyze every aspect of it.
The manner in which cellulose nitrate film deteriorates generally does not allow for separation of the different layers. The removal of a cellulose nitrate film base from a negative can be accomplished by first carefully dissolving the anti-curl layer from the verso, followed by the dissolution of the cellulose nitrate base itself using strong, toxic chemicals (Hendricks 1991). This is rarely done, and only carried out by trained conservators, but would be a potential option for high-value items. The process of deterioration of cellulose nitrate differs from that of cellulose acetate in the sense that it does not blister and channel but rather dissolves into a sticky brittle mass. The more degraded it becomes, the more the image is obscured. However, the images are often salvageable through scanning, even in advanced stages of deterioration. Although the scanned image will show the damage of the negative, basic information will still be retrievable. Scanning followed by freezing is definitely the preferred option in the case of deteriorating cellulose nitrate.
Storing plastic film-based negatives
The chemical stability of cellulose nitrate and cellulose acetate is very much influenced by temperature and RH. Research has shown that the control of humidity alone can increase the longevity of the plastic film base by a factor of three to four. Controlling the temperature, on the other hand, can provide a much more significant benefit, particularly so when the humidity is also lower. Ambient to high temperatures and RH can greatly accelerate the rate of deterioration. Lower temperature and lower humidity storage is critical to the negative’s long-term survival. As for polyester, since it is extremely chemically stable, it requires less rigorous temperature and RH standards, though protecting the image silver from oxidation must always be considered.
Cellulose nitrate film is known to be highly flammable and, as a consequence, strict standards for storage are legally applied. NFPA 40, being the only existing standard for the storage of cellulose nitrate film, has been generally adopted internationally, though local jurisdictions can affect the degree to which it is implemented and alter its interpretation. Quantities of film exceeding 11 kg (25 lb.) must be stored in an NFPA 40-compliant manner. Lesser quantities can be stored in the same manner as other plastic films, though segregation is highly recommended.
International standards for the long-term preservation of collections of photographic materials recommend environmental set points for temperature, humidity, air purity and light. These standards, along with recommendations from scientists and other researchers as well as anecdotal information, guide contemporary decision makers on how to maximize the lifespan of these unstable collections through temperature and humidity control. Though 25 years ago the American National Standards Institute may have told us that an environment of 18°C and 25% RH was satisfactory for cellulose acetate film storage (ANSI 1985), experience has shown that, under these conditions, vinegar syndrome can appear and progress.
The recent relaxing or rationalizing of environmental standards for museums and archives has allowed for more flexibility and subsequent cost savings for most institutions. Unfortunately, when storing cellulose nitrate and cellulose acetate, rigorous conditions must continue to be applied, particularly if the process of deterioration has begun.
International Organization for Standardization (ISO) Standards ISO 18934:2011, Imaging Materials – Multiple Media Archives – Storage Environment and ISO 18911:2010, Imaging Materials – Processed Safety Photographic Films – Storage Practices provide recommendations for storage environments that include temperature, humidity and air quality. General temperature categories, taken from ISO 18934:2011, are shown in Table 8 and will be used throughout this bulletin.
| Condition* | Temperature range (°C) |
|---|---|
| Room | 16 to 23 |
| Cool | 8 to 16 |
| Cold | 0 to 8 |
| Sub-zero | -20 to 0 |
| *Assuming 30% RH to 50% RH for each condition | |
| Base material | Recording layer | Minimum RH% | Maximum RH% | Maximum temperature (°C) |
|---|---|---|---|---|
| cellulose nitrate | black and white photo | 20 | 30 | 2 |
| cellulose acetate | black and white photo | 20 | 50 | 2 |
| cellulose acetate | black and white photo | 20 | 40 | 5 |
| cellulose acetate | black and white photo | 20 | 30 | 7 |
| cellulose acetate | colour photo | 20 | 50 | -10 |
| cellulose acetate | colour photo | 20 | 40 | -3 |
| cellulose acetate | colour photo | 20 | 30 | 2 |
| polyester | black and white photo | 20 | 50 | 21 |
| polyester | colour photo | 20 | 50 | -10 |
| polyester | colour photo | 20 | 40 | -3 |
| polyester | colour photo | 20 | 30 | 2 |
Cold storage
Almost all photographic materials benefit from cold storage, including prints and negatives in both black and white and colour. The inherent chemical instability of cellulose nitrate, cellulose acetate and colour photographic dyes is the characteristic at hand in the most well-known and documented examples of the benefits of lower-temperature storage. Much research has been conducted in this area by the Image Permanence Institute, Wilhelm Imaging Research, Mark McCormick-Goodhart and others, all pointing to the essential need for temperature and humidity control in order to provide the highest standard of care.
In the case of deteriorating plastic film bases, humidity-controlled, sub-zero temperature storage is the only recourse to ensure the long-term viability of the material. Sub-zero storage essentially places the collection in a state of suspended animation. Though not strictly true, chemical activity slows down to a point where little degradation occurs. If a comprehensive copying program is implemented prior to the collection being placed in cold storage, it won’t be necessary to remove the material from storage, thus contributing to its long-term survival.
Cool, cold and sub-zero storage environments are expensive, with heavy resource implications. They can be scaled to the size of the collection, with lower-cost solutions often being found for smaller collections.
Important resources for planning cold storage include:
- The Conserve O Grams series from the National Park Service of the U.S. Department of the Interior:
- 14/10 “Cold Storage for Photograph Collections – An Overview” (2009)
- 14/11 “Cold Storage for Photograph Collections – Using Individual Freezer Unit” (2009)
- 14/12 “Cold Storage for Photograph Collections – Vapor-Proof Packaging” (2009)
- Cold Storage: A Long-Term Preservation Strategy for Film-Based Photographic Materials (online tool)
Acclimatization
When negatives that have been placed in cold or sub-zero storage are requested for viewing, they must be gradually warmed to ambient temperature prior to being unwrapped. Condensation can thoroughly wet an object transferred directly from cold storage to ambient room temperature. The air around the object is warm and therefore has a higher moisture content than the cold air. As the warm air contacts the cold object, the water condenses out of the air; liquid water is then deposited on the surface of the object. This occurs when the change in temperature from cold to warm crosses the dew point.
Items properly wrapped for humidity control in cold or sub-zero environments can be left wrapped in the warm air until the entire bundle has warmed to the ambient room temperature (4–24h). If the cold storage environment is fully humidity-controlled and the negatives are not wrapped, they must be bagged prior to being removed from the cold conditions and again allowed to sit until the entire bundle has reached room temperature. Alternatively, insulated and sealed picnic coolers can be used. Unwrapped items can be placed in a sealed cooler in the freezer; then, the cooler can be brought into the warm room and allowed to sit closed until its interior temperature reaches that of the room. Thermocouples with an external reader can be employed to monitor the interior temperature.
Without acclimatization, the photographic gelatin can become saturated with water, resulting in the softening of the gelatin, which, in turn, can precipitate sticking and blocking of the negatives. This is particularly devastating for degraded films where the gelatin may be already compromised and may be rendered more soluble.
Humidity control in cold storage
The influences of—and the relationships between—temperature, RH, equilibrium moisture content (EMC) and atmospheric pressure must all be considered when investigating environments that promote the long-term stability of photographs.
Photographs are composite objects and, in general, all of their elements are hygroscopic by nature, meaning that they readily absorb moisture. Gelatin is the most hygroscopic component, capable of holding very high levels of moisture. The EMC of photographs is a function of both RH and the temperature of the surrounding air. It is the moisture content at which the photograph is neither gaining nor losing moisture; however, this is a dynamic equilibrium and it changes with RH and temperature. Since moisture content is not conveniently measured and is tied to RH, for the purposes of determining the appropriate moisture content for freezing conditions, only the RH is usually considered in conjunction with temperature. Atmospheric pressure is generally considered as a constant.
In addition, one must look at the glass transition temperature (Tg) of gelatin, which is considered the component of a photograph most reactive to RH. In practical terms, this means that in temperatures below the Tg, gelatin becomes hard and brittle, and above the Tg, it becomes soft and gel-like. An important characteristic of gelatin that requires consideration here is that the higher the moisture content or RH of gelatin, the lower the temperature at which the gelatin will reach its gel state. This makes it a very desirable binder for image-forming substances, including silver halides and dyes. It will soften and allow the ingress of processing chemicals in aqueous solutions (high moisture content) at ambient temperatures, and then revert to a tough flexible material when dry (low moisture content) at the same ambient temperature.
In conditions of high RH, above its Tg, gelatin will reach its gel state even at ambient temperatures, which can result in softening and sticking of the gelatin to materials in contact with it, and/or in ferrotyping of the surface. Oxidation of image silver is also facilitated, as silver ions migrate more readily when the gelatin is in its gel state. Mould, always a potential outcome of high RH, can be particularly devastating when the gelatin is above the Tg.
Cycling between high and low humidity can exert enormous physical stresses on gelatin, leading to high mechanical pressures that often result in fracturing, cracking, planar deformation and delamination from substrates. To ensure stability, the normal limits of 35–60% RH must be maintained at room temperature.
Photographic materials will absorb and desorb moisture based on the RH of the environment in which they are stored. As air is cooled, its capacity to hold moisture diminishes and, in a closed environment where the air is striving to reach equilibrium, the gelatin emulsion will absorb the excess moisture condensing out of the cooled air. The problem lies in the very high capacity for gelatin to absorb moisture even in cold temperatures and the potential crossing of the Tg. Under freezing conditions, of course, it will be stable but, as it thaws, the gelatin can potentially solubilize. Therefore, in order to maintain a constant level of moisture content in the gelatin emulsion, the RH must be reduced 3–4% for every 10°C drop in temperature, starting at around 50% (McCormick-Goodhart 1996).
Condition monitoring
The deterioration of both cellulose nitrate and cellulose acetate results in the generation of high levels of acidity. The accompanying odour related to the deterioration of the film is often the first indication of problems.
Deteriorating cellulose acetate negative collections often generate a strong smell of acetic acid, a by-product of deterioration in conjunction with atmospheric humidity. Deteriorating cellulose nitrate films have their own particular smell, which is difficult to characterize but rather pungent.
Once these odours are identified in collections, the level of deterioration is significant. Immediate action should be taken to control the rate of deterioration, with low-temperature storage being the only option in most cases. Procedures can be put into place to monitor the condition of the collection so that steps can be taken and proper planning can be done to prevent reaching a crisis point.
One approach to monitoring collections is to conduct regular random surveys where individual items are examined for signs of deterioration. This requires considerable experience with deteriorating collections on the part of the surveyor and can be very labour intensive.
Another option for monitoring the condition of plastic film bases that can be relatively easy to implement is the use of acid indicator strips developed by the Image Permanence Institute, called Acid-Detector (A-D) Strips (Figure 31). This monitoring procedure is specifically designed for cellulose acetate film and is not recommended for cellulose nitrate film.

© Image Permanence Institute
Figure 31. Acid-Detector (A-D) Strips.
A-D Strips respond to elevated levels of acidity in collections by changing colour. The dye-coated paper strips were initially developed to be placed inside cellulose acetate motion picture film cans, where they are more efficiently used to monitor “vinegar syndrome,” but they can be effectively used in still negative collections as well. The strips come with a colour guide that starts out blue and evolves to green and then finally yellow, each colour corresponding to different levels of acidity that can then be correlated to the condition or possible level of deterioration of the plastic (Table 10). Note that, at the 1.5 level, or bright green strip, deterioration becomes very rapid as it crosses the autocatalytic point.
| AD Strip level | Strip colour | Film condition | Recommended actions |
|---|---|---|---|
 |
Blue | Good—no deterioration | Cool or cold storage |
 |
Teal | Fair to Good—deterioration starting | Cold storage Monitor closely |
 |
Green | Rapid decay starting—point of autocatalytic decay | Cold or frozen storage |
 |
Yellow-green | Poor—actively degrading | Freeze Copying advisable |
 |
Yellow | Critical—shrinkage and warping imminent, possible handling hazard | Freeze immediately Copy |
The strips are to be placed inside boxes, sitting on top of collection material. They should then be monitored on a weekly basis to evaluate any changes. If there is no change after a few weeks, the monitoring interval can be extended to every three or four weeks. If changes are noted after a short period of time, it is a clear sign that immediate action is required. This monitoring process is by no means an exact science, but it does provide a clear indication of rapid deterioration.
Preparing collections for cold or sub-zero storage
When the decision has been made to store a photographic negative collection in cold or sub-zero storage, the following four steps should guide the process (each step is further outlined below):
- survey the collection
- segregate plastics
- implement a copying plan
- evaluate enclosures
1. Survey the collection
Collection surveys are the necessary first step when attempting to assess the needs of any collection and are essential tools in support of requests for resources. Surveys of collections of cultural material of any kind are generally done for two basic reasons: to determine the size of the collection (volume of material, number of square feet of storage space required, etc.) and to determine the condition of the collection. For a photographic negative collection, a survey will also help in identifying the collection’s material types (cellulose nitrate, cellulose acetate or polyester) and in establishing whether the collection is at risk and thus requires cold or sub-zero storage.
The term “survey” tends to be used as the blanket term for examining entire collections. The notion of a survey can be subdivided into two groups, surveys and censuses, which are two very different things, based on methodology.
Surveys take a sample population of collection items that represent the entire collection. The representative samples are selected randomly, free of bias. In other words, every single item in the collection must have an equal opportunity of being selected for the survey. In order to be statistically accurate with an error rate of +/-3%, only a small number of samples are required. In the case of LAC’s cellulose nitrate collection survey, a statistically accurate survey of the collection, containing approximately 600,000 items, was conducted by looking at only 1065 items (Henessey 2010). A survey can also be in the form of a questionnaire sent to a group of people, in which they are asked to respond to a series of questions about their objects or collections.
Censuses are defined as “official counts” and necessitate the examination of every single item in a collection. A census would be used in a segregation project, for example, to ensure that all cellulose nitrate and cellulose acetate films are separated from each other. Based on the results of a survey, one may choose to do a census, if feasible. If there are only a few cellulose acetate negatives interspersed in a majority collection of cellulose nitrate and they are all going into sub-zero storage, segregating those few cellulose acetate items becomes unnecessary. On the other hand, if a collection of 50/50 cellulose nitrate and cellulose acetate has started to deteriorate and is destined for ambient, cool or cold storage, and not sub-zero storage, segregation is highly recommended.
For larger collections, surveys are generally more practical and will provide the level of accuracy required in order to make informed decisions for the long term. For small collections, containing under a thousand items, a census is feasible; it provides an opportunity to see the collection in its entirety and will allow for decisions to be made readily with regards to storage requirements.
Prior to planning or conducting a survey (using any survey methodology or census), one should first determine what is already known about the collection. This may include interviewing staff members who are familiar with the collection. Corporate knowledge may allow you to better understand or grasp the extent of the collection as well as the nature of the materials, to get a broadened sense of the significance of the documents and, possibly, to establish the date range. For example, if it is known that the collection dates to no earlier than 1960, one can assume that there will be no cellulose nitrate and that the general condition of the collection will be good. It is also important to understand how the collection is used and what the access requirements are. Establishing what you know will help you to better focus your survey requirements.
Selecting a survey methodology
A multitude of survey formats can be employed; regardless, the critical starting point is to know precisely what information you are looking for. It sounds simple enough, but in practice, there is always a tendency to attempt to do too much and to try to answer too many questions. As a result, further questions arise, which are often vague or unfocused, and the survey can lead to weak conclusions. If you have no defined question at the outset and hope to trawl through the data looking for significant associations, you run the risk of manipulating data, and the accuracy of the results will be called into question.
In general, you will want to know a few critical pieces of information, which could include the following:
- How big is the collection?
- What are the various formats of the negatives?
- What are the plastic film base types?
- Is there a mixture of plastic types?
- What condition is the collection in?
- What percentage of the collection is deteriorating?
- What types of envelopes and boxes is the collection stored in?
These questions will allow you to determine the scope of the problem, the housing needs, the long-term storage environments and, ultimately, the required resources (Kelley et al. 2003).
Some online tools are available that allow you to survey your collection following a very strict protocol. One example is CALIPR (Ogden and Jones 1997), designed to enable institutions without staff members who have preservation expertise to assess the preservation needs of paper-based and audiovisual collections. It is a proprietary software available from the California Preservation Program, which was the result of a 1992 task force formed by the California State Library to design a preservation program for California to meet the education, training and assistance needs in the field of preservation. This tool may be of interest to some collection managers.
Surveys of plastic film-based negative collections: three case studies
Case study 1: representative random sample survey
Survey – LAC Cellulose Nitrate Still Negative Collection, 2010 / Lisa Hennessey
© Government of Canada
Source: Library and Archives Canada
In 2010, LAC was in the final stages of preparing to move its cellulose nitrate holdings to a new facility. It was an ideal time to conduct a survey, as the collection required much re-housing. The goal of the representative random sample survey that they conducted was to assess the overall condition and state of deterioration of the films and to examine the current housing conditions prior to their move.
Survey details
- Type of survey: Representative random sample survey
- Estimated population size: 600,000 negatives
- Number of samples tested: 1065 negatives
- Number of containers pulled: 721
- Confidence level: 95%
- Error level: +/-3%
Survey questions
The survey questions were divided into three categories: Container, Envelope and Negative. For each sample surveyed, the following information was collected:
Container
- Is the container available for surveying? Y/N
- Is there any evidence of pests in the container (insects, rodents, waste, holes, etc.)? Y/N
Envelope
- The type of envelope based on an identification chart. A to F or N/A
- Are there multiple negatives housed in the one envelope? Y/N
- Is the envelope bound into an album? Y/N
- Is the envelope made from glassine? Y/N
- Is the envelope made from plastic or Mylar? Y/N
- The current pH of the envelope.
Negative
- Is the negative made from safety film? Y/N
- Is there mould present? Y/N
- What is the size of the negative?
- What is the negative’s current state of deterioration, according to the deterioration stages of nitrate film-based negatives – Image Dictionary (consult Table 11)? Level 0 to 5
Item level selection
With a population of 600,000 items, 1065 samples were needed to run a representative random sample survey with a confidence level of 95% and an error level of +/-3%.
The tool used to calculate the sample size needed was Custom Insight’s Survey random sample calculator. Other similar calculators can be found online.
Randomly selecting containers to survey
As there were very few negatives accessioned to the item level in the collection, in order to select the 1065 negatives needed for a representative sample, the following method was used:
- The containers that held cellulose nitrate film needed to be identified. In this collection, 1426 containers were identified as holding cellulose nitrate-based negatives.
- A list of samples was randomly developed. In order to do this, a list of random numbers was created in Microsoft Excel. The formula “(=RANDBETWEEN(1,1426))7” was copied into 1065 cells. This produced a list of 1065 random numbers ranging from 1 to 1426.
The numbers that this list produced were not unique; often, the same number was randomly selected multiple times. As 1065 random numbers were selected from a list of only 1426 possible numbers, it was highly probable that some containers were going to be selected multiple times and some would not be selected at all. The number of times a container was selected denoted how many samples would be taken from it (for example, if a container was randomly selected three times, three samples would be selected from it). This list was then sorted into ascending order. - A survey list was prepared by pairing up the random number list with the list of containers in the collection. This involved matching the random numbers (1–1426) with the catalogue numbers of the collection’s container list (container barcode).
- A master survey list that included container barcode and vault locator information was made. If a container was listed multiple times, it was highlighted to make it obvious to the surveyors.
- A second, smaller random container list was created as a back-up in the likely event that one of the main survey containers should not be present to sample. This was done by repeating steps 2–4 with a smaller sampling of only 76 random numbers.
Randomly selecting samples from a container
Once the containers were selected and the necessary number of samples required from each was established, the following method was used to randomly select samples.
This selection method used a ruler and was based on the unit of sixteenths of an inch, this measurement being approximately the thickness of one negative housed in a paper envelope. Using this selection method, a random number of sixteenths of an inch was generated and, after measurement, the negative that was housed the closest to that distance was selected.
- The container with the largest interior depth was measured and found to be 15.5 in., which is equivalent to 248 sixteenths of an inch. Therefore, 248 sixteenths of an inch would represent the maximum length of material that could be stored in a single row in any one box. Then 248 was multiplied by 2, which equals 496, because there were often two rows of archival material stored in a container.
- The Microsoft Excel formula “(=RANDBETWEEN(1,496))” was used to randomly select a number from 1 to 496. A column was added to the master survey list, and this formula was copied into a cell for each of the 1065 containers. We now had a list of 1065 random containers, each with a random number (n) of sixteenths of an inch for measurement purposes.
- To give each item in a container an equal chance of being selected, a random starting point for measurement was also established: 1–bottom left corner, 2–bottom right corner, 3–top left corner, 4–top right corner (Figure 32).
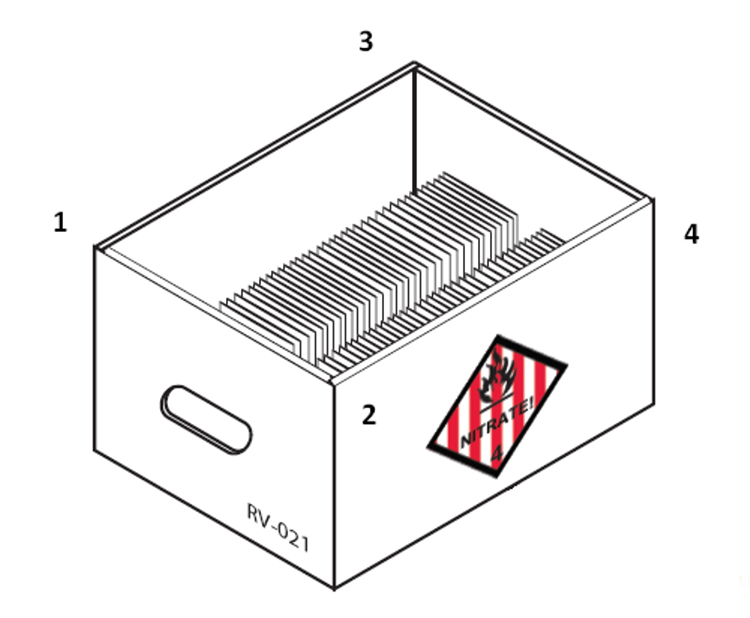
Source: Library and Archives Canada
Figure 32. Random selection of samples from one of four labelled sides of a container. - The Microsoft Excel formula “(=RANDBETWEEN(1,4))” was used to randomly select a number from 1 to 4. A column was added to the master survey list, and this formula was copied into a cell for each of the 1065 containers. We now had a list of 1065 random containers, each with a random number n of sixteenths of an inch for measurement purposes and a random point from which to start measuring.
- To select a sample, a random starting point was chosen in the container and was measured up (or down) the random n sixteenths of an inch. If two or more rows of material were present, measuring was repeated in a circular fashion until the correct distance was reached. If n exceeded the total length of the material in the container, the excess n was taken and used again at the starting point, and the operation was repeated until the total n was measured.
- When n was reached, the negative closest to that point was selected. The surveyor used a flag to mark the position where the negative had been removed.
- When the negative sample was placed back in the container, prior to pH testing, the flag was placed immediately in front of the envelope to be tested. If multiple samples were selected from the same container, the flags were numbered in the order in which they were listed on the survey list.
Survey workflow
The survey was completed over six days and involved six staff members. Two employees selected samples, flagged negatives and recorded findings. Three employees performed pH tests and recorded results. One employee pulled containers from vaults, loaded containers onto book carts, replaced containers into vaults and worked on another project during down time.
On average, it took approximately 45 seconds to sample one negative and record the results on paper, and approximately 2.5 minutes to perform a pH test on one negative sleeve and record the results.
Information collected by the survey
Negative deterioration levels
A six-point scale (0–5) (Table 11) was used to grade the deterioration level, from better to worse, of each negative sampled in the survey. This information gives a general idea about the current state of preservation of the collection as a whole.
| 0 | No deterioration |
|---|---|
| 1 | Film turns yellow, image shows signs of silver mirroring |
| 2 | Film is yellow and has silver mirroring |
| 3 | Film becomes sticky and emits odour and/or becomes amber in colour; the image begins to fade |
| 4 | Film is soft and welds to adjacent negatives and enclosures; surface may be covered with viscous froth |
| 5 | No legible image, strong odour, brown powder |
From this survey, it can be said that 63.29% of the collection (+/-3%) was at level 0 or showed no obvious signs of deterioration, and that 36.15% of the collection (+/-3%) was at level 1 and displayed signs of the first stages of deterioration. (Note: this survey did not sample any material currently stored in the destruction or deterioration vaults.)
Negative formats
All of the negative formats found in the collection and their estimated percentage representation in the collection were recorded. The formats were then correlated with the level of deterioration recorded for each negative. The data shows that the 4 in. by 5 in. format was the most prevalent in the collection and had the highest percentage of negatives at level 0, and that the 5 in. by 7 in. format had the most negatives at levels 1 and 2 of deterioration.
Envelopes
With this survey, it was important to learn what percentage of the collection was housed in original envelopes, or in less than ideal extra-institutional envelopes, and what percentage had been re-housed into archival envelopes. Additionally, LAC wanted to test the pH value of these types of envelopes and to learn if it was having any effect on the collection.
Containers
Pests, mainly flies, had been a continuous problem at LAC’s old storage facility. A surveying of containers for evidence of pests was carried out in an attempt to ascertain the efficacy of the pest eradication program at the old facility. The occurrence of pests was correlated to the vault number and the collection stored within it to determine any pattern of occurrence.
Housing conditions
Other information gathered during the collection survey included:
- the occurrence of multiple negatives housed in a single envelope
- the number of negatives housed in albums
- the prevalence of glassine envelopes within the collection
- the occurrence of plastic envelopes/sleeves
- the occurrence of cellulose acetate or safety film
- the occurrence of mould damage
With less than 0.2% of the collection surveyed, a considerable amount of information could be generated with a high degree of accuracy, statistically speaking. The amount of time required to complete the survey was six days on-site, though the post-survey compilation and analysis of the data took considerably more time to complete.
The key to this survey’s success was precise, clear planning and a dry run, which helped to ensure accuracy.
Case study 2: census
Census – Cellulose Nitrate Panoramas, 2007 / Janet Kepkiewicz
© Government of Canada
Source: Library and Archives Canada
LAC had a large collection of improperly housed cellulose nitrate panorama negatives that filled 91 boxes and that had little item level information on condition or content. The collection numbered between 4000 and 5000 negatives, many rolled together in metal tubes, while many others had no primary containers at all. A census was conducted with a view to capturing the necessary information and to re-housing all of the items in preparation for a move to a new facility.
In order to maintain safe environments for the cellulose nitrate film during the census, a few boxes at a time were delivered to the LAC Preservation Centre, where they were emptied, while the negatives were temporarily placed in large zip-lock bags and placed in cold storage. This allowed for small numbers of items to be examined and re-housed while maintaining safe storage conditions.
Each negative was separated and unrolled, and important information about it was recorded in a Microsoft Excel spreadsheet, including:
- accession number
- former barcode number
- former box number
- temporary box number (which actually became the new box number)
- photographer
- title
- date the photo was taken
- location of the photo
- dimensions (measured in height and width)
- original item number (this was a number given by the photographer; in cases where there was no item number or canister number, an N/A was given)
- canister number (in cases where there was no item number)
- content
- condition
- notes
- presence of mould
- noticeable odour
- e-copy number
Each item was then individually rolled into a custom acid-free bond paper wrap, onto which had been recorded the following information:
- item number
- accession number
- original box number (this was included to simplify the search in the Microsoft Excel spreadsheet; even though there was no formal finding aid prepared for the collection, this number did correspond to some original records)
The bond paper wraps were cut into 11 in. by 12 in. sheets and notched along the bottom edge to allow them to be folded up into the interior of the rolled negative. In addition, a notch was cut 3 1/2 in. from the top in order to feed cotton twill tape through so that the negative could be held more securely inside the wrap. As well, templates were developed to make it easier to cut the paper to the appropriate size, thus accelerating the process.
Very tightly rolled negatives that would have been damaged by unrolling and those items that were already flat were placed in envelopes and then in boxes. All of the wrapped negatives were also boxed, providing them with maximum support and protection.
A divider system that allowed the individual negatives to stand vertically was developed (Figure 33). Rolled negatives that were too high to fit vertically in the boxes were laid flat. Adjustments or modifications to the compartmentalized box design were easily made to accommodate negatives that were placed in sleeves and rolled negatives that were stored horizontally (Figure 34).
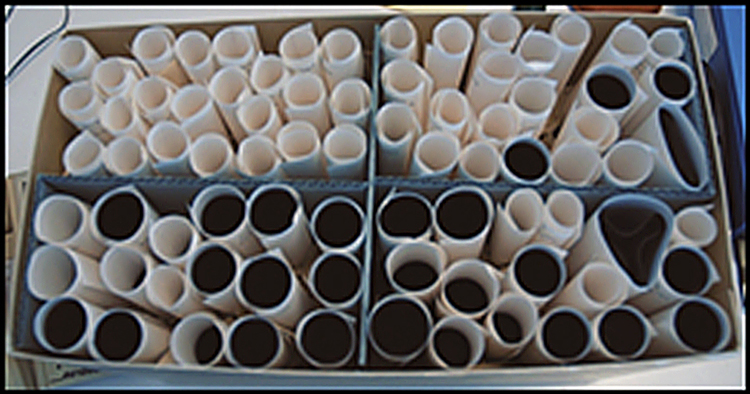
Source: Library and Archives Canada
Figure 33. Panorama negatives wrapped and boxed.
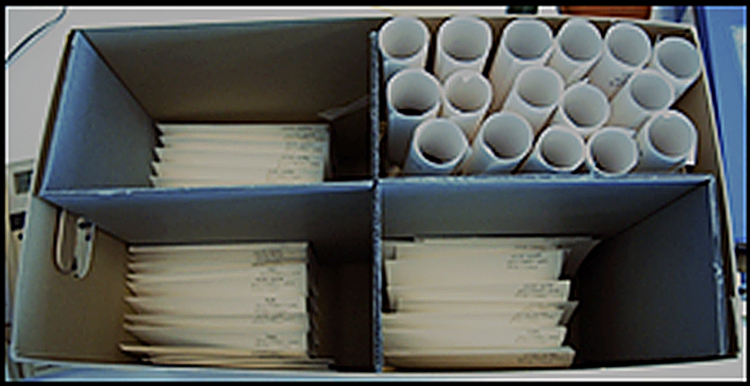
Source: Library and Archives Canada
Figure 34. Negatives in sleeves stored with rolled negatives that were too long to be stored vertically.
Case study 3: surveying members of an organization
Determining the percentage of photographic negative material types across a province
The Centre de conservation du Québec (CCQ) conducted a survey with members of the Regroupement des services d’archives privées agréés du Québec (RSAPAQ) regarding the dates of their collections to attempt to determine the approximate percentages of cellulose nitrate and cellulose acetate in those collections.
CCQ conservator Susanne Holm developed the survey methodology with the primary objective of quantifing the number of negatives on cellulose nitrate bases, cellulose acetate bases and polyester bases. The questionnaire required the responders to roughly determine the number of negatives from specific time periods, as cellulose nitrate was prevalent from the late 19th century to the mid-20th century, while cellulose acetate has been prevalent since the 1920s and polyester, since the late 1950s. Due to the overlapping time frames, strict accuracy of numbers was not possible; yet it did provide a reasonable approximation.
Results were then tabulated, and a provincial profile for Quebec was developed. Over the course of a year, CCQ and CCI staff conducted on-site visits with representatives from 24 separate collections across Quebec. During these visits, the conservation team provided instructions on the identification of different film base types and formats, and the related preservation issues. All attendees were polled as to the nature of their negatives collections, and a general profile of the RSAPAQ membership’s negatives collections was developed.
This case study demonstrates a less scientific approach. However, the survey did provide significant information related to the nature and condition of negatives collections across a region of Canada.
2. Segregate plastics
If the survey has established that the collection is made up of different material types, the next step is to segregate the plastics. Since the high levels of nitric and acetic acid generated in the deterioration process of cellulose nitrate and cellulose acetate films volatilize and become airborne, they can catalyze the deterioration process in all of the materials in their proximity. There are many examples of this being particularly true between cellulose nitrate and cellulose acetate stored in ambient conditions, with catastrophic results. Oxidizing gases and strong acids can also cause oxidation of the image silver of polyester films stored within their range.
If a small quantity of one film type is interspersed throughout another film type, it does not need to be removed if the entire collection is going into sub-zero storage.
In addition to segregating the plastics, separate any print or extraneous material that may be stored with the negatives and, at this point, apply appropriate control numbers to the collection.
Segregation projects require strict attention to the following.
Health and safety
When conducting segregation projects of film collections, particularly degrading films, health and safety concerns need to be addressed and proper personal protective equipment must be provided (consult Health and safety concerns related to degrading plastics).
Identification
Differentiating film types can be extremely difficult. Staff must be very familiar with identification techniques (consult Identifying and differentiating plastic film-based negatives).
Control numbers
When items are segregated from a larger collection, location tracking numbers that link the negatives back to the collection of origin must be assigned. This can be difficult when multiple film types are present, and particularly difficult when item level identification numbers have not been assigned. The assignment of control numbers must be carefully planned and done in full compliance with the institutional practices and procedures.
Marking numbers directly on negatives is a practice that, although discouraged, is sometimes a necessity. Numbers should be placed only on the very edge of the negative, in the border region, and should be added very discreetly. Only high quality permanent marking pens that have been tested for stability can be used. Inks must not fade or diffuse over time, nor act as an oxidizing agent for image silver. Inks should be soluble and removable with a mild solvent such as alcohol.
The products listed in Table 12 have been tested and found satisfactory for using directly on negatives.
| Brand name | Nature of material | Removability | Stability |
|---|---|---|---|
| Stabilo All Pencil | Graphite pencils designed to write on most non-porous surfaces, including plastic | Use swabs lightly dampened with distilled water and ethanol | Extremely stable; non-reactive with image silver |
| Light Impressions Black Film/Print Marking Pen | Ink pens designed for edge-marking of films | Use swabs lightly dampened with ethanol | Non-bleeding and permanent |
Rehousing
As a segregation project generally involves handling most items in a collection, it can present an ideal opportunity to re-house the collection into stable archival sleeves and boxes.
3. Implement a copying plan
Before placing a photographic negative collection in storage, it is important to plan how it is going to be accessed and viewed in the future. Implementing a copying plan is one approach to making the collection available. Determine if it is possible to copy or scan all of the negatives before placing them in storage. If it is not feasible to copy all of the negatives, concentrate on material of high use and high value.
“Collection access” refers to making original photographic negatives and/or their images available to researchers. Access can be provided in three different ways, with the latter two preferred:
- direct contact with original negatives
- digital scans of original negatives
- prints made from digital scans of original negatives
Ideally, original negatives should never be made available to researchers directly, and copying should be carried out on-site under strict protocols, overseen by collections staff. Making prints from scans can be done readily, provided that the scans allow for accurate tonal reproduction.
With the availability of digital technologies that can provide extremely high quality reproductions, the question as to the need to maintain the original looms large, particularly if the original is degrading and the only option for stabilizing it is expensive cold storage. This becomes a somewhat subjective decision with profound consequences requiring the decision maker to be fully informed on the issue. The informational value versus the artifactual value is a necessary debate. There are numerous cases of original negatives being destroyed following copying with subsequent regrets because of the poor quality of the reproduction. As well, the issue centres on the loss of original material, since a copy will always remain a copy. The artifactual value of the original is determined and assigned by the curator or archivist of the collection and needs due consideration even if the informational value is key.
Offering the collection to other institutions with similar collecting mandates should be considered prior to destroying it, particularly if those institutions have a cold storage vault or are NFPA 40-compliant. Additionally, the cost of storing a negative in a traditional cold storage environment is low compared to that of copying and to the ongoing storage costs for digital media. Predicting the long-term digital storage cost is impossible, but it is accepted that it is expensive and complex (Rosenthal et al. 2012).
The decision to allow access to collections is informed by the following key elements.
Value of the collection
The value of the collection, both historic and monetary, can and should be determined through a collection survey. Most valuable and most highly sought after images should be placed on the top of the copying priority list. Occasionally, if resources are extremely limited, placing an “at risk” collection in vapour-proof packages and sub-zero storage with no access is an appropriate strategy, provided that this small collection is on a long-term copying plan and that on-demand copying is allowed.
Condition of the collection
The condition of the collection is assessed by conducting a survey. The chemical instability of materials like cellulose nitrate and cellulose acetate generally requires that they be stored in cold or sub-zero environments in order to maximize potential for long-term preservation.
Copying should be carried out before the collection is placed in cold storage. However, this can be very problematic, depending on the degree of deterioration of the film. Health and safety issues must be addressed when handling chemically unstable materials. Note that some post-scanning image enhancement may be required, particularly in the case of a request for copies of images from unstable negatives, which will add to the labour costs. Treatment of degraded negatives prior to copying is a potential option for some cellulose acetate film, while disposal may be the only option left for others.
Intended use of the collection
The anticipated demand for a group of negatives or a collection must be determined, and collections that have the potential to be heavily requested should be placed on a priority copying list. Occasionally, duplicates or digital scans do not meet the needs of a researcher, and ongoing access to the original is required. The retrieval of negatives from cool, cold or sub-zero conditions demands that they be acclimatized prior to viewing or use, and procedures must be developed in order to do that. Also, the amount of time that a negative spends out of cold or sub-zero storage must be monitored, as this time can significantly diminish the benefits of cold storage as well as the life of the negative. Regardless of the need, all originals should, ideally, have preservation copies in the event of inadvertent damage or loss.
Existence of high-quality duplicates or digital copies
The existence of good-quality duplicates or scans allows for the immediate storage of the negatives in cold or sub-zero environments. Access requirements can be met by scanning or copying duplicates, either an entire collection at one time or on an on-demand basis. Original negatives can be properly housed and stored with little need for access to originals. Existing duplicates or copies must be assessed to ensure that they meet acceptable standards and researcher’s needs.
Seven critical considerations for copying or scanning projects
The following are seven critical considerations related to planning and implementing a copying or scanning project:
3.1. Use high scanning standards
Copying programs accomplish two goals: image access and material or image preservation. Access to images is permitted while eliminating the need to handle original negatives and the need to remove them from their preservation storage environments.
High-quality duplicates or digital scans will remove the need for physical access to collections and should be done at a very high resolution, suitable for all applications, using lossless file compression formats. This means that the file format algorithm looks for more efficient ways to represent an image, while making no compromises in accuracy. The idea is to scan once. Web-based resources that contain scanning standards and protocols are listed under the seventh consideration.
3.2. Consider digital scanning before making physical copies
If high-quality conventional duplicates have been made in the past, they can continue to provide image access. Historically, when the prescribed procedures are followed, the duplication of negatives using conventional photographic materials designed for copy-work have produced very high-quality duplicates (Hendriks et al. 1991, p. 217). Most of these materials were on polyester bases and, when processed for maximum permanence, they were extremely chemically stable. Digital copies are now preferred for ease of copying, dissemination and control. The very high resolution scans now available, coupled with the fact that very few conventional photographic copy materials are available on the market, make scanning or digital copying preferable.
3.3. Develop a plan before copying or scanning
It is recommended to develop a comprehensive copying plan, meticulously and with considerable foresight. Rapid technological changes in the field of digital image capture can be extremely challenging, requiring a flexible, adaptable plan that anticipates and facilitates file migration.
Digitization projects are expensive. Aside from the upfront costs related to the equipment and staff necessary to carry out the scanning process, the post-scanning processing of the images and the development of the metadata require considerable time and expertise. Thorough planning and understanding of all of the steps in the process are key to efficiency and project success.
3.4. Prioritize the collection before copying or scanning
Copying or scanning of negatives is an expensive process that can take a considerable amount of time to complete. Priority should be given to the most deteriorated and most requested material.
3.5. Use the copying or scanning project as an opportunity for re-housing negatives
Copying or scanning projects should incorporate a preservation component for analogue originals, including re-sleeving and re-boxing.
3.6. Consider surface cleaning and/or treatment of cellulose acetate films before copying or scanning
Negatives often require some degree of surface cleaning to maximize the quality of the scan. Degraded cellulose acetate film without a good prior copy can be treated to remove the emulsion from the plastic support prior to scanning, a treatment to be conducted only by trained conservators.
3.7. Follow resources and guides on the planning of copying or scanning projects
The following online resources may be helpful in offering advice and guidelines on digitizing photographic and film collections:Endnote 1
- Bibliographic Center for Research’s Colorado Digitization Program (BCR’s CDP) Best Practices Working Group. BCR’s CDP Digital Imaging Best Practices, Version 2.0 (PDF format).
- Canadian Council of Archives. Step-by-step guides to digitisation projects (PDF format).
- California State University Northridge. Project Scanning Standards. Oviatt Library, Digital Collections.
- University of North Texas Libraries. Digital Projects Unit
- Still Image Working Group. Digital Conversion – Documents and Guidelines: A Bibliographic Reference, Federal Agencies Digital Guidelines Initiative.
- Still Image Working Group. Guidelines: Content Categories & Digitization Objectives: Reformatting Historical Printed Matter, Documents and Manuscripts, and Pictoral Materials – Content Categories and Subcategories table, Federal Agencies Digitization Guidelines Initiative.
- Still Image Working Group. Guidelines: Technical Guidelines for Digitizing Cultural Heritage Materials. Federal Agencies Digitization Guidelines Initiative.
- Bill LeFurgy. Information or Artifact: Digitizing Photographic Negatives and Transparencies, Part 1. Library of Congress, October 2011.
- Bill LeFurgy. Information or Artifact: Digitizing Photographic Negatives and Transparencies, Part 2. Library of Congress, October 2011.
- ISO 13008:2012, Information and Documentation – Digital Records Conversion and Migration Process.
4. Evaluate enclosures
The long-term storage environment will dictate enclosure requirements. For example, negatives destined for sub-zero storage can be left in original sleeves, provided that they are physically sound. The potential deteriorating effect of an acidic old sleeve on the negative will be minimized in cold storage, and the deterioration rate of the original sleeve itself will be slowed down, eliminating any threat to the negative. On the other hand, collections going into ambient or cool environments need to be housed in paper sleeves and in vented boxes to promote air circulation.
Ideally, every negative should be sleeved individually. In reality, many institutions cannot afford to house negatives in separate envelopes due to the cost of archival enclosures or to the increased space requirements of individually sleeved items. A number of negatives can be stored together in one sleeve, provided that proper control numbers are applied. This approach is even less of a concern if the negatives are in cold storage. However, if they are staying in ambient conditions, the negatives could be interleaved with a sheet of good-quality acid-free paper.
The transfer of item level information and control numbers from original enclosures to new ones is critical and can add a considerable amount of time to the project. Information transfer can involve either manually transcribing data, or scanning or photocopying original sleeves. Time considerations can be a strong argument for maintaining original sleeves in sub-zero storage.
Sleeves
Original envelopes do not need to be replaced in all cases. If the sleeves are in good condition, they can be maintained. Replace badly damaged, degraded and dirty sleeves, particularly if they are going into sub-zero conditions. Multiple negatives in one sleeve can be maintained as such. In this case, item level tracking numbers must be recorded on the exterior envelopes for all items within.
Paper envelopes are recommended over plastic envelopes as the paper absorbs decomposition by-products, permitting diffusion of volatiles, whereas plastic sleeves contain them.
Whether to use buffered or non-buffered paper enclosures has been a long-standing debate within the photograph conservation community. Generally, there is now consensus that buffered paper is preferred for the storage of cellulose nitrate and cellulose acetate films due to its greater capacity to absorb acidic by-products of deterioration. Research conducted at Image Permanence Institute has shown that the presence of an alkaline buffer in the paper used for envelopes has little or no impact on the long-term stability of the cellulose acetate film stored within the envelopes under accelerated aging conditions (Bigourdan et al. 1996). In other words, the end results were the same for a buffered paper envelope and a non-buffered paper envelope. These results were obtained under experimental conditions; how this translates to natural aging conditions is not entirely known.
Some investigations at room temperature showed that the use of a paper envelope was a secondary contributor to the vinegar syndrome. This risk was not eliminated by the use of buffered paper.
Although plastic sleeves, including polyester, polystyrene, polypropylene and polyethylene, are stable and acceptable from a conservation perspective, they restrict the migration of acids, which allows interior environments to become even more highly acidic. This, in turn, speeds up the rate of acid-catalyzed hydrolysis of the film.
Polyester films, on the other hand, can be stored in polyester, polystyrene, polypropylene and polyethylene due to their vastly superior chemical stability. Polyvinyl chloride and all plastics coated with anti-static and slipping agents are to be avoided. This stands true regardless of whether or not the collection is in below zero, cold, cool or ambient temperatures.
Commercially available storage enclosures should be tested and pass the Photographic Activity Test (PAT) as outlined in ISO 18916:2007, Imaging Materials – Processed Imaging Materials – Photographic Activity Test for Enclosure Materials. Many archival supply houses now indicate in their catalogues which of their products pass the PAT. Should you find a product you like but are unsure of, PAT testing can be carried out at the Canadian Conservation Institute for a fee.
Glassine sleeves, even though they may pass the PAT and they are marketed as being acid-free and buffered, are not recommended due to their capacity to soften and stick to photographic emulsions if humidity levels are high.
The following ISO standards outline what materials are considered acceptable for the storage of most photographic collections:
- ISO 18902:2013, Imaging Materials – Processed Imaging Materials – Albums, Framing and Storage Materials
- ISO 18916:2007, Imaging Materials – Processed Imaging Materials – Photographic Activity Test for Enclosure Materials
Boxes
There are many different options for boxes for long-term storage of sleeved negatives, including laminated acid-free buffered cardboard, corrugated acid-free buffered cardboard, fluted polypropylene, Coroplast and non-acid-free corrugated cardboard. Most come in a broad range of sizes, formats and prices. Any box selected should allow some degree of ventilation. Hand holes are generally considered sufficient.
As with sleeves, the first choice is between paper and plastic. Paper is preferred for the same reason paper sleeves are preferred. Paper boxes will absorb acidic by-products of decomposition, increasing the rate of diffusion of these volatiles away from the deteriorating plastic film.
Plastic boxes are generally fluted polypropylene (Coroplast) and come in a broad range of standard sizes. This choice should only be considered for sub-zero storage of cellulose nitrate and cellulose acetate. In ambient and even cool storage environments, paper boxes are recommended, particularly for films exhibiting signs of deterioration.
Polyester-based film collections are safe in polypropylene boxes due to their superior chemical stability in most storage environments (Porck and Teygeler 2000).
Boxes can be used to create vapour-proof packages. They must be compatible with the interior dimensions of the selected freezer and the proposed installation layout in order to efficiently maximize the use of space (large boxes, for example, take up three-quarters of a shelf, which would mean losing a considerable amount of storage space).
Boxes will generally be rectangular or square with a tight-fitting lid and correspond to the format of the negatives stored within. If the negatives do not fit snugly in the box, spacers should be employed to ensure little to no movement inside the box (spacers should be made of lightweight inert materials that can be easily cut and installed, such as Ethafoam, Coroplast or corrugated cardboard).
Labelling on the outside of the box should include, ideally, the accession number, the catalogue number, the item level number and a brief description of the material. There should be two sets of labels on the box, one on the end that is going to be visible when the freezer door is opened and one on the side of the box to facilitate retrieval from multiple vantage points.
Spot cobalt humidity indicator cardsEndnote 2 can be applied to the side of the box where the label was placed (Figure 35; McCormick-Goodhart 2004). Using a humidity indicator card will allow for easy surveying of the boxes while in the freezer to determine the efficacy of the vapour-proof packaging. The card will signify changes to the microclimate as a result of leaks in the bags used to create the vapour-proof housing.

© Government of Canada, Canadian Conservation Institute. CCI 122361-0112
Figure 35. A spot cobalt humidity indicator card.
Options for cold or sub-zero storage
Choosing the most suitable option for cold or sub-zero storage is dictated primarily by the volume of material in the collection that requires such storage, the available resources and the urgency to delay severe deterioration. There are four basic options for cold storage of negative collections:
- standard domestic upright freezer
- stand-alone walk-in freezer vault, with or without full vault humidity control
- leased commercial freezer space
- NFPA 40-compliant facilities for cellulose nitrate film
Numerous factors must be considered in order to make an informed decision about which type of cold storage to choose, and they are discussed below under each category of cold storage.
Standard domestic upright freezer
A standard domestic upright freezer is a viable option for most small collections and is available in a variety of sizes and interior space configurations. Choosing a frost-free unit is essential; also, it is important to select interiors with few permanent built-in obstructions in order to maximize flexibility.
Because of RH cycling, it is necessary to place the negatives in vapour-proof packages before putting them in the freezer. Provided that the interior set-up allows some flexibility, 0.42–0.48 m3 (15–17 ft.3) of material in vapour-proof packages can generally be stored in an average upright freezer. Given the limited interior space, there are few options for storing oversized collections.
For larger (medium-sized) collections, where resources are limited, it is possible to start with 1 to 10 upright freezers for housing significant material or material in the beginning stages of deterioration. One to 10 units make up a modest initial capital outlay; choosing more than 10 units diminishes the cost benefit of the upright freezers with regard to capital outlay and energy efficiency.
Stand-alone walk-in freezer vault, with or without full vault humidity control
A stand-alone walk-in freezer is good for larger collections that require more than 10 upright domestic freezers, particularly if collection expansion is anticipated. In addition, oversized collection material can be more easily accommodated and a full range of shelving options can be used (fixed, mobile, etc.), depending on the needs of the collection and the budget.
This type of freezer requires higher initial capital outlay. It must be frost-free. Standard-size or custom-made stand-alone, pre-fabricated, modular, insulated panels can be used to meet specific requirements of the collection and should include fire-suppression systems and remote environmental monitoring alarm systems. RH-controlled vaults require air-chilled coolers, compressors, condensers and desiccant wheels and, if humidity control is needed, they require back-up units.
Construction of cold-storage rooms requires performance-based procurement specifications to ensure proper fabrication and subsequent operation. The U.S. National Park Service outlines specifications and requirements for cold storage units in its online document Performance Specification for a Cold Storage Vault to Be Used for Film-Based Photographic Media (PDF format).
With full vault humidity control, a stand-alone walk-in freezer entails higher costs in both capital and installation, as well as higher ongoing energy costs. Often, many technical challenges are associated with strict humidity control. However, easier access can be provided to collection material as the material is not packaged; however, strict acclimatization of collection material is required when removing it from the freezer.
Without full vault humidity control, vapour-proof packaging of negatives is essential (with the benefit that there is no need to package negatives for acclimatization upon removing them from the cold). Sealed, microclimate storage cabinets can be used to control and maintain specified RH in the vault, though acclimatization is still required when removing items from the cabinets.
Leased commercial freezer space
A leased commercial freezer space can be a best-case short-term option when emergency storage is required for a deteriorating collection or when waiting to implement a permanent cold storage facility.
When leasing commercial freezer space, choose a business that has a proven track record, if at all possible, and who can provide the appropriate level of security. Full technical knowledge of the facility is essential: temperature cycling, consistency of environments, shelving configurations, handling, transport, etc. The contractual arrangement must include details on ongoing rates, access agreements, shipping, handling, bar coding, etc.
Vapour-proof packaging will be required for collection material and packaged material must be placed securely on pallets.
NFPA 40-compliant facilities for cellulose nitrate film
NFPA 40 stipulates storage temperatures of 21°C or less; cool and sub-zero temperatures are recommended and can be implemented while still complying with the full standard. The standard differentiates between non-extended term storage and extended term storage and provides guidelines for both types of storage. In addition, the standard establishes prescriptions with regards to the following elements for storing cellulose nitrate:
- construction materials and structure
- fire rating of materials
- capacity
- venting
- cabinet design
- shelving: design and layout
- sprinkler systems
- explosion-proof utilities
- temperature
- storage and container materials
- handling and transport of film
- disposal of cellulose nitrate
An NFPA 40-compliant facility is useful for quantities of nitrate film exceeding 11 kg (25 lb.). Although smaller quantities of nitrate film are exempt from compliance to NFPA 40, they still must be segregated from other plastic types and stored in cool, cold or sub-zero environments.
Quantities of less than 340 kg (750 lb.) can be stored in either compliant cabinets or vaults. Quantities exceeding 340 kg (750 lb.) must be stored in compliant vaults.
Humidity control in sub-zero storage
There are three ways to achieve humidity control in sub-zero storage (each option is further discussed below):
- vapour-proof packaging
- sealed or gasketed cabinets
- air-drying systems
Vapour-proof packaging
When there is no humidity control in an upright freezer or vault apart from the routine frost-free function, use vapour-proof packaging.
Applications of this humidity-control method are described in the two following online resources:
- Mark McCormick-Goodhart. On the Cold Storage of Photographic Materials in a Conventional Freezer Using the Critical Moisture Indicator (CMI) Packaging Method (PDF format), 2004.
- Sue Bigelow. Cold Storage of Photographs at the City of Vancouver Archives (PDF format). Canadian Council of Archives, 2004, p. 34.
Sealed or gasketed cabinets
Choose sealed or gasketed cabinets (Figure 36). They allow a large quantity of material in controlled humidity to be stored without having to be wrapped. Vapour-proof and humidity-controlled cabinets require high-quality gasketing that is not easily compromised, as well as interior silica gel panels conditioned to 30–40% RH. The silica gel must be regularly monitored and routinely conditioned.
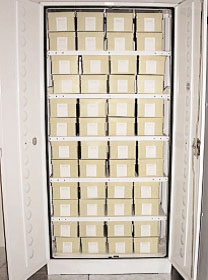
© City of Vancouver
Figure 36. A gasketed cabinet at the Vancouver City Archives.
Applications of this humidity-control method are described in the Bigelow resource, under Vapour-proof packing, and in the following resource:
- Henry Wilhelm and Mark McCormick-Goodhart. "The Design and Operation of a Passive Humidity-Controlled Cold Storage Vault Using Conventional Freezer Technology and Moisture Sealed Cabinets" (PDF format), 2004.
Air-drying systems
Use humidity-controlled vaults that incorporate air-drying systems, usually desiccant wheels, plus backup units for RH control.
Humidity control entails substantial capital costs and the ongoing potential of doubling energy costs compared to having no RH control. The units in question routinely pose technical challenges that result in higher maintenance costs. Yet, for large collections, this may be the most efficient approach as vapour-proof packaging is labour intensive and gasketed cabinets can be expensive to install. There are many examples of institutions that have constructed temperature and humidity controlled vaults. Two key North American examples include Northeast Historic Film in Bucksport, Maine, and the Harvard Depository at Harvard University.
Conclusion
This Technical Bulletin has set out to address all of the salient points to be considered when working towards the long-term preservation of plastic film-based negative collections and to guide collection custodians to that end.
Caring for these materials starts with their identification, followed by understanding their mechanisms of deterioration, both of which help to make sense of storage and housing recommendations. The overarching goal, that of long-term preservation, can be achieved through surveys, copying and access strategies, treatment and cool or cold storage implementation. Resourcing these endeavours, though outside the scope of this Bulletin, is always a challenge. This too can be facilitated by a systematic and thorough approach to determining the needs of the collection.
Inherent vice, physical abuse and adverse storage materials and environments all contribute to the degradation and destruction of plastic negatives. Though managing these collections, large or small, can appear to be a daunting task due the variability in material structure, the degree of deterioration and, often, the sheer number of objects, tools and guidance are offered for every step.
Acknowledgements
Special thanks to Marie-Lou Beauchamp, Conservator (Archival Documents and Photographs), for her help in reviewing this Technical Bulletin.
Bibliography
Adelstein, P.Z., and J.L. McCrea. “Stability of Processed Polyester Base Photographic Films.” Journal of Applied Photographic Engineering 7,6 (August 1981), pp. 160–167.
Adelstein, P.Z., J.M. Reilly, D.W. Nishimura and C.J. Erbland. “Stability of Cellulose Ester Base Photographic Film: Part I, Laboratory Testing Procedures.” Society of Motion Picture and Television Engineers (SMPTE) Journal 101,5 (1992), pp. 336–346.
Adelstein, P.Z., J.M. Reilly, D.W. Nishimura and C.J. Erbland. “Stability of Cellulose Ester Base Photographic Film: Part II, Practical Storage Considerations.” Society of Motion Picture and Television Engineers (SMPTE) Journal 101,5 (1992), pp. 347–353.
Adelstein, P.Z., J.M. Reilly, D.W. Nishimura and C.J. Erbland. “Stability of Cellulose Ester Base Photographic Film: Part III, Measurement of Film Degradation.” Society of Motion Picture and Television Engineers (SMPTE) Journal 104,5 (1995), pp. 281–291.
Adelstein, P.Z., J.M. Reilly, D.W. Nishimura and C.J. Erbland. “Stability of Cellulose Ester Base Photographic Film: Part IV, Behavior of Nitrate Base Film.” Society of Motion Picture and Television Engineers (SMPTE) Journal 104,6 (1995), pp. 359–369.
Adelstein, P.Z., J.M. Reilly, D.W. Nishimura, C.J. Erbland and J.L. Bigourdan. “Stability of Cellulose Ester Base Photographic Film: Part V, Recent Findings.” Society of Motion Picture and Television Engineers (SMPTE) Journal 104,7 (1995), pp. 439–447.
American National Standards Institute. ANSI PH1.43-1985, American National Standard for Photography (Film) – Processed Safety Film – Storage. New York, NY: American National Standards Institute, 1985.
Barsha, J. “Inorganic Esters.” In E. Ott, H.M. Spurlin and M.W. Grafflin, eds., Cellulose and Cellulose Derivatives, vol. 5, part II. New York, NY: Interscience Publishers, 1952, pp. 713–762.
Bigelow, S. Cold Storage of Photographs at the City of Vancouver Archives (PDF format). Ottawa, ON: Canadian Council of Archives, 2004.
Bigourdan, J.-L., and J.M. Reilly. “Effectiveness of Storage Conditions in Controlling the Vinegar Syndrome: Preservation Strategies for Acetate Base Motion-Picture Film Collections.” In M. Aubert and R. Billeaud, eds., Image and Sound Archiving and Access: The Challenges of the 3rd Millenium, Proceedings of the Joint Technical Symposium, Paris 2000. Paris, France: Centre national de la cinématographie, May 2000, pp. 14–34.
Bigourdan, J.-L., P.Z. Adelstein and J.M. Reilly. “Acetic Acid and Paper Alkaline Reserve: Assessment of a Practical Situation in Film Preservation.” In J. Bridgland, ed., ICOM-CC, 11th Triennial Meeting, Edinburgh, Scotland, 1–6 September 1996, Preprints, vol. 2. London, UK: James & James Ltd., 1996, pp. 573–579.
Bigourdan, J.-L., P.Z. Adelstein and J.M. Reilly. “Moisture and Temperature Equilibration: Behavior and Practical Significance in Photographic Film Preservation.” In S. Monod, C. Capderou and C. Chahine, eds., La conservation: une science en évolution, bilans et perspectives, actes des troisièmes Journées internationales d’études de l’ARSAG, Paris, 21 au 25 avril 1997. Paris, France: Association pour la recherche scientifique sur les arts graphiques, 1997, pp. 154–164.
Burton, W.A. The ABC of Modern Photography, 2nd ed. London, UK: Piper & Carter, 1879.
Calhoun, J.M. “Storage of Nitrate Amateur Still Camera Negatives.” Journal of the Biological Photographic Association 21,3 (August 1953), pp. 1–13.
Canadian Council of Archives. Step-by-step guides to digitisation projects (PDF format). Ottawa, ON: Canadian Council of Archives, n.d.
Carrol, J.F., and J.M. Calhoun. “Effect of Nitrogen Oxide Gases on Processed Acetate Film.” Journal of the Society of Motion Picture and Television Engineers 64,9 (September 1955), pp. 501–507.
Chapman, S. “Counting the Costs of Digital Preservation: Is Repository Storage Affordable?” Journal of Digital Information 4,2 (2003), pp. 1–15.
Cummings, J.W., A.C. Hutton and H. Silfin. “Spontaneous Ignition of Decomposing Cellulose Nitrate Film.” Journal of the Society of Motion Picture and Television Engineers 54,3 (March 1950), pp. 268–274.
Eder, J.M. History of Photography. Mineola, NY: Dover Publications, 1978.
Edge, M., N.S. Allen, M. Hayes, P.N.K. Riley, C.V. Horie and J. Luc-Gardette. “Mechanisms of Deterioration in Cellulose Nitrate Base Archival Cinematograph Film.” European Polymer Journal 26,6 (1990), pp. 623–630.
Film Forever. “(Chapter) 3. Know Your Enemy: Damage and Decomposition.” In The Home Film Preservation Guide, n.d.
Fischer, M. A Short Guide to Film Base Photographic Materials: Identification, Care, and Duplication. Revised. Andover, MA: Northeast Document Conservation Centre, 2012.
Fischer, M., and A. Robb. “Guidelines for Care and Identification of Film-Base Photographic Materials.” Topics in Photographic Conservation 5. Washington, D.C.: Photographic Materials Group (PMG) of the American Institute for Conservation of Historic and Artistic Works (AIC), (1993), pp. 117–123.
Gelernter, G., L.C. Browning, S.R. Harris and C.M. Mason. “The Slow Thermal Decomposition of Cellulose Nitrate.” The Journal of Physical Chemistry 60,9 (1956), pp. 1260–1264.
Gernsheim, H., and A. Gernsheim. The History of Photography: From the Earliest Use of the Camera Obscura in the Eleventh Century Up to 1914. Oxford, UK: Oxford University Press, 1955.
Guild, S., M. MacDonald and T. Strang. Mould Prevention and Collection Recovery: Guidelines for Heritage Collections, revised. Technical Bulletin 26. Ottawa, ON: Canadian Conservation Institute, 2019.
Health and Safety Executive. The Dangers of Cellulose Nitrate Film (PDF format). HSE Leaflet INDG469. London, UK: Health and Safety Executive, 2013.
Heckman, H. “Burn After Viewing, or, Fire in the Vaults: Nitrate Decomposition and Combustibility.” (PDF format) The American Archivist 73 (Fall/Winter 2010), pp. 483–506.
Hendriks, K.B., et al. Fundamentals of Photograph Conservation: A Study Guide. Toronto, ON: Lugus Productions Ltd. in cooperation with the National Archives of Canada and the Canada Communication Group, 1991.
Hennessey, L. 2010 Survey of the Photographic Nitrate Film Collection Housed at the Rockcliffe Nitrate Storage Facility, Version 1.20, Rockcliffe Nitrate Storage Facility, Canadian Forces Base Rockcliffe, Codd’s Road, Ottawa. Internal document. Ottawa, ON: Library and Archives Canada, 2010.
Horvath, D. G. The Acetate Negative Survey (PDF format). Final Report. Louisville, KY: University of Louisville, 1987.
International Organization for Standardization. ISO 18931:2001, Imaging Materials – Recommendations for Humidity Measurement and Control. Geneva, Switzerland: International Organization for Standardization, 2001.
International Organization for Standardization. ISO 18916:2007, Imaging Materials – Processed Imaging Materials – Photographic Activity Test for Enclosure Materials. Geneva, Switzerland: International Organization for Standardization, 2007.
International Organization for Standardization. ISO 18901:2010, Imaging Materials – Processed Silver-Gelatin-Type Black-and-White Films – Specifications for Stability. Geneva, Switzerland: International Organization for Standardization, 2010.
International Organization for Standardization. ISO 18911:2010, Imaging Materials – Processed Safety Photographic Films – Storage Practices. Geneva, Switzerland: International Organization for Standardization, 2010.
International Organization for Standardization. ISO 18934:2011, Imaging Materials – Multiple Media Archives – Storage Environment. Geneva, Switzerland: International Organization for Standardization, 2011.
International Organization for Standardization. ISO 13008:2012, Information and Documentation – Digital Records Conversion and Migration Process. Geneva, Switzerland: International Organization for Standardization, 2012.
International Organization for Standardization. ISO 18906:2000 (reviewed in 2012), Imaging Materials – Photographic Films – Specifications for Safety Film. Geneva, Switzerland: International Organization for Standardization, 2012.
International Organization for Standardization. ISO 18902:2013, Imaging Materials – Processed Imaging Materials – Albums, Framing and Storage Materials. Geneva, Switzerland: International Organization for Standardization, 2013.
James, T.H. “The Search to Understand Latent Image.” In E. Ostroff, ed., Pioneers of Photography: Their Achievements in Science and Technology. Springfield, VA: The Society for Imaging Science and Technology, 1987, pp. 47–62.
Kelley, K., B. Clark, V. Brown and J. Sitzia. “Good Practice in the Conduct and Reporting of Survey Research.” International Journal for Quality in Health Care 15,3 (2003), pp. 261–266.
MacLean, B.L. Resin-Coated Photographs: Searching for an Appropriate Labelling Device. Master’s Thesis, Queen’s University, 2000.
Maddox, R.L. “A Silver Salted Gelatine Emulsion.” British Journal of Photography (September 8, 1871).
McCormick-Goodhart, M.H. “The Allowable Temperature and Relative Humidity Range for the Safe Use and Storage of Photographic Materials.” (PDF format) Journal of the Society of Archivists 17,1 (1996), pp. 7–21.
McCormick-Goodhart, M.H. On the Cold Storage of Photographic Materials in a Conventional Freezer Using the Critical Moisture Indicator (CMI) Packaging Method (PDF format). Grinnell, IA: Wilhelm Imaging Research, 2004.
Mees, C.E.K. From Dry Plates to Ektachrome Film: A Story of Photographic Research. New York, NY: Ziff-Davis Publishing Company, 1961.
Messier, P. Preserving Your Collection of Film-Based Photographic Negatives. Denver, CO: Rocky Mountain Conservation Center, 1993.
Morrisson, N. “Film Data Index.” Photon Detector. N.p.: Nicolai Morrisson, 2005–2010.
National Fire Protection Agency. NFPA 40, Standard for the Storage and Handling of Cellulose Nitrate Film. Quincy, MA: National Fire Protection Agency, 2011.
National Park Service. Cold Storage: A Long-Term Preservation Strategy for Film-Based Photographic Materials. Washington, D.C.: National Park Service, n.d.
National Park Service. “Caring for Cellulose Nitrate Film.” (PDF format) Conserv O Gram 14/8. Washington, D.C.: National Park Service, 2004.
National Park Service. “Cold Storage for Photograph Collections – An Overview.” (PDF format) Conserv O Gram 14/10. Washington, D.C.: National Park Service, 2009.
National Park Service. “Cold Storage for Photograph Collections – Using Individual Freezer Units.” (PDF format) Conserv O Gram 14/11. Washington, D.C.: National Park Service, 2009.
National Park Service. “Cold Storage for Photograph Collections – Vapor-Proof Packaging.” (PDF format) Conserv O Gram 14/12. Washington, D.C.: National Park Service, 2009.
National Park Service. “Cobalt Indicating Silica Gel Health and Safety Update.” (PDF format) Conserve O Gram 2/15. Washington, D.C.: National Park Service, 2005.
Neblette, C.B. “History of Photographic Processes.” In J.M. Sturgee, ed., Neblette’s Handbook of Photography and Reprography, Materials, Processes and Systems, 7th ed. New York, NY: Van Nostrand Reinhold, 1977, pp. 1–5.
Norris, D.H., and J.J. Gutierrez, eds. Issues in the Conservation of Photographs. Los Angeles, CA: Getty Conservation Institute, 2010.
Porck, H.J., and R. Teygeler. “Chapter 3: Film and Photographic Materials.” In Preservation Science Survey: An Overview of Recent Developments in Research on the Conservation of Selected Analog Library and Archival Materials (PDF format). Washington, D.C.: Council on Library and Information Resources, 2000.
Puglia, S. “Cost-Benefit Analysis for B/W Acetate: Cool/Cold Storage vs. Duplication.” Abbey Newsletter 19,4 (September 1995).
Puglia, S., J. Reed and E. Rhodes. Guidelines for Digitizing Archival Materials for Electronic Access. College Park, MD: National Archives and Records Administration, 2004.
Reilly, J.A. “Celluloid Objects: Their Chemistry and Preservation.” Journal of the American Institute for Conservation 30,2 (1991), pp. 145–162.
Rosenthal, D.S.H., D.C. Rosenthal, E.L. Miller, I.F. Adams, M.W. Storer and E. Zadok. “The Economics of Long-Term Digital Storage.” Presented at The Memory of the World in the Digital Age Conference. [unpublished proceedings] Vancouver, B.C., September 2012.
Rossell, D. “Exploding Teeth, Unbreakable Sheets, and Continuous Casting: Nitrocellulose, from Guncotton to Early Cinema.” In R. Smither and C. Surowiec, eds., This Film Is Dangerous: A Celebration of Nitrate Film. Brussels, Belgium: International Federation of Film Archives, 2002.
Selwitz, C. “Cellulose Nitrate in Conservation.” (PDF format) Research in Conservation 2. Marina del Rey, CA: Getty Conservation Institute, 1988.
Shepilova, I.G. “(Chapter 1.) Combustibility Characteristics of Information Media in Libraries and Archives.” In A.G. Thomas, ed., Main Principles of Fire Protection in Libraries and Archives: A RAMP Study. Paris, France: UNESCO, 1992.
Stroebel, L., J. Compton, I.B. Current and R. Zakia. Photographic Materials and Processes. Boston, MA: Focal Press, 1986, pp. 233–235.
Tétreault, J., and E. Hagan. Moving Targets: Evolving Environmental Guidelines for Museums. Lecture. Canadian Conservation Institute, 65th Annual Canadian Museums Association Conference. Ottawa, ON, April 24, 2012.
Theisen, E. “The History of Nitrocellulose as a Film Base.” Society of Motion Picture and Television Engineers (SMPTE) Journal 20,3 (March 1933), pp. 259–262.
Valverde, M.F. Photographic Negatives: Nature and Evolution of Processes. Rochester, NY: Advanced Residency Program in Photograph Preservation, Image Permanence Institute, 2004.
Wentzel, F. Memoirs of a Photochemist. Philadelphia, PA: American Museum of Photography, 1960, pp. 26–27.
Wikipedia. Notch Code, March 25, 2012.
Wilhelm, H., and C. Brower. “(Chapter 20.) Large-Scale, Humidity-Controlled Cold Storage Facilities for the Permanent Preservation of B&W and Color Films, Prints, and Motion Pictures.” (PDF format) The Permanence and Care of Color Photographs: Traditional and Digital Color Prints, Color Negatives, Slides, and Motion Pictures. Grinnell, IA: Preservation Publishing Company, 1993.
Wilhelm, H., and M. McCormick-Goodhart. “The Design and Operation of a Passive Humidity-Controlled Cold Storage Vault Using Conventional Freezer Technology and Moisture Sealed Cabinets.” (PDF format) In F. Frey and R. Buckley, eds., Final Program and Proceedings: IS&T Archiving Conference, San Antonio, Texas, 20–23 April, 2004. Springfield, VA: The Society for Imaging Science and Technology, 2004, pp. 176–182.
Williams, R.S. The Diphenylamine Spot Test for Cellulose Nitrate in Museum Objects. CCI Notes 17/2. Ottawa, ON: Canadian Conservation Institute, 1994.
© Government of Canada, Canadian Conservation Institute, 2020
Published by:
Canadian Conservation Institute
Department of Canadian Heritage
1030 Innes Road
Ottawa, Ontario K1B 4S7
Canada
Cat. No.: CH57-3/1-35-2020E-PDF
ISSN 2562-0282
ISBN 978-0-660-33875-0