Digitizing Intangible Cultural Heritage : A How-To Guide
Prepared by the Museum Association of Newfoundland and Labrador for the Canadian Heritage Information Network
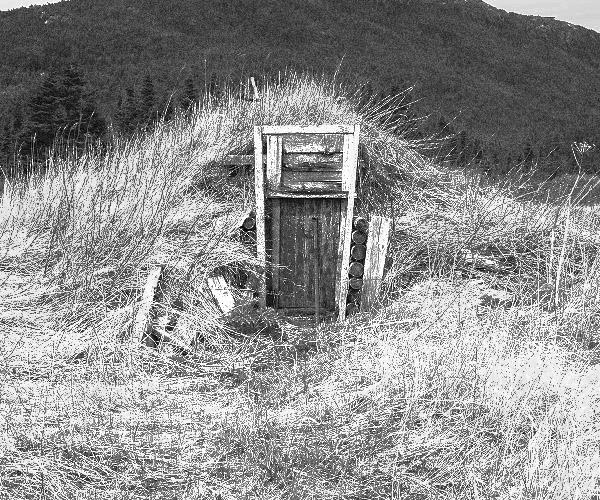
A guide to assist museums, archives and independent researchers
This manual assists museums, archives and independent researchers in digitizing their existing collections of intangible heritage-related material. Aside from providing step-by-step digital transferring instructions, it also offers definitions for heritage-related terminologies, as well as a significant number of technological terminologies. While this digitization guide aims to be user-friendly, familiarity with basic audio/visual equipment and media software is a prerequisite. Digitization instructions are provided for both Windows and Mac operating systems.
Intangible Cultural Heritage can take various forms
The customs and traditions practiced by the members of a group or community help to give that group or community a sense of identity. These non-physical components of any given cultural group are referred to as Intangible Cultural Heritage (ICH) and are closely linked to what makes a specific group of people unique. ICH can take the form of knowledge, such as where to forage for wild berries, or how to cure a cold, and skills, like how to build a boat or knit a pair of mittens. It can also include things like dances, songs, legends, and elements of language such as regional dialects and expressions. Because certain customs and traditions require physical objects to execute, ICH can also include the instruments, tools, artifacts and cultural spaces associated with these customs. For example, ICH might include the materials required in boatbuilding, the costume worn for a cultural dance, or the fishing structure where a day's catch is cleaned and processed. With ICH, the tangible and intangible come together to create a backdrop that communities, groups and individuals see as being part of their cultural heritage and identity.
Old practices and beliefs of a group are not the only form of ICH that should be acknowledged. ICH also includes the contemporary "…rural and urban customs and traditions practiced by diverse cultural groups and incorporated into contemporary expression.Footnote 1" These community practices are often handed down from one generation to another, but not without changing and evolving along the way. In fact, a tradition practiced by your grandparents may have been adapted for a contemporary setting, giving it the illusion of being a new tradition. Although these traditions may not occupy physical space, they are a part of the living heritage of a place and therefore hold an important role not only for individual families, but for groups and larger distinctive communities too. According to UNESCO's position paper for the 2003 conference, ICH "…is constantly recreated by communities and groups in response to their environment, their interaction with nature and with history, and provides them with a sense of identity and continuity, thus promoting respect for cultural diversity and human creativity."
UNESCO has delineated five different categories of Intangible Cultural Heritage. These include:
- Oral traditions and expression, including language as a vehicle for ICH
- Performing arts;
- Social practices, rituals and festive events;
- Knowledge and practices concerning nature and the universe;
- Traditional craftsmanship
Building ICH Collections is safeguarding our living heritage
What can a recorded interview about a root cellar tell us about how people used to live? Who will find this information valuable and how can it have a positive impact on a community? Documenting traditional practices, such as how to build and store food in a root cellar, is important because if we don't take the time to learn about skills acquired in the past, certain forms of traditional knowledge may become inaccessible to current and future generations. Documentation is key to safeguarding our Intangible Cultural Heritage. It is an important community-building practice because as it helps to ensure the longevity of invaluable customs and practices, it also validates the life experiences of older members of a community. Meanwhile, through sharing ICH, younger generations are encouraged to meditate on how certain aspects of their community have changed, and why. As more and more root cellars fall into disrepair, photographs and stories can remind us that there were certain traditions that are no longer being used, yet may be useful or desirable to us in the future.
The act of safeguarding our living heritage, as encouraged by UNESCO, requires not only dedication but also the use of a practical research, documentation, and stewardship skills. To safeguard ICH is to enact measures that ensure the validity of ICH. Such measures include "…the identification, documentation, research, preservation, protection, promotion, enhancement, transmission, particularly through formal and informal education, as well as the revitalization of the various aspects of such heritage" (UNESCO). In all of this, a group's traditions are given meaning, and the community is strengthened in the process. How this multi-faceted goal of safeguarding is enacted may vary, but one thing that can help meet several of these goals is ICH accessibility. Once a collection of ICH has been accumulated, it is important that it becomes accessible to the larger community. Digitizing collections is one way to ensure accessibility, and accessibility is just one of many benefits of digitization in the management of museum and archival collections.
Many ICH documentation methods to choose from
There are many ways of documenting ICH that should be considered when safeguarding the living heritage of a group or community. Some documentation methods might include taking photographs of people, places, architecture, and cultural objects such as tools and costumes. For audio, this means doing recorded interviews to collect stories, memories, songs, beliefs, and descriptions of how to make crafts or how to perform certain customs and traditions. You can also use video recorders to document cultural activities and performances, conduct interviews, or to show how a place looks and operates. Existing collections of ICH held by museums and archives are likely in such formats, but quite often have not been digitized for proper storage or exhibition. This manual aims to guide museums, individuals or organizations in digitizing their existing collections, thereby helping to meet goals around ICH safeguarding.
Digitization facilitates ICH collection storage and online exhibit creation
The digitization of ICH material is increasingly essential in the modern-day management of collections. There are several notable reasons for this. First and foremost, digitization can help museums prepare for up and coming electronic advances in collection storage and exhibition. Another reason, one that has already been mentioned, has to do with making cultural material accessible to the public. Accessibility of a digital collection is an important goal because it can help to raise awareness about forms of ICH at local, national and international levels. At a local level, making a collection accessible may help to ensure the longevity of certain traditions, validate the custom or tradition for the community, or even revitalize a practice that has gone out of use. This is especially true if digitized collections become accessible on the Internet, where a group or community can view ICH collections from their own region, encouraging the group to maintain an appreciation for their unique customs and traditions. It also gives outsiders a chance to see what kinds of ICH are present in other places—helpful in terms of promotion, which is linked to goals of safeguarding.
Once digitized, a next step in collection management may involve the exhibition of a collection. Some museums and organizations will choose to publish their material on-line to reach a wider audience. Having a collection available for on-line viewing is beneficial because this virtual space can become an arena wherein community members can engage with local material, even when they have limited mobility or are living away from the cultural group. In some cases, it may also become possible for community members to contribute material to such collections from a distance, by uploading scanned images/documents or personal recordings, adding this to a growing pool of heritage material. In these cases, members of a cultural group are offered the opportunity to continue a relationship with specific customs and traditions, even ones that are no longer being practiced, which may provide them a sense of continuity and connectivity. In addition, on-line databases allow individuals, researchers and community members alike, quick and easy access to a collection, as well as heightened sharing capabilities. This information can also be used in formal/informal learning situations, transgressing the physical boundaries of educational institutions.
Another important reason for digitizing collections of ICH has to do with the long-term protection of culturally relevant ephemera. Items such as photographs, drawings, cassette tapes, CDs and other physical records of living heritage are always in danger of being lost or damaged. While this is true for digital material too, the digitization of such objects is an act of backing-up that helps to ensure that this material is more-or-less lasting, as it is transferred into an additional format.
Learn how to Digitize audio, video, and photographic Intangible Cultural Heritage material
The following sections of this manual are dedicated to providing detailed step-by-step instructions for how to digitize and store ICH collections. They will cover all aspects of the process from converting and editing audio and video files to scanning photographs and other relevant documents. This manual will also go over how to store and protect this material as well as how to ensure that it is both organized and accessible. A digital collection that is properly managed will help in the preparation of how to present this material to an audience. The role of exhibition is key to any collection of ICH, and should be kept in mind as a final goal during digitization.
It should be noted that this manual primarily focuses on the management and digitization of existing collections, rather than how to collect new digital material. For new collection projects, it will be important to consider which digital formats to document the ICH ultimately reducing the amount of time spent digitizing the new collection. For example, if a new audio interview is recorded as a WAV file, it will not have to be transferred to this format after the fact. If a researcher consistently collects new material using the highest quality possible in terms of file size and format, the digitization, management, and exhibition of a collection will be simpler.
After the step-by-step process for audio, video, and photographic material, an archival case study from Memorial University of Newfoundland (MUN) will be provided. The Digital Archive Initiative (DAI) is a study that not only provides a template for the process of managing and organizing a collection of material, it also offers insights on the benefits of digitization, and how such material can be exhibited. Before beginning the digitization process, it is important to note that very specific types of audio/visual equipment and computer programs are required. Since the equipment available to you or your institution may vary, this manual will provide examples based on what Memorial University's DAI uses to accomplish this work. Required programs and equipment will be listed under the sections in which they are used.
Digitizing and editing Audio Recordings – A step by step process
This entire Audio Recording section is for both Mac and PC (Windows) users, as the software used is compatible with both operating systems. The first step in digitizing an audio recording is to take note of which format of audio you are working with. Older collections will often include cassette tapes that require digitization, but you may also have CDs to transfer. This section will cover the conversion of both cassettes and CDs, as well as how to do simple edits of your digital copies. Each audio format will be transferred to the computer and then saved as WAV files.
Please note that you should always do any work with audio files in WAV. WAV is a lossless format, meaning that no data is lost when you save it. Other formats, like MP3 and WMA, compress the file each time you save, resulting in a degradation of quality. It is only in the final step of the editing process that recordings are converted to MP3 or WMA for storage and exhibition.
Converting Cassette Tapes to digital format
By connecting a tape deck to your computer using a line-in connecting cord, you can make use of Audacity to make a digital recording of your tape. This simple tape-to-WAV transferring technique requires a minimum amount of equipment.
Programs and equipment needed:
- Audacity:
- This is a free, open-source computer program used for recording and editing audio files. All conversion steps and associated examples will be from this user-friendly program. There are downloads available that support both Windows and Mac operating systems. It can be found on-line at the following URL address: http://audacity.sourceforge.net/
- Connecting Cord:
- You will need a 1/8 inch stereo audio cord. This cord has a headphone jack on both ends and will be used to connect the tape deck into the computer's microphone (line-in) input.
- Tape Deck:
- A cassette tape player, such as a portable cassette recorder, is essential for digitization if your ICH collection includes a significant amount of material on cassette tapes.
- Note:
- If you want the highest quality sound output possible, you will need an external audio interface rather than just the onboard input on your computer. Such an interface might be a USB mixing board, but there are many different kinds of audio interface devices that do audio line in to the computer from another unit, such as a tape deck. Adjusting levels on a mixing device like this will ensure that the sound output achieves the highest quality. Since an interface is not essential in digitization, the step-by-step process will not include instructions for use.
Step-By-Step Digitization:
-
Before beginning, check the line in sound levels on your computer to ensure that there is enough volume input. This may have to be adjusted again as you record your tape to ensure that the level is not too high, or too low. To set this level, go to System Preferences > Sound. Then click on Line In/Built-in Input and then set the Input volume level to around 75%. On a Mac computer it will look something like this:
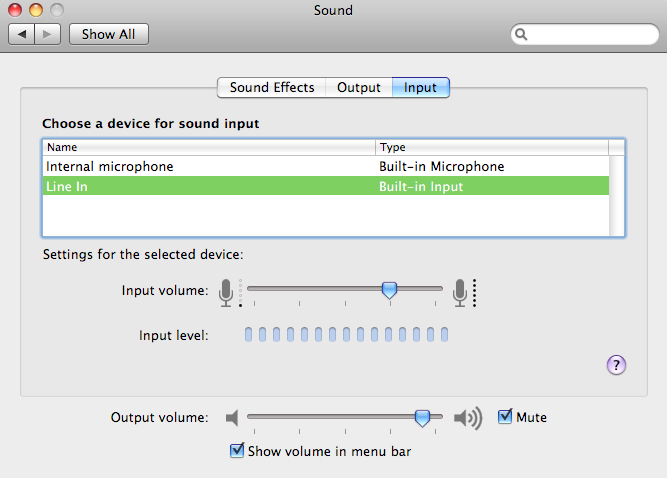
Sound preferences settings on a Mac. Slider tools show how to set input and output volumes. To set input levels on a PC, access Menu, then go to Sound Setting > View Volume Control. Then, in the Master Volume window, click Options > Properties. Switch the mixer device to Input and take note of where the Recording slider is. Again, this level may have to be changed to ensure the input volume is adequate.
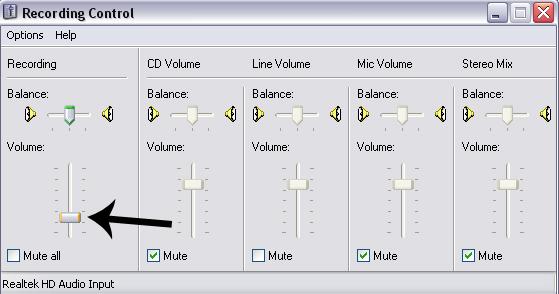
Sound recording preference settings in windows. Slider tools show how to set volume and balance levels for various input/recording features. - Connect the tape deck to the computer by plugging the stereo cable into the headphone jack on the tape deck, and the other end into the line-in on the computer. Insert a cassette tape into the tape deck, with side A facing up. Rewind the cassette to make sure it is at the beginning. Now open Audacity, your recording and editing program, to prepare for digital transfer. Set it to Built-in Output and Built-in Input as seen below:
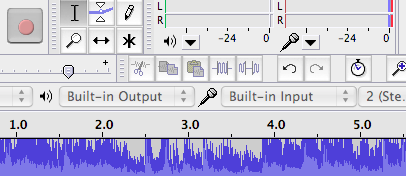
Audacity volume-out and volume-in features can be set to the default "built-in output" and "built-in input" settings. - The first file you create should be a test to ensure that volume input levels on your computer are adequate, that your input levels in Audacity are set correctly, and that the volume on the cassette player is not too high, nor too low. Since cassette tapes tend to vary in volume and quality, volume on the player and input levels in Audacity (see image below) may have to be adjusted from one cassette to another. As you are recording your test, adjust this Input Volume Slider to see how it changes the recording.
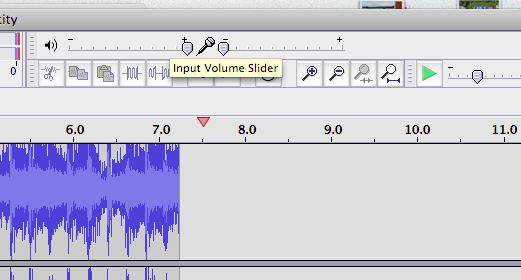
Audacity input and play volume can be set using slider controls. - To record onto your computer from the tape, first click the record button in Audacity which appears as a red circle. Next, press play on the tape deck. A sound signal from the deck will be transferred to your computer and recorded as a new digital file in real-time, and you will be able to review and edit this sound file in Audacity. Since this a test, press stop after 30 seconds and listen to what you just recorded by pressing the play button in Audacity. You can press pause at anytime to stop the playback. Your screen should look something like this:
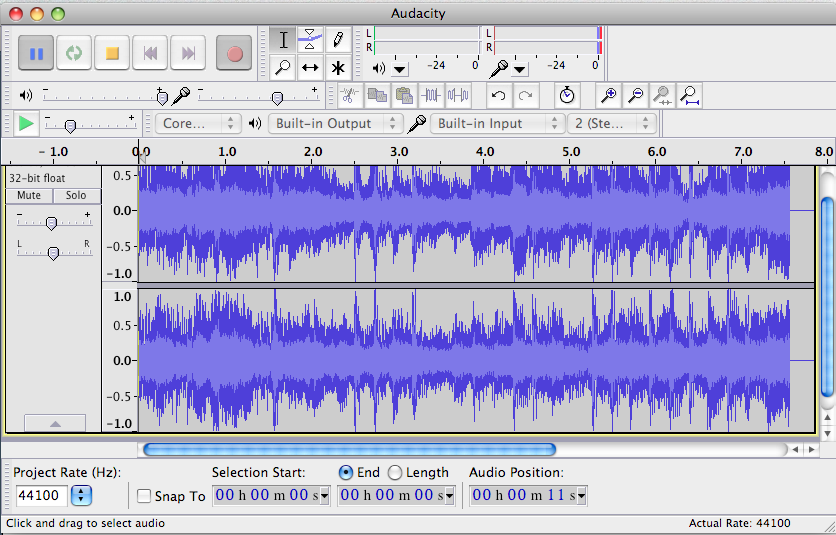
Audacity displays sound signal as a histogram; positive and negative amplitude on the vertical axis, and time on the horizontal axis. -
Beware of clipping when setting your sound recording. Clipping occurs when the audio signal is too high, resulting in a rough sound throughout the recording. On the other hand, the recording may be too quiet if the input levels are too low. There is a bar called the Input Level Meter at the top of Audacity that shows the amount of sound input from your tape. Watch this bar to ensure that the sound signal doesn't hit the end of the bar. If the volume is too low, try adjusting the input volume by moving the slider with the picture of the microphone and record again.
A transfer with levels that are too low looks like this (note the red bars):
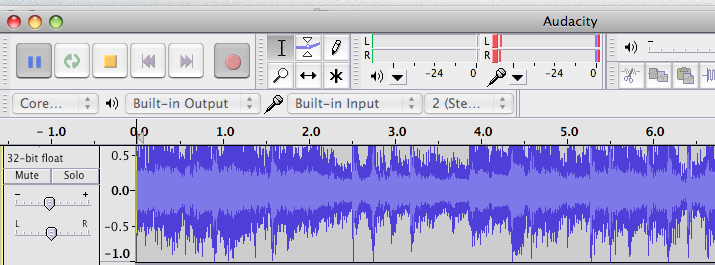
Audacity noise level meter is shown as a series of red bars. If the red bars barely appear, the recording level is set too low. This is how the levels look when they are set correctly:
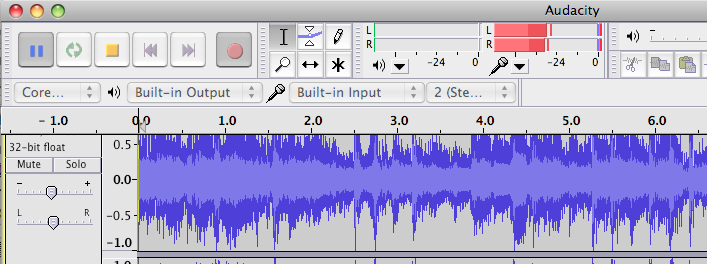
Correct settings for Audacity noise level meter. Red bars occupy much of the range, but do not fill it completely. A transfer with clipping looks like this (the red bars are too long and often hit the back of the meter):
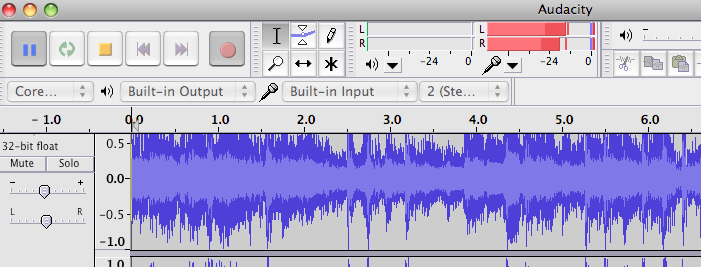
Red bars occupying the entire noise level meter indicates volume settings are too high and the sound signal will be clipped. -
Now that levels are set, do a final transfer of the tape. Rewind the tape, press record in Audacity, and then press play on the tape player. It will take the length of the tape's time to record. When the tape is finished playing, the transfer is complete. To save a copy of your transfer, go to File > Export. You can choose the type of file format you wish to save it in—select WAV. Give your new digital file a name and save it in an appropriate folder. Now follow the same steps to transfer side B of the tape. Your two-sided tape will be transferred and saved as two separate files.
Note: Backing up all transfers as you progress is important so that your digital transfers are not in danger of being lost. A USB memory stick or external hard-drive will be useful for this, but since WAV files are larger than other formats, please note that backing them up requires more space than other file types. WAV files also take longer to save onto your external memory device due to their large size.
Converting CDs and Mini-discs to digital format
Audacity does not allow you to extract CD tracks from your disc drive directly into the program, though this is the highest quality transfer method. To rip CD files to your computer and convert them to digital WAV files, a secondary piece of software is required. For Mac users, iTunes has an import function that transfers CD files directly from your disc drive onto your computer. You can then open up the individual audio files in Audacity to save them in a WAV format. If you are using a PC, Windows Media Player has a ripping function, or alternately you can use an open-source program such as MediaMonkey. To download this free program visit: http://www.mediamonkey.com/. Again, once ripped, the files will have to be opened up in Audacity and saved as WAV files.
If you do not use a ripping method to import CD files, the following section provides step-by-step instructions for recording CDs and mini-disc from a player within the Audacity editing program.
Programs and equipment needed:
- Audacity:
- Previously described software that can be downloaded for free at: http://audacity.sourceforge.net/.
- Connecting Cord:
- You will need a 1/8 inch stereo audio cord. This cord has a headphone jack on both ends and will be used to connect the computer or Mini-disc player into the computer's microphone (line-in) jack port.
- A CD Player:
- A CD player, such as a stereo system or a portable Discman, is important for digitization if your ICH collection includes material that has been burned onto discs for storage or listening purposes. You can make a digital recording of your CD in Audacity by connecting your CD player to your computer using a line-in connecting cord.
- Mini-disc Player:
- If your collection includes material recorded on mini-disc, you will require a mini-disc player to transfer this audio to a digital format. The instructions will be the same as for CD and tape transfers.
The Digitization Process:
Digitizing a CD or Mini-disc using Audacity is done very much the same as making a digital copy of a tape. Please refer to the Converting Cassette Tapes to digital format section in this guide and follow the same instructions. Where it says to press play on the tape cassette player, substitute CD or Mini-disc player. Audacity records in real-time, so the time required to make a digital copy is equal to the amount of time to play the media.
Editing Digital Audio Files
Now that you have made digital audio files from either cassette tapes, CDs or Mini-discs, you can edit this material to make short clips, or edit out information not for exhibition. Cleaning up the recordings is key to proper exhibition, though the raw material will be important to keep for archival purposes. Do not delete your unedited digital transfers—store them on a hard drive.
Listening to sections of audio: Begin by opening Audacity and selecting a file by going to File > Open in the menu bar. Each opened audio file will appear with two parts; one over the other. This is because the recordings are in stereo. Press play to begin listening to the audio. You can listen to a specific portion of the recording by using the selection tool, appearing as a capital "I" next to the record button. Select which part you would like to hear by clicking and holding at the beginning of the desired segment then dragging the cursor to the end of the segment. Once done, press play.
Removing sections of audio: The selection tool is vital for editing as it is used for selecting the material you wish to remove. First, listen to the recording to see if there are any other sections you wish to delete. This could include personal information provided by the interviewer or interviewee, interruptions in the interview, or other irrelevant material. With the selection tool, click at the start of the area to remove, and drag your cursor to the end of the unwanted section. Once highlighted, go to Edit in the menu bar, then Remove Audio, and click Delete. You can eliminate multiple sections of your audio using this method. When finished, save a new copy of your file by going to File > Export in the menu bar. Remember to give the audio a new name that indicates that it has been edited.
See the delete function below:
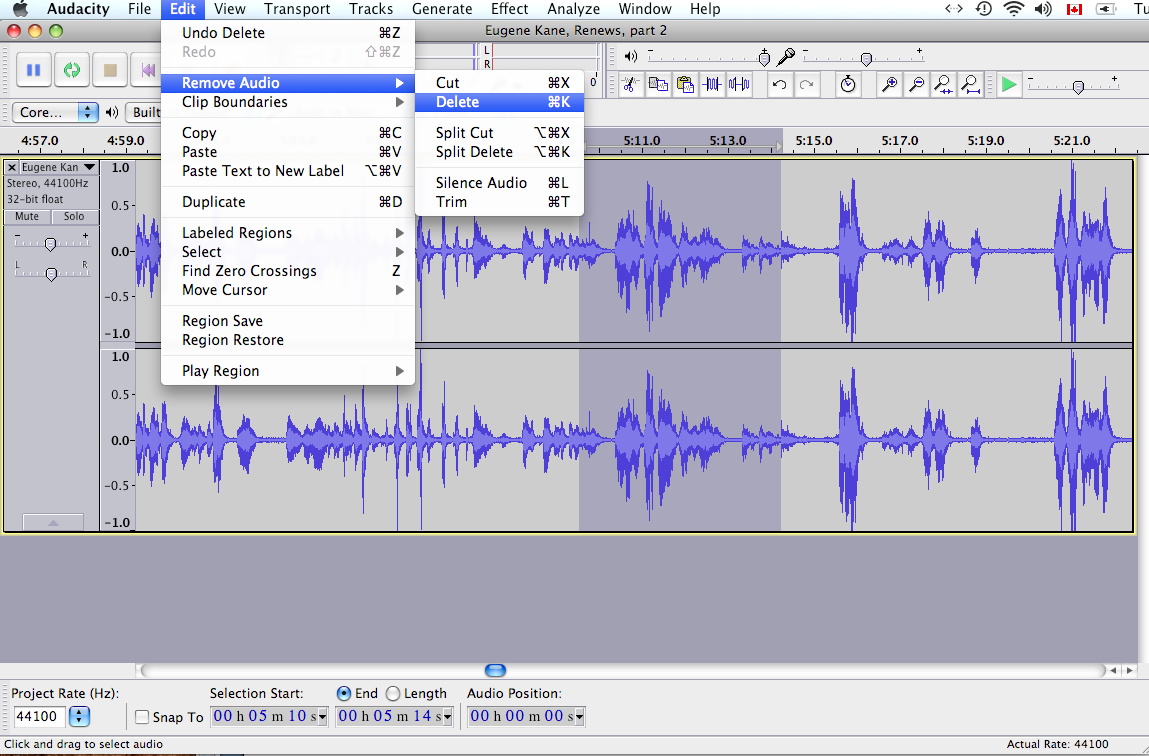
If the goal is to remove dead air at the beginning or end, these sections are the parts of the file that are a simple straight line, with no peaks or valleys. Select this section by clicking, holding, and dragging the cursor from left to right or right to left over any silent sections at beginning or end of the audio file. Then, as in the example above, go to Edit > Remove Audio > Delete.
Making an audio clip: If you wish to make a short clip from your audio track, highlight the section using the selection tool, then go to Edit > Copy. Once your section has been copied, go to File > New and a new Audacity window will open up. In this new window, go to Edit > Paste to store your clip. Save this as a new file by going to File > Export.
Putting Audio Files Together: A final useful editing tool is placing two separate audio files into one track so they can be played together. This will be important if you wish to make one longer interview or performance out of two or more clips. To add parts of an audio file to another, open up both files you want to work with. They will open in two windows in Audacity. Decide which file you would like to be your primary audio. This will be the file that material is added to. Listen to this file to decide where the new material will go. It may be before or after your primary audio. For a two-part interview, naturally, the second part will come after the first. Go to part two, use the selection tool to highlight the length of what you wish to add to part one, and then go to Edit > Copy in the menu bar. Next, return to the window that has your primary audio (part one). With your selection tool, click at the end of the interview and paste in part two using Edit > Paste. Now save this new audio file by going to File > Export.
By first digitizing your audio recordings and then using these simple editing methods to edit them, your audio collection will be prepared for both storage and display - key factors in collection management.
Digitizing and Editing Video Recordings – A step by step process
Digitizing and editing video from VCR tapes, MiniDV tapes, DVDs, and digital video files will require the use of specific video software. The methods used will differ according to the type of operating system you are using. The software that comes with your computer, such as iMovie HD for Macs or Windows Movie Maker for PCs, is adequate for most digitization work. By using iMovie HD or Windows Movie Maker you can capture video clips from VHS cassettes, DVDs, and digital video camcorders that use MiniDV tapes. You can also edit these clips and then export them as a QuickTime movie that can be stored or played on PCs or Macs.
The instructions below will be broken up into two sections: one for Mac users, and another for PC users. Please refer to the appropriate section for the kind of computer you have access to.
Converting VHS tapes
For Mac users:
To convert VHS video format for use in iMovie HD you need a special converter with standard S-Video and RCA input/output ports for video and audio, as well as a FireWire input/output port. However, if you have access to a DV camera that has S-Video or A/V input ports, you may be able to use the camera itself as a converter. Consult the camera's manual for information on recording from a VCR using an A/V connecting cable.
The following instructions assume that you have access to such a DVcamera.
Programs and equipment needed:
- Video Software: iMovie HD
- VCR Player: A VCR player or VCR camcorder will be required to play footage that was recorded in VHS format.
- DV Camcorder: Most camcorders that use MiniDV tapes also have jacks that connect the camera to a VCR. By using the camera as a go-between, you can connect a VHS player to your computer using a FireWire cable. If you do not have a DV Camcorder that can act as a go-between, you can use an "analogue-to-DV converter box" in lieu of it (substitute it for the camcorder in the instructions below).
- Connecting Cords: Two different cables are needed—one that connects the VCR to the camcorder, and another that connects the camcorder to the computer. This second cord should be a FireWire cable (also referred to as an iLink) that has a USB connector on one end.
- External Hard Drive: Digital conversions of tape take up a great deal of memory. Thirty minutes of tape can take up as much as 10 GB of space. It therefore may be important to make use of external hard drives to store this material as soon as it is finished converting. Once backups of the original file have been made to at least two separate devices, you can delete the original file on your computer to free up working space.
The Digitization Process:
- Connect the VCR's audio and video outputs to the audio and video inputs on the digital converter (in this case, the DV camera). The audio and video connections have red and white ends respectively. If the VCR only has one of these two—for example, only a white output— then connect that one. After making these connections, connect the camera to your computer's FireWire or USB port. Now ensure that your VCR tape is at the beginning, and open the software you are going to be using.
- Before beginning the transfer, adjust the sound settings on your computer. Go to System Preferences > Sound. If possible, set the input to Digital-in/Optical digital-in port. If this isn't an option, you want the settings to indicate that you are using the line-in, and that the levels are set at around 75%. The output setting should be Headphone/Build-in audio.
- Turn on your VCR and your camcorder. Set the camcorder to VTR mode (some camcorders call this Play or VCR). Now in iMovie, switch into camera mode so that it is prepared to import your video.
- Press play on the VCR and watch what you have on the tape through the camcorder. When in VCR mode, the camcorder will transmit the video to the iMovie software. When you are ready to begin importing the footage, click the Import button in the iMovie monitor, or simply press the space bar.
- The import will occur in real-time. When the tape is finished playing, press Import again to stop the transfer. Now save the project onto your desktop or into a specially allocated file. Back up this file using an external hard drive. This is your raw digital transfer that is now ready to be edited.
For PC Users:
Transferring videotape (such as VHS) to digital is called Video Capture in Windows Movie Maker.
Programs and equipment needed:
- Video Software: Windows Movie Maker. Depending on the version of Movie Maker that came with your Windows operating system, you may have to download a recent (free) update, as some versions of Movie Maker do not allow for video capture. Try the procedure below, and if you find that video capture is not possible with your currently installed copy – do a quick internet search on "Windows Movie Maker Download" for the most recent version that matches your operating system.
- Video Hardware: There are various solutions for hardware. To keep this manual simple, only one solution will be considered here. If your computer does not have this hardware, or cannot accept the installation of such a device (a laptop for instance that cannot accept new cards), an external video capture device (a box that costs as little as $50) that plugs into your USB port may be all that is required.
The solution here will involve a Video Card installed in your PC that accepts video-in. This is most commonly done through a 9-pin VIVO port that is found on higher-end graphics cards:
9-pin female S-video (VIVO) port is a circular port with pins sockets in three rows (3, 4, and 2 pins). Note: ports having a similar appearance but with fewer pins generally only transmit video signals out – not in, as is required for this procedure. Even if your computer does have a 9-pin VIVO port, you will still need to verify that the card accepts video-in, as some lower-end cards use this port for video-out only. Check the details for the card in your system.
- Connecting Cable(s): For the solution proposed here, a 9-pin S-Video (VIVO) cable is needed. This cable has a male 9-pin plug at one end to connect to your PC and a series of plugs at the other end to plug into your VCR or video camera; if your VCR/Camcorder has an S-video-out port, use the s-video plug as the image quality will be better. Alternately, you can use the traditional composite video (RCA) connector plug commonly found on older equipment.
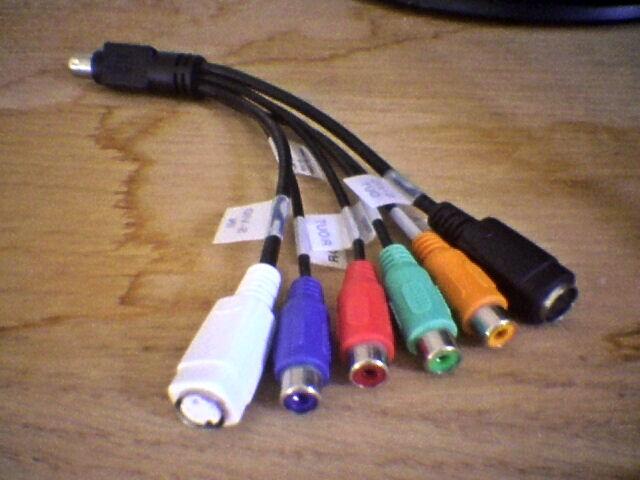
The end of the VIVO cable with only one plug connects to your PC. Connect female VIVO plug at the other end to VCR or camcorder. Ignore other plugs. - Additional Audio Cable: You will also require an RCA-to-stereo cable. This cable will have an audio jack at one end similar to PC headphone and microphone jacks – it will plug into your microphone (or audio-in) port on your computer. The other end will have either one or two RCA plugs (a red and white plug for stereo signals, or just a white plug for mono). These will plug into the audio-out jack(s) of your VCR/Camcorder.
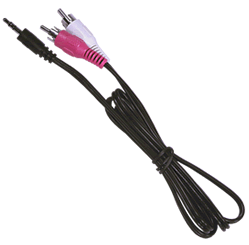
Male audio jack at one end of cable plugs into computer’s microphone/audio-in port. Connect the RCA plugs at the other end to audio-out of VCR/Camcorder. - VCR or Camcorder: Any device that plays VHS tapes can be used.
- External Hard Drives: For storing large digital video files. Never save an original file to one location only – for this reason, you may consider using two external drives.
Unlike Mac operating systems, VHS can be transferred directly to your Windows PC (using the above setup) without further help of a digital converter – no further hardware is required.
The Digitization Process:
- Connect your PC to your VCR or Camcorder (see "Video Hardware" above for details on how to connect devices), then open Windows Movie Maker. Note that while the PC hardware configuration described for this process does not require a digital conversion unit (which is required by Mac users) this configuration assumes that your PC's graphics card can accept video in. If your machine cannot do this, take your PC to your local computer repair shop and describe what you want to do.
- Once devices are connected and turned on: if you are using a camcorder, set the camera mode to play recorded video, often labeled VTR or VCR. Rewind your tape to the beginning.
- Open Windows Movie Maker. In the File menu, click "Capture Video". Capture video functions can also be found in the menu bar to the left side of the program. Windows Movie Maker will automatically sync up to your VCR, as the tape is recorded into the program in real-time. To test your recording, you may wish to stop the transfer by clicking Stop Capture. Play back what you recorded to see that the video is transferring properly. Your screen should look like this:
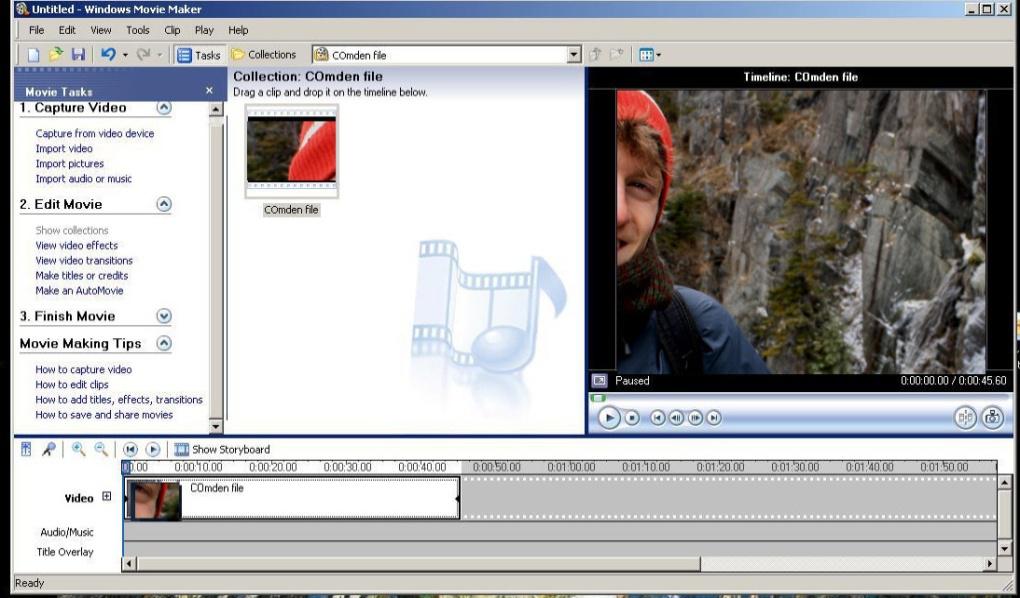
Windows Movie Maker displaying real-time capture from a VCR. Live video is displayed to the right. - After doing a test capture, rewind your tape again and do a final transfer. When finished, go to File > Save As to save your digital file.
Converting MiniDV tapes
For Mac Users:
The process of importing a MiniDV tape is similar to transferring a VHS tape using iMovie, though you will not need a digital converter as the DV camera operates as such.
Programs and equipment needed:
- Video Software: iMovie
- DV Camcorder: When working with DV mini tapes, you will need a camcorder that uses this format to record and play.
- FireWire Cable: This cable has a USB connector on one end that is inserted into your computer's USB port.
- External Hard Drive: Digital conversions of tape take up a great deal of memory. Thirty minutes of tape can take up as much as 10 GB of space. It therefore may be important to make use of external hard drives to store this material as soon as it is finished converting. Once backups of the original file have been made to at least two separate devices, you can delete the original file on your computer to free up working space.
The Digitization Process:
- Turn on your DV camera. Set the camera to VTR mode (some camcorders call this Play or VCR). Now, in iMovie, switch into camera mode so that it is prepared to capture or import your video.
- Press play on the DV camera and watch what you have on the tape through the camcorder. When in VCR mode, the camcorder will transmit the video to the iMovie software. When you are ready to begin importing the footage, click the Import button in the iMovie interface, or press the space bar.
- The import will occur in real-time. When the tape is finished playing, press Import again to stop the transfer. Now save the project onto your desktop or into a specially allocated file. Back up this file using an external hard drive. This is your raw digital transfer that is now ready to be edited if that is what is required.
For PC Users:
Programs and equipment needed:
- Video Software: Windows Movie Maker
- DV Camcorder: When working with MiniDV tapes, you will need a camcorder that uses this format to record and play.
- FireWire Cable: This cable has a USB connector on one end that is inserted into your computer USB port.
- External Hard Drives: For storing large digital video files. Never save an original file to one location only – for this reason, you may consider using two external drives.
The Digitization Process:
The process for digitization of DV tapes is much the same as the VCR process. The main difference is that a DV camera is used to play the tape.
Note: These instructions do not include the transfer of HD tapes, as these require the use of software other than Windows Movie Maker. However, iMovie HD editing software (for the MAC) does support HD recordings.
- Plug the camera into a power source and connect it to the computer using the FireWire port.
- Put the tape you want to import into the DV camera and switch the camera into VCR mode.
- A window should then appear on the computer asking you what you want Windows to do. Click Capture Video using Windows Movie Maker. If that window doesn't pop up, open Windows Movie Maker and start a new project.
- Enter the file name for the video and indicate where you want to save it. An external hard drive is probably the best place for video files as they are about 1 GB per hour at these settings. Click Next.
- Choose Best quality for playback on my computer and click Next.
- Select Capture the entire tape automatically and click Next. Given that the camera is on, you do not need to perform any further operations on the camera—the program will do the importing automatically.
- This process will create a WMV file of the entire tape. The digital file is now ready for saving, backing up, and editing.
Transferring Digital Video Files
For Mac Users:
- To import a video file from a source other than one supported by a camcorder choose File > Import, and search for the given file on your computer or storage device. These files could be from a digital camera primarily used for photography, or from a video camera. Once you have found the given file, select it and click Open.
- Alternately, you can drag files from your desktop or from iPhoto to the Clips Pane or the Timeline Viewer. It is also possible to drag, copy, and paste clips between different iMovie HD projects. Using these simple methods you can add more video to your clips—helpful if you are hoping to store and exhibit multiple interviews or pieces of footage together.
Note: When you import clips in a format different from your project, they are automatically changed to the video format of your movie. For example, if you have created a movie using high definition video, standard definition clips that you import are converted to the movie's high definition format.
For PC Users:
Importing a digital file from your computer's hard drive or from an external memory device, is as simple as dragging a video file into the Clips Pane in Windows Movie Maker. Or you can click Import Video in the Tasks Menu, which opens up a search function so that you can locate your video file and open it in the program. When you drag or import a file, a file source remains in the same location on your computer from which it was imported. If this source file is deleted, it must be replaced on your computer, or on a location your computer can access, to gain access to it in Window Movie Maker.
Converting DVDs
Neither iMovie nor Windows Movie Maker will allow you to capture a DVD from your computer's disc drive for viewing or editing. Both require the use of a secondary piece of software that allows for ripping. If your collection has video burned to DVD that is not available in any other format, it is recommended that this information be ripped and saved digitally. Finding a piece of ripping software on-line is not difficult and will assist in the proper management of your collection. A freeware program that is commonly used to perform this for Mac and Windows users is called WinX DVD Ripper. For more information about this open-source program please visit the following website: http://www.winxdvd.com/dvd-ripper/.
Be sure when using this software that you are not violating copyright law. For more information on current copyright law, see http://balancedcopyright.gc.ca/eic/site/crp-prda.nsf/eng/home (Accessed on 2013).
For Windows users, HandBrake is a program that allows you to rip DVDs onto your computer. To download this program please visit this website: http://handbrake.fr/. While Pineapple Express is only used for Mac operating systems, HandBrake has software downloads available for both Mac and PC.
Editing Digital Video Files
Now that you have digital video material to work with, you may wish to edit it to cut unwanted material out for exhibition purposes. Like for audio material, it will be important to keep both the raw material and edited material for archival purposes. A well-managed collection will ensure that all portions of the material are stored in at least two physical locations for possible use in the future.
For Mac Users (iMovie):
Before starting, switch from Play to Editing mode, indicated by the scissors:
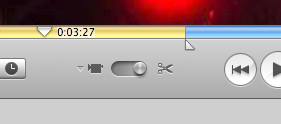
- Cropping your video: Cropping allows you to edit a video by selecting the portion of video you require and removing the rest. To do this, select the clip you want to crop by clicking it in the Clips Pane, Clip Viewer, or Timeline Viewer. Now, drag the playhead to where you want your scene to begin and place your cursor just below it. Then drag to the right to include the footage you want to keep. The gold portion of the bar (shown above) highlights the footage you've selected.
To adjust where the selected footage begins and ends, click a crop marker to select it, and then press the Left or Right Arrow key to move the crop marker one frame at a time. To move the marker in ten-frame increments, hold down the Shift key while pressing the arrow key.
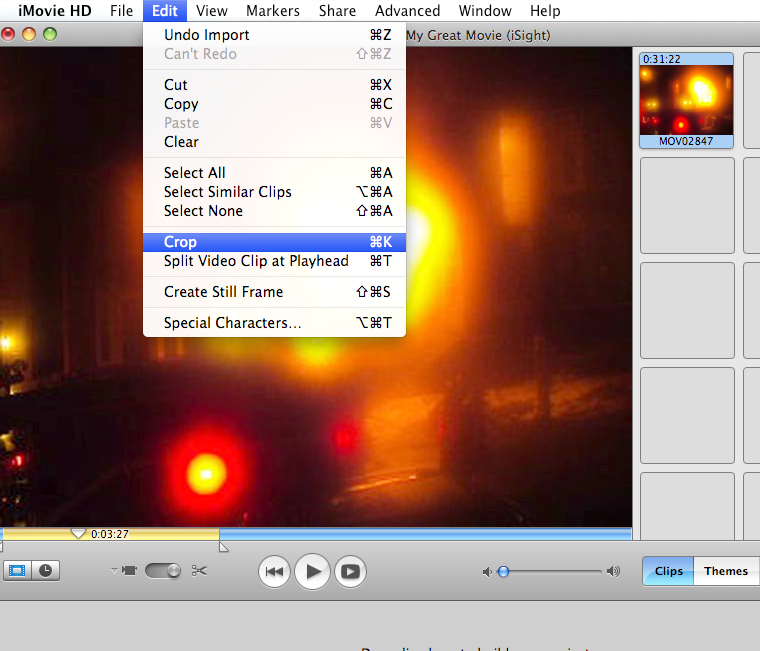
To remove all but the selected segment in iMovie, Select "Edit" from menu bar, then "Crop". Once the desired footage has been selected, choose Edit > Crop to keep the portion of video highlighted and remove the rest. Save a copy of this newly edited video.
- Trimming your video: If you wish to clean up your video by trimming out portions at the beginning or end of a clip, drag the crop markers to highlight the portion you want to remove, and then choose Edit > Clear.
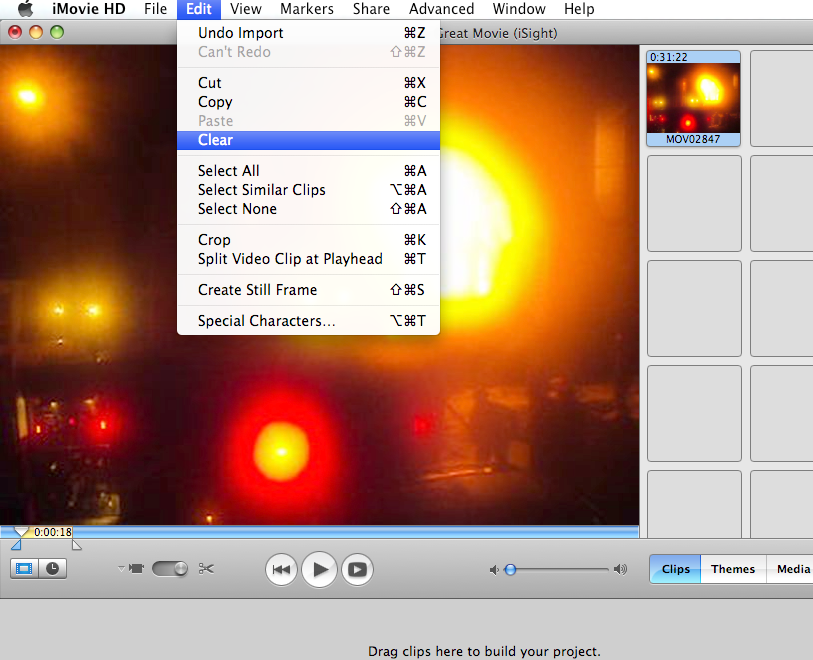
To remove a selected segment in iMovie, select "Edit" from menu bar, then "Clear" Note: When cropping or trimming your files, keep in mind that iMovie HD doesn't actually remove or delete what you are editing out, it only hides this material. If you accidentally trim too much, you can always choose Edit > Undo to cancel your change, or extend the clip back to the desired length by dragging one of its edges in the timeline viewer.
For PC Users (Windows Movie Maker):
- Splitting your video: Removing select pieces of a video (called cropping in iMovie), can be done by splitting your file into sections, and removing the sections you don't want to use. To do this, in the Play Menu (found directly below the video) click the play button, then at the point you would like to split the video, click the pause button. To split the video here, click the button indicated by the black dot in the screenshot below. Now you can trim your section of video to make the desired clip. To save an individual clip, you can copy it as a new project by right-clicking on your clip in the Timeline, choosing copy, and pasting it into a new project in the File Menu.

Video can be split into multiple sections in Windows Movie Maker - Trimming your video: Through trimming a clip you can edit the starting and end points of a video, changing the length of your clip. To trim a clip, move the trim points in the Timeline. The start trim handle appears as a blue line and the end trim handle is the black bar at the end of your clip. Click and drag each handle to the desired trim point. The white space between these two points will be what remains of your video clip.

Trim handles in Movie Maker can be moved to determine the start and end points of a video clip. - Save a new copy of the trimmed clip you just made.
Digitizing Photographs and Ephemera – A step by step process
Since there are various kinds of scanners that can be used to digitize photographs, and each scanner will vary in how it operates, the following section of the manual will not provide step-by-step instructions. It will however go over some general guidelines and standards to consider when using scanners to back up photographs, negatives, and ephemera.
When selecting a scanner, make sure that it has an attachment for scanning slides and photo negatives. Whenever possible, it will be essential that negatives and slides are scanned as they can corrode over time.
Note: When saving images, it is recommended that you save them as a TIFF rather than a JPEG. JPEGs are adequate for on-line sharing, but lose quality when compressed to make the image smaller. TIFFs meanwhile, do not use compression and are a large file size even when the image is re-sized. They are best for archival purposes—all image detail that was recorded in the scanning process is preserved in this format.
Scanning Photographs
Before scanning, you will need to check that you have the necessary scanning software downloaded onto the computer. At times you can find this software on-line, but for the most part, you want to use the CD that came with the scanner.
Open the software and set your document type to photograph in the settings. If you are scanning a black and white photograph, set the document type to black and white photograph. Likewise, if you are scanning a color photograph, set the document type to color photograph. You also have to make sure that your DPI (dots per inch) settings are correct. The minimum setting should be 600 DPI as this resolution is suitable for archiving - lower resolution images for use in web publishing or similar activities can then be made from this higher resolution "master" image. Depending on the type of scanner you are using, it may self-crop images, or scan several photos at one time.
Note: Scanning at higher DPI takes longer than scanning at lower numbers, therefore ensure that you have enough time to make the scans.
Naming photograph files: Each scanned photograph will then need to be saved separately into a file folder on your computer's desktop or external hard drive. Naming your files in an organized, logical fashion will help you find images later on. This is especially important if you are scanning large numbers of photographs in a collection. It may be useful to develop a numbering and filing system before beginning the scanning process. The file name that is ascribed during scanning can correspond to a list where the photograph is properly described. In managing large collections of photographs, it is important to have a database containing any available details. Such information could include where and when the photo was taken, who took the photo, who is in the photo, who donated the photo, whether or not the photo is damaged, what format the film was taken in (i.e. 35 mm film), and whether or not a negative is held in the collection.
Editing photographs: There are many different photo-editing programs that allow you to adjust the image quality of a scanned photograph. If a scanned photo or document was not automatically cropped by the scanning software, it will be important to do so after the fact. Cropping out white spaces is important so that only the image itself is present in the scan. Once you are finished cropping, the photograph's image quality can be altered. Images that are either over or under-exposed will require changes to the contrast or brightness settings. For instance, photographs that appear washed out will benefit from having the contrast increased. This will make the image appear more crisp. After cropping and editing the scan, you can name and save the file as a final copy. Edits that you make to photographs should be saved as such - do not overwrite your original image file. As such, you may choose a file naming convention that distinguishes between an original scan, and an edited version of the same image.
Note: Image quality edits (i.e. changes to contrast) are not always important when dealing with archival photographs—usually the original quality is how the digital versions should be represented. However, slight edits may be needed when particular images from a collection are to be published or used in an exhibit.
Scanning Negatives
Film negatives should be scanned when a printed copy of that image is not present in the collection. If both photograph and negative are available for digitization, only the photograph needs to be scanned. If only a negative is available, a negative scanned using the proper equipment and software should be digitized as a high-resolution photograph. Like for scanning photographs and other documents, it is important to ensure that you are scanning at the highest possible DPI to ensure an image quality that is suitable for archiving. The minimum DPI that your negatives should be is 1200 but you can scan as high as 4800 DPI on most scanners. You will also have to indicate what kind of film you are scanning. Set to either: color negative film, color positive film, black and white negative film, or black and white positive film. Once scanned, you can treat the images as photographs by naming and filing them accordingly.
Scanning Ephemera
Among others, ephemera in an ICH collection may include: posters for events, drawings of tools and objects, floor plans, maps, receipts, certificates, and hand written letters. These items are often included in archival collections and will need to be digitized for the same reasons that a photograph or negative does. The scanning method is much the same as for a photograph, but with the settings changed to black and white document or color document. Again, using certain scanner settings, sometimes the scanner will crop the image automatically and sometimes, you can scan several items at one time. Ensure that your DPI is set to 300 or above.
Digital Cameras
As part of the digitization process, you may wish to take photographs of objects that have been included in an ICH collection. Such items might include craft objects or tools required for a specific skill. Digital photography ensures that there will still be a visual record if the physical object is ever lost or damaged. It is recommended that a ruler be included in the photograph to show the scale of the object being documented.
When taking photos for digital documentation purposes, it is of great importance to ensure that the camera is set to its highest resolution (or the largest file size) setting. While these larger files take up more space on the camera's memory card and on a computer's hard drive, it is important that the ICH digital collection consist of high quality images. A resolution setting of 10 mega pixels or higher is preferable, as is a color depth of 24 bits. CHIN's Professional Exchange has a number of resources covering digital photography and digitization. For more information, please review the Digitization – Digital photography section in Appendix B.
Data Storage and Management
Hard Drives and USB Storage
As mentioned, an external hard drive is invaluable in any digitization project. In some cases, more than one hard drive will be needed as an off-site storage system so that if the first one fails, a second drive will still house the collection. Hard drives are available in different sizes, which will become relevant to your collection when considering the large audio, video, and image files. Hard drives are corruptible because there are moving parts within, so must be treated with utmost care. RAID storage systems are designed for professional use, tailored for storing mass amounts of digital material that need to be backed up on more than one hard drive. Such a multi-drive system may be used for the safe storage of your ICH collection.
USB sticks can be useful in a digitization project as temporary back up for small collections or files.
File Names and File Systems
File names and systems will be unique to the individual museums and archives that create the digital collection. In many cases, items will be given both a series of letters and numbers that will help to categorize the material, as well as keep track of how many items exist in the collection. For example, PN-0003 could be given to the third scanned photograph that also includes a negative. The following case study offers a different method of naming that involves numbers which correspond to a spreadsheet that houses vital details about the item.
Case Study: Memorial University's Digital Archive Initiative
MUN's Digital Archive Initiative (DAI) is an on-line storage and exhibition site where a significant amount of Intangible Cultural Heritage material is kept. It is notable as a place where digitized collections of audio, video, and photographic material are profiled and made available to the public. In order to store a collection here, it must consist of high quality digital files that are organized, numbered and described in a metadata spreadsheet before being submitted to the archive's technicians. This site is connected to MUN's library website and can be searched by using key words, or by browsing special collections or topic headings. Digital copies of material from the University's Special Collections can be found here, as well as collections submitted by individual researchers. The DAI's ICH collections are organized on the site by either origin location (i.e. ICH—Central Newfoundland) or by subject heading (i.e. ICH—Oral Traditions and Expressions).
The DAI's metadata requirement assists in executing the proper management of a digital collection. Metadata spreadsheets have a number of fields that must be filled out for each photo, video, or audio clip that will be exhibited on the DAI site. Therefore, each item must be numbered, and then all the details for that item must be filled into the spreadsheet. This information must be accurate because when the metadata is completed, it will be uploaded to the Internet alongside the digital files in the collection. As an example, there are two portions of a spreadsheet below. This metadata is from a series of photographs taken of a specific person's handmade craft objects. Each photograph was numbered and corresponds to a line in the spreadsheet. The data fields for that number were then filled out to include the following information: informant's name, informant's biographical information, collector's name, item description, date collected, location collected, searchable topics (i.e. roots cellars, crafts, buildings), format (i.e. JPEG, WAV), type (i.e. audio/video/still image), and the collection's name.
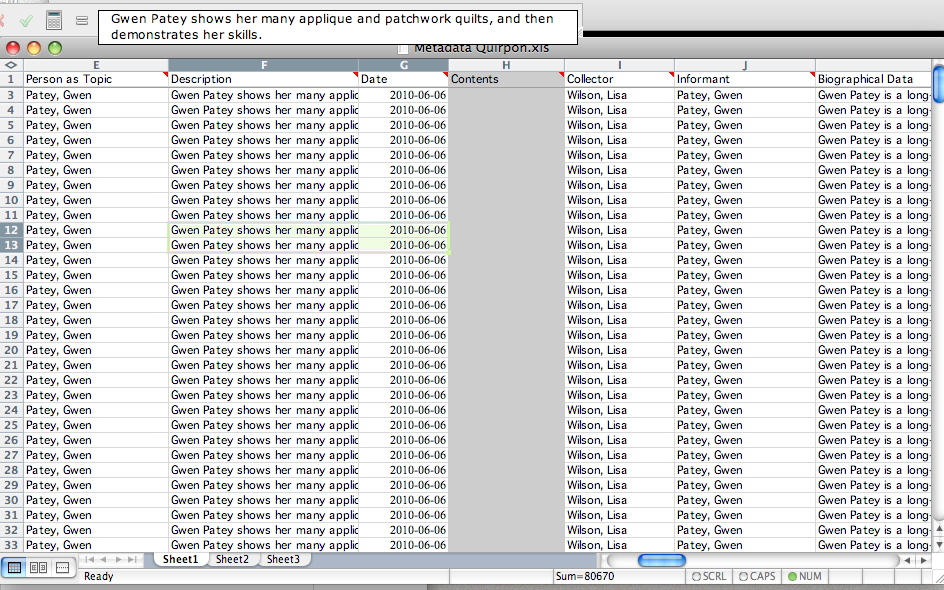
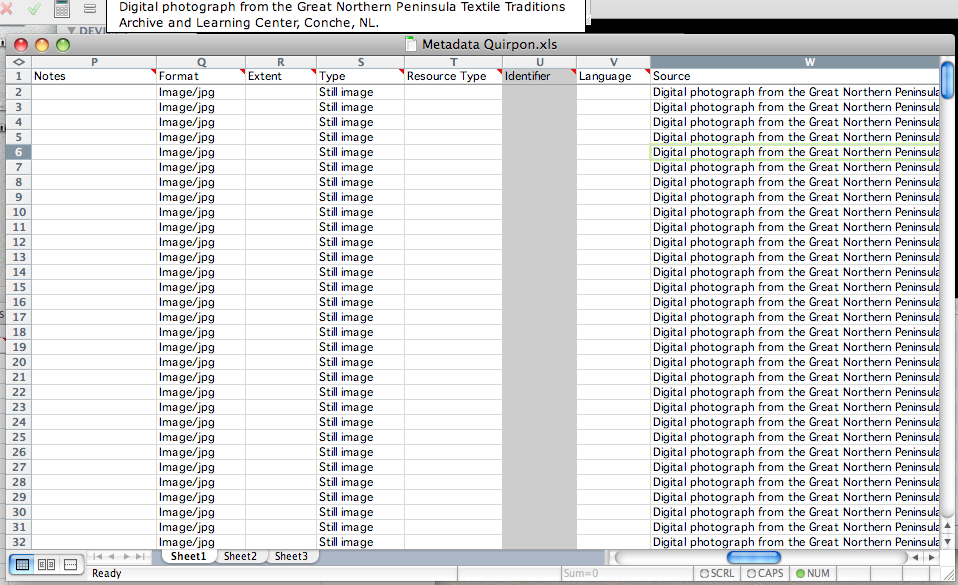
Different spreadsheets can be filled in for different parts of a collection. A collection can be divided according to type of ICH, location that it was collected, or even just for an individual informant. Once the metadata fields have been completed, the digital collection is ready for exhibition on the DAI website. In the examples below, note that metadata information appears in red below the photo or video.
How the DAI exhibits photographs:
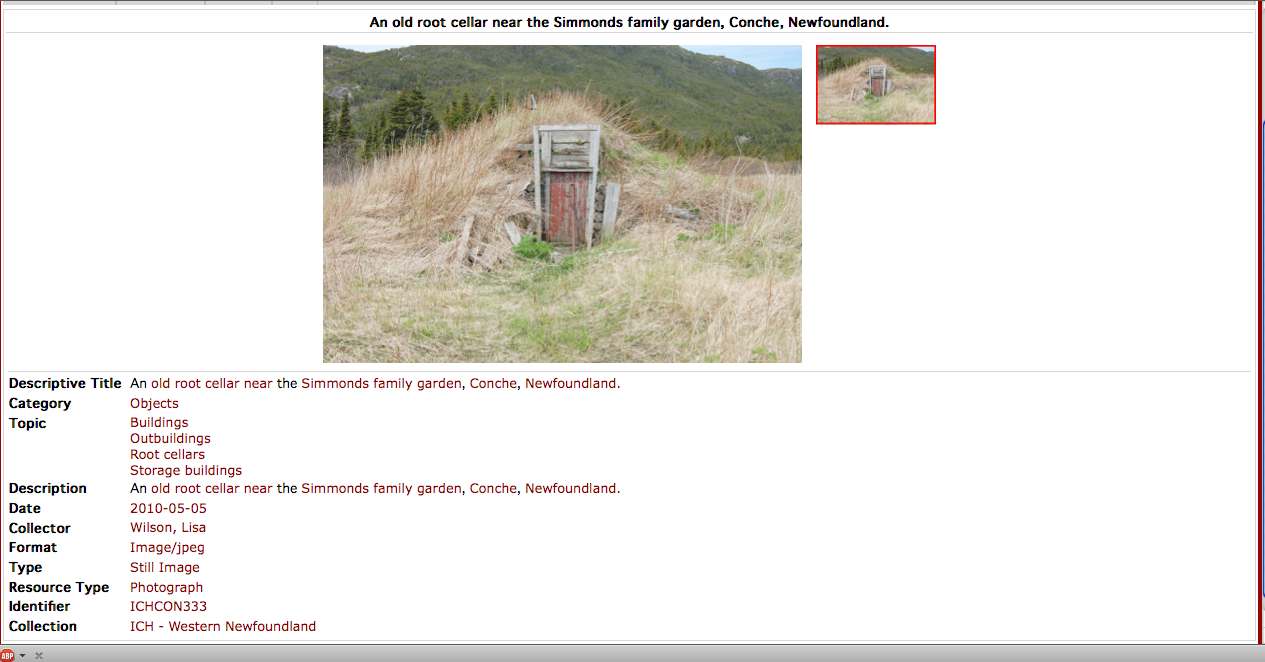
To view this photo on-line: http://collections.mun.ca/cdm4/item_viewer.php?CISOROOT=/ich_wn&CISOPTR=278&CISOBOX=1&REC=15.
How the DAI exhibits audio:
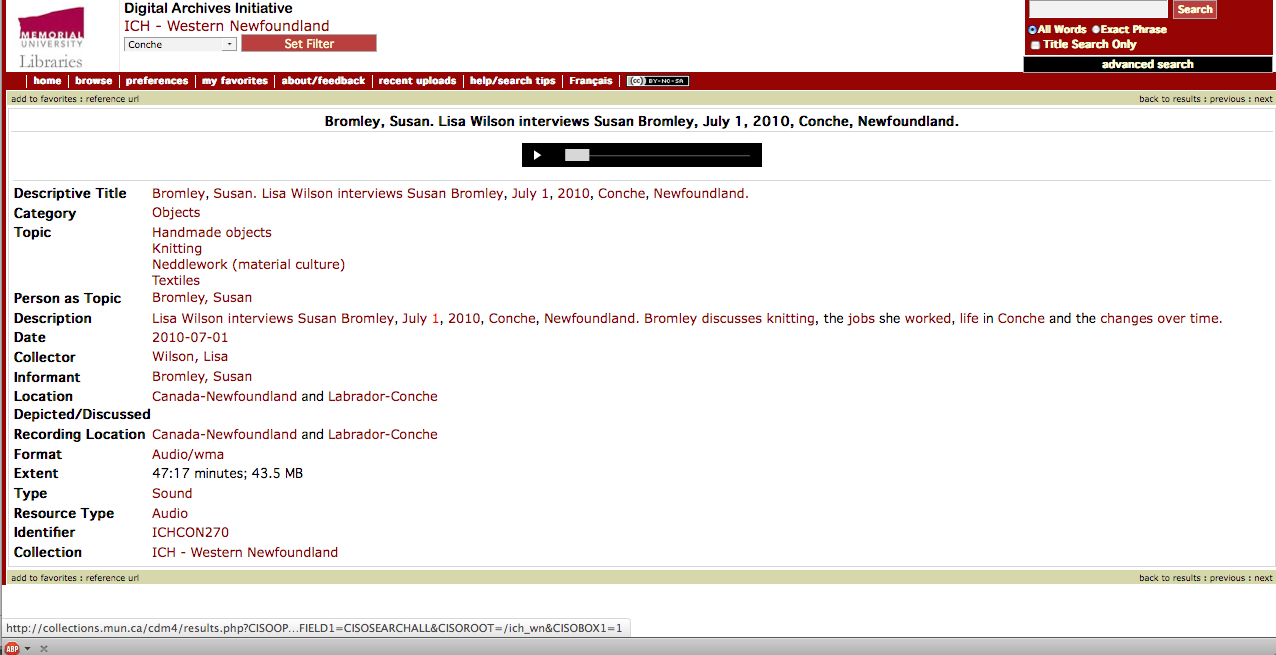
To hear this audio on-line: http://collections.mun.ca/cdm4/item_viewer.php?CISOROOT=/ich_wn&CISOPTR=329&CISOBOX=1&REC=13.
How the DAI exhibits video on-line:
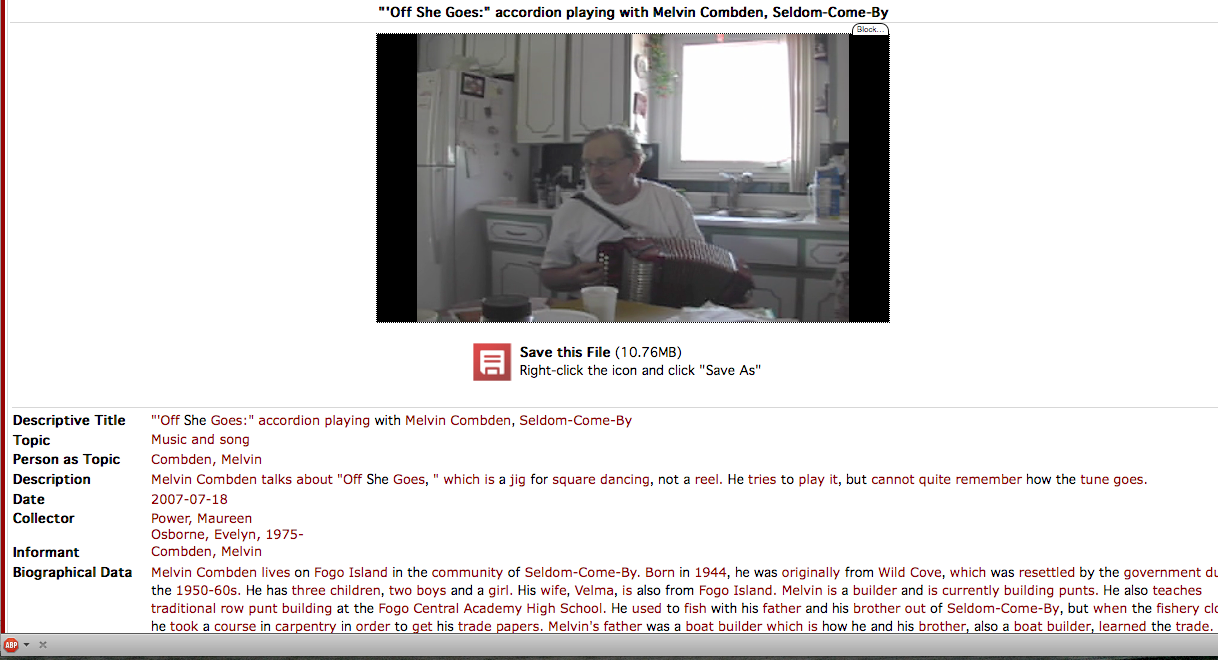
This video can also be viewed on-line.
Concluding Remarks:
The DAI is an example of how individual collections of digital material can come together to be stored and exhibited on-line in an organized fashion. Through digitization initiatives, archives, museums, and other groups or institutions, can play an ICH stewardship role that sets a comparable example.
Glossary
Heritage Related Terms
- Intangible Cultural Heritage (ICH)
- - The customs, traditions and practices that help give a specific group of people their sense of identity.
- Living Heritage
- – An alternate term used to describe Intangible Cultural Heritage. This term implies that the customs, traditions and practices are always evolving as they continue to be used over time.
- Safeguarding
- – The concerted effort to preserve, promote and protect the Intangible Cultural Heritage of a culture or group of people.
- UNESCO
- – United Nations Educational, Scientific and Cultural Organization: This organization promotes worldwide heritage-based incentives such as the safeguarding of ICH.
Technology Related Terms
- A/V
- – Audio/Video - In the context of cables, this refers to cables transmitting audio and video signals separately, and having a white jack and a red jack on each end. They are used to connect either a camera or a video tape player to another device such as a computer or a television. A/V input/output ports are the ports on devices to which these cables connect.
- CD
- - or compact Disc – An optical disk designed to store digital data. The longevity of information stored CD media varies widely with the quality of the manufactured CD. Reputable manufacturers claim information can be stored over periods ranging from 50 to 200 years – evidence shows some brands can be unreadable in as little as 2 years.
- Clipping
- – This refers to when the sound levels of an audio recording are set too high, resulting in a distorted noise.
- Clips
- – When a portion of video is taken out of a larger video file, it is called a video clip. This term is also used in reference to segments of an audio file.
- Colour Depth
- – The number of bits used to indicate the colour of a single pixel in a bitmapped image or video frame buffer. True Colour uses 24 bits for red, green and blue hues. Each hue uses 8 bits, yielding 256 shades, or a combination of over 16 million different colours. The human eye can discern as many as 10 million colours.
- Cropping
- – Extracting a section of video from a larger video file to make a clip.
- Dead Air
- – Strictly, this is the unintended interruption in a radio broadcast during which no sound is transmitted. In the context of this document, it refers to any section of an audio file in which there is no sound.
- DPI
- – Dots Per Inch is used in reference to the file size of a digital image, whether a photograph or another kind of scanned document. The higher the DPI, the better quality the image is and the larger the file size will be.
- DV
- – Digital Video. A system of recording, storing, and playing back video information as a digital (as opposed to analogue) signal.
- DVD
- – Digital Video Disc – an optical disc storage format found on discs with the same dimensions as compact discs (CD). The format offers slightly more storage capacity than CDs, but manufacture ratings for lifespan tend to be slightly lower than that of their comparable CD media.
- Firewire
- – A high-speed IEEE communications interface standard designed by Apple Computer. The interface is commonly used to transfer voluminous real-time data such as video or hi-fidelity audio.
- GB
- – Gigabyte / Gibibyte. A volume of binary storage. A Gigabyte is now widely accepted as 1 billion (10003) bytes; a round number in the decimal system that is easily recognized by consumers. Historically, the term was used to denote 10243 bytes (a round number in the binary system, which is central to computer architecture). Windows operating systems still measure drive capacity in gibibytes, whereas drive manufacturers and recent Apple products measure drive capacity in gigabytes. Thus an external drive plugged into a PC will appear slightly smaller than the same drive plugged into a Mac.
- HD
- – High Definition. Any one of a number of High Definition Digital formats – typically for audio, or audio/video files. The term may also be used in reference to physical media on which such files are recorded (as in HD tape), or software used to edit such files.
- JPEG
- – A file format used to save images using compression. This format is ideal for upload/download on the Internet, but is not recommended for professional use. This format losses quality when saved after alteration.
- Metadata
- – Data that is used to describe another set of data. If the data is a photograph, the metadata would be the information that describes that photograph.
- Mini Disc
- – a magneto-optical disc designed by Sony to store digital audio recordings. The disc (which is smaller than a CD and is permanently contained in a plastic case similar to a 4" diskette) can be written to multiple times; significantly more than a CD-RW disk). Mini-discs store up to 80 minutes of sound.
- Mini DV
- – Miniature digital video tape cassette. This video storage media, also known as S-size (small size) cassettes were originally intended for amateur video recording equipment, but its use become accepted in professional recording productions as well.
- MP
- - MegaPixels is used to describe the number of pixels in a digital image, as well as the number of image sensor elements in a digital camera. 1 MP image contains one million pixels. The more pixels contained in an image, the better image quality, and (in general) the larger the resulting file size.
- MP3
- – A compressed audio file format used for playback on digital media players, and for Internet upload/downloads.
- Pixels/Pixilated
- – For digital images, a pixel is the smallest display unit possible on a computer screen. Pixels are single points that come together to create the entire image. When an image is pixilated (an unwanted state), individual pixels can be seen in the image.
- Playhead
- – A triangular cursor used in audio/video computer programs that shows the time that has lapsed in the file while watching or listening to it.
- RAID
- – Redundant Array of Independent Discs is a hard drive system that involves the use of multiple disc drives to replicate data onto multiple drives simultaneously. It is considered reliable because data is being backed up in more than one place.
- RCA Port
- – RCA Connector – RCA Socket – RCA Jack. Also called a phono connector or cinch connector. These connectors, designed by Radio Corporation of America originally to carry audio signals (the connector has been a common feature of stereo systems for several decades) is also used to carry video signals. A composite video image is typically carried through a single yellow RCA connector, whereas a component video image is typically carried through green, blue and red connectors (sometimes labeled Y, Pb/Cb, and Pr/Cr).
- Ripping
- – The word used to describe the process of taking audio files from a CD and putting them onto the computer. The computer's internal disc drive is used to perform this operation.
- S-Video Cables
- – Separate-Video cables are often used in analogue video transmission.
- Scart Adapter
- – A method of connecting audio and video equipment together, often used to connect televisions to VCRs or other devices.
- Splitting
- – Taking a video file and cutting it into sections to make separate clips.
- Trimming
- – Removing sections at the beginning or end of a video file during the editing process.
- TIFF
- – Tagged Image File Format is a format for saved image files that is commonly used for professional purposes. It is a lossless format that retains a high quality when saved after alteration.
- URL
- – Uniform (or Universal) Resource Locator – The address of a Web page.
- USB
- – Often referred to as USB sticks or USB flash drives; small, external storage devices that use flash memory. They are considered more reliable than hard drives because they have no moving parts.
- VCR
- – Videocassette Recorder - An electromagnetic device used for recording audio and video. The most common tape format for VCR recordings is VHS.
- VHS
- – Video Home System – a widely-adopted videocassette recording (VCR) technology that was developed by Japan Victor Company (JVC).
- VTR
- - Video Tape Recorder. A device to record video material to magnetic tape. While originally the tape was stored on reels, subsequent models stored material on cassettes, and were commonly referred to by the trade name VCR.
- VIVO
- - Video in video out. A video port that allows some computer graphics cards to have both video input and video output. This 9-pin circular port is sometimes labeled " TV" or a similar variant. It is found only on higher-end graphics cards. Note that not all graphics cards having this port make full use of it – some cards may only use it to transmit video out.
- WAV
- – Waveform audio file format is the primary format for raw, uncompressed audio files. It is larger in size that other formats, and retains high quality after being altered and saved.
- WMA
- – Windows Media Audio is a compressed file format used by Windows operating systems when working with and saving audio files.
- WMV
- – Windows Media Video is a compressed file format used by Windows operating systems when working with and saving video files.
Useful Online Sources
ICH - Intangible Cultural Heritage
- Heritage Foundation of Newfoundland and Labrador Website: www.heritagefoundation.ca.
- The Roles of Museums in Safeguarding Intangible Cultural Heritage (PDF) UNESCO's 2003 Position Paper: PDF available on-line.
- UNESCO's 2003 Convention Website: http://www.unesco.org/culture/ich/en/what-is-intangible-heritage-00003
- What Is Intangible Cultural Heritage? A booklet prepared by the Heritage Foundation of Newfoundland and Labrador. Download available here: http://www.mun.ca/ich/about/
Digitization – Digital Photography
- Canadian Heritage Information Network - Professional Exchange: Digital Photography and Digitization of Museum Collections.
- Canadian Heritage Information Network - Professional Exchange: Capture Your Collections – Small Museum Version.
Digital Preservation
- Canadian Heritage Information Network - Professional Exchange: Digital Preservation for Museums: Recommendations
Technology
- Audacity Wiki: Tips and Troubleshooting for Audacity: wiki.audacityteam.org
- iMovie Support: Tips and Troubleshooting for iMovie: www.apple.ca/support/imovie/
- Windows Movie Maker Support: Tips and Troubleshooting for Windows Movie Maker: www.windowsmoviemakers.net/Forums/
- QuickTime Software Download: www.apple.com/quicktime/download/
Footnotes - Digitizing Intangible Cultural Heritage : A How-To Guide
Contact information for this web page
This resource was published by the Canadian Heritage Information Network (CHIN). For comments or questions regarding this content, please contact CHIN directly. To find other online resources for museum professionals, visit the CHIN homepage or the Museology and conservation topic page on Canada.ca.