
Construction of a "Soft" Profile Gauge – Canadian Conservation Institute (CCI) Notes 18/3
(PDF Version, 353 KB)
CCI Note 18/3 is part of CCI Notes Series 18 (Conservation Equipment)
Introduction
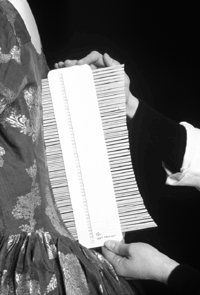
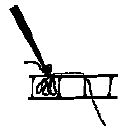
A profile gauge provides a practical way to trace contoured or unevenly shaped objects in order to produce accurate form-fitting supports and mounts for them (Figure 1). Commercially available profile gauges typically consist of a row of metal wires or plastic slats in a friction-fit holder. When pressed against an object, the wires or slats are pushed in incrementally, producing a reverse profile on the gauge. The exactness of the profile (outline), or resolution, depends on the thickness of the gauge elements.

Commercial profile gauges are designed to reproduce the curves of firm, stable materials such as wood, stone, plaster, and metal on, for example, architectural mouldings. The stiffness of these gauges and their weight pose a threat to museum artifacts that are soft or fragile, or that may easily be marked by the pressure required to move the wires or rods.
As an alternative, a "soft" profile gauge can be constructed using supplies commonly found in museum workshops. The "soft" profile gauge is not as accurate as a fine wire metal profile type, but its degree of accuracy is sufficient for most mount-making applications.
Soft profile gauges have many advantages over stiff, commercial gauges:
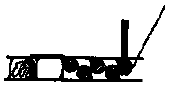
- They are gentle. Because the rods require only a very light tap to move and conform to the shape of the object, soft profile gauges can be used on very delicate surfaces (Figure 2).
- They are inexpensive and easy to construct.
- They are ultra-light. For example, the gauge described below weighs only 50 g.
- They can be made longer than commercial gauges, which are typically 20 cm. In contrast, a soft profile gauge can be 30, 50, or even 80 cm, depending on the size of the piece of fluted plastic used.
Materials
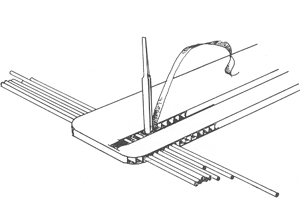
- Scrap piece of 3-mm-thick (1/8") fluted plastic sheet (Coroplast or Cor-X), for example 7.5 cm x 30 cm (Figure 3). Note that the flutes on a 5-mm-thick (3/16") sheet will be too large to hold the sticks tightly. Make sure the flutes are running perpendicular to the length of the plastic sheet (Figure 4).
- Cotton tape, 6 mm wide. Choose a smooth, plain weave cotton tape that is not likely to snag on the wooden sticks. Cut a strip at least twice as long as the piece of fluted plastic.
- Straight hardwood applicator sticks, 145 mm long x 2 mm in diameter. (Bamboo skewers of a similar diameter can be used as an alternative. However, they have a slippery surface that causes the sticks to fall out of the weave. They also need careful trimming to length.) Rolling the sticks on a flat surface will determine which ones are straight. Warped sticks do not roll well. Reject warped and splintered sticks. Be sure that the sticks are exactly the same length; this will give you the option of using either the negative or the positive profile created by the sticks.
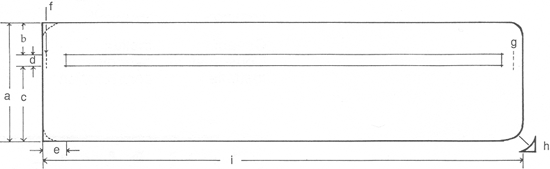
Figure 3.
a- 66 mmb- 20 mm
c- 40 mm
d- 6 mm
e- 2 1/2 channels wide
f and g- 7 mm slit through the top layer of the fluted plastic
h- rounded corners
i- This length can vary, depending on the size of the curves that need to be reproduced. A convenient size is 11.25 cm.
Instructions
- Round off the corners of the fluted plastic sheet (Figure 3, h) because sharp corners on a measuring tool can damage museum objects.
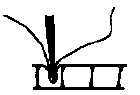
- Cut out a 6-mm-wide slot in the piece of fluted plastic using a sharp utility knife and a straightedge (Figures 3 and 4).
- Cut a 7-mm slit through the top layer of the plastic sheet (Figure 3, f).
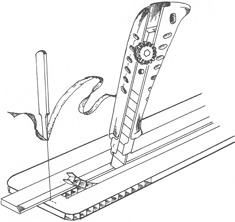
- Secure one end of the cotton twill tape into the slit produced in Step 3 (Figures 5a and 5b) with a sharpened flat wooden slat (e.g. a Popsicle stick), and glue the twill tape into the slit with hot-melt glue. To ensure that the twill tape is long enough to weave down the whole length, measure out at least twice the length of the piece of fluted plastic.
- Weave the twill tape in between two applicator sticks per flute (Figures 5c and 6). The tension exerted on the weave end is critical to the proper movement of the wooden sticks and to the stiffness of the resulting gauge. It is best to practice until an even, light tension is maintained. If the correct tape tension is created, the sticks will move easily, but will not fall out during normal use.
- After the weaving is complete, cut another 7-mm slit through the top layer of the sheet ( Figure 3, g), then insert several loops of tape inside the slit, and glue the end inside the slit as done previously. As an alternative to glueing the tape at the end, run it through one or two additional flutes. This provides a method of increasing the weave tension at a later date if required.
Large Gauge
A large gauge can be useful when taking profiles to build supports for large objects such as canoe hulls. Such a gauge can be made by using 8-mm Hi-Core fluted plastic. In this case, it is not necessary to use cotton tape. Instead, choose dowels thick enough to fit the width of the channels. The dowels should slide down the channels easily and smoothly, yet with enough friction to prevent them from sliding out when the gauge is held vertically.
Suppliers
Applicator or swab sticks (hardwood dowels 2 mm diameter):
Scientific supply stores
Fluted plastic (Coroplast, Cor-X, Hi-Core), dowels, hot-melt glue, Popsicle sticks:
Hardware stores
Bamboo skewers (if scientific supply dowels are not available, see note in text):
Grocery stores
Cotton tape:
Fabric stores
Bibliography
Barclay, R., A. Bergeron, and C. Dignard. Mount-making for Museum Objects, second edition. Ottawa, ON: Canadian Conservation Institute / Quebec, QC: Centre de conservation du Québec, .
Schlichting, C. Working with Polyethylene Foam and Fluted Plastic Sheet. Technical Bulletin Nº 14. Ottawa, ON: Canadian Conservation Institute, .
by Carl Schlichting
revised by Robert L. Barclay
Originally published
Revised
Copies also available in French.
Texte également publié en version française.
©Minister of Public Works and Government Services, Canada,
Cat. Nº NM 95-57/18-3-2007E
ISSN 0714-6221