
Making Padded Blocks – Canadian Conservation Institute (CCI) Notes 10/2
Introduction
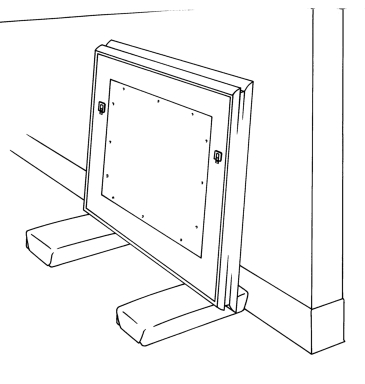
Padded blocks are recommended for galleries or museums that have paintings in their collection. Two features of padded blocks make them ideal as support devices for paintings: a cushioned surface protects the frame or edges of an unframed painting from abrasion; and a skid-proof bottom reduces the chance of slipping. Padded blocks safely support paintings when installing or dismantling an exhibit. They raise paintings off the floor when the works of art are in temporary storage, thus protecting them from water damage in case of flooding (Figure 1).
© Government of Canada, Canadian Conservation Institute. CCI 96347-0001
Figure 1. Padded blocks support paintings during temporary storage. Having the painting raised off the floor protects it from flood damage. In placing a framed painting as illustrated, soft padding should be placed between the wall and upper edge of the frame to prevent abrasive damage.
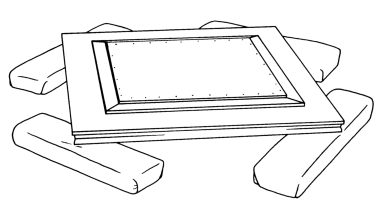
Padded blocks of various lengths can also be placed on tables to support and cushion paintings and frames, either face up or face down, while they are being examined or treated (Figure 2). It is important to note that when paintings are placed face down, as illustrated in Figure 2, no elements of either the frame or painting snag on the padded blocks. To avoid this form of damage, blocks can be covered (wrapped) in plastic or Mylar sleeves. A Mylar or plastic sleeve will also prevent soiling of the padded block.
© Government of Canada, Canadian Conservation Institute. CCI 96347-0009
Figure 2. Supporting a painting and frame placed face down.
Figure 2 illustrates the safe placement of blocks at a 45° angle to each of the four corners. This is a typical block placement for paintings (framed or unframed) when placed either face up or face down. If frame corners are built up with decorative elements, do not position the blocks directly in contact with these fragile projecting surfaces when the frame is placed face down. Move blocks further into the frame, maintaining the 45° angle with respect to the corners, until blocks rest on flat surfaces of the frame. Similarly, if a painting has fragile, projecting paint elements, do not place the painting face down under any circumstances without provision for protection of the paint layer.
Constructing Padded Blocks
Padded blocks are easily made (see steps 1 through 5) and at minimal cost.
-
Cut a 5 cm x 10 cm (2 in. x 4 in.) section of wood into 30 cm (12 in.) lengths or more, as required. Choose wood that is well-seasoned, non-resinous and from areas that are not warped and twisted. Either pine or basswood is a good choice.
-
Wrap the block with cushioning foam. Foams that are commonly used for packaging and cushioning are often made from:
- polyethylene
- polyurethane
- polystyrene
The foam required for padded blocks should:
- compress only slightly when pressed between thumb and forefinger, then recover fully when pressure is released, and
- be chemically stable and therefore durable.
- Polyethylene foams
- Polyethylene foams have the best balance of the properties noted above. Many different polyethylene foams are produced by a wide range of manufacturers. They are available in both closed-cell, crosslinked forms (e.g. Volara, Minicell and Plastazote) and closed-cell, uncrosslinked forms (e.g. Ethafoam brand polyethylene foam). Both types are suitable as a padding material for wood blocks. The crosslinked foams have, in general, smaller cell sizes and possibly better mechanical resistance than the uncrosslinked polyethylene. However, as crosslinked small cell-size polyethylene foams are often designed for specialty applications, they may not be as readily available as the more common uncrosslinked polyethylene foams.
- Polyurethane foams
- Polyurethane foams used for padding in cushions and mattresses may also be used but must be more frequently changed because they are less durable and more compressible than polyethylene foams.
- Polystyrene foams
- Polystyrene foams are not suitable because they are more brittle, are easily dented and do not have much elastic recovery.
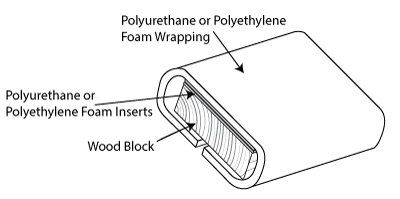
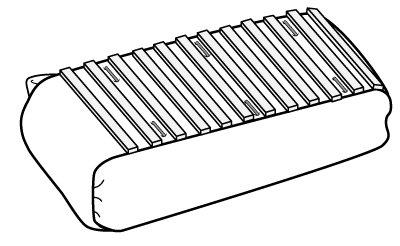
Cut one to two layers of the chosen padding material to the same dimensions as the top of the wood block and apply to a combined thickness of approximately 1.5 cm (1/2 in.). Lay these shaped foam sections on the top of the block and then wrap a 0.5 cm (1/4 in.) thick section of the same foam material over and around the block, joining the edges on the underside of the block (see Figure 3). The joined edges of the wrapping foam can be secured along the underside using either double-sided tape or staples. The block is now padded on the top surface with 2 cm (approximately 3/4 in.) of foam. When wrapping the block of wood, be sure to extend the wrapping foam beyond the corners and sharp edges of the block as shown in Figure 3. This will prevent any risk to paintings and frames from exposure to a hard edge.
© Government of Canada, Canadian Conservation Institute. CCI 96347-0005
Figure 3. Wooden block padded with cushioning foam. -
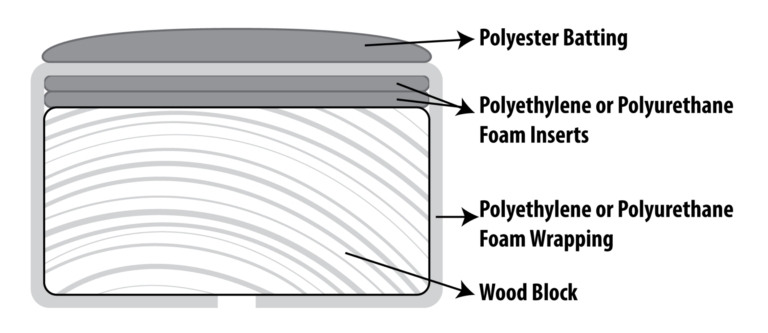
To provide extra cushioning on the top surface of the padded block, add a layer of polyester batting. The padded block will now appear, in cross-section, as seen in Figure 4. The amount of overall cushioning recommended in this Note for the top of the block (2 cm plus a thin layer of polyester batting) is adequate for most easel-sized paintings with frames of commensurate size and weight. If the padded blocks need to support heavy paintings and frames, the block size can be increased as well as the depth of the padding up to 2.5 cm (approximately 1 in.). In the case of heavy framed paintings positioned either along one edge or face down, increase the number of supporting blocks to better distribute the weight.
© Government of Canada, Canadian Conservation Institute. CCI 96347-0007
Figure 4. Cross-section of padded wood block with polyester batting. -
Cover the foam (with or without the polyester batting) with a fabric that is soft, smooth, tightly woven and colourfast. A non-coloured cotton flannelette is often used for this purpose (Figure 5). The edges of the fabric should be tightly and neatly folded on the underside of the block. The edges of the fabric can be secured by stapling, ideally with stainless steel staples. (Figure 6).
© Government of Canada, Canadian Conservation Institute. CCI 96347-0002
Figure 5. Padded block covered with fabric.
© Government of Canada, Canadian Conservation Institute. CCI 96347-0003
Figure 6. Fabric stapled to the underside of the block. -
Padded blocks used in temporary storage to raise paintings off the floor should be sealed with polyethylene sheeting. In the event of a flood, this covering will prevent the padded block from absorbing water. Polyethylene sheeting should be of medium weight and should cover the block completely. Seal the edges of the polyethylene using an adhesive-coated packing tape on the underside of the block.
The block needs to be skid-proof or “slide-proof” so that heavier paintings, when placed on edge on the blocks and leaning against a vertical support, do not slide out from the wall. The easiest way to skid-proof a block is illustrated in Figure 7. Here, a narrow strip of textured rubber mat has been cut to fit the bottom surface. This strip can either be stapled or secured to the block using small finishing nails.
© Government of Canada, Canadian Conservation Institute. CCI 96347-0008
Figure 7. Staple or tack a skid-proof pad to the bottom of the wrapped block.
It is important to remember to only use padded blocks as temporary supports. Paintings, framed and unframed, require proper housing and support systems for long-term storage.
by Debra Daly Hartin
Revised by Wendy Baker in 2016
Originally published in 1986
Également publié en version française.
© Government of Canada, Canadian Conservation Institute, 2016
ISSN 1928-1455