
Making Triwall Containers – Canadian Conservation Institute (CCI) Notes 1/4
CCI Note 1/4 is part of CCI Notes Series 1 (Care of Collections - General Guidelines)

Introduction
Shipping containers are the first line of defence against shipping hazards. An appropriate container and an effective cushioning system work together as a system for preventing physical damage to fragile objects during shipment.
Wooden containers continue to be a popular choice for many museum shipments. They are strong, and can be fabricated to high performance standards by museum preparators with readily available materials and power tools.
The strength and durability requirements of a shipping container depend on the nature of the contents to be shipped and the hazards that are likely to be encountered in a particular distribution system. As an extreme example, marine shipment of heavy items requires very durable containers to resist compressive forces resulting from the high stacking heights in ship cargo holds, and to resist damage during handling by equipment such as grab hooks and slings. On the other hand, source-to-destination transport of relatively light items by museum staff or qualified art handlers places much lower demands on a shipping container.
In certain situations, especially those involving transport by museum staff and art handlers, it may be possible to reduce crating costs by seeking alternatives to conventional wooden cases. An example of such an alternative is the triwall container developed by the Department of Canadian Heritage, Parks Canada, Heritage Presentation and Public Education Branch, Collections Management Unit. The container is inexpensive, easy to build and surprisingly strong, and it can be quickly fabricated without the use of power tools. The assembly and fabrication procedures developed by the Collections Management staff of Parks Canada have been reproduced here to expand the range of crating options available to museum staff.
Materials and Tools
- 16 mm (5/8";) thick triwall cardboard sheet
- 8 pieces of 50 mm x 50 mm (2"; x 2";) cedar, cut to required lengths
- fibre-reinforced Kraft paper tape
- white resin glue
- 25 mm long (1";) staples or 25 mm long (1";) #8 wood screws and washers
- 1 m to 2 m long (4' to 6') crimping block (described in text)
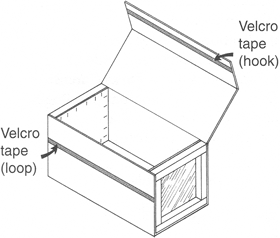
- 19 mm or 25 mm wide (3/4"; or 1";) self-adhesive Velcro tape
- 75 mm long (3";) box nails
- utility knife
- measuring tape
- straightedge
- rubber mallet (heavy weight)
- screwdrivers or an electric or pneumatic staple gun (depending on construction method)
Assembly Instructions
Determine the inside dimensions of your container.
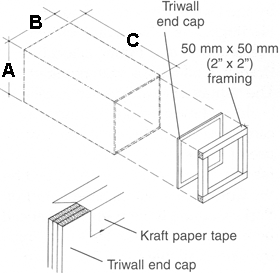
Note: If a power stapler is not available, use 25 mm long (1";) #8 wood screws with 12 mm (1/2";) washers. To determine the width of triwall material required for the container, add the thickness of the two end cap panels, including the cedar frames, to the desired internal width to arrive at the outside width (C).

Important: Before cutting the triwall material, ensure that the corrugations will run across the width of the container. This orientation enables the material to be properly folded to form the corners. To determine the length of triwall material necessary to cover the entire container, use the following calculation: (2 x A) + (2 x B) + (the desired flap length) + (a 50 mm (2";) allowance for folding).
Note: The fastening flap should be at least 2/3 of the internal height (A) of the container. Use Kraft paper tape to seal all edges of the triwall material in the same manner described for the end caps.
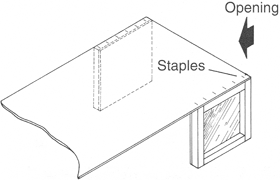
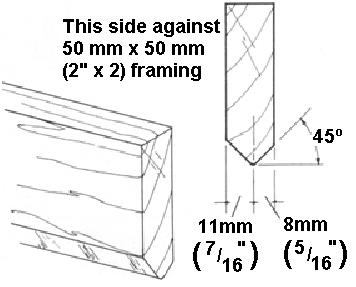
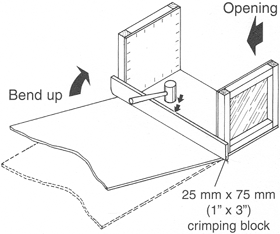
Figure 3: Choose the desired location for the container opening. From one side of this opening, begin to attach the triwall material onto the cedar end cap frames using glue and 25 mm (1";) staples. Attach the triwall material onto the cedar end cap frames using glue and staples. After the triwall material has been attached to one side of the container, it is necessary to fold the material 90°. To produce a crisp and straight fold, a crimping block must be used. A crimping block can be made from a 1 m to 2 m (4' to 6') piece of 25 mm x 75 mm (1"; x 3"; nominal) hardwood (preferably birch or maple), shaped with a pointed edge.
Note: Be sure to identify which sides of the triwall material will form the lid and fastening flap and remember that these sections are not stapled or screwed to the end cap frames.
Options
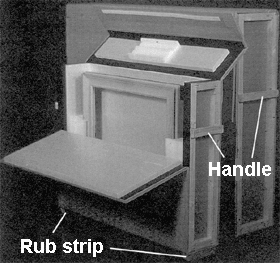
Handles
Alternative Closures
If desired, the stretch and security of the closure can be increased by using hardware such as T-nuts or draw latches to secure the lid and fastening flap during transport.
Water Resistance
If a water-resistant barrier is desired, one or two coats of lacquer may be applied to the exterior of the container.
Rub Strips
Rub strips on the base of large containers allow easy movement and help avoid contact between the triwall material and wet floor. Rub strips can be attached to the base of the container with nails or bolts. The rub strips can be oriented along the length or width of the container.
Written by D. Snutch
(Collections Management Unit,
Heritage Presentation and Public Education Branch, Parks Canada,
Department of Canadian Heritage); and
P. Marcon (Canadian Conservation Institute).
Copies are also available in French.
Texte également publié en version française.
© Canadian Heritage,
Cat. Nº NM95-57/1-4-1997E
ISSN 0714-6221