
Matting Works on Paper – Canadian Conservation Institute (CCI) Notes 11/5
(PDF Version, 1.23 MB)
CCI Note 11/5 is part of CCI Notes Series 11 (Paper and Books)
Introduction
There are many reasons for housing works on paper in mats. During handling, a mat provides support and protection from damage. Mats are useful for storage and for display in frames. When in a frame, a window mat creates an air space to protect the image of a work from direct contact with the glazing. Accession numbers, titles, and other information can be written on the mat rather than on the artifact itself. Finally, a mat provides an aesthetic means of presentation.
This Note describes how to make the simplest and most commonly used mat. Variations for artifacts that present unusual problems are not discussed here.
Because paper is extremely sensitive to contamination by poor-quality materials, it is essential to use only conservation-quality matboard, papers, and adhesives (CCI Notes 11/2, Storing Works on Paper) in contact with paper artifacts. Matboard recommended for conservation purposes, described by the manufacturers as "100% rag fibre," is available either buffered (pH 7.5 to 8.5) or unbuffered (pH 7). Matboard made from highly purified wood pulp buffered to pH 8.5 is an acceptable, more economical alternative. Matboard that is buffered to protect paper from acidity is appropriate for most works on paper. Generally, the use of white or buff 4-ply matboard is recommended.
Mat Size
The size of the mat might be dictated by the size of the existing frame. If there is no existing frame, mats and frames can be cut to standard sizes for convenience and for economy of space in storage and display. Mats (and frames) are normally pre-cut to the following sizes:
8" x 10" (20.3 cm x 25.4 cm)
10" x 12" (25.4 cm x 30.5 cm)
14" x 18" (35.6 cm x 45.7 cm)
16" x 22" (40.6 cm x 55.9 cm)
22" x 28" (55.9 cm x 71.1 cm)
28" x 36" (71.1 cm x 91.4 cm)
Choose a mat size that will give a balanced appearance to the work and that will provide adequate protection during handling. The window opening must be large enough to reveal the image, platemark, signature, title, and any other significant notations. Normally, the top and side margins of the mat are the same width, while the bottom margin is slightly larger to create a balanced visual effect.
Preparing the Mat
The following materials are required to make one mat:
- 2 pieces of conservation-quality, 4-ply matboard
- 1 strip of gummed linen tape, cut to the length of the longest mat edge
- mat cutter
- weights
- small 3" x 4" (8 cm x 10 cm) pieces of Reemay (spun polyester web), blotting paper and matboard
- Japanese paper for hinges
- wheat starch paste
- paste brush
Cutting the Window
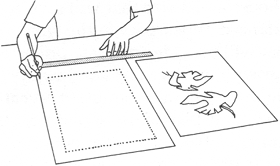
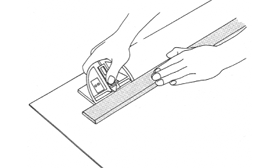
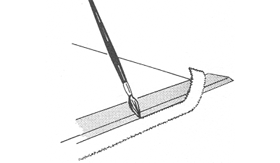
Windows are usually cut with a 45o bevel to enhance their appearance and to reduce shadows. It is advisable to practise on a piece of scrap matboard before cutting the final mat. Place the artwork on one of the pieces of matboard and measure the margins. Ensure that the edges of the mat will overlap the edges of the artifact by at least 2 mm to 4 mm in order to hold down the work. Using a pencil, lightly draw the window on the matboard (Figure 1). Cut the window out with a mat cutter (Figure 2). Remove any pencil marks from the back with a soft white eraser. Lightly rub the back of the bevelled edges with fine sandpaper to eliminate the slight burr that is created when the matboard is cut.
Joining the Front and Back Matboards
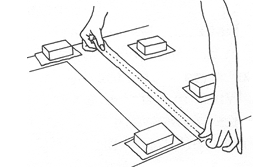
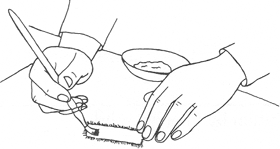
Join the front and back matboards together along one edge using gummed linen tape (Figure 3). The tape provides maximum support when it is placed on the longest edge; that is, on the top edge if the format is horizontal or on the left edge if the format is vertical. Place weights on both matboards to prevent them from slipping. Moisten the tape with a sponge and centre it over the join. Press the tape firmly in place and cover with Reemay, blotting paper and weights. Leave the assembly to dry.
Hinging
Hinging is the best way to attach works on paper to their mats. Hinging provides secure attachment while permitting some movement of the paper in response to changes in climatic conditions. Suspending the work by hinges also permits the reverse of the work to be examined easily. In addition, should the work have to be removed from the mat, hinges make the process simple and straightforward.
Although commercially available gummed and pressure-sensitive tapes are convenient to use, they are often made of inappropriate materials and have poor aging properties. Eventually, they will cause staining and damage and may be difficult to remove. Keep a selection of Japanese papers, of different weights, on hand. Hinges should not be heavier or stronger than the work itself, yet must provide adequate support. Not all Japanese papers are of conservation quality. Some Japanese papers may contain a large proportion of wood pulp, making them unsuitable. Buy from a reputable source and check the fibre content with the supplier before purchasing.
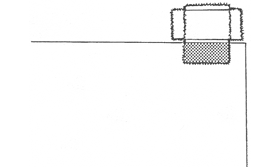
The T-hinge is the strongest and most versatile hinge for standard matting. The weight, size, number and location of the hinges is determined by the work of art. Most works on paper require two hinges, but additional hinges may be required to support larger objects. The hinges can be placed either vertically, as shown in this Note, or horizontally. Generally, either orientation is acceptable although horizontal hinges will provide additional support for large, horizontal works of art. A T-hinge is made from two rectangular pieces of the selected paper, one longer than the other. The lower half of the shorter strip (the stem tab) is attached to the top reverse edge of the artifact. To secure the artwork to the mat, the longer tab (the cross tab) is placed over the top half of the smaller one and pasted onto the support board (Figure 4). Details of the procedure follow below.
Feathering the edges of the tabs (achieved by tearing rather than cutting the tabs from the hinge paper, as described below) provides better adhesion and prevents ridges from forming. To make a feathered edge, dip a small pointed brush in water, or use a ruling pen (a pen containing water for ruling, which usually has a split nib). Draw a line on the hinge paper and tear a strip off along the line against the edge of a ruler (Figure 5). Use the same technique to divide the strips into appropriate lengths to make the tabs. The width of the tabs will depend on the size of the artifact, but should not be narrower than 1.5 cm.
Wheat starch paste is the best paste to use for hinging. Instructions for making wheat starch paste can be found in CCI Notes 11/4, Wheat Starch Paste.
It is advisable to practise the following procedure on scrap paper, for example on a piece of old newspaper, before applying the procedure to an artifact. Some artifacts are more problematic than others to hinge. If in doubt, consult a paper conservator.
Place the artifact face-down on a clean surface. Brush paste onto the lower half of the stem tab (Figure 6). Attach the hinge to the reverse of the artifact on the top edge, near but not at the corner. Keep in mind that the portion of the tab in contact with the artifact should be as small as possible, but that the attachment must be strong enough to support the work as it hangs in the mat. Insert a piece of blotting paper, followed by a piece of Reemay, underneath the artifact in the hinged area. Then place another piece of Reemay on top of the hinge.
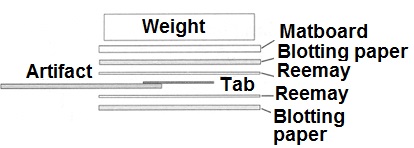
On this piece of Reemay, put one or two pieces of blotting paper, followed by matboard. The Reemay will prevent the pasted area from sticking to the blotting paper. Secure the Reemay, blotting paper and matboard with a weight (Figure 7). Repeat the procedure for the second hinge. Change the blotting paper on both hinges after five minutes and allow hinges to dry under weight for several hours.
When the tabs are dry, position the artifact on the mat. Secure the artifact with a small weight to prevent it from slipping; place a clean piece of white paper between the weight and the artifact. With scissors, trim off the feathered edge from the side of the cross tab that will be closest to the work of art. (This is done to prevent small fibres from adhering to the artwork.) Leave a narrow space corresponding to the thickness of the paper, but not exceeding 2 mm, between the top edge of the object and the cut edge of the cross tab to permit free lifting of the matted object. Brush paste onto the tab and place the tab across the stem tab on the back support matboard (Figure 8).

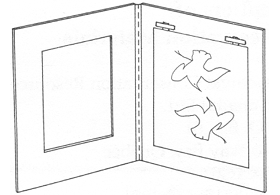
Once the cross tab hinge is attached, place Reemay, blotting paper, matboard and weights on top of the hinge. Repeat this procedure for the other cross tab. Change the blotting paper after five minutes and allow hinges to dry under weight for several hours. Figure 9 shows the completed mat.
Suppliers
Conservation quality matboard (neutral pH or buffered):
- Available from local art and drafting supply stores, framing shops, suppliers of conservation materials.
White gummed line tape:
- Available from suppliers of conservation materials.
Mat cutters:
- Several types are available from local art and drafting supply stores.
Reemay (If necessary, dressmakers' lightweight non-woven interfacing is a reasonable substitute. Do not use the fusible type, which is coated with a hot-melt adhesive.):
- Available from suppliers of conservation materials.
Japanese paper:
Available from local art and drafting supply stores, suppliers of conservation materials, or from
- The Japanese Paper Place
887 Queen Street West
Toronto, Ontario
M6J 1G5
Telephone: 416-703-0089 - Au Papier Japonais
24 Fairmount West
Montréal, Québec
H2T 2M1
Telephone: 514-276-6863
Fax: 514-276-6979
Suppliers of Conservation Materials
- Archival Conservation Resources (Canada) Ltd.
P.O. Box 61
Norway Bay, Québec
J0X 1G0
Telephone: 819-647-1981
Fax: 819-647-1981 - Carr McLean
461 Horner Avenue
Toronto, Ontario
M8W 4X2
Telephone: 416-252-3371
Toll-free:1-800-268-2123
Fax: 416-252-9203
Toll-free fax: 1-800-871-2397 - University Products of Canada
Division of BFB Sales Ltd.
6535 Millcreek Drive, Unit # 8
Mississauga, Ontario
L5N 2M2
Telephone: 905-858-7888
Toll-free: 1-800-667-2632
Fax: 905-858-8586 - Woolfitt's Art Enterprises Inc.
(distributors for Gaylord Archival
Storage Materials &
Conservation Supplies,
Multi Media Audio Visual
Supplies and Library Supplies)
390 Dupont Street
Toronto, Ontario
M5R 1V9
Telephone: 416-922-0933
Toll-free: 1-800-490-3567
Fax: 416-922-3017
Further Reading
-
Ellis, Margaret Holben. The Care of Prints and Drawings. Nashville, Tennessee: AASLH Press, .
-
Holm, Suzanne-Marie. Le montage et l'encadrement des oeuvres sur papier. Québec: Ministère des Affaires culturelles, .
-
Smith, Merrily A. Matting and Hinging of Works of Art on Paper. Washington, DC: National Preservation Program Office, Library of Congress, .
Available from:
Superintendent of Documents
U.S. Government Printing Offices
Washington, DC 20402
USAThis publication includes information on standard and special-purpose matting as well as on paste preparation and storage.
Written by Sherry Guild.
Copies also available in French.
Texte également publié en version française.
© Canadian Heritage,
Cat. Nº NM95-57/11-5-1986E
ISSN 0714-6221