
How to Make and Use a Precipitated Calcium Carbonate Silver Polish – Canadian Conservation Institute (CCI) Notes 9/11
- Introduction
- Procedure: how to make and use a precipitated calcium carbonate silver polish
- Evaluating an object to decide whether to polish
- Abrasives and polishing
- Acknowledgements
- Suppliers
- References
Introduction
Silver discolours and darkens when it is exposed to sulfur-containing gases such as hydrogen sulfide. This change results from a corrosion process called tarnishing which produces silver sulfide. Thick tarnish on silver or silver alloys is black, but thinner layers can show a variety of colours.
Although tarnish can be removed by various methods, with some objects it is advisable to avoid polishing altogether. Some objects have features that should not be removed, such as niello in inlays or areas of intentional patination. Other objects have visible fire scale, revealed by previous polishing; more polishing will expose more of the fire scale and disfigure the object further. The section Evaluating an object to decide whether to polish examines these cases and offers tips on how to distinguish silver-plated objects from objects made with a silver alloy.
Each time tarnish is removed, the silver that reacted to form the tarnish is lost. Moreover, polishing also removes some of the underlying untarnished silver. After many cycles of tarnishing and polishing, so much silver may be removed that fine detail on the object is lost. With silver-plated objects, too much polishing can remove all the silver in some areas, revealing the underlying metal. The best way to minimize polishing of a silver object is to prevent the object from tarnishing. Selwyn (1990) and CCI Note 9/7 Silver — Care and Tarnish Removal provide information on how to minimize tarnishing during storage or display.
When tarnish removal is necessary and acceptable, one of the options is to use an abrasive polish. CCI Note 9/7 Silver — Care and Tarnish Removal lists several kinds of abrasive polishes. Most are commercial polishes, but one is simply a slurry of precipitated calcium carbonate in water. The current Note discusses how to prepare and use silver polish made with precipitated calcium carbonate. This polish is considered mild because it does not remove too much of the silver under the tarnish. Using this silver polish avoids using commercial polishes, which may contain unknown abrasives or additives that are harmful to the object.
The procedure described here is suitable for silver objects (either silver-plated or a silver alloy) that can be rinsed with water without damaging associated materials like wood or ivory. A laboratory and ventilation are not required unless organic solvents are used. Prior to using a chemical or solvent, consult its safety data sheet (SDS) for health and safety information.
Procedure: how to make and use a precipitated calcium carbonate silver polish
How to make & use precipitated calcium carbonate silver polish
This video was created by the Canadian Conservation Institute.
Equipment and materials required to make and use the polish
- Tarnished silver
- Disposable nitrile gloves
- Precipitated calcium carbonate
- Water (distilled or deionized if available)
- Petri dish or suitable container to hold small quantities of the polish
- Spatula or spoon
- Lint-free cotton pads or clean cotton flannel for polishing
- Clean cotton flannel or specialty cotton cloths for drying and for removing residual abrasive powder
- Soft natural fibre brushes, preferably without a metal ferrule (the metal band holding fibres in place) that could scratch the silver; choose a brush as soft and fine as possible (such as sable or squirrel)
- Plastic wrap such as Saran Wrap, Handi-Wrap, Cling Wrap or Parafilm M (a stretchy laboratory film)
- Acrylic sheet [acrylic is a transparent polymer, poly(methyl methacrylate) or PMMA, available under trade names such as Plexiglas, Lucite, and Perspex]
- Mild detergent or surfactant (such as sodium lauryl sulfate)
- Optional: acetone, ethanol or mineral spirits, if needed to remove wax or grease
Procedure to prepare the silver polish and test on acrylic
- To make a small amount for testing or for polishing a single object:
- Use a spatula or spoon to transfer some precipitated calcium carbonate to a Petri dish.
- Add water and stir with the spatula or soft brush to form a cream-like paste.
- To make a large amount to keep on hand, mix equal volumes of precipitated calcium carbonate and water. One way to do this is:
- Fill a container (such as a large beaker) with a chosen volume of water and mark the level.
- Transfer the water into a temporary container.
- After drying the original container, fill it to the mark with precipitated calcium carbonate.
- Air bubbles in the powder can be removed by gently tapping the container on a hard surface.
- Return the measured water to the container and stir to mix.
- Store the slurry in a labelled bottle.
- Shake well before use.
- To test a batch of precipitated calcium carbonate that has not been used before:
- Use a new piece of acrylic sheet and remove the protective plastic film.
- Cut small squares of cotton pad or cotton flannel; a convenient size is about 5 cm by 5 cm.
- Wipe a small part of a cotton pad through the carbonate paste prepared under step 1 above, to transfer some paste to the pad.
- Rub the cotton and paste back and forth several times over a distance of a few centimeters on the acrylic.
- Examine the acrylic for scratches. With clear acrylic, scratches are easier to see if black cardboard is placed behind the acrylic sheet. Hold the acrylic at different angles to the light to find the best angle to see the scratches. Scratches are more obvious on black acrylic sheets than on clear ones.
- If there are scratches, label the calcium carbonate as unsuitable for polishing silver and find a different source of calcium carbonate.
- In addition to testing calcium carbonate, acrylic can also be used to test other polishes, such as aluminum oxide or commercial polishes, or to test brushes or cloths.
A reminder before polishing
Check for marks that may help to identify a silver alloy or silver plating, and look for worn areas that may help to identify the base metal under the plating. Consult curators, other experts and available documentation to determine if there is niello, fire scale or an intentional patina. The decisions to remove tarnish from silver, on how much tarnish to remove and on the final appearance should be made jointly by a conservator and a curator. Polish only when necessary because too much polishing can remove the silver from a plated object or details from a silver alloy. Avoid polishing silver with an intentional patina, and minimize polishing on areas containing fire scale or niello.
Procedure to use the polish on tarnished silver
- Prepare a suitable workspace, including a work surface padded with soft cotton. For further details, see Long (1999).
- Put on a pair of disposable nitrile gloves before handling silver or chemicals.
- Remove dust with a soft natural fibre brush. Ensure the brush is clean, as dust particles can scratch the silver. Use a new brush or one that is reserved for cleaning silver. Wash and dry the brush before it is used the first time. If the brush has a metal ferrule, cover the ferrule with tape so the metal cannot scratch the silver. Brush lightly. For further advice on cleaning, see Long (1999).
- Use plastic wrap to cover any materials that should not be exposed to water or solvents (bone, wood or ivory, for example). In some silver trays, the rims are strengthened with iron, which must not be allowed to get wet. (A magnet can be used to check for iron at the rim of the tray.) Do not allow water to get into hollow handles or other hollow parts of an object.
- Clean the silver with a few drops of mild detergent and water to remove any dirt and grease. Dry well.
- Optional: If necessary, use ethanol, acetone or mineral spirits to remove adherent grease, candle wax or other organic residues. An organic solvent may also remove some of the tarnish, if the tarnish contains a significant amount of organic material (Hallett et al. 2003).
- Prepare a calcium carbonate paste, and transfer some of it to a small part of a cotton pad (about 5 cm by 5 cm) as was done in the test on acrylic.
- Polish the silver surface with the cotton pad by gently rubbing the surface. Use a circular motion where possible.
- Replace the cotton pad when it is soiled. Always use a clean pad to wipe through the carbonate paste.
- Stop often to wipe off, rinse and inspect the area being polished. Do not assume that the object needs more polishing just because a clean pad turns dark with polishing. Even after all the tarnish has been removed, the pad will still turn dark as the abrasive removes silver from the surface.
- Do not spend too much time polishing any one area. It is better to go over the entire object several times rather than polish one area too much at once. If one area is polished too much, the whole object may have to be polished to the same level.
- Once polishing is done, rinse the surface to remove fine particles of precipitated calcium carbonate. If possible, rinse under running water; otherwise use wet cotton flannel or cotton swabs. (Take care not to scratch the silver with cotton swabs made with wooden applicator sticks as wood may scratch silver.)
- Dry the object well with soft absorbent cloths such as cotton flannel. Make sure there is no water left in crevices. Pat dry rather than wipe.
- Examine the object under magnification and remove remaining traces of calcium carbonate with a soft brush or a cotton Selvyt polishing cloth. Use a small soft natural bristle brush to clean residual powder from grooves.
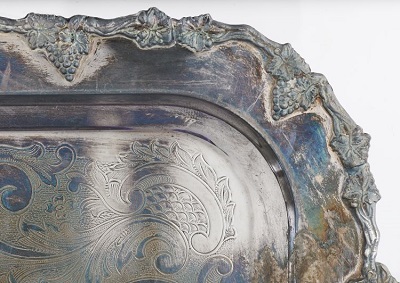
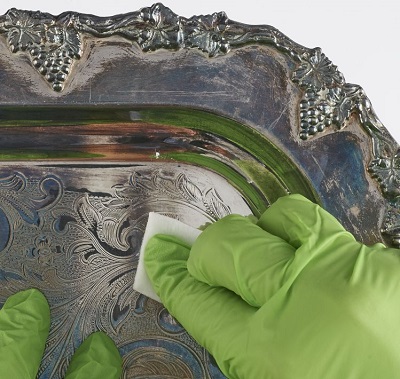
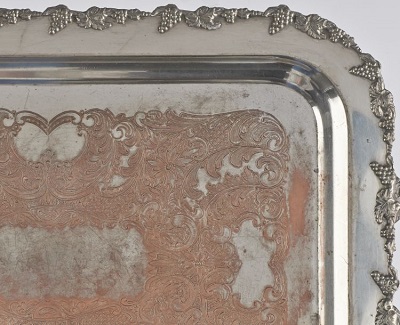
Some steps of the polishing procedure are demonstrated on a tarnished silver-plated tray in Figures 1 to 3. Figure 1 shows a strip of unpolished silver between two areas that have already been polished, rinsed and dried. In Figure 2, the cotton pad is rubbed on the tarnished strip. The resulting polished surface is shown in Figure 3. Some tarnish has been left in the engraved design to bring out the details.
© Government of Canada, Canadian Conservation Institute. CCI 120260-0321
Figure 1. Silver tray after two tarnished areas have been polished with precipitated calcium carbonate, leaving a vertical unpolished strip.
© Government of Canada, Canadian Conservation Institute. CCI 120260-0326
Figure 2. Silver tray during polishing of the vertical strip with a paste of precipitated calcium carbonate and a cotton pad. The dark areas that look like there is still tarnish left (but look polished in Figure 1) are caused by unwanted reflections in the photograph.

© Government of Canada, Canadian Conservation Institute. CCI 120260-0329
Figure 3. Silver tray after polishing the vertical strip of tarnish. The dark areas that look like there is still tarnish left (but look polished in Figure 1) are caused by unwanted reflections in the photograph.
Additional information
Modifications of the procedure
Some conservators recommend adding a few drops of detergent to the water used in making up the slurry with calcium carbonate (Wharton 1989). Others recommend using denatured ethanol instead of water to make up the slurry (Long 1999) or a mixture of ethanol and water (Pouliot et al. 2015).
Sometimes precipitated calcium carbonate does not remove all the tarnish on a silver object, especially on silver alloys. For stubborn tarnish stains, try polishing with a paste of a 0.05 μm powder of aluminum oxide (alumina, Al2O3) and water. (As with calcium carbonate, test the aluminum oxide on an acrylic sheet first.) A paste of aluminum oxide can be made following the same procedure as the one with calcium carbonate. If this is not effective, try 0.3 μm or 1.0 μm aluminum oxide. Be careful, especially on silver-plated objects, because this abrasive may remove material more quickly than calcium carbonate does.
Removing material from recessed areas
It can be difficult to remove tarnish from recessed areas and grooves such as an engraved design. Using cotton swabs or other small soft tools can help to polish challenging areas. However, it may be beneficial to leave some tarnish (even if it is not original) in the recessed areas as it provides definition to a design and keeps a historic appearance rather than making the object look "new." The decisions to remove tarnish, on how much to remove and on the final appearance should be made jointly by a conservator and a curator.
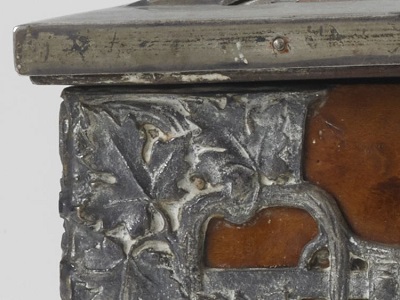
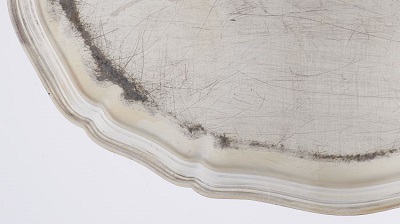
As much residual polish as possible should be removed from the recessed areas because it disfigures the object. Figure 4 shows an example of white residue from an unknown polish that has built up after repeated polishing.
© Government of Canada, Canadian Conservation Institute. CCI 126182-0053
Figure 4. Detail of white polish residue that has built up in recessed areas of sterling silver ornamentation on a wooden presentation box, due to insufficient rinsing.
Cotton pads and cloths
Lint-free cotton pads are used in the printing industry to remove excess chemicals or inks. These non-woven, compressed cotton fibre pads are sold in 10-cm squares and are handy for supporting the slurry during polishing.
Larger cotton cloths are useful for drying silver after it has been polished. A cotton Selvyt polishing cloth can be used to remove residual calcium carbonate after the object is dried, in a final cleaning step. These are reusable after washing. Do not confuse the cotton Selvyt polishing cloth with other cloths sold under the Selvyt brand name, such as Selvyt MF woven soft fibre polishing cloth (polyester) or impregnated cleaning cloths (which have been impregnated with a polishing compound). Also be warned that other companies use the term "polishing cloth" to refer to cloths impregnated with a polishing compound; such cloths should not be used to remove residual calcium carbonate.
Evaluating an object to decide whether to polish
Intentional patination and other aspects of an object's history
Before polishing an object, determine whether the silver object might have been intentionally patinated. For example, between 1840 and 1950 a surface finish that was popular in Europe and America was called "oxidized silver" (Rudoe 1993). An object was immersed in a sulfur-containing solution to give a richer and older appearance. After this intentional tarnishing, the object was often lacquered to prevent further unintentional tarnishing. Another method used to intentionally enhance engraved designs was to fill them with niello, a lustrous dark material made from one or more metal sulfides (Selwyn 2004). Even in modern pieces, patination may be used to highlight marks on an object. Unfortunately, many such items have lost their original surface colour through polishing. Consult with a curator or other museum staff to identify oxidized silver, niello or intentional patination and to decide whether the surface should be polished.
Another aspect of the object's fabrication to consider is fire scale, also known as fire stain. It is a copper oxide layer (or scale) formed on sterling silver (a silver alloy containing 7.5% copper) when an object is being made (Mass and Matsen 2012). Fire scale develops when the sterling silver is annealed by heating. The heating step is followed by pickling in dilute sulfuric acid, which removes the fire scale on the surface but may leave some fire scale buried underneath a surface layer of nearly pure silver. This buried layer can be uncovered later by repeated polishing. Then it appears as an irregular dull grey area, best seen if the object is viewed against a white surface. Once fire scale has been uncovered, further polishing may expose an even larger area of fire scale, rather than removing the small area already exposed.
Before polishing, also consider whether the scratches on the object are an important part of the object's history. The scratch pattern indicates both use and repeated polishing and gives an impression of the age of the object. If the historical scratch pattern is removed through excessive polishing, this information will be lost. Excessive polishing could produce a mirror finish, which might be inappropriate on a historical object.
Distinguishing silver plate from sterling silver using hallmarks and other marks
Many different techniques and materials are used in making silver objects, but overall the objects can be separated into two categories: silver plate and silver alloys. Silver plate is a term used in two ways, to refer either to an entire object (usually tableware), or to a thin layer of silver deposited on a base metal. In this Note, the term is used to refer to the silver layer. The most familiar silver alloy is sterling silver, sometimes called 925, which contains 92.5% silver and 7.5% copper by weight. (Pure silver, also called fine silver, is seldom used to make objects because it is too soft.)
Before an object is polished, it is important to try to distinguish between a silver alloy and silver plate. For silver-plated objects, it is useful to identify the underlying base metal. (For example, the base metal could be lead and, therefore, hazardous.) With plated objects where the plating has already been damaged, it might be better not to polish, to avoid the risk of removing more of the plating.
Silver objects are often stamped with marks to indicate the silver composition or to distinguish between a silver alloy and silver plate. Sometimes these marks are required by law. In many countries sterling silver and other silver alloys must be identified in an inconspicuous area with one or more small stamps called "hallmarks" (Selwyn 2004). In Canada, hallmarks are not legally required, but any marks put on a silver object must conform to the Precious Metals Marking Act. (See also Guide to the Precious Metals Marking Act and Regulations.) Figure 5 illustrates the hallmarks on the back of a sterling silver spoon.

© Government of Canada, Canadian Conservation Institute. CCI 121042-0002
Figure 5. Hallmarks on the back of a sterling silver spoon from the United Kingdom. Marks from left to right: George IV (duty mark), an encased K (London date-letter style for 1825), leopard (town mark for London), lion passant (sterling standard mark) and TB (maker's mark). A useful reference for hallmarks from the United Kingdom is Bradbury (2011).
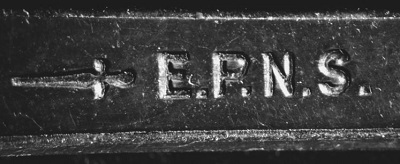
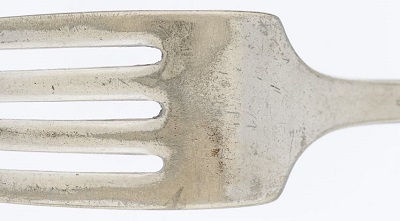
Different techniques have been used to apply a thin layer of pure silver to a base metal (La Niece 1993) to produce silver plate. To identify silver plate, first look for marks. Plated objects may be stamped with words such as "silver plate," or "silverplated" or with letters S.P. or E.P. The letters E.P. indicate that the object has been electroplated, a technique (first patented in 1840) where a thin even layer of metal (silver in this case) is deposited on any metal by an electrochemical process (Raub 1993). The letters E.P. may be followed by a word or by other letters to indicate the base metal: E.P. lead, E.P. copper, E.P. brass, E.P.B.M. for electroplated Britannia metal (an alloy of mainly tin with copper and antimony) or E.P.N.S. for electroplated nickel silver (an alloy of mainly copper with nickel and zinc but no silver). Figure 6 shows the mark on the back of an E.P.N.S. fork. Other marks that can identify a silver-plated object are those indicating a company that produced only silver plate. Detailed lists of marks used on silver alloys and silver plate are available; see for example the Online Encyclopedia of Silver Marks, Hallmarks & Makers' Marks, Silver Hallmarks and Marks and Silverplate Marks. Some advice on identifying plating done by techniques other than electroplating is given by Beentjes (2007).
© Government of Canada, Canadian Conservation Institute. CCI 87306-0037
Figure 6. Mark on the back of an electroplated nickel silver fork, marked E.P.N.S. The sideways cross represents a company mark.
Recognizing the base metal in a silver-plated object
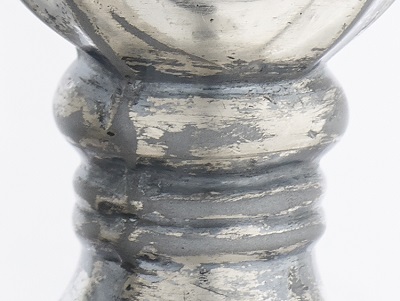
Another way to identify silver plate is to look for worn or over-polished areas where the base metal is showing. Base metal is often seen at edges and corners or at the highest parts of an object where metal has been removed by touching and polishing. Figures 7 to 10 show some severe examples.
Figure 7 shows where the reddish colour of the underlying copper is visible on a silver-plated copper tray. The detail in Figure 8 reveals the golden yellow colour typical of brass in a goblet that was silver-plated. This golden colour can easily be mistaken for a thin layer of tarnish.
© Government of Canada, Canadian Conservation Institute. CCI 120260-0318
Figure 7. Detail of silver-plated copper tray. Note the salmon-red colour of the base metal revealed by repeated polishing.
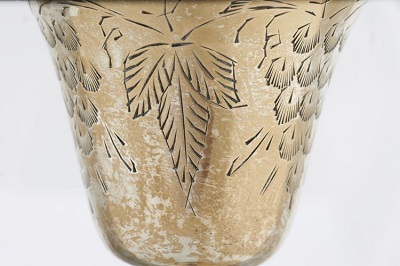
© Government of Canada, Canadian Conservation Institute. CCI 120260-0313
Figure 8. Detail of silver-plated brass goblet. Note that the yellow colour of the base metal has been revealed by repeated polishing. The plating has almost been completely removed.
Figure 9 shows the detail of a silver-plated lead candlestick. The dull grey areas are lead. Lead is hazardous, and special precautions should be taken. Wear gloves, label the object as containing lead and treat any cloths used for polishing as hazardous waste. For further guidelines on dealing with lead, see CCI Note 1/8 Lead in Museum Collections and Heritage Buildings. (Lead is also present in some silver objects in decorations; for example, in trays similar to the one in Figure 7, the decoration along the edge could be made of a lead alloy.)
Figure 10 shows an example of a fork where some of the silver plating has been removed, revealing the base metal, which is nickel silver. Although duller than silver, nickel silver is similar in colour, making it useful as a base metal, since the loss of the plating metal is less noticeable than on a base metal with a contrasting colour, such as copper (Figure 7).
© Government of Canada, Canadian Conservation Institute. CCI 120260-0315
Figure 9. Detail of a silver-plated lead candlestick. The dull grey colour on the protruding parts is the lead base metal, and the blue-grey in the grooves is silver tarnish that has not yet been removed.
© Government of Canada, Canadian Conservation Institute. CCI 120260-0355
Figure 10. Detail of the back of a silver-plated fork made of nickel silver, where some of the silver plating has worn off.
Identifying the presence of a coating
Silver objects may be coated with a lacquer or wax to form a barrier that helps to slow down tarnishing (Selwyn 1990). A relatively new coating on silver will be transparent and may be difficult to see. As lacquers age, they may yellow, shrink and crack. For further information on lacquers on silver, see Pouliot et al. (2015) and references therein.
On a lacquered silver object, tarnish will develop at defects in the lacquer, such as at cracks or scratches, or in areas that were not lacquered properly. Figure 11 shows an example of a lacquered silver-plated tray with dark tarnished areas and scratches.
© Government of Canada, Canadian Conservation Institute. CCI 120260-0331
Figure 11. A lacquered silver-plated tray. The silver plating has tarnished in damaged areas of the coating, e.g. in scratches and on the perimeter.
Coatings can sometimes be recognized by comparing the reflectance of the object to an uncoated object or by looking for damage in the coating, such as tarnished scratches. One test for a coating is to measure the electrical resistance of the surface using a multimeter with an ohms function. Start with a piece of uncoated metal, and lightly touch the probes from the meter to the metal surface. Apply enough pressure until the resistance drops to a low value, indicating that the surface is conducting. Then touch the probes to the coated object, using about the same pressure. A coated surface will show a high resistance, probably off scale on the meter. Do not press too hard or move the probes on the surface; otherwise the probes could scratch through the coating to the metal underneath. If a coating is present, it must be removed before the silver is polished and a new coating applied after.
Abrasives and polishing
For an abrasive to remove material from a metal surface, the abrasive must be harder than the surface (Samuels 2003). Silver sulfide, the main component of tarnish on silver, is only slightly softer than silver metal; there is no abrasive with just the right hardness to remove the tarnish but not the metal. Calcium carbonate (CaCO3), only slightly harder than either silver or silver sulfide, is considered to be a gentle abrasive, but it is still hard enough to scratch the silver surface (Wharton et al. 1990). Acrylic is about as hard as silver and silver tarnish, making it a convenient material to use for testing a polish.
Although all abrasives produce scratches on the surface of an object (Samuels 2003), the scratches will not be visible to the eye if they are narrower and shallower than roughly the wavelength of visible light, about 0.5 μm. Only a corner of an abrasive particle removes material from the surface, so the diameter of the particles can be a few times the wavelength of light, 1 or 2 μm in diameter, without producing visible scratches. But powders designated as this size may still contain larger particles, because particle sizes for abrasives are generally given as an average value (or possibly as a range of values).
Chemically produced calcium carbonate is precipitated from a saturated solution and is sometimes referred to as precipitated chalk. Although precipitated calcium carbonate is often sieved to remove large particles, the powder may still contain particles large enough to cause visible scratching on silver (Wharton et al. 1990). Naturally occurring calcium carbonate is generally found as the mineral calcite, which is present in limestone, chalk, marble and shells (Eastaugh et al. 2008). The powders of these materials (such as ground chalk, ground limestone or whiting) may contain large particles or impurities and should not be used for polishing silver.
Conservators tend to avoid commercial polishes because they may contain abrasives with particles large enough to produce visible scratches on silver (Selwyn and Costain 1991). Another possible source of abrasive particles is in commercial dulling agents (sprays, matting powders), which are sometimes used prior to photography and wiped off after (Harvey 1999). Abrasives may even be found in plastic polyethylene storage materials like zipper bags. These plastics sometimes contain inorganic material added as a filler or intended to improve properties of the plastic (for example, to prevent the plastic from sticking to itself). Some of these inorganic particles (such as silicon dioxide) are harder than silver and can scratch it. Silver should always be wrapped in acid-free tissue paper before it is placed in plastic.
Acknowledgements
Special thanks to Lucy 't Hart (former intern at CCI) for her help with developing this Note.
Suppliers
Note: The following information is provided only to assist the reader. Inclusion of a company in this list does not in any way imply endorsement by the Canadian Conservation Institute.
Precipitated calcium carbonate (precipitated chalk)
Precipitated calcium carbonate is available from some conservation suppliers such as Talas (calcium carbonate USP ultrafine, particle size 1.6 μm) and Conservation Support Systems (particle size 1.2 μm).
Selvyt polishing cloth
Cotton Selvyt polishing cloths are available from some jewellery suppliers and conservation suppliers. One example is Lacy & Co.
Lint-free cotton pads
Webril Cotton Handi-Pads, made by Fiberweb, are available from conservation supply companies, such as Talasor Carr McLean. Lint-free cotton pads are also available from print suppliers, such as Mark Andy Print Products (A.B. Dick brand), or laboratory suppliers, such as VWR International.
Aluminum oxide powder
Aluminum oxide powder, Micropolish II (1.0 μm or 0.3 μm particle size) or MicroPolish (0.05 μm particle size) is available from Buehler.
References
Beentjes, T.P.C. "An Introduction to Silver Plating in 18th-century Europe." In C. Degrigny, R. van Langh, I. Joosten and B. Ankersmit, eds., Metal 07: Proceedings of the Interim Meeting of the ICOM-CC Metal Working Group, vol. 1, Amsterdam, 17–21 September, 2007. Amsterdam: Rijksmuseum, 2007, pp. 17–21.
Bradbury, F. Bradbury's Book of Hallmarks: A guide to marks of origin on English, Scottish and Irish silver, gold, platinum, palladium and on foreign imported silver and gold plate, Diamond Jubilee Edition 1952–2012. Sheffield, UK: Sheffield Assay Office, 2011.
Eastaugh, N., V. Walsh, T. Chaplin and R. Siddall. Pigment Compendium: A Dictionary and Optical Microscopy of Historical Pigments. Oxford, UK: Butterworth-Heinemann, 2008, pp. 80–81.
Hallett, K., D. Thickett, D.S. McPhail and R.J. Chater. "Application of SIMS to Silver Tarnish at the British Museum." Applied Surface Science 203–204 (2003), pp. 789–792.
Harvey, D. "The Effects of Commercial Photographic Dulling Sprays on Silver Objects." In V. Greene and E. Kaplan, eds., Objects Specialty Group Postprints: Volume Six, 1999. Washington, DC: American Institute for Conservation of Historic and Artistic Works, 1999, pp. 36–40.
La Niece, S. "Silvering." In S. La Niece and P. Craddock, eds., Metal Plating and Patination: Cultural, technical & historical developments. Oxford, UK: Butterworth-Heinemann, 1993, pp. 201–210.
Long, D. Caring for Silver and Copper Alloy Objects (PDF format). Conserve O Gram 10/2 (May 1999). Washington, D.C.: National Park Service, 1999.
Mass, J., and C. Matsen. "Quantitative Non-destructive Analysis of Historic Silver Alloys: X-ray Fluorescence Approaches and Challenges." In A.N. Shugar and J.L. Mass, eds., Handheld XRF for Art and Archaeology. Leuven, Belgium: Leuven University Press, Studies in Archaeological Sciences vol. 3, 2012, pp. 215–247.
Pouliot, B., J. Mass, C. Matsen, W. Donnelly, K. Andrews and M. Bearden. "Three Decades Later: A Status Report on the Silver Lacquering Program at Winterthur." In L. Kaplan, E. Hamilton and K. Dodson, eds., Objects Specialty Group Postprints: Volume Twenty, 2013. Washington, DC: American Institute for Conservation of Historic and Artistic Works, 2015, pp. 32–48.
Raub, C. "The History of Electroplating." In S. La Niece and P. Craddock, eds., Metal Plating and Patination: Cultural, technical & historical developments. Oxford, UK: Butterworth-Heinemann, 1993, pp. 284–290.
Rudoe, J. "Oxidized Silver in the 19th Century: The Documentary Evidence." In S. La Niece and P. Craddock, eds., Metal Plating and Patination: Cultural, technical & historical developments. Oxford, UK: Butterworth-Heinemann, 1993, pp. 161–170.
Samuels, L.E. Metallographic Polishing by Mechanical Methods, 4th ed. Materials Park, OH: ASM International, 2003.
Selwyn, L.S. "Historical Silver: Storage, Display, and Tarnish Removal." Journal of the International Institute for Conservation — Canadian Group 15 (1990), pp. 12–22.
Selwyn, L. Metals and Corrosion: A Handbook for the Conservation Professional. Ottawa, ON: CCI, 2004.
Selwyn, L. Silver – Care and Tarnish Removal. CCI Notes 9/7. Ottawa, ON: CCI, 2007.
Selwyn, L. Lead in Museum Collections and Heritage Buildings. CCI Notes 1/8. Ottawa, ON: CCI, 2010.
Selwyn, L.S., and C.G. Costain. "Evaluation of Silver-Cleaning Products." Journal of the International Institute for Conservation — Canadian Group 16 (1991), pp. 3–16.
Wharton, G. "The Cleaning and Lacquering of Museum Silver." WAAC Newsletter 11,1 (1989), pp. 4–5.
Wharton, G., S.L. Maish and W.S. Ginell. "A Comparative Study of Silver Cleaning Abrasives." Journal of the American Institute for Conservation 29,1 (Spring 1990), pp. 13–31.
Written by Lyndsie Selwyn
Également publié en version française.
© Government of Canada, Canadian Conservation Institute, 2016
ISSN 1928-1455