
How to Test for Copper and Lead – Canadian Conservation Institute (CCI) Notes 17/3
- Introduction
- Procedure: using spot test paper with water
- The science behind test papers for metals
- Acknowledgements
- Suppliers
- References
Introduction
It is important to be able to identify both lead and copper. Lead metal and alloys, and their corrosion products, are toxic. They must be identified before any treatment so that lead-contaminated material can be contained and disposed of as hazardous waste. Lead-containing objects may be covered with a dark patina (on old pewter, for example) or white corrosion products (on a lead anchor on a wooden ship model inside a display case or on lead tokens stored inside a wooden cabinet, for example). The spot test described in this procedure can detect lead in either instance. Several examples of lead-containing objects are shown under Objects containing lead.
Copper alloys are usually identified by their reddish or yellow colour but some alloys may be indistinguishable in colour from gold. In addition, certain white-coloured alloys contain copper, such as sterling silver (92.5% silver and 7.5% copper) or nickel silver, also called German silver (copper-rich alloys containing nickel and zinc, but no silver). The copper spot test described in this procedure is sensitive enough to detect the copper in sterling silver, so the test can distinguish sterling silver from silver plate. Several examples of copper-containing objects are shown under Objects containing copper.
Spot tests are one of the simplest analytical techniques for identifying metals. This CCI Note describes the procedure and the required materials to detect lead or copper in metals using commercial spot test papers. No sampling of the object is required. The first step in the procedure involves testing known samples of copper and lead to gain experience using the test papers and to confirm that they are working properly. Then unknown metals can be tested. For more information on spot tests in conservation, consult The science behind test papers for metals.
Procedure: using spot test paper with water
Equipment and materials required for spot tests for copper and lead
- Commercial spot test papers from Macherey-Nagel (consult Suppliers for information on obtaining these test papers)
- Copper (Cuprotesmo 90601)
- Lead (Plumbtesmo 90602)
- Copper object or coupon
- Lead object or coupon
- Water (deionized or distilled)
- Plastic tweezers
- Scissors
- Pipettes (Pasteur or plastic) or eyedropper
- Acetone (optional, proper ventilation required)
General advice
- Wear disposable gloves to avoid touching the test papers and metals with bare hands.
- Choose an inconspicuous spot to test in case the test leaves a mark on the object.
- Cut small triangular pieces of test paper from a larger sheet. Cut the triangles so that they have a sharp point. Using a sharp point also helps minimize any mark left by the test.
- Use a Pasteur pipette or eyedropper to transfer water to the test paper. Avoid adding too much water because this may wash away the reagent on the test paper.
- Use plastic (not metal) tweezers to handle the test papers, and clean tweezers with water after each use to prevent contamination.
- It may be necessary to degrease the metal surface before the test because a dirty surface can interfere with the test. (Use soapy water or acetone.) The test will not work if a coating such as wax or lacquer is present.
- Optional: use a microscope to watch for a colour change on the test paper. This allows an even smaller spot to be tested.
- When testing objects of unknown metal, start by testing known samples of copper and lead to see what the reaction should look like and to ensure the test paper still works. Keep known metal samples with the test papers for this purpose.
Procedure
- Hold the small triangle of test paper (sharp point facing out) with plastic tweezers.
- Add just enough water to the test paper to wet it; one small drop is usually enough. (Note that the water may turn test papers slightly yellow.)
- Apply the sharp point of the wet test paper to the metal surface. (For better results, apply pressure to the test paper using a gloved finger for about 30 seconds to 2 minutes.)
- If the test is positive, the test paper will become coloured. Lead test paper will turn pink to dark purple, and copper test paper will turn pink to crimson.
- The test paper may leave a pink or red mark on the object. After the test, use clean water to rinse the test area on the metal to remove residual chemicals from the test, and dry the surface immediately.
- After each test, use clean water to rinse the tweezers.
Results of this procedure
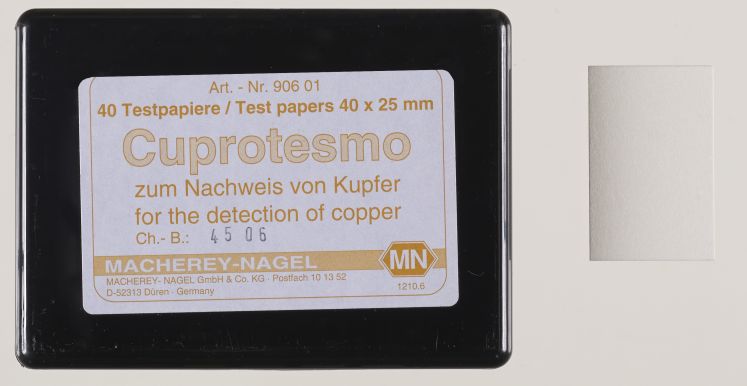
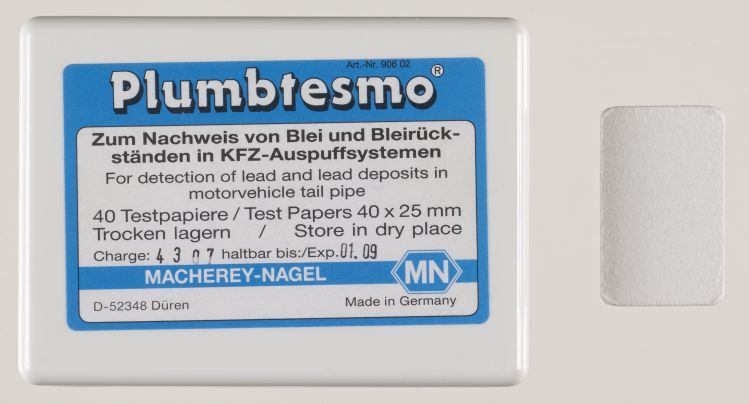
The commercial test paper for copper is shown in Figure 1 and for lead in Figure 2.
© Government of Canada, Canadian Conservation Institute. CCI 120260-0228
Figure 1: Cuprotesmo test papers. Pictured are the case and a single sheet of test paper.
© Government of Canada, Canadian Conservation Institute. CCI 120260-0220
Figure 2: Plumbtesmo test papers. Pictured are the case and a single sheet of test paper.
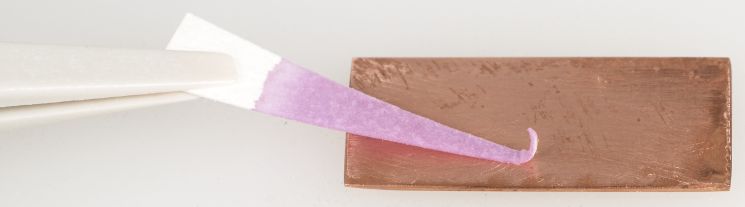
Figure 3 shows a triangular piece of copper test paper placed against a piece of copper before the colour has changed.

© Government of Canada, Canadian Conservation Institute. CCI 120260-0229
Figure 3: Cuprotesmo test paper wetted with pure water is held in plastic tweezers and placed on the piece of copper.
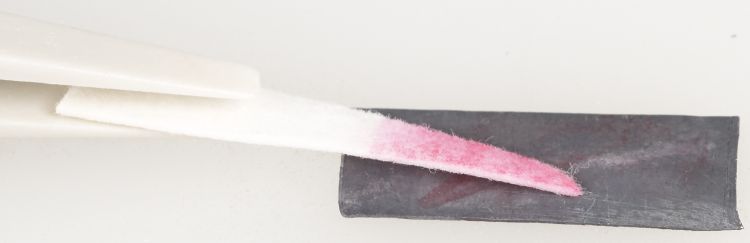
Figure 4 shows copper test paper after it has reacted with a piece of copper and Figure 5 shows lead test paper after it has reacted with a piece of lead. In these examples, where there is a significant amount of copper or lead, the colour change occurs rapidly. In other cases, where an alloy contains less copper or less lead, the colour change may take several minutes.
© Government of Canada, Canadian Conservation Institute. CCI 120260-0231
Figure 4: Cuprotesmo test paper after the reaction has occurred and the paper has turned pink.
© Government of Canada, Canadian Conservation Institute. CCI 120260-0223
Figure 5: Plumbtesmo test paper after the reaction has occurred and the paper has turned pink.
Additional information
Objects containing copper
Try testing some objects that contain copper. Some examples are shown in Figures 6 to 8.
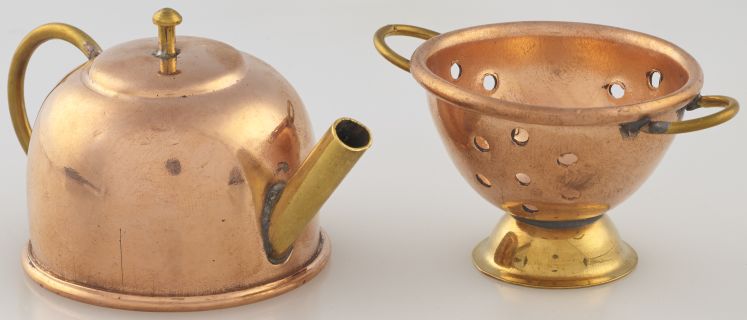
© Government of Canada, Canadian Conservation Institute. CCI 120260-0233
Figure 6: Small copper alloy kettle and strainer, used as ornaments.

© Government of Canada, Canadian Conservation Institute. CCI 120260-0232
Figure 7: Pendant for a necklace (copper found in areas of yellow metal).
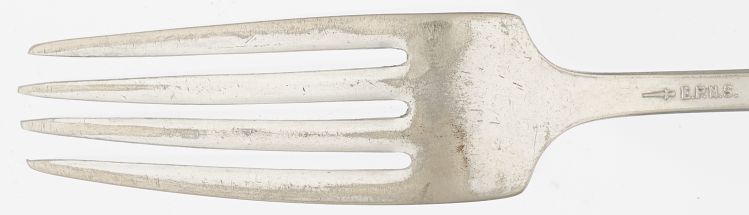
© Government of Canada, Canadian Conservation Institute. CCI 120260-0354
Figure 8: Fork made with a nickel silver alloy and electroplated with silver. The areas where the plating has worn off tested positive for copper.
Copper test paper is sensitive enough to detect the copper in sterling silver. Test for copper in a piece of sterling silver (which should show a positive result for copper), and in a piece of pure silver or silver plate (which should not).
Objects containing lead
Try testing some objects that might contain lead. Objects that tested positive for lead are shown in Figures 9 to 12.
© Government of Canada, Canadian Conservation Institute. CCI 120260-0225
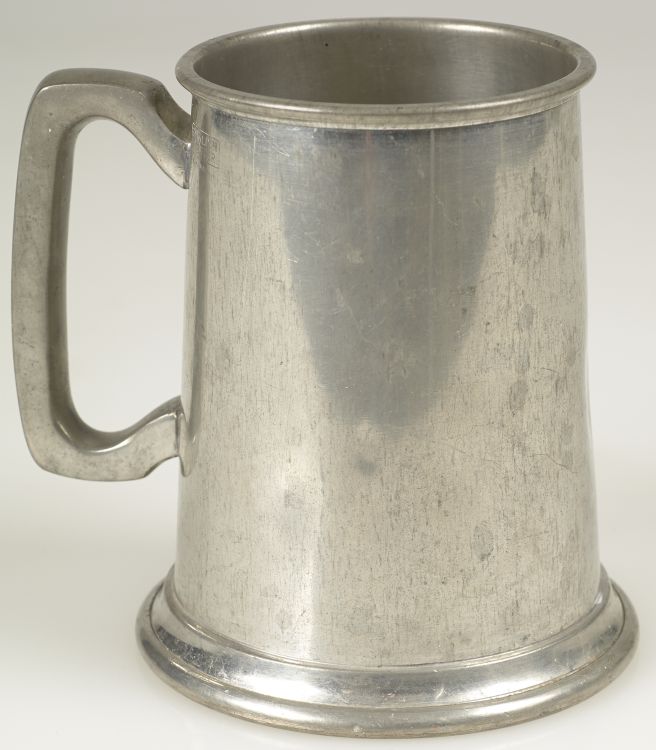
Figure 9: Leaded-pewter mug.

© Government of Canada, Canadian Conservation Institute. CCI 120260-0224
Figure 10: Child’s bracelet (lead present in base metal beneath plating).

© Government of Canada, Canadian Conservation Institute. CCI 97852-0006
Figure 11: White lead corrosion on armature wire for a puppet’s hand.
© Government of Canada, Canadian Conservation Institute. CCI 120260-0316
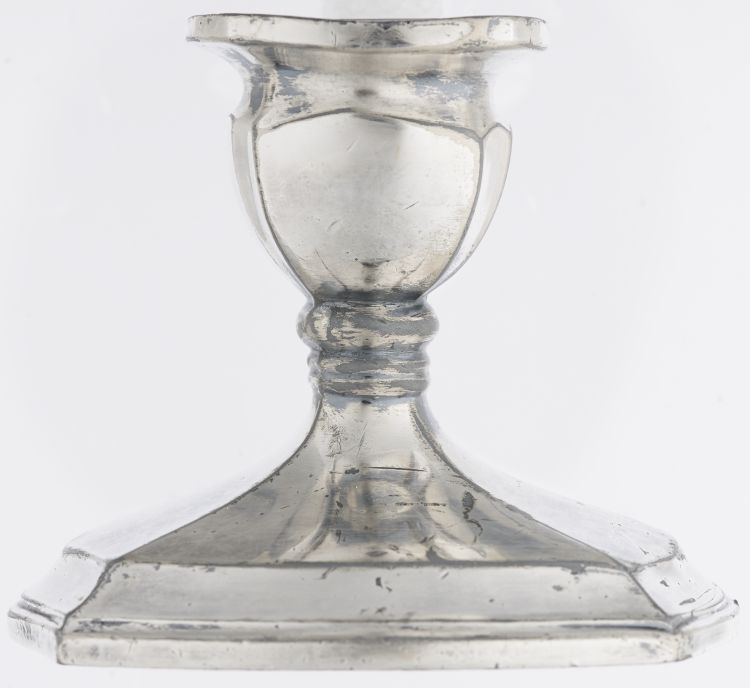
Figure 12: Silver-plated lead candlestick. The dull gray metal where the plating was removed by polishing tested positive for lead.
Interferences
In an ideal spot test, only one metal element produces the colour change. In general, however, other metal elements may also cause a similar colour change. This is called interference, and if it occurs, the test paper can give a positive result even though the metal being tested for is not present. For example, the instructions for Plumbtesmo test paper warn that five elements can cause interference if present in large quantities: tellurium, silver, cadmium, barium, and strontium. The instructions for Cuprotesmo test paper do not list any elements that interfere with the test.
Storage
These test papers need to be stored below 30°C in a dry place away from sunlight. If stored properly, they last several years. Nevertheless, it is important to check that the test papers still work by testing known samples of copper and lead.
Spot tests in conservation
In a spot test, a small drop of water is allowed to react with the metal, producing a coloured reaction product. The test may leave a small mark on an object, but because only a small amount of metal dissolves, the test can usually be done on an inconspicuous area of the object.
Spot tests can also be used to detect lead in pigments, ceramics and white corrosion products. For example, lead was identified in the white corrosion products on a miniature cannon made with a shiny yellow metal (probably brass) indicating that the alloy used contained lead. The cannon was inside an oak display case together with wooden objects. Acetic acid from the wood probably caused the lead to corrode.
A large number of spot tests are available for metals, as described in the book by Feigl and Anger (1972). For detailed information on the use of metal spot tests in conservation (and on detection limits and interferences), see publications by Laver (1978), Townsend (1988), and Odegaard et al. (2005).
Other tests for lead
Lead test kits are sold for home use to check china, ceramics, paint, vinyl mini-blinds, etc. These kits are often available at local paint stores, hardware stores, drug stores, and pottery supply stores. For more information on the hazards of lead, see Selwyn (2005).
The science behind test papers for metals
How test papers work
A chemical indicator has been incorporated into these commercial test papers. The indicator changes colour when exposed to a specific metal ion in solution. For these tests to work, that specific metal ion must be present in solution. Commercial test papers for lead and copper work well because these two metals corrode rapidly when exposed to water. Once their metal ions have dissolved in solution, they quickly react with the chemical indicator in the paper. The test papers detect low levels of metal ions in solution. The Plumbtesmo paper can detect 100 mg/L (100 parts per million) or more lead ions in solution. The Cuprotesmo paper can detect 10 mg/L (10 parts per million) or more copper ions in solution.
Acknowledgements
Special thanks to Avital Lang, Ute Werner and Lucy ‘t Hart, former CCI interns, for their help in developing this CCI Note.
Suppliers
Note: The following information is provided only to assist the reader. Inclusion of a company in this list does not in any way imply endorsement by the Canadian Conservation Institute.
Macherey-Nagel test papers
The commercial test papers for lead (90602, Plumbtesmo) and copper (90601, Cuprotesmo) are made in Germany by Macherey-Nagel. Each box of test papers contains 40 sheets with dimensions 25 x 40 mm. Distributors for these test papers include Aldert Chemicals in Canada and CTL Scientific Supply in the USA.
Copper and lead
Thin sheets of pure copper and lead to use as reference materials are available from chemical suppliers, such as Sigma-Aldrich.
Sterling silver
Sterling silver is available from jewellery suppliers such as Lacy & Co.
References
Feigl, F., and V. Anger. Spot Tests in Inorganic Analysis. New York, NY: Elsevier, 1972.
Laver, M.E. “Spot Tests in Conservation: Metals and Alloys.” In ICOM Committee for Conservation, 5th Triennial Meeting, Zagreb. Paris, France: International Council of Museums, 1978, pp. 78/23/8/1–11.
Odegaard, N., S. Carroll and W.S. Zimmt. Material Characterization Tests for Objects of Art and Archaeology, 2nd ed. London, UK: Archetype Publications, 2005.
Selwyn, L. “Health and Safety Concerns Relating to Lead and Lead Compounds in Conservation.” Journal of the Canadian Association for Conservation 30 (2005), pp. 18–37.
Townsend, J.H. “The Identification of Metals: Chemical Spot Tests.” In R.E. Child and J.M. Townsend, eds., Modern Metals in Museums. London, UK: Institute of Archaeology, 1988, pp. 15–22.
Written by Lyndsie Selwyn
Également publié en version française.
© Government of Canada, Canadian Conservation Institute, 2016
ISSN 1928-1455