
The Digitization of VHS Videotapes – Technical Bulletin 31
Joe Iraci
CCI Technical Bulletins
Technical Bulletins are published at intervals by the Canadian Conservation Institute (CCI) in Ottawa as a means of disseminating information on current techniques and principles of conservation of use to curators and conservators of Canada’s cultural artifacts and collection care professionals worldwide. The author welcomes comments.
Abstract
Most archives, libraries and other heritage institutions have VHS videotapes in their collections. Often, this is the dominant video format found in these institutions because it was an economical and simple method for video recording. Unfortunately, like other magnetic tapes, the preservation of VHS videotape faces certain key challenges: it has a finite lifetime before degradation occurs; its playback technology is nearing its end-of-life and the expertise to repair playback equipment is disappearing. If the information recorded on VHS videotape is to remain accessible, it must be migrated to new technology. This Technical Bulletin provides information and procedures for digitizing VHS videotapes. It is intended to assist small to mid-size heritage institutions that lack the funds for professional digitization.
Author
Joe Iraci is a Senior Conservation Scientist at CCI. He researches the deterioration, longevity, stability, disaster recovery and storage of electronic media, such as optical discs, magnetic tapes and disks, and flash media.
Table of Contents
- Abbreviations
- Introduction
- Outsourcing the Digitization
- Overview of the In-House Digitization Workflow
- Evaluation of Tape and Cassette Condition
- Selection of Material to Be Digitized
- Playing the Tape
- Analog to Digital Conversion
- Backups, Masters, Edited Masters and Access Files
- Metadata and File Naming
- Care of Tapes – Storage and Handling Requirements
- Retention of Originals
- Technology Watch
- Appendix A: Problems That May Be Encountered When Playing Back VHS Tapes and Possible Remedies
- Appendix B: Specifications for Digitizing Standard Definition Analog Video and Recommendations for Producing Digital Preservation Masters
- Appendix C: Suppliers
- Appendix D: Approximate Capacity (TB) Required for Various Hours of Digitized Video and Cost of Media for Storage
- Appendix E: Equipment Costs for Each Digitization Set-up
- References and Notes
- Further Reading/Resources
Abbreviations
- AVI
- audio video interleaved
- BD-R
- recordable Blu-ray disc
- CPU
- central processing unit
- DV
- digital video
- DVD
- digital versatile disc
- DVD-R and DVD+R
- recordable digital versatile disc
- DVD-RW and DVD+RW
- rewritable digital versatile disc
- EP
- extended play
- HD
- high definition
- HDD
- hard disk drive
- HQ
- high quality
- JVC
- Victor Company of Japan
- LAN
- local area network
- LP
- long play
- LTO
- linear tape-open
- MPEG
- Moving Pictures Experts Group
- NAS
- network-attached storage
- NTSC
- National Television System Committee
- PAL
- Phase Alternating Line
- PCI
- Peripheral Component Interconnect
- PCM
- pulse-code modulation
- PVR
- personal video recorder
- RAID
- redundant array of independent discs
- RF
- radio frequency
- RH
- relative humidity
- SECAM
- "séquentiel couleur à mémoire"
- SLP
- super long play
- S/N
- signal/noise
- SP
- standard play
- SSD
- solid state drive
- S-VHS
- super VHS
- S-VHS-C
- super VHS compact
- S-VHS-ET
- super video home system expansion technology
- S-video
- separate video
- TBC
- time base corrector
- UPS
- uninterruptible power supply
- USB
- universal serial bus
- VCR
- video cassette recorder
- VHS
- video home system
- VHS-C
- compact video home system
- VOB
- video object
- XP
- high quality
Units of Measure
- b
- bit
- B
- byte
- dB
- decibel
- Hz
- hertz
Introduction
In 1976, JVC launched the VHS format aimed at the consumer market. A rival format was Sony’s Betamax, introduced in 1975. Both formats competed against each other in the marketplace during the latter part of the 1970s and into the 1980s. Eventually, VHS won the format war and Betamax slipped into obsolescence.Footnote 1 VHS boomed in the pre-recorded video market and blank tapes were popular for recording television programs in the home and for use with camcorders. For many years, VHS was in widespread useFootnote 2 and is consequently the most prevalent video format found in heritage institutions.
Format variations
There are four basic formats of VHS cassettes: standard VHS, compact VHS (or VHS-C), super VHS (or S-VHS), and compact S-VHS (or S-VHS-C).
Standard VHS
VHS cassettes make use of half-inch wide tape. The most common and standard cassette size is about 18.7 cm (7.4 inches) by 10.2 cm (4.0 inches) by 2.5 cm (1 inch). When purchasing blank VHS cassettes, the lengths of tape are well defined and are labeled with the letter “T” followed by a number, representing the recording time at SP speed mode. The letter “T” is used for NTSC video recordings, whereas the letter “E” is used for PAL or SECAM ones. NTSC, PAL and SECAM are the analog television standards that are used worldwide. For example, NTSC is used in North America, Japan and parts of South America; PAL is used mostly in Europe, Africa, Southern Asia and parts of South America; and SECAM is prevalent in Northern Asia and parts of Europe and Africa. These standards are not compatible with each other and therefore conversion is required in order to view a VHS recording made using one television system and viewed on another one. This document will focus on NTSC recorded tapes. Table 1 lists the common NTSC labels associated with blank VHS cassettes.
| Label |
NTSC Recording Time SP Mode |
NTSC Recording Time LP Mode |
NTSC Recording Time EP Mode |
|---|---|---|---|
| T-20 |
20 |
40 |
60 |
| T-30 |
30 |
60 |
90 |
| T-45 |
45 |
90 |
135 |
| T-60 |
60 |
120 |
180 |
| T-90 |
90 |
180 |
270 |
| T-120 |
120 |
240 |
360 |
| T-160 |
160 |
320 |
480 |
| T-180 |
180 |
360 |
540 |
Collections may also contain VHS cassettes that are loaded with non-standard amounts of tape, as was common with recordings that were distributed by duplication houses. Pre-recorded content on VHS also has a variable amount of tape in the cassette, depending on the length of the content.
The SP setting is the most commonly used mode, and most pre-recorded movies use this setting. The LP mode runs at one half of the speed of the SP mode, and the EP mode (sometimes referred to as the SLP mode) records at one third of the SP mode. These longer recording times are used in order to maximize the amount of video that can be stored on one cassette, which limits the amount of tapes and provides cost savings. However, as the recording speed slows, the quality suffers. Therefore, SP provides the highest quality video and audio recordings and the EP mode provides the poorest.
Even though VHS was used extensively, it is an inferior video format when compared to many others that have been produced. Table 2 lists the maximum lines of horizontal resolution for a variety of analog and digital video formats. The number of lines of horizontal resolution is a measure of the quality of the video recording.
| Format |
Maximum Lines of Horizontal Resolution |
|---|---|
| VHS/VHS-C |
240* |
| Betamax |
250 |
| 8 mm |
280 |
| S-VHS/S-VHS-C |
400 |
| Laserdisc |
425 |
| Hi8 |
440 |
| Digital 8 |
500 |
| miniDV |
520 |
| Commercial DVD |
540 |
| Commercial Blu-ray |
1080 |
*VHS tapes labeled with the letters HQ were slightly better in horizontal resolution at 250 lines.
VHS-C
The VHS-C format was introduced in 1982 and uses standard VHS tape but in a smaller cassette housing (Figure 1). This format was designed to be used in conjunction with smaller and more portable VCRs but then also became popular with less bulky VHS camcorders. The compact cassette size is 9.2 cm (3.6 inches) by 5.5 cm (2.2 inches) by 2.0 cm (0.8 inches) and, because of this smaller size, an adapter cassette is required in order to play it in a regular VCR. No signal conversion or any other adjustments are required when playing VHS-Cs in VCRs designed for standard sized cassettes. In SP mode, the maximum recording time for a VHS-C cassette is 60 minutes.
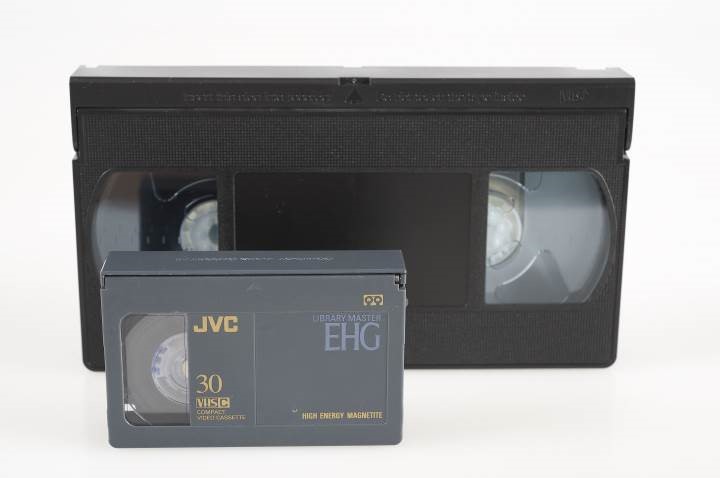
© Government of Canada, Canadian Conservation Institute. CCI 124014-0018
Figure 1. A size comparison between a standard VHS (back) and a VHS-C cassette (front).
S-VHS
Whereas VHS is considered poor quality, the S-VHS format is a considerable improvement. It makes use of professional grade equipment and is aimed at the industrial and education markets instead of the home consumer. S-VHS was introduced in 1987 once again by JVC and provided an improved horizontal resolution to approximately 400 lines, improved chrominance (colour) and superior tape quality. The S-VHS tape width and cassette size are the same as the standard VHS format but the S-VHS tape requires an S-VHS VCR for proper playback. Both VHS and S-VHS often have logos imprinted on the cassettes, usually at the top right corner when viewing the front of the cassette, that can be used to identify the format (Figure 2). Some standard VCRs can playback S-VHS at VHS resolution if they have the S-VHS Quasi Playback feature, otherwise the video quality will be poor, highlighted by high brightness levels and image instability. VHS can be played in S-VHS machines and recorded in S-VHS machines with S-VHS-ET technology. Note that LP-recorded VHS tapes may not play properly in some S-VHS VCRs because these machines do not have an LP mode. The results will be that the video plays too fast and that irregular horizontal noise bands will appear in the image.
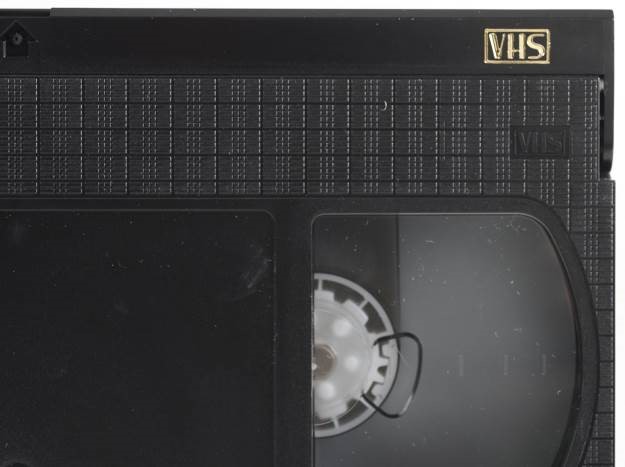
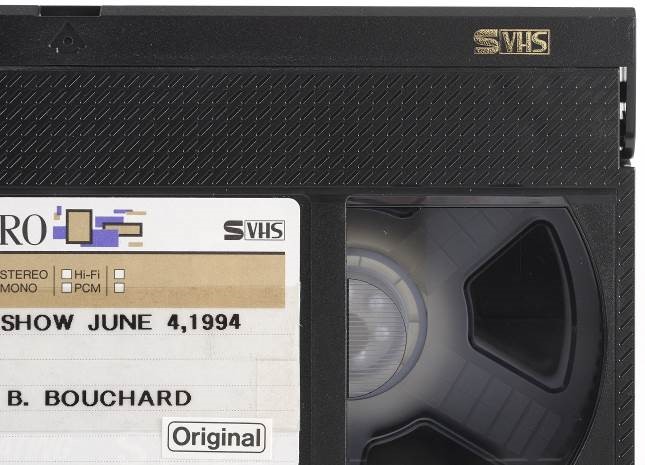
Figure 2. VHS cassettes can be distinguished from S-VHS cassettes by looking for the stamped logo found at the top right corner on the front of the cassette housing.
S-VHS-C
As for VHS, S-VHS has a compact cassette version (introduced in 1987) for use in camcorders, referred to as an S-VHS-C. An S-VHS adapter cassette is required in order to play it in a regular S-VHS machine.
VHS tapes are near end-of-life
VHS is still in use today but its popularity has significantly decreased. There are a number of reasons for this decline such as the introduction and popularity of superior movie distribution formats like DVDs (in 1997) and Blu-ray discs (in 2006). In 2003, sales of movies on DVD format surpassed those of VHSFootnote 4 and, finally, in 2006,Footnote 5 after a long run, the major movie studios stopped releasing movies on VHS.
In addition, VCRs have been rapidly replaced for home recording by PVRs, which use a hard disk drive to record television programming, are more versatile and are convenient to use. With the exploding popularity of high-definition television sets, the VHS format simply cannot deliver the amount of detail that these sets can output. The shift in the use of camcorders from the bulky VHS to more compact Hi8 and, more recently, digital has also led to the decline in the use of VHS.
The family of VHS formats is considered outdated. VCR stand-alone units are no longer being manufacturedFootnote 6 as of 2014, although DVD/VCR, DVD-R/VCR and even Blu-ray/VCR units are being produced. VHS is still being used extensively in some parts of the world and in certain communities,Footnote 7 and blank tapes are being manufactured to a limited extent, although their quality is suspect. It is noteworthy that many households and organizations, even though they may have updated to better formats, still possess one or more working VCRs.
Despite the availability of tapes and also equipment to play VHS videos, there is a serious concern about this format. On average, magnetic tape has a lifetime of 10 to 30 years and because the VHS format has been in existence for over 35 years, much of the media in collections today are in the latter part of their lifetime. VHS tapes cannot be stored indefinitely with expectation of future retrieval of the recorded information. Therefore, now is the ideal time to migrate or convert the recordings off of old VHS tape and into a new video format, while VHS playback devices are readily available. As more time passes, there is a greater risk of increased tape deterioration. This makes the tape more difficult to play and costly to migrate because remedial actions will be required to make it play properly. Waiting also results in the reduced availability of playback devices that are in good condition. This may lead to only an outside organization being able to perform the conversion process since it would have the equipment and expertise to do the work, but this also generally means a significant rise in cost for most projects.
Migration is necessary
The information stored on these analog tapes needs to be migrated to a newer format if it is to remain accessible. There are basically two migration options: analog to analog migration (e.g. information from old VHS cassettes being copied onto new VHS tape, often referred to as refreshing) or analog to digital migration, where the VHS video is changed to a totally different form.
The analog to analog migration strategy is not recommended for a number of reasons. First, analog to analog migrations generally lead to a loss in quality from one generation to the next. Projecting this over several migrations into the future would result in a very poor video recording. The second reason is the upcoming obsolescence of VHS. Although not currently in a high risk category for obsolescence,Footnote 8 the amount and availability of good machines and tapes are declining, and this situation is continually becoming worse. In addition, there is little expectation of future support for this and other analog formats. Finally, analog migrations are very labour intensive. This option will therefore not be discussed further in this document.
The best option to preserve VHS tapes and, in fact, all other analog videotape formats is an analog to digital migration to a data file, as opposed to a specific digital video format (e.g. Digital Betacam). Digitization to a specific digital video format ties the recording to specific equipment and media, meaning that only this equipment can play the tape. Limiting how information can be accessed is not ideal in terms of preservation. On the other hand, a data file has greater flexibility and can be stored on any type of digital storage media and can be played using a wide variety of software media players. This is a better scenario for the long-term preservation of the video content. Conversion of analog recordings into data files will not only preserve them, but also make them more accessible to researchers and other interested parties, assuming the appropriate access infrastructure and metadata (information that describes the recording) associated with the files are properly put into place.
There are many other advantages. For example, there is potential for no quality loss with future migrations, depending on how the initial and subsequent digital migrations are performed. In addition, digitization simplifies mass transfers from one carrier to another because the transfer can be automated, saving significant labour costs. Once an item is digitized, it can easily be certified that digital copies are exactly the same as the original. Copies of the digital master can be produced that would be equal in every respect to it. Another advantage with digital conversion is that data can be transmitted electronically and without the use of physical media or regular mail. Digitization along with the inclusion of information about the digital file will allow the information to be more easily searchable than it was in its previous analog form. Finally, in the digital domain, error correction systems are in place to correct some problems that may occur with the file or media.
Although the conversion of analog recordings to data files is the preferred preservation pathway, there are certain disadvantages that must be noted. Poor sampling or digitizing of the original analog record means that the digital version is not an accurate representation of the original and, if data compression schemes that eliminate data to save storage space (i.e. “lossy” compression) are chosen, then some data from the master analog recordings will be forever lost. Digital media generally have shorter lifetimes than analog media, and digital storage technologies tend to change more rapidly than the older analog technologies did. Therefore, more frequent migrations to new technologies, approximately every 5 to 10 years for some technologies, are required in order to preserve the content. Finally, whereas analog media tend to degrade slowly over time, digital media or files may be suddenly unreadable, without warning, which is problematic.
Purpose of this Technical Bulletin
Ideally, digitization for preservation should be performed at the highest quality and this generally involves the use of high-end and moderately expensive to very costly approaches. Unfortunately, many institutions lack the funds for the professional digitization of NTSC VHS videotapes. This Technical Bulletin provides information and procedures that small to mid-size heritage institutions can use to digitize NTSC VHS videotapes in their collections. A variety of in-house options are provided, including lower cost ones that may not be ideal but will still allow institutions to digitize their VHS videotape collections now.
The cost-effective options provided in this Technical Bulletin should produce reasonable results, but more costly options are also discussed that may provide better quality and flexibility going into the future. Higher end digitization of video is usually only available to well-equipped institutions with highly knowledgeable and trained staff, unless the work is outsourced. If several options are available, it is recommended to perform some tests in order to determine the quality of the end product and the system that works best for your organization. An organization should choose the highest quality option that is within its means.
There is no standard for video file format or digitization software to use or on how to store the digitized video. The results of a recent surveyFootnote 9 where 21 archives, representing a wide cross-section of size, mission and focus with audiovisual holdings, showed that 12 different file and video formats with varying technical parameters are being used for the production of digital preservation masters. This underscores the fact that certain standards for video preservation are lacking. In light of this, each institution needs to decide what is acceptable and what is not for their needs today and into the future. Often, this is a balance between ideal digitization and the realities of the costs associated with managing and storing the large files generated from a conversion project.Footnote 10 Waiting for an ideal video preservation format is problematic and will likely lead to a loss of assets.
Outsourcing the Digitization
Prior to investing time and resources into an in-house digitization project, it is worthy to investigate outsourcing in order to see if it is a viable option. At the very least, consideration should be given to using a professional service that will use high-end equipment and software for high quality and/or highly valuable recordings. This is likely not required for all the records in a collection and therefore a mix of strategies can be an effective method for successfully completing the digitization of the VHS videotape collection.
In addition, there are other cases where it may not be reasonable or cost‑effective to perform the digitization of VHS videotapes in-house as explained below:
- Problem cassettes (those where the cassette and/or tape inside it are not in good condition) could suffer further damage if they are played before the problems are remedied. In such cases, professional help or at least a consultation with a professional should be pursued before digitization is attempted.
- Small collections may not be able to justify the expense to purchase or lease the equipment to set up a transfer facility and learn how to operate it effectively. In many instances, it may be more cost-effective to outsource the work, especially if no playback or other equipment is readily available. For small collections that have most of the necessary machines, and for mid‑sized to large collections, money can be saved by doing the work in-house, but this is only true if at least a portion of the work is done by volunteers or by employees who have spare time outside of their other assignments. If the transfer operator is a full‑time salaried employee, at the end of the day, this work might end up costing more than if it were outsourced.
What to look for when outsourcing
When outsourcing, there are certain questions that need to be asked and details that need to be sorted out in order to ensure that the digitization goals of the organization are met. These include the following:
- ask for references from the outsourcing companies and ask other institutions for recommendations and their past experiences with vendors they have used
- look at the credentials and credits of the organizations under consideration; qualifications of staff and experience; how long they have been doing transfers; what analog formats they specialize in (VHS only or other video formats as well)—organizations that only digitize VHS tapes may not produce the quality that is required
- talk with the people involved with doing the work and do not hesitate to ask about specific challenges if you think your tapes are suffering from deterioration or damage
- discuss the shipping procedures, for example, how will the tapes be packed and what temperature and humidity environment will they be exposed to, and costs involved in shipping the originals or masters to and from the outsourcing organization; the shipping costs alone may make outsourcing prohibitive for smaller organizations
- verify whether the outsourcing company has insurance to cover loss of the materials during shipping or when the tape is being used
- determine how the originals will be stored and handled while with the outsourcing organization
- determine what equipment will be used to perform the digitization
- will a TBC be used and will there be any other corrections made to the analog video, such as noise reduction, etc., prior to digitizing?
- is the playback machine regularly cleaned, aligned and maintained?
- discuss the available options for the quality of the digitization, the file format, and the delivery of the digitized content (i.e. on which type[s] of media)
- verify whether metadata will be provided/embedded in the digitized video files and how the files will be named
- establish up front what the added costs would be for cleaning the tapes if necessary and especially for remedial procedures to make problem ones playable, because dealing with these tapes can raise the cost of outsourcing significantly
- ensure that a priority list is established; begin with the most valuable material and proceed to other material if funds remain or become available in the future
It is prudent to do some trials with the outsource organization to test for quality and for satisfaction with the end product before committing to a larger scale project.
More guidance on how to develop a request for proposal for outsourcing the digitizing of video can be found in the Guide to Developing a Request for Proposal for the Digitization of Video (and More) [PDF version] by Chris Lacinak, which is available for free.
Overview of the In-House Digitization Workflow
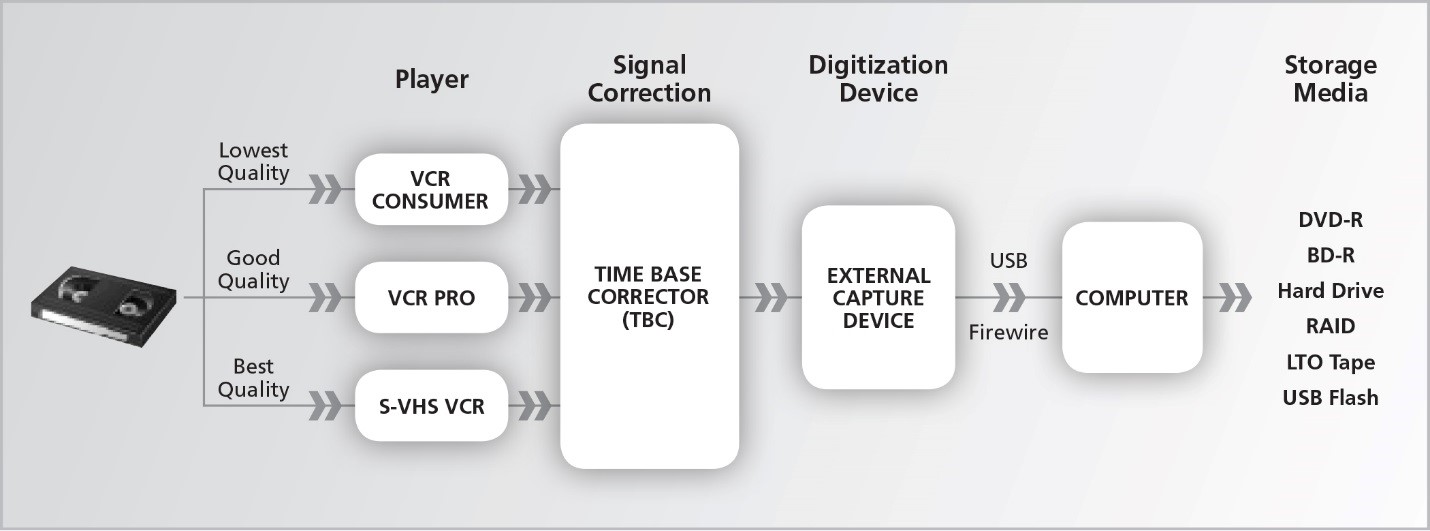
The basic procedure for digitizing the VHS format is summarized in Figure 3. Information on each step will be provided in this Bulletin.
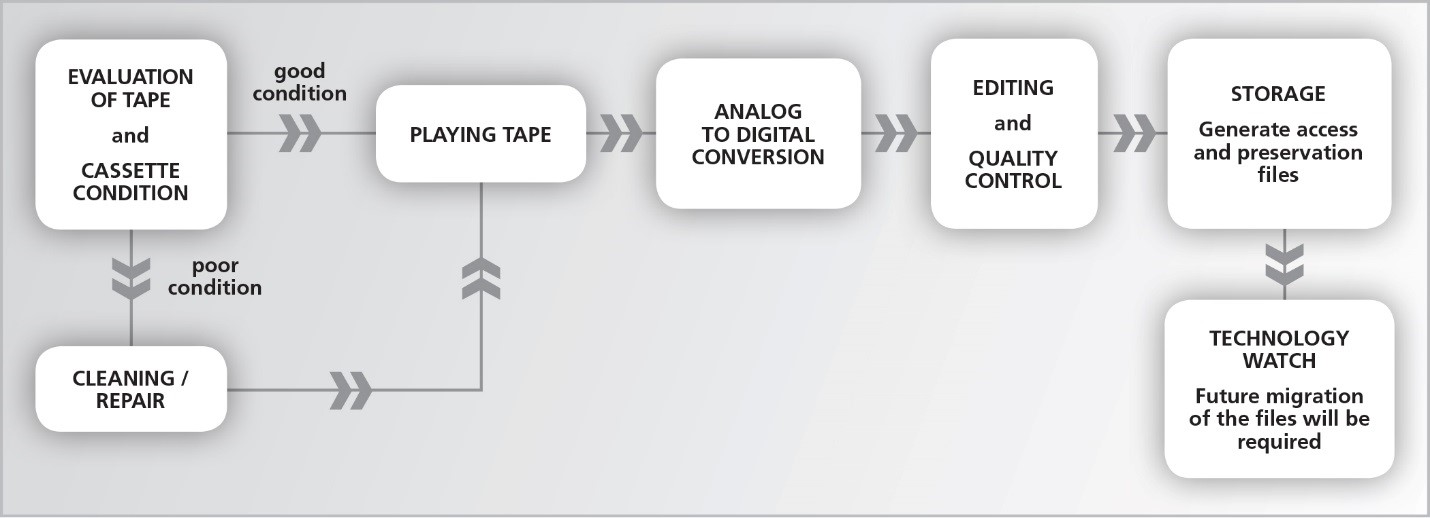
© Government of Canada, Canadian Conservation Institute. CCI 124014-0043
Figure 3. Workflow diagram for the conversion of VHS video to digital video.
Evaluation of Tape and Cassette Condition
The first step in the workflow is to evaluate the condition of the cassette and tape. Deficiencies in one or both of these will impact the playback performance and ultimately the quality of the digitized video. All tapes should be visually inspected for signs of deterioration or damage and those with physical or chemical damage will need some form of treatment before they can be played. In most cases, successful recovery requires the services of a professional restorer. Some remedies can be performed in-houseFootnote 11 but success depends on the experience of the individual and the degree of degradation. Failure to remedy issues before playing the tape may result in loss of the video and damage to the playback equipment.
A proper evaluation involves conducting a thorough condition survey of the materials in the collection while focusing on the following factors, which are discussed in more detail below:
- cassette condition
- tape quality
- tape condition
- presence of contaminants
- chemical degradation of tape
- physical damage to tape
- cleaning of tape
Cassette condition
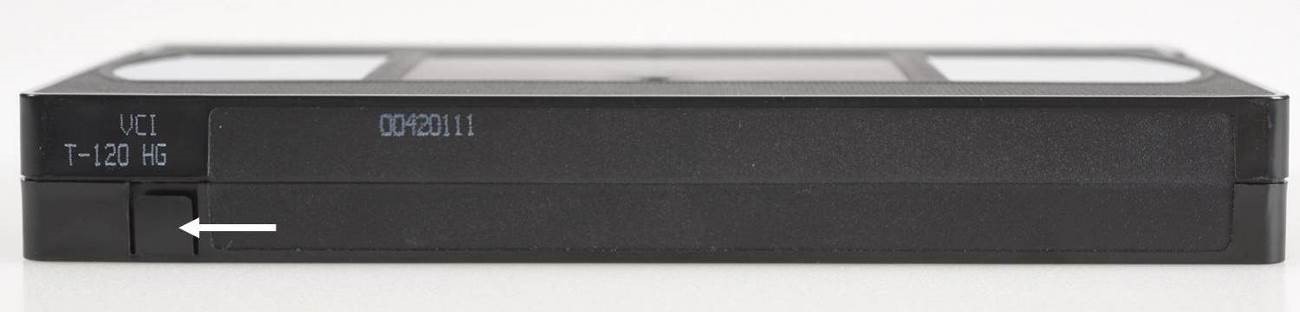
The cassette shell should be examined for signs of damage that, if found, could mean that the tape within it has also been compromised. Playing a damaged VHS cassette may not only damage or destroy the tape (stretching, breaking, tearing or edge damage) but also the playback equipment. Some typical cassette problems include cracks in the housing, a broken or missing window, broken reel flanges, hubs that have seized and do not freely rotate or are stripped, and a broken or improperly functioning cassette door. VHS cassette hubs have a lock feature that prevents them from turning when the cassette is not being used and therefore prevents the wind from becoming loose. In order to test that the hubs are functioning properly, the small button located between and below the hubs, as shown in Figure 4, needs to be depressed and held while gently rotating the take-up reel. Do not use excessive force if the hubs are not turning. The functioning of the cassette door can be verified by depressing the small release button found towards the top right side of the cassette, as shown in Figure 5. Once the button is pressed, the spring action of the door can be tested for smooth movement.
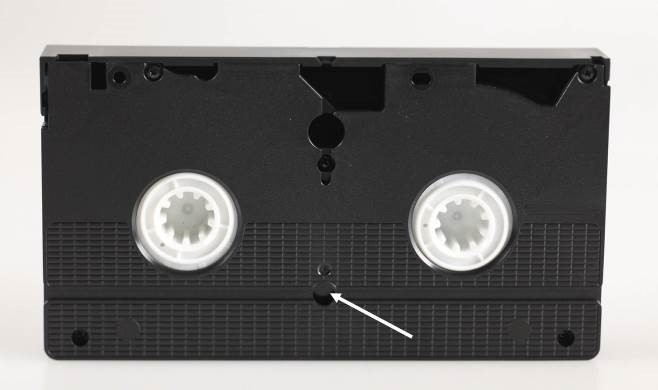
© Government of Canada, Canadian Conservation Institute. CCI 124014-0019
Figure 4. Depressing the area indicated by the arrow unlocks the hubs so that they can be checked for smooth rotation.
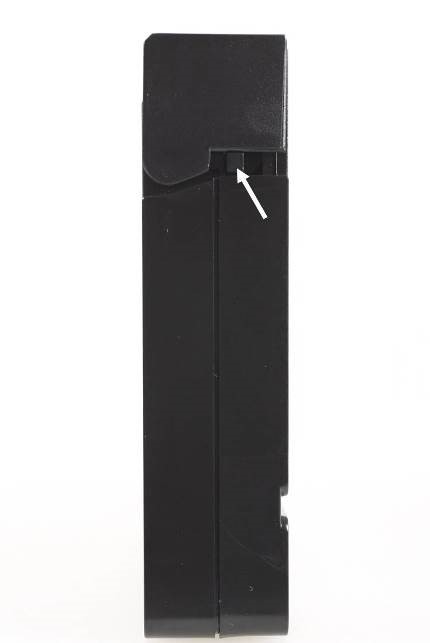
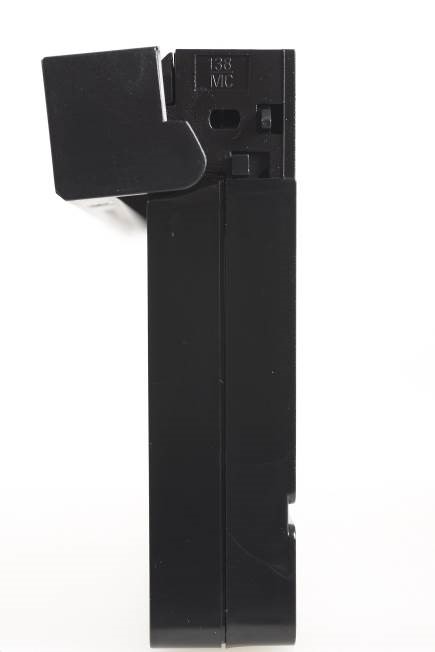
Figure 5. Left image: Pressing the button indicated by the arrow allows the spring-loaded gate to be manually opened so that the proper functioning of the gate can be verified. This is an essential component of the cassette. Right image: The same cassette with the gate opened.
Lightly shaking a cassette and listening for excessive rattling noises can help determine if there is any internal damage. Note that the hubs normally do move around a little and will produce some rattle. Looking through the window of the cassette while moving it may lead to the discovery of loose parts within the housing.
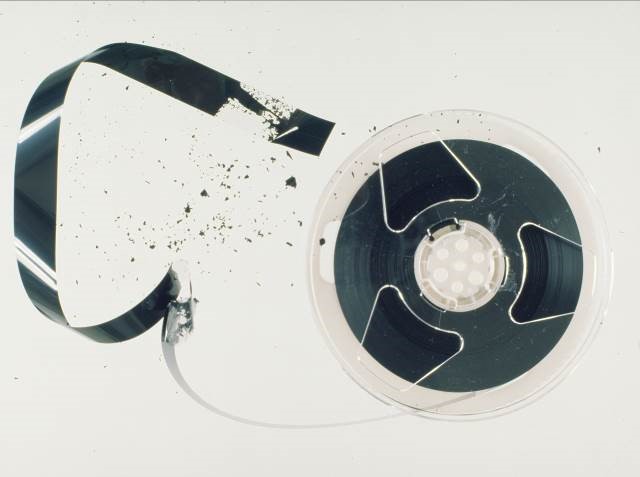
If the cassette is damaged, it is recommended that the tape is transferred to a new shell so that it will play properly and without being damaged. Although this can be a challenging procedure for the inexperienced due to the many small parts (Figure 6), it can be done. If attempting to perform this type of repair, it is a good idea to practice on a discarded VHS cassette and to have an open one available for reference. Ideally, a shell from the exact same brand should be used, but generic cassette shells are also available and can be equally useful.
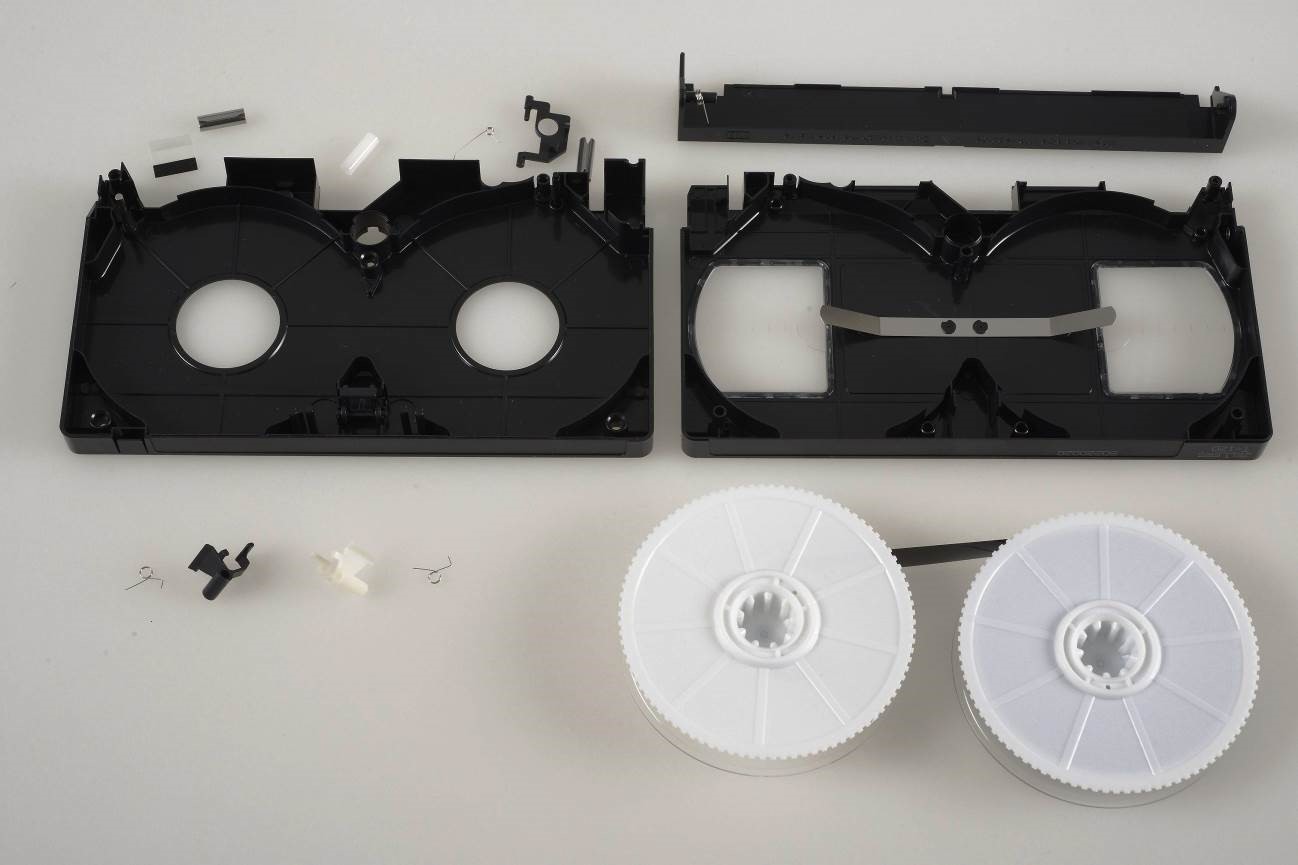
© Government of Canada, Canadian Conservation Institute. CCI 124014-0027
Figure 6. Image of an opened and dismantled VHS cassette illustrating the many small parts that exist.
Tape quality
When evaluating the condition of the VHS tape, it is worth taking note of the brand. Generic brands or those without a recognizable manufacturer brand name are generally inferior and likely to exhibit more dropouts or momentary signal losses during play, higher wear rate and other problems caused by shedding magnetic oxide material, such as video head clogging and contamination of the tape transport. Brand name tapes experience less of these problems, although a brand name does not always guarantee a good product because batch-to-batch variations do occur.
VHS tape is often labeled (usually on the external packaging for the cassette but sometimes on the cassette itself) with a designation such as Standard Grade, High Grade or Extra High Grade. Although there is no standard for what these terms mean, High Grade and Extra High Grade generally refer to a better and more durable product, although in some cases there may not be a significant difference. Also, these terms only have meaning within the same brand. A high grade labeled tape from one manufacturer may be inferior to a standard grade one from another. Therefore, although generally useful, determining tape quality based on brand name and tape grading system can be unreliable in some cases.
Tape condition
Because videotape is in a cassette, the evaluation of its condition is not straightforward. One thing that can be done without opening the cassette housing is an inspection of a small portion of tape as well as of the two inner guide posts in the cassette. In order to perform this inspection, the cassette door needs to be opened and the hub lock released as described above under Cassette condition. The door should be propped open so that it will not slam shut on the tape. Once the hub lock is released, a small amount of tape can be pulled away from the posts. Always use lint-free cotton gloves when handling tape to avoid fingerprint contamination. Examine for contaminants or any damage. More importantly, examine the posts for any signs of buildup. This may be from degradation of the tape binder, which will appear as black or white debris, likely from lubricant breakdown. There may also simply be buildup from general dust or dirt particles. If anything is noticed on the tape or posts, then a good cleaning of the whole tape is required prior to it being played. After the inspection, ensure that the hub is turned so as to gather up the loosened tape so that it is snug. More advice on tape inspection can be found in ISO 18933:2012, Imaging Materials — Magnetic Tape — Care and Handling Practices for Extended Usage.Footnote 12
Presence of contaminants
One of the first things to look for when visually inspecting a tape is contamination, which can appear in many forms.
Dust, dirt, liquids and other debris
The most common types of contaminants are dust and dirt. Other types of debris include smoke particles, skin flakes, fingerprints, particulates from deteriorating or damaged cassettes or storage containers (in particular, paper sleeves), and white powder or crystalline residue on tape edges from lubricant breakdown. Although not common with the VHS format, there may be adhesive residue from poorly made or aged splices. If debris is present on a tape and it is played, a separation will occur between the tape surface and the read heads. This separation will cause a signal loss. Particulates wound between tape layers will eventually cause permanent impressions in the surface of the tape and also result in signal losses or dropouts. Debris also contaminates and damages the read/record heads and other parts of the equipment. Finally, dust, dirt and other debris can scratch the tape as it plays, leading to signal losses and equipment contamination. It is possible that tapes may have come in contact with various liquids; stained labels are a good indication that this has occurred. Liquids are problematic because they can accelerate degradation and result in tape layers tightly sticking together.
Fungus or mould
These types of contaminants usually appear as fuzzy or thread-like growths that vary in colour but are commonly black, brown, dark yellow or mustard-coloured. A musty odour may be present and especially noticeable immediately after opening a closed storage container. If it is known that the tapes have been exposed to high humidity or, even worse, a water disaster event, then the presence of mould is a good possibility. If no knowledge of the history is known, look for signs of water damage on the cassette, the container or any labels. Look for mould on the inside of the container and inside the cassette housing. In particular, focus on the edges of wound tape.
Tapes contaminated with mould should be bagged and isolated from the rest of the collection material and dealt with by experts in mould remediation because mould is a health hazard. If treatment is attempted in-house, proper safety procedures and safety equipmentFootnote 13 need to be used by anyone handling or exposed to the mouldy items.
When assessing a mould problem, if the mould smears when it is rubbed, it is considered active and, in this state, should not be cleaned. If the mould has the appearance of a dry powder, it is likely dormant. An active mould can be driven into dormancy by storing the affected item in a dry environment (less than 40% RH). Once dormant, the mould can be cleaned.Footnote 11 However, mould is difficult to eliminate completely and any traces left behind will result in a resurgence of the problem should the RH rise above about 65%. Mould is also very invasive and will penetrate between layers of wound tape. This scenario would require an extensive amount of cleaning beyond a surface wiping or vacuuming of the exterior of the wound tape pack and is beyond the scope of work that can be performed by non-experts in mould remediation.
Finally, mouldy tapes should never be played as they will contaminate the equipment. Tapes that are subsequently played on the machine will become contaminated unless thorough and extensive cleaning is performed.
Pests (insects and rodents)
If tapes have been exposed to pests, it is possible that contaminants, such as droppings and urine, may have been left behind. Also, there may be a certain amount of gnawing damage on the tape, cassette shell or storage container, resulting in a significant amount of debris. Cleaning and repair will be required prior to playback. Tapes with droppings should be handled with appropriate personal protective equipment.
Chemical degradation of tape
VHS tape is composed of a polyester plastic base coated with a polyester urethane binder material containing magnetic oxide particles. It is these oxide particles that hold the video signal. The polyester base is very stable and chemical degradation is not an issue under normal storage conditions. The magnetic oxide material is generally very stable as well and signal losses due to changes in the magnetic oxide are usually not significant over the lifetime of the tape. The main chemical degradation problem is the decomposition of the binder layer via hydrolysis. This is a reaction between the binder polymer and water molecules and results in a tape that can be very difficult to play. Binder hydrolysis, also known as the “sticky shed syndrome,” is more prominent in audio reel-to-reel tapes but is also present in videotape formats. This degradation can be identified by:
- the presence of a pungent waxy or “dirty-socks”-type odour immediately detected when a tight storage container is opened (avoid direct smelling but instead fan air towards nose)
- stickiness when the tape is unwound
- squeals when the tape is played
- binder and magnetic particles readily flaking off the tape base resulting in sections of missing binder material (Figure 7)
© Government of Canada, Canadian Conservation Institute. CCI 83365-0023
Figure 7. Flaking of binder and magnetic particles from the base of a VHS tape. This may be due to binder degradation or failure of the adhesion between binder and base for other reasons.
The oxide flakes may be present inside the container or visible through the clear VHS cassette window. Often, there is no oxide loss until the tape is played and, as it plays, the oxide/binder debris accumulates on the posts and heads of the VCR. This buildup causes picture noise, friction and squealing that become progressively worse when playing the tape. Depending on the degree of degradation, the tape will also stick repeatedly to the equipment parts making play extremely difficult. In more severe cases, the tape may completely stop during play. Fast winding the tape will often not be smooth, and a slapping or knocking sound may be heard during the process. In addition to picture noise, playing a tape with binder hydrolysis can produce a video image with side-to-side ripples or a wavy appearance.
Playing a tape with binder degradation can lead to loss of the recording. Therefore, if obvious signs of binder degradation are present (debris and squealing), the tape should not be played or should be immediately stopped, and a treatment should be undertaken. Tapes should always be monitored during play.
The popular treatment for binder hydrolysis is “baking” or exposing the tape to moderate heat (less than 50ºC) for a period of 4 to 24 hours.Footnote 11 Footnote 14 Other treatments involve cleaning the tape surface with a lint-free fabric or desiccating it at room temperature or in cool conditions.Footnote 11 Footnote 15 These types of treatments should only be performed by individuals experienced in these methods. Baking and other remedies, if not performed properly, can lead to complete loss of the recording.
Physical damage to tape
VHS tape is a thin medium and, consequently, is vulnerable to physical damage in many forms. In fact, many of the playback problems associated with videotape can be linked to a physical problem. This damage will result in reduced playback performance for the recording, represented by moderate to severe dropouts, the complete loss of picture in the damaged sections, or poor audio. Playing physically damaged tape can lead to additional damage, complete loss of the recording or damage to the VCR. Prior to playing, it is imperative that the tape condition is diligently assessed for physical damage and, if any is evident, remedial action is required.
There are characteristic physical damage problems that are associated with magnetic tape plus basic remedies for these problems to restore proper playback, for example:
- breakage – results in an unplayable tape and requires a proper splice to be made, which may lead to possible loss of some content
- stretching and tears – results in image skewing to the left or right; the stretched or torn tape needs to be cut out and the good ends properly spliced together (note that there will be loss of content due to the missing piece of tape)
- wrinkles – cause a degradation in playback quality depending on the amount of wrinkling and is characterized by horizontal bands of picture noise lines rolling from top to bottom or bottom to top; if severe, the tape may jam in the equipment; wrinkled sections might need to be removed or, alternatively, smoothed out using techniques such as the application of mild heat under pressure, but such techniques should only be performed by a professional tape restoration expert
- folds or cinches – describes tape that has folded over onto itself and created a crease or creases, often many in a row, creating an accordion look; this often occurs when the tension in the tape pack is too loose, allowing gaps to form in the pack; the problems encountered and remedies are similar to wrinkles in the tape, described above
- cupping – occurs when the tape deforms in the shape of the letter U and results in poor head-to-tape contact, creating dropouts or noise lines that cannot be removed with player adjustments; flattening techniques such as those used for wrinkles may be required
- scratches – result in dropouts or stationary noise band lines for longitudinal scratches, or noise bands drifting either down to up or up to down for diagonal scratches, if the magnetic oxide signal carrying layer has been affected; there are no remedies to repair losses caused by scratches, and scratched tapes that are played can contaminate the VCR
- edge damage – describes any type of damage to the top or bottom edges of the tape that can lead to information loss or significant playback problems; depending on the type of damage, some of the remedies discussed above may be required
Note that improperly made splices can damage the VCR heads. The use of splices should therefore be limited as much as possible. When they are required, the appropriate splicing tape and splicing block should be used. Never try to perform free cuts and never use regular pressure sensitive tape (i.e. Scotch tape) to make the splice. CCI Technical Bulletin 27 Remedies for Deteriorated or Damaged Modern Information Carriers further discusses splicing and other problems, and provides more details on remedial actions where they exist.
A key to determining physical damage to the cassette and tape is inspection of the storage container. If it is showing signs of damage, it is possible that the cassette or tape may also be damaged.
Cleaning of tape
Because of the many problems caused by debris and other contaminants, contaminated tapes should never be played without proper treatment. Cleaning will improve playback performance significantly.
If the videos have been stored in debris-proof containers and in known debris-free environments, then cleaning before digitization is generally not required. Cleaning should not be performed on tapes when it is not required in order to avoid damaging the tapes unnecessarily. Containers that are covered in debris should be vacuumed or wiped clean with a lint-free cloth and moistened if necessary prior to removing the cassette from the container in order to avoid contaminating it. If there is contamination inside the storage container but it is limited to the outside of the cassette, cleaning can be easily performed in-house. The same cleaning procedures outlined above for storage containers can be followed with cassettes that have debris on them, being careful to not suck up the tape if using a vacuum. Debris in a storage container should be cleaned prior to returning the cassette to it or, if contamination is significant, the container should be replaced.
Any debris or other contaminants, including liquid contaminants, within the cassette shell and in between tape layers will require a more extensive cleaning effort. Cleaning of VHS tapes is generally performed with a device that begins by running the tape at high speed first over a burnishing blade to remove tightly adhered debris and smooth out the surface. A Pellon tissue (a non-abrasive, non-lint producing fabric) wiping stage follows to remove loosely held debris. Although this type of cleaner performs well on new tapes and eliminates dropouts caused by debris, it is too rough on older ones or those that have chemical or physical degradation issues. In this latter scenario, a specialized cleaner that is less aggressive is required to avoid completely damaging the fragile older tapes. Modifications of standard equipment, such as removing the burnishing blade and reducing the speed, may help reduce the risk of damage. Alternatively, there is also the option of hand wiping the tape using Pellon tissue. This is a very labour intensive process and there is a high risk of damage if not performed carefully.
If the contamination on the tape is due to residue from old splices, this residue should be cleaned and the splices remade with appropriate splicing material for videotape.Footnote 11
Cleaning of tape wound in a cassette is not a straightforward process. Once more extensive cleaning than the basic procedures outlined above is necessary, then specialized equipment and expertise is required that is beyond the capability of most non-experts in tape remediation. In these situations, cleaning of contaminated tapes should be left to companies equipped and trained to handle heavily contaminated and older fragile tapes.
Selection of Material to Be Digitized
Checks should be made to ensure that the material has not been previously digitized or an acceptable digital copy does not already exist, scenarios which would reduce the workload. Based on each individual institution’s mandate, it has to decide what videos are valuable and should be preserved and what should not. Footnote 16 Footnote 17 Digitization is not a minor effort and eliminating materials that have been properly appraised by the collecting institution and deemed insignificant will have a substantial impact on the resources required. The days of collecting and preserving everything are gone, and existing resources need to be used wisely.
Prioritizing for digitization
Once the decisions have been made for the selection of material to be digitized, the next step is prioritization. In most cases, funds are limited and the recordings will likely be dealt with over several years as funds become available. Therefore, it is essential that certain materials are digitized first. Other than the fact that a recording has been deemed to be of high value, historical or otherwise, and these recordings should be the top priority for digitization, there is no other straightforward way to determine what should be digitized first. One way of quantifying the prioritization is to use a triage system as illustrated in Table 3.
| Question |
Point value if YES |
|---|---|
| Does the tape exhibit signs of binder hydrolysis such as squealing during playback, frequent head clogging, flaking of binder layer or sticky surfaces? |
+5 |
| Is it physically damaged? |
+4 |
| Is it a single copy? |
+5 |
| Is it between 10 and 15 years old? |
+3 |
| Is it between 15 and 20 years old? |
+4 |
| Is it older than 20 years? |
+5 |
| Is it older than 25 years? |
+1/year |
| Has the tape been stored in 8–23ºC temperature range and in 15–50% RH conditions and without large fluctuations in these conditions for most of its lifetime? |
-4 |
| Total (The tapes with the highest point total should be digitized first.) |
- |
Playing the Tape
Selecting and outfitting the space
The initial step in any digital conversion project is to set up a workstation or work area. Ideally, a separate clean and quiet room should be used for the transfers described in this Technical Bulletin. The room should be equipped with a dedicated 15 A 120 V circuit to feed the video and computer equipment (i.e. no other electrical source such as lights should be on this circuit).
In terms of the play environment, tapes should not be played under high humidity conditions as this promotes the tape sticking to the spinning heads and other machine parts. This, in turn, leads to high friction, tape damage and premature wearing of the VCR heads. If the humidity is too low, static discharge may occur and it appears as a flash when the video is being played. The optimal playback environment is 21 ± 2ºC and 50 ± 10% RH.Footnote 19 Footnote 20
Playback equipment
Any device that is used for playback should be clean, properly aligned and regularly maintained as indicated in the manufacturer’s instructions or as performed by a qualified service technician. This will result in the best playback signal and prevent damage to the recording. Machines with worn components can lead to greater friction during playback and cause distortion, wrinkling, creasing and stretching of the tape. A tape path that is out of alignment can lead to damages to the tape edges, making the playback problematic. A periodic inspection of the unit should be performed by a qualified individual, especially if the noted problems are encountered.
A dirty tape path in the equipment will result in signal losses and physical damage to the tape, such as scratching. Cleaning of the path may involve the use of wet or dry cleaning cassettes, which can remove some debris on the machine parts. However, these cleaners are abrasive and may damage the video heads. Alternatively, manual cleaning may be performed with a lint-free swab and a suitable cleaning solvent. Whichever method is used, it is imperative to consult the manufacturer’s instructions to avoid damaging the components in the VCR. In addition, cleaning should only be performed by individuals that are experienced in or properly trained in VCR cleaning techniques. The frequency of cleaning is difficult to determine as it depends on the age and cleanliness of the tapes and the playback environment. Older recordings may shed more debris and, therefore, more frequent cleaning may be required than if only newer ones are played. However, it is important not to clean more often than necessary. Regular inspections of the playback unit and taking note of degradation in the video signal are two ways to determine when cleaning is required.
If playback is problematic and there are no obvious problems with the equipment, tape or cassette, it is worth attempting to play the tape in another VCR. Occasionally, there can be interchange or compatibility issues between the cassette and/or the videotape and the playback unit. This compatibility problem may also be due to the VHS recording being made with one television standard (NTSC, PAL or SECAM) and played back on a VCR that only plays a different standard (e.g. NTSC VHS recording being played back on a PAL VCR). If this occurs, the image may be distorted or there may be no image at all. Ensure that the player and recorded tape are compatible in terms of the television standards.
Power conditioning
High-end power conditioning (i.e. use of a device to deliver voltage of the proper level and characteristics to equipment in order for it to function without electrical issues) is not required, but plugging all of the devices into a standard computer UPS is a good idea. This will protect the equipment against power surges and against loss of data for short power interruptions. A 1000 VA or 1200 VA unit is more than adequate.
Preparing the tape for playback
VHS and S-VHS cassettes all contain write protect tabs on the cassette, as shown in Figure 8. It is good practice to break off the tab if it is still present in order to prevent the accidental erasing of the recording during use.
© Government of Canada, Canadian Conservation Institute. CCI 124014-0024
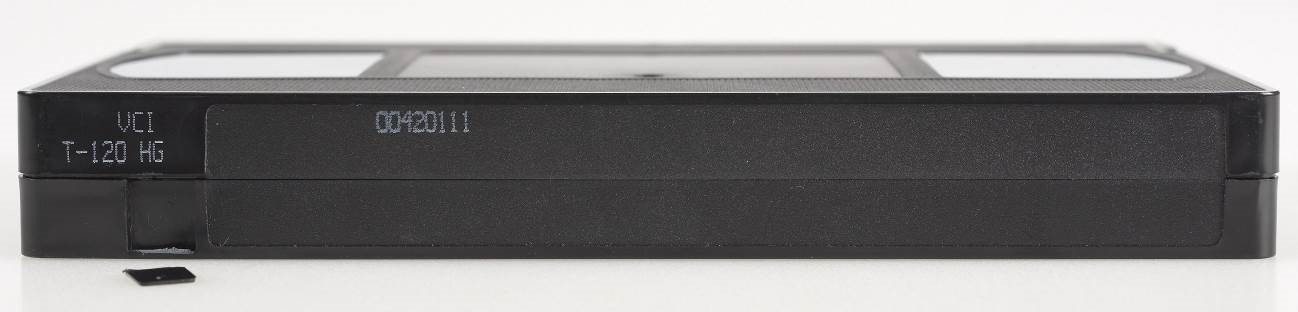
© Government of Canada, Canadian Conservation Institute. CCI 124014-0025
Figure 8. Above: The write protect tab as indicated by the arrow is found on the top of all VHS cassettes. Below: The write protect tab should be broken off to prevent the accidental erasing of the recording.
VHS cassettes in collections often have several adhesive labels attached to them. Ensure that there is no label that is loose or peeling and, if there is one, re-adhere or preferably remove it entirely. Ideally, labels on cassettes should be used as little as possible and situated only in the recessed portion on the front or spine of the shell, both areas designed specifically for label placement.
The tape pack should be inspected visually by looking through the cassette window. If there is any loose or slack tape present, then it needs to be taken up by releasing the hub lock (described above under Cassette condition) and gently turning one of the hubs in the direction that leads to the tape being taken up.
It is important that tapes are acclimatized to the playback environment and that playback occurs in the correct environment. Usually a couple of days should be sufficient for acclimatization. If tapes are being transferred from a cold or cooler environment, then precautions should be taken to avoid moisture condensation on the materials. These precautions involve keeping tapes in sealed containers or placing them in sealed plastic zip-lock bags until the containers have warmed to the playback environment. Alternatively, the materials can be slowly warmed in a staging area. Failure to acclimatize the tapes will result in poor playback performance and possible damage if moisture condensation has occurred on the tape surface.Footnote 21
Play procedures
A tape and cassette in good condition should be loaded into the VCR and be fully engaged before beginning. It is best to minimize the number of times that a cassette is inserted and removed from the machine to avoid damaging the tape. Next, before playing, it is recommended to fast-forward to the end of the tape and, once at the end, stop the VCR. After a couple of seconds, rewind completely to the beginning. These actions benefit the playback by conditioning the tape to the wind tension of the VCR being used, restoring the tension in the tape pack after potentially several years of idle storage, and helping to acclimatize the tape to the use environment. Avoid fast-forwarding and rewinding repeatedly and do not leave the VCR in pause or still mode for long periods of time, as this can damage the tape. Always hit stop on the VCR when moving from one mode, such as fast-forward or rewind, to another to avoid stressing and possibly damaging the tape. The fast-forward and rewind processes should be smooth, otherwise this may be an indication of damage or degradation to the tape or cassette. Note that this fast-forward and rewind conditioning procedure should not be performed on fragile tapes or on tapes suspected of being in poor condition.
After this preparation, the wound pack may still contain problems, such as individual strands of tape popping out from the main pack, commonly referred to as popped strands. If the problem is not severe, there should not be an issue. However, packs with many and significantly popped strands should not be played or, at the very least, be closely monitored during play and, if problems become evident, the poor wind needs to be remedied.Footnote 11
The prepared tape is then played in order to examine if the heads are properly tracking the video signals. Often, the video heads from the machine that plays back the tape will not have the same alignment to the recorded tracks as the heads from the VCR that recorded them. This difference in alignment, usually as small as a few micrometers, creates a tracking problem. Some VCRs perform automatic tracking adjustments to optimize the output. However, for others, the tracking may have to be manually adjusted by using the controls on the equipment or remote until the picture is optimum. Tracking that is not properly adjusted is indicated by the presence of horizontal noise lines across the screen. When the tracking is completely off, the heads are not following any part of the recorded signal tracks on the tape and the picture consists of “snow” (Figure 9). Properly adjusted tracking results in a video image with no lines. Once this adjustment has been made by playing the recording for a couple of minutes, the tape should be stopped, rewound, played to the point where the digitization is to begin and then stopped. The adjusted tracking is not likely to change unless another machine was used to make additional recordings on the same tape.
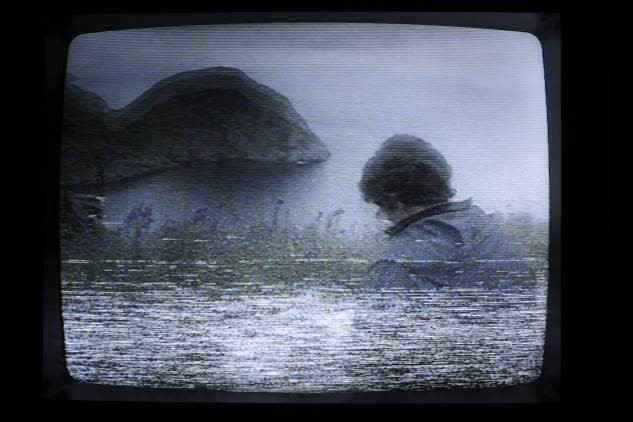
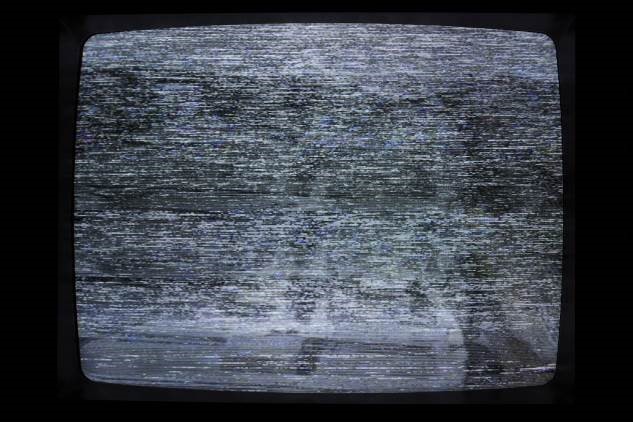
Figure 9. Left: Screenshot of a VHS tape playback showing tracking that is a little bit off and indicated by the group of horizontal lines that obscure the image at the bottom. Right: Screenshot capture of a VHS tape playback showing tracking that is almost completely off. The image consists mainly of “snow.”
There are also a number of other problems that may be encountered when playing back VHS videotapes. Some of these problems are listed with some brief descriptions in Appendix A. It is important to remedy issues, where possible, prior to digitizing, otherwise the errors will be transmitted to the digital copy.
Viewing of the playback is performed via an attached television monitor or computer monitor with the appropriate viewing screen available through the capture software. This would depend on the type of digitization being performed.
The tape is now ready to be played and digitized. During play, listen to the sound of the transport mechanism in the machine. Any strange noises or indications that the play is not smooth, is slowing down or is straining are indications to stop the playback, as these are likely signs of a problematic tape or cassette. Visually, if the video image becomes progressively worse with play, then the machine should be stopped as well. The more familiar an individual is with the playback device being used, the easier it will be to identify abnormal sounds and performance. Careful monitoring during playback of the tape is recommended at all times.
Test cassette
A useful item to have on hand is a test cassette that is known to work well and contains good quality video. The purpose of this cassette is to determine whether a problem that is encountered during playback is due to the equipment, tape or cassette, or whether the problem was recorded onto the tape when it was first created. This allows for a more accurate treatment to be pursued for the problem encountered. For example, a tape is played and is displaying bands of noise lines consistent with a tracking issue. A manual adjustment of the tracking does not solve the problem. Therefore, the test cassette is played in the VCR to determine if the problem still exists. If it does, there is an issue with the equipment. If it does not, then either the effect was recorded on the tape when it was created or the tape and possibly cassette are damaged. This type of procedure can be followed for many of the video problems encountered during playback.
Analog to Digital Conversion
It is easy to fall into the trap of not doing anything because of the lack of the perfect solution for digitizing analog video. In fact, there is no “one solution fits all” and therefore institutions need to evaluate their own situations and move forward. It is imperative to do something now, at the best quality level available to the institution, before it is too late and tape degradation or playback machine obsolescence leads to the complete loss of the VHS recordings in a collection.
There are many options available for converting VHS recordings to a digital format, each with its own positive and negative aspects. Ultimately, the method chosen depends upon what is acceptable quality, what expertise and resources are available to perform the work, and what resources will be available for managing the newly created information in the future. This Technical Bulletin provides three options for digitizing VHS video that can be categorized as low (Digitization Set-up One), medium (Digitization Set-up Two) and high (Digitization Set‑up Three) quality. Always strive for the best quality option possible based on the parameters listed above as it is likely that the VHS tape will never be digitized again or perhaps even be playable again in the future.
Ideally, for ease of management of the digital video in the future, it would be best to choose one standard format. However, it is possible to use different options depending on the value of the content being digitized. An organization may decide that its digitization of VHS goals can be met by using low to medium quality for most of the collection, but using high quality only for the most unique and valuable material. High quality digitization may also be the preferred route for deteriorated material as this may be the last time it would be playable and because it may require editing and corrections once digitized, a process that is more successful on a better quality digital file.
In terms of the three categories of digitization, there will not necessarily be much visual difference between them when the digital videos are compared. This is especially the case when dealing with VHS recordings as the source material, where the advantage of utilizing a higher quality digitization may be lost in the noise of the signal. In fact, some simpler or cost effective options can produce excellent visual results. However, differences may become evident with future migration or future manipulation of the files. This is where digitizing at the higher quality can be beneficial and, if possible, preferred over the other methods. The higher quality will provide greater flexibility in terms of file manipulation (e.g. a better end product after editing the content or after producing lower quality distribution files), and migration to other video file formats will result in no or minimal loss in details. Another point to keep in mind is that digitizing at a lower quality may appear to give a satisfactory result using today’s display monitors but, in the future, the result may prove to be unsatisfactory.
Whichever digitization set-up is selected, it is important to conduct a variety of tests to become familiar with the equipment and software being used as well as the workflow being performed. Thorough experimentation and comparison tests are essential before commencing large scale projects in order to produce the best result possible and to limit mistakes that lead to projects having to be redone.
The conversion to digital process is in real time and, therefore, every hour of a recording will require one hour of digitization time plus one hour to view the converted video. In addition, time will also be required to preview the material prior to digitizing, which may necessitate cleaning and repairing, as well as other tasks. The amount of labour required is approximately three times the amount of video. For example, digitizing one hour of video will require about three hours of labour time. This is an important factor to consider when undertaking this type of project as labour costs can make it unaffordable unless costs can be reduced via the use of trained volunteers.
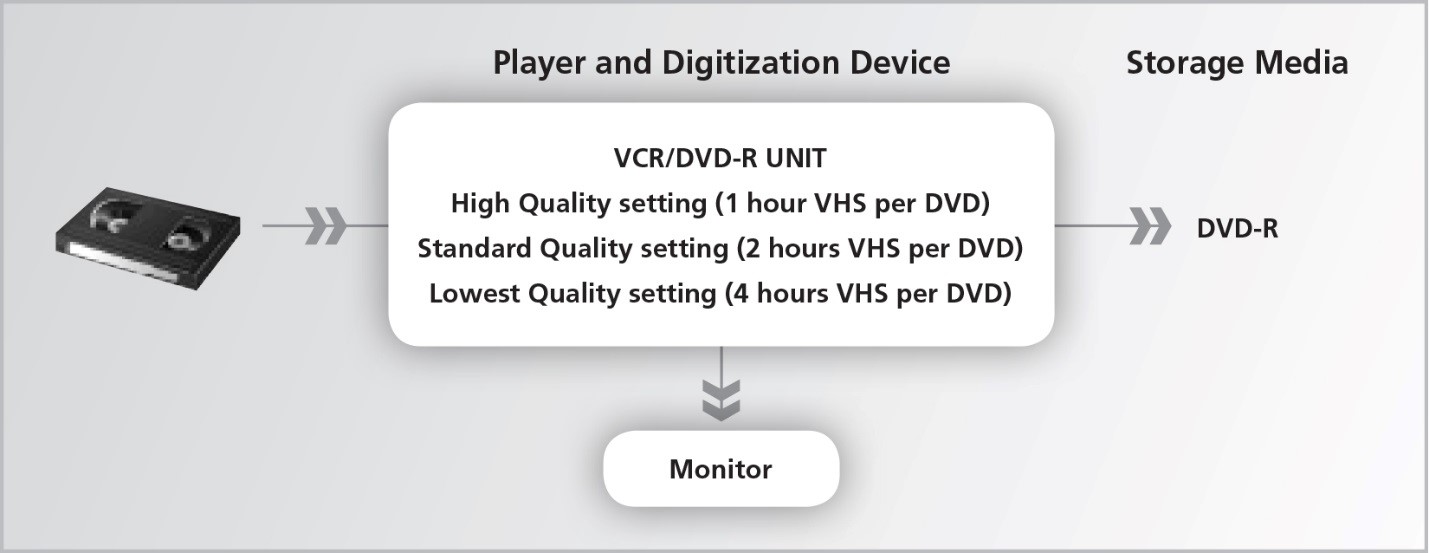
Digitization Set-up One: conversion to DVD
The Digitization Set-up One workflow is shown in Figure 10. The simplicity of this set-up lies in the fact that the playback unit is also the digitizer and the end product is a movie DVD. Figure 11 shows an example of one of these units. One side is a regular VCR and the other is a recordable DVD drive. Internally, there is a device to convert the analog video to digital form. The options for units that contain internal analog to digital converters are limitedFootnote 22 (see Appendix C for suppliers) and the quality of the final result varies depending on how well the VCR portion plays the tape, the quality of digitization device within the unit, and the amount of signal correction that occurs.
© Government of Canada, Canadian Conservation Institute. CCI 124014-0033
Figure 10. Workflow diagram for Digitization Set-up One.
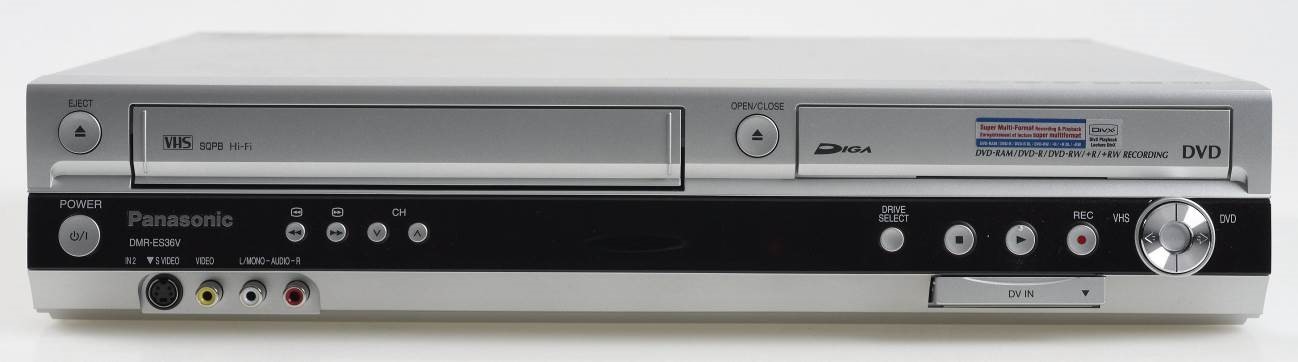
© Government of Canada, Canadian Conservation Institute. CCI 124014-0005
Figure 11. A VCR and DVD-R combination unit that can be used to make movie DVDs from VHS videotape recordings.
Equipment and connections
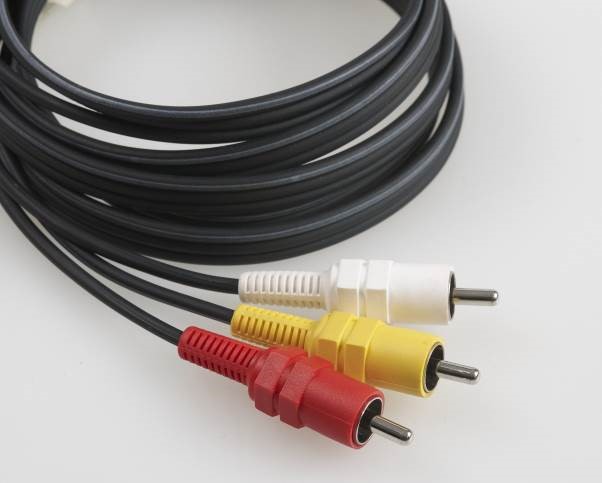
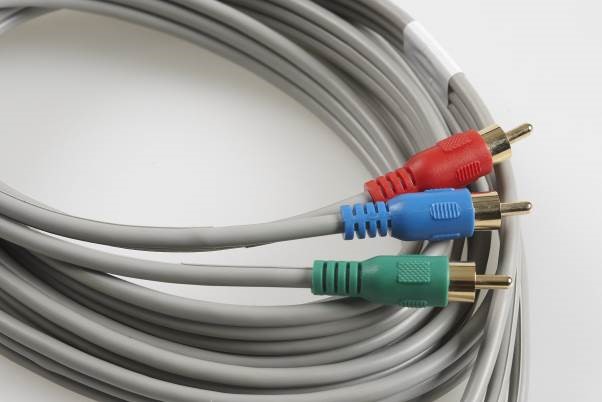
Detailed instructions on how to use this machine are provided in the manual for the VCR/DVD‑R unit. Therefore, before beginning, it is best to become familiar with the unit by reading through the user manual and then performing some digitization tests. Most VCR/DVD-R units come with onscreen display menus or graphical user interfaces to guide the user through the process. The unit needs to be connected to a monitor in order to view this display. The monitor will also allow the recording to be examined during the conversion process to ensure that there are no problems. The connection between the unit and the monitor depends on the outputs available on the unit and what input options are available on the monitor that is being used. Most VCR/DVD-R units have three output options that are listed below in order of lowest to highest quality (the corresponding cables are illustrated in Figure 12):
- Composite – yellow connector for the video signal, red and white connectors for the left and right audio signals
- Component – red, green and blue connectors for the video signal (these connections are not usually found on VCRs) and the audio is connected with the red and white composite cables
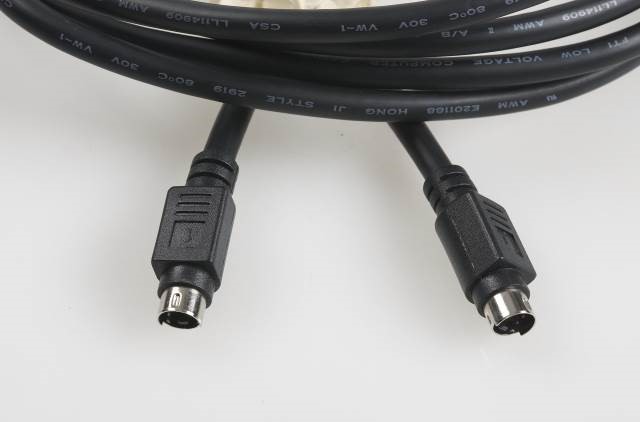
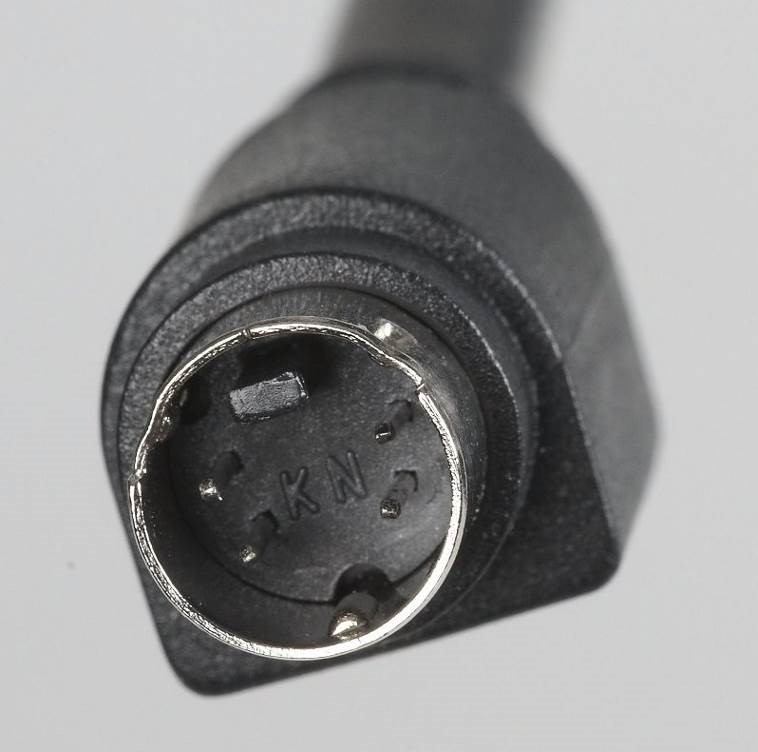
- S-video – 4-pin connector (Figure 13) for video, and the audio is connected with the red and white composite cables; the video signals of luma (brightness) and chroma (hue and saturation or colour) are carried separately through an S-video cable and this differs considerably from composite cables where the signals are blended together
To properly connect the equipment to the monitor, select one of the cable options above and connect from the Video Out and Audio Out of the VCR/DVD-R unit to the Video In and Audio In of the monitor.
© Government of Canada, Canadian Conservation Institute. CCI 124014-0013
Figure 13. Close up of an S-video cable showing the 4-pin configuration.
Digitization procedure
For this digitization set-up, since editing of the resulting product is not easily done, it is important to screen the tapes prior to digitization. During the screening process, duplicate content and material that is deemed invaluable may be discovered, eliminated and not digitized, leading to significant savings in terms of cost, time and human resources. Screening also involves determining the recording length or running time that is present on the cassette. Considering that a VHS cassette may contain up to six hours of material, it is imperative to know the length and other details before actually starting the digitization because only a limited amount of content can fit on a recordable DVD disc. Labels on cassettes or the storage containers may or may not contain an accurate description of this information. Proper organization of the content before digitizing will improve the efficiency and success of the digitization using this method.
The screening of the tapes should only be performed if they are in good condition and, if possible, on a machine other than the one used for digital conversion in order to preserve its life. If it is suspected that multiple plays may damage the tape, the digitization should be performed on the first playback (i.e. during screening). It will always be possible to redigitize if it turns out that the tape is not problematic.
For other digitization options, such as Digitization Set-ups Two and Three discussed further down, the digitized content can be more easily edited. For those options, it is likely a better approach to digitize all the content on the VHS cassette and then decide afterwards what needs to be kept. This will eliminate the time required to screen the tapes, subject the tapes to less wear and tear since they are not played twice, and preserve the life of the analog equipment.
Some general details on how to digitize non-copy-protected VHS videotapes with this method are provided below. These procedures may differ from one unit to the next but do give some guidance on how to proceed. The details below pertain to the Panasonic DMR-ES36V unit.
To perform the digitization of the VHS, the VCR/DVD-R unit and the monitor are turned on. The prepared tape, as discussed above under Evaluation of Tape and Cassette Condition and Playing the Tape, is inserted in the VCR side of the machine and cued to the starting point. Next, a blank DVD-R is inserted in the DVD-R drive. From the onscreen menu, the Copy function is selected. Next, the Copy Direction has to be set and, in this case, the Source will be VHS and the Destination will be DVD. The next decision to be made is the Recording Mode and this refers to the calibre of the conversion to digital. There are three modes that can be selected: XP mode (also referred to as HQ mode) is the best option and allows one hour of VHS video to be recorded per DVD-R disc; SP mode is medium level and allows 2 hours of video content per DVD-R; LP mode is the lowest quality of digitization and allows for 4 hours of VHS content per DVD-R. In order to maximize the quality, the XP mode should be selected. The SP mode may be used in situations where it may not be feasible to separate a recording into two discs, but keep in mind that there will be quality loss. Once the Recording Mode has been selected, the copying process can begin by selecting Start Copying, which automatically starts the VHS playback and the conversion to digital.
Once the content has played through, the process is stopped. At this point, a title can be added and the content can be divided into chapters for easier navigation of the DVD. In order for the DVD-R to be playable on compatible DVD players, it needs to be Finalized. This process is selected from the menu options and, once initiated and completed, no other content can be added to the disc. Note that most VHS/DVD-R units can allow a recording to be stopped and for content from different tapes or different parts of the same tape to be added as long as the disc has not been Finalized. For most machines, this is the extent of the editing possible for this level of digitization and therefore there is very little flexibility on what can be done with the video.
It is a good idea to play the DVD through from beginning to end to ensure that the digitization process was successful and to spot any problems, such as signal losses or other glitches.
Storage media
Avoid the use of cheap generic DVD-Rs and other lower stability discs, such as the erasable DVDs (DVD-RW or DVD+RW) and recordable dual discs (DVD-R DL or DVD+R DL). In general, it is best to avoid the use of DVD+Rs as well because these discs tend to experience more compatibility issues with different drives. Also, if maximum longevity is desired, then gold metal layer DVD-Rs should be used.Footnote 23 Consult the user manual of the equipment because it may indicate the preferred brand of disc to use with the DVD recorder.
Advantages of Digitization Set-up One
- simple and little expertise is required to learn how to use the system
- minimal knowledge of the equipment is required
- a powerful computer to process the video is not required
- low cost
Disadvantages of Digitization Set-up One
- lossy compression is used to make the DVD and therefore information is irreversibly lost, video may be degraded if compression program is poor, and video is more susceptible to corruption if any data is damaged
- proper decoding of the video and audio information stored in the DVD video format may be problematic and future migration from the DVD without further degrading the video and audio may be an issue; software that extracts content from DVDs will often use another form of compression or format conversion and quality will be affected
- use of recommended high quality setting or even standard setting may produce several DVD-Rs per VHS cassette and content from one recording may have to be spread over two or more discs; combining this content into one file in the future, if the content is extracted from the DVD, will be problematic
- some units may use an internal TBC for signal adjustment, but there is no flexibility to do any adjustments other than tracking prior to creating the DVD; therefore, the video signal being fed into the digitization device may not be as good as possible
- editing options are very limited and labeling of the video segments is limited and not very user friendly
- flaws present in the original VHS video may be enhanced when digitized to DVD
- limited selection of VCR/DVD-R units to choose from
Digitization Set-up Two: conversion to a digital file with an external capture device
The Digitization Set-up Two workflow is provided in Figure 14. More flexibility is provided with this option when compared to Digitization Set-up One, especially with respect to the selection of the type of player, signal correction that can be employed, external capture device and, finally, the type of storage media that can be used. However, with flexibility comes more complexity and added cost.
© Government of Canada, Canadian Conservation Institute. CCI 124014-0035
Figure 14. Workflow diagram for Digitization Set-up Two.
Equipment
Player
The first part of this workflow is the playback unit. Everyday consumer VCRs will get the job done but will provide the poorest playback. Preferably, professional or prosumer (semi-professional) VCRs or S-VHS VCRs should be used, as these will provide a better playback. It is critically important to obtain the best and most problem-free signal off of the tape because the better the signal that is fed to the digitization device, the better the result. Therefore, the best player available or affordable should be used.
Signal correction
The next element in the workflow is a TBC. It is used to correct variations in the synchronizing signals that would otherwise lead to distortions, such as skewing in the video image. The TBC is able to make this adjustment automatically without user intervention by delaying the video signal so that each scan line starts at the proper time. It can also rectify problems with white-black levels and colour. A TBC can be part of a VCR or S-VHS VCR but is generally only found in professional or prosumer units. The use of a TBC can actually cause artifacts to be created in the digitized recording. The two principal ones are over-enhancement (images appear as ghost images instead of sharp lines) and velocity errors (characterized by alternating dark and light horizontal bars).Footnote 24
There are other signal correction elements that can be used in addition to the TBC. Two examples are a waveform monitor and a vectorscope. A waveform monitor measures and displays the voltage levels of the video versus time in order to determine if the levels are too high (too white) or too low (too black), resulting in loss of details. A vectorscope does not measure brightness like a waveform monitor would but instead measures the colour data in the video signal, specifically saturation and hue. Both of these signal correctors can be hardware- or software-based, with the software versions that are now available being as accurate as the hardware ones. Often, both of these can be found in one piece of equipment or software package.
Whether or not to use a TBC, waveform monitor and vectorscope for the creation of digital masters is open to debate and some believe that there should not be any signal processing of any kind. Indeed, adjustments not true to the original should not be made for the master but are often desired for distribution or access copies. Also, it is worthy to keep in mind that without thorough knowledge on how to use these tools, more harm may be done than good.
At the very least, a TBC should be used because not using one can lead to poor digitization and, usually, the benefits outweigh any shortfalls. Monitoring of the digitized video and performing some trials will help determine if the TBC has introduced any unwanted elements or not.
Most TBCs have outputs for composite and S-video connections (Figure 15) and, therefore, the connection used depends on whether a regular VCR (composite connections) or a S-VHS machine (S-video connection for video and composite for audio) is used—see Equipment and connections above under Digitization Set-up One. There are a variety of different TBCs that are available, from low end to professional.
Typical properties for a decent and reasonably priced TBC include:
- digital processing at 8-bit video resolution and 4:2:2 sampling rate
- frame synchronization with full frame memory
- low noise with S/N ratio >50 dB
- regeneration of all synchronization signals to stabilize the video
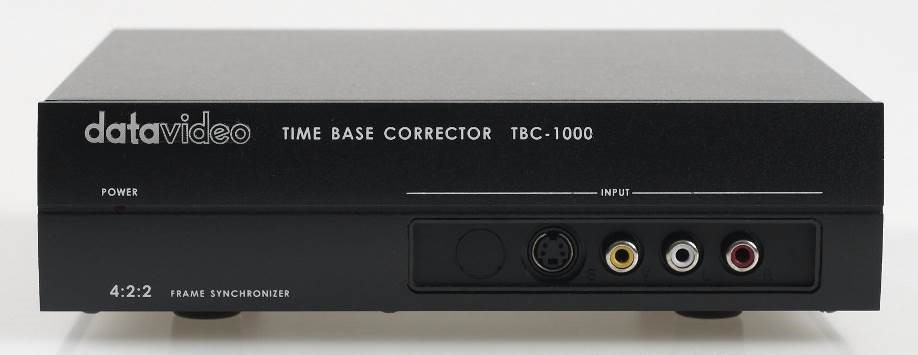
© Government of Canada, Canadian Conservation Institute. CCI 124014-0007
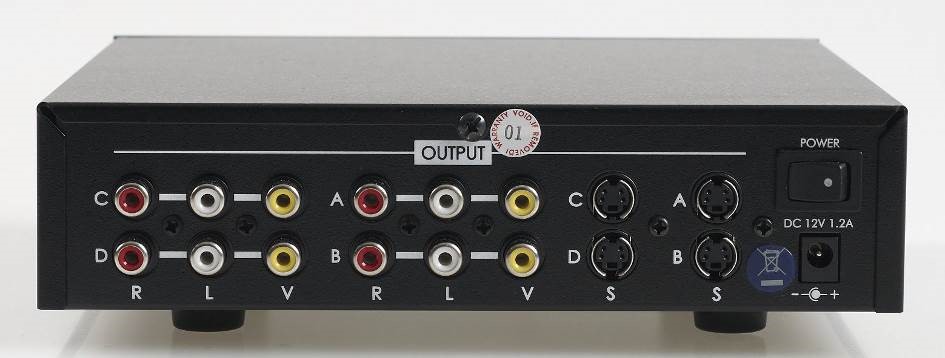
© Government of Canada, Canadian Conservation Institute. CCI 124014-0008
Figure 15. Front (top image) and back (bottom image) view of the Datavideo TBC.
Digitization device
There are a variety of different external digitization devices that can be used. These range in cost depending on the quality desired and the flexibility that is required. All of the devices in this class use compression and therefore are throwing out some information that is in the original video. As stated previously, although visually the video may be very good, compression can lead to problems indicated by artifacts and overall lower quality when the digital files are migrated into a new digital format at some point in the future. The conversion to digital for devices in this class basically allow for the following capture formats: DV, MPEG-2, MPEG-1 and MPEG-4. In this Technical Bulletin, the focus will be on DV and MPEG-2. The selection of the format will depend on how much editing is required after the conversion has taken place, on the institution’s capacity to deal with large files, and on current as well as future capabilities. More information on these two formats is provided below under Converting to DV using the Canopus ADVC110 from Grass Valley and Converting to MPEG-2 format using Pinnacle 710-USB.
Computer
The most up-to-date as possible computer should be used for digitizing video. Older and slower computers do not handle the process well and can lead to the loss of content. In addition, older computers are likely to lack the required capacity to deal with the large files that are generated with video digitization.
The following basic minimum specifications are recommended:
- Operating system: Microsoft Windows 7
- Processor: 2.4 GHz
- Random-access memory (RAM): 4 GB
- Hard disk drive capacity: 2 TB
- USB 3.0 ports
- Firewire IEEE 1394 card or on-board connection
- Internal recording device for the storage media being used (e.g. DVD/Blu-ray recorder drive, LTO tape drive). Note that these devices may also be external or separate from the computer and connected via a USB connection.
Some tips for a successful digitization process include:
- Defragment the hard disk drive, which consolidates fragmented files and ultimately results in a hard disk drive that is quicker and works more efficiently.
- Close programs not associated with the process, avoid copying files and disable a number of existing features on the computer such as screensaver, sleep mode and scheduled tasks. If open, these may impact computer performance and the digital conversion (e.g. dropping frames of video).
Although the above specifications should meet the requirements of the digitization and signal correction units for this digitization set-up, it is recommended to consult the product literature of the devices to ensure that the computer is compatible with them.
Connections
The following connections are summarized in the diagram shown in Figure 16.
Standard TBCs have both the composite and S-VHS connections available. Therefore, for a standard VCR, connect the Video Out from the VCR to the Input of the TBC using the yellow composite cable. Connect the Audio Out from the VCR to the Input of the TBC using the red and white composite cables. For S-VHS, connect the Video Out from the S-VHS VCR to the Input of the TBC using an S-video cable and connect the Audio Out from the S-VHS VCR to the Input of the TBC using the red and white composite cables. Note that, instead of using the S‑video connection with the S-VHS machine, there is also the option to use the yellow composite cable for video. However, the S-video cable will provide a better picture.
The TBC is then connected to the digitization apparatus. For most units, if the Input to the TBC is connected with composite cables, the Output of the TBC is connected to the Input of the digitizer with yellow (video) and red and white (audio) composite cables; if the Input to the TBC is connected with an S-video cable, the Output is connected to the Input of the digitizer with an S‑video cable (for video) and red and white composite cables (for audio). If no TBC is used, then the VCR or S-VHS VCR is connected directly to the digitizing equipment.
The TBC does not process audio but merely passes it through. Therefore, the audio connections may bypass the TBC and connect directly to the digitization device. In fact, some TBCs may not have any audio connections at all.
The final connections are between the digitization device and the computer. Most will connect to the computer by attaching a USB cable from the Output of the digitizer to a USB port in the computer. If using a device that converts to the DV format, it is connected to the computer via a Firewire IEEE 1394 connection.
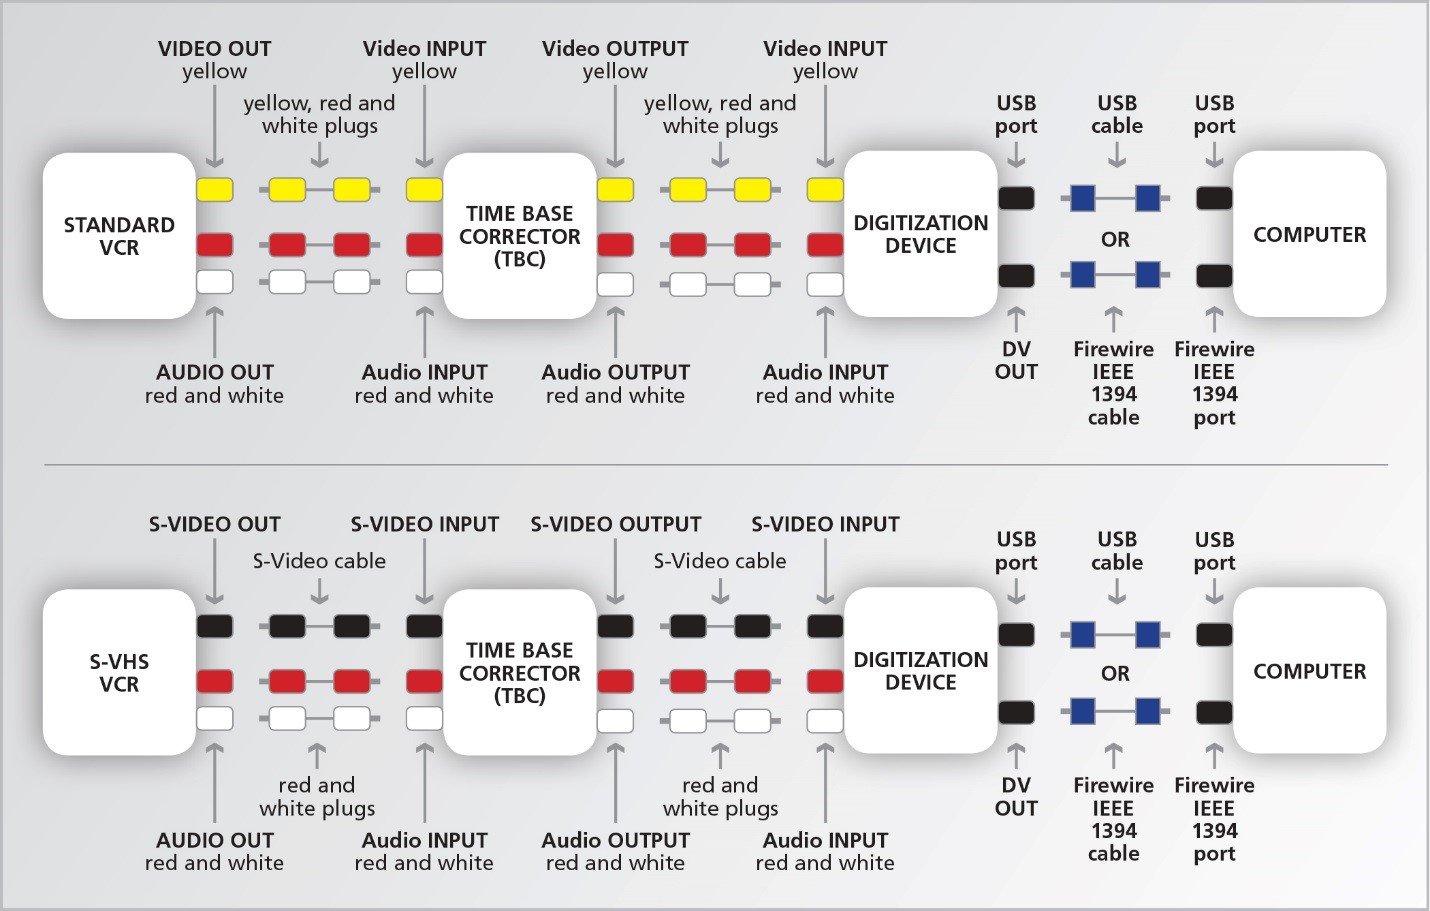
© Government of Canada, Canadian Conservation Institute. CCI 124014-0037
Figure 16. Connection diagrams for Digitization Set-up Two. Note that the audio connections from the VCR or S-VHS VCR can bypass the TBC and connect directly to the digitization device.
Digitization procedure
Connect the equipment as described above under Connections.
Two different pieces of digitizing equipment will be discussed in this Technical Bulletin in order to illustrate this set-up. Other units can be used and the procedures to use them should be similar. Examine the literature of the specific device being used in order to properly perform the digitization. Note that these types of devices and associated software change frequently and it may be difficult to find the exact products in the future. However, the details below will help to illustrate what is involved in the digitization procedure.
Converting to DV format using the Canopus ADVC110 from Grass Valley
The DV format was first launched in 1996 and is a codec (coder-decoder or compressor decompressor) that is in use by many digital video cameras. It uses lossy compression in a 5:1 ratio and, therefore, information is being discarded when digitizing from the original analog video. Despite using compression, the overall quality is very good and the file size is still large, with one hour of DV requiring 13 GB of storage space. An advantage of selecting DV is that it is easily editable, a useful feature for those requiring manipulation of the video for publishing, distribution, etc.
The ADVC110 unit (Figure 17) has a switch on the front labeled Input Select that toggles between Digital In and Analog In. Since analog video is being captured, ensure that the Analog In setting is selected. In order to use the ADVC110, video capture software is required. There are many different types that are available, some at no cost and others that are more expensive. Many options can be found by performing an Internet search using the search terms “DV capture software” (see Video Editing/Capture Software in Appendix C for some examples). Higher cost software provides greater flexibility for editing the video after the capture process has occurred and is generally a better choice overall. Regardless of the software chosen, it is important to study the associated documentation and perform some tests in order to become comfortable with the software before beginning the digitization project. For basic capture, software that is free, such as Windows Movie Maker, can be used and the process for using it is described below. The instructions below relate specifically to Version 6.0.6002.18005 and are provided to illustrate the digitization process. Earlier or later versions of this software may not have the same functionality.
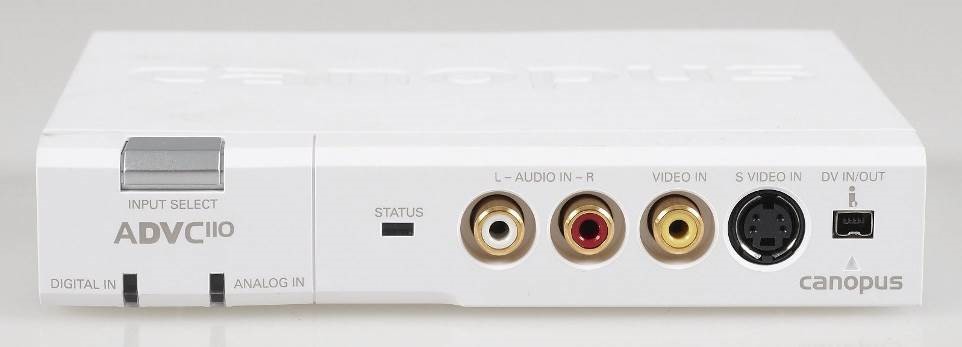
© Government of Canada, Canadian Conservation Institute. CCI 124014-0010
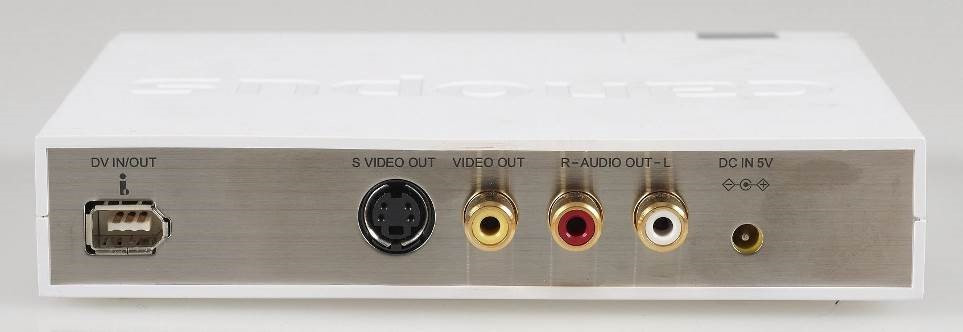
© Government of Canada, Canadian Conservation Institute. CCI 124014-0011
Figure 17. Front (top) and back (bottom) view of the ADVC110 digitization equipment.
When using Windows Movie Maker, the first step is to open the software. In the File tab, select the Import From Digital Video Camera option. A window will appear where the following fields need to be filled:
- Name – provide a name for the video to be captured
- Import To – provide a location (folder) where the file will be stored
- Format – select the Audio Video Interleave (single file) option
After this data has been entered, hit the Next button and another window will appear and two options will be provided:
- Import the entire videotape to my computer
- Only import parts of the videotape to my computer
The latter option provides more flexibility when capturing because it allows the user to decide what is being captured and produces individual files on the spot without the need for subsequent editing. The first option will capture the full tape into one file, which may not be desired when a variety of unrelated content has been recorded on one tape. Editing will be required after capture to divide up the video.
Next, the prepared tape, as discussed above under Evaluation of Tape and Cassette Condition and Playing the Tape, is inserted in the VCR or S-VHS VCR. The recording is cued to the spot where the capture is to begin using the viewing screen associated with the Windows Movie Maker software and then the tape is paused. Click on the Start Video Import button and then press Play on the player. Note that some types of software may allow you to control the VCR from the computer. To stop the capture process, click on the Stop Video Import button and stop the VCR.
Note that the connection from the digitization device to the computer will be via Firewire.
Converting to DV format using the Pinnacle 710-USB
The Pinnacle Studio digitizer (Figure 18) comes with software to capture and edit digital video. One of the options available for capture is the production of DV movie files. The step-by-step instructions below relate specifically to the Pinnacle Studio HD Ultimate Collection Version 14.0.0.7255 software.
To begin the digitization, open the Pinnacle software. Select the Import tab and a new window will open. Under Import From, select the Pinnacle 710 and the appropriate connection, either Composite (yellow cable for video and red and white cables for audio) or S-video (S-video cable for video and red and white composite cables for audio). Next, under Mode, select DV; under Import To, indicate where the digital video will be stored; and, finally, under Filename, provide an appropriate name for the file. Note that the file extension will be .avi. Next, the VHS tape is prepared and adjusted for tracking, as outlined above under Evaluation of Tape and Cassette Condition and Playing the Tape, and cued to the point where the capture will begin using the viewing screen associated with the Pinnacle software and paused. Click on Start Capture and then press Play on the VCR. Once the segment of the video to be captured has ended, click on the Stop Capture button to end the process and stop the playback of the VHS recording.
Note that the connection from the Pinnacle unit to the computer will be via USB.
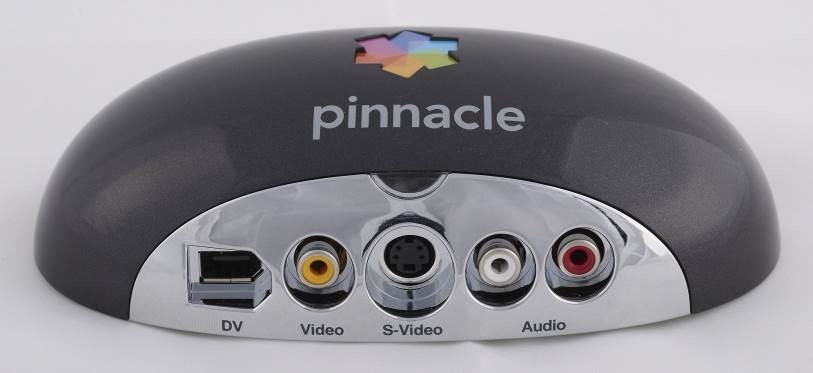
© Government of Canada, Canadian Conservation Institute. CCI 124014-0015
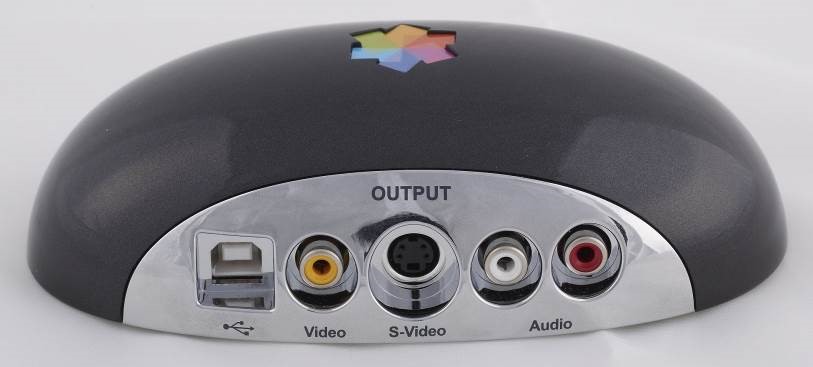
© Government of Canada, Canadian Conservation Institute. CCI 124014-0014
Figure 18. Front (top) and back (bottom) view of the Pinnacle 710-USB.
Converting to MPEG-2 format using the Pinnacle 710-USB
The Pinnacle 710-USB also allows analog video to be digitized into MPEG-2. MPEG-2 is very flexible in terms of quality and is used in creating DVDs and for digital television signals. Like DV, MPEG-2 is a lossy compressed format, meaning that information from the original analog record is being discarded when digitized into this format.
Follow the instructions as outlined above in the Converting to DV format using the Pinnacle 710-USB section with the following exception—under Mode, select MPEG instead of DV. In this case, the file extension of the digital video file will be .mpg. Next, click on the arrow next to Presets in order to bring up a small window. Within this window, select MPEG2 as the compression codec and then maximize the data rate using the slider. For the Pinnacle unit, the maximum data rate is 10 Mb/s. Other compression devices and software may have other maximum data rate settings up to a very high quality of 50 Mb/s and above. The highest data rate possible with the digitization equipment being used is the preferred selection because it will result in better video, but note that it will also take up more storage space than lower data rates.
Monitoring and completing the digitization capture process
In all three conversion scenarios discussed above, the capture process can be monitored on the computer monitor using the viewing screen associated with the capture software. The audio can be monitored by using the audio speakers associated with the computer. At the end of the process, it is recommended that the digital file be viewed in its entirety to ensure that there are no problems with any portion of the final product.
Windows Movie Maker is basic software, but it will allow video clips either from the same VHS tape or from others to be put together into one file. It will not allow editing, such as the removal of unwanted portions after the video file has been created. These portions must be removed by starting and stopping the digitization process, which will create individual files that can then be incorporated into one. Windows Movie Maker does not provide tools for correcting video-related problems (e.g. brightness, contrast). The Pinnacle software provides more flexibility and allows the files to be edited so that unwanted sections can be removed. It also provides a variety of tools such as colour correction, noise reduction and stabilization. Whether such tools should be used or not is a decision to be made by the institution. Some argue that the digitized master should be as close as possible to the original and any corrections or enhancements can be saved as a separate master file and identified as such.
Storage media
There are a variety of options for the storage of the files that are generated by this digitization set-up. These options include DVD-Rs, BD-Rs, hard disk drives, RAID systems, LTO data tapes and flash media, such as SSDs or USB flash drives. CD-Rs cannot be used because their low capacity would only allow very short video segments to be stored. Another factor to consider other than capacity is how much media will be generated by storing these video files. An institution has to decide whether it can physically store and manage a large amount (e.g. a few thousand DVD-Rs or a few hundred BD-Rs) of media as opposed to only a few external HDDs. In addition, the cost is a significant variable in choosing media for storage. Appendix D summarizes the amount of media required and the associated cost for various digitization options. Appendix E summarizes the equipment costs. These appendices can help an institution determine what is manageable and feasible.
A closer look at each of the storage options is presented below:
Optical discs
The advantage of using optical discs for storage is that there is random access to files and therefore no need to fast-forward or rewind in order to locate files. Optical discs are portable and suffer no wear and tear with repeated use because there is no physical contact with the reading or writing device. The major disadvantages are the low transfer speed, meaning it will take a long time to copy or extract files from the discs, and the low storage density, resulting in many discs being required to store a digital video collection of any significant size.
DVD-Rs
A single layer DVD-R can hold 4.7 GB of data. This is the preferred recordable DVD to use instead of the DVD+R or dual layer discs, as indicated in the Digitization Set-up One section. Under ambient temperature and RH conditions, standard DVD-Rs have an approximate lifetime of 10–20 years, whereas gold metal DVD-Rs have a lifetime range of 50–100 years. By following some general guidelines,Footnote 25 recordings with low error rates can be produced, thus ensuring maximum longevity for the discs. Keep in mind that, although lifetime values may be high in some cases, technologies to read the discs may not be available in the future and therefore obsolescence of technologies should always be monitored. DVD-Rs are not a suitable option for storing DV video due to the high storage capacity requirement.
BD-Rs
BD-Rs are available in one layer (25 GB), two layer (50 GB), three layer (100 GB) and four layer (128 GB) versions. The most common disc is the one layer and offers about five times more storage capacity than a single layer DVD-R. There is generally little knowledge available with respect to the stability of Blu-ray discs. However, some recent testingFootnote 26 has indicated that, under accelerated aging conditions, the stability is slightly lower than standard DVD-Rs and significantly lower than the gold metal DVD-Rs. Gold metal BD-Rs are available but testing indicated similar stability to non-gold metal BD-Rs.
The use of BD-Rs is not as widespread as DVD-Rs. Also, this technology is still fairly new and evolving with changes in formulations occurring in order to achieve higher write speeds. It is likely that recording properly to these discs with low error rates may be difficult and, in some cases, the recorded discs may be of poor quality and questionable longevity.
Hard disk drives
Like optical discs, hard disk drives provide random access to data but at faster speeds. The storage density is very high and therefore one hard disk drive can store a significant amount of data (up to 4 TB as of 2014), making it very cost-effective to store digitized video. The general problem with hard disk drives is that they are highly mechanical, and failure of the mechanical parts due to wear or shock results in short lifetimes. The approximate average lifetime of hard disk drives is five years, and sudden and early failures can occur. There is also uncertainty as to the actual lifetime rating of hard disk drives that are not used often and are stored on a shelf. If hard disk drives are chosen as the storage medium, the drives should be checked every year and replaced approximately every five years. Several different types of free software programs are available on the Internet that can monitor hard disk drives for performance and errors (see Appendix C).
There are a number of factors to consider when choosing a hard disk drive. All of the major manufacturers make reliable drives but all have had some that fail. If the drive will be running for many hours at a time, it is important to compensate for the heat produced because heat can damage the drive. A drive in a heavy-duty aluminum case that dissipates heat well is preferable to one in a plastic case that acts like an insulating blanket and keeps the heat in. If the drive is going to be moved frequently, consider an external laptop drive (2.5 inches). Laptop drives tend to be more resistant to damage from shock, since they are designed to be installed in devices that are carried around.
A closer look at various hard disk drive options is presented below:
Internal hard disk drives
Internal hard disk drives reside in the computer case and therefore are tied to the computer and not portable.
External hard disk drives
External hard disk drives are similar to internal hard disk drives except they are more portable and connect to a computer via a USB connection.
RAID systems
RAID is the acronym for Redundant Array of Independent Disks. RAID systems are a series of hard disk drives linked together in order to provide one large compact storage system. They consequently provide more capacity than individual hard disk drives. A major benefit of using a RAID system is that it affords some protection for failure of the individual hard disk drives. RAIDs require software and controllers to make the system function and can be quite expensive depending on the type of RAID system that is implemented. RAID systems require ongoing management and, due to their complexity, more information technology skills are required compared to other storage options. While this technology can be significantly more expensive than the other choices, easier-to-use and inexpensive RAID arrays are becoming available.
A RAID as referred to here is a stand-alone product that has multiple disk drives, a power supply and typically an Ethernet LAN connection. RAID can be built into computers, but the stand-alone array seems to be a better option as it is typically running dedicated storage software. As a stand‑alone product, it is generally referred to as an NAS unit and provides instant access to files. Other types of storage only provide off-line storage.
The two RAID configurations that could be considered are RAID-5 and RAID-6. In the case of RAID-5, the capacity of one disk drive of the set is reserved for redundancy and the array can tolerate the failure of one disk drive without the loss of any data. Once that disk is replaced, the system rebuilds the data on it and full protection is restored. RAID‑6 is similar but can tolerate the failure of two disk drives, with the penalty that the capacity of two disk drives is earmarked for redundancy. A RAID unit should be connected to a dedicated UPS via a data cable so that the unit can be shut down gracefully in the event of an electrical interruption. Another RAID type to consider is RAID-1, where the data is mirrored across two drives. In this case, if one drive fails, the other still exists with the data intact.
LTO data tape
LTO is an often-used technology for storing large amounts of data, making it a viable option for storing digital video. This is a very high capacity format and has some backward compatibility to previous versions. The existing LTO generations and their read and record compatibilities are provided in Table 4. A roadmap indicating the release of future versions is also available,Footnote 27 that allows institutions to plan on when they need to convert their older versions to newer ones. Because of the high capacity, LTOs are very cost effective for storing data. However, there are several drawbacks for using tape for storage. For example, there is slower access speed due to sequential storage of data. In addition, tape is in contact with machine parts when being used, resulting in wear and tear and possible damage. Another disadvantage is the requirement for a recorder drive, which adds much more cost when compared to some of the other storage options. Finally, changeover to a more current format is usually required every five to seven years because of the short tape life and short life of the various LTO generations (Table 4).
| LTO Generation |
Year of Introduction |
Read Ability |
Record Ability |
|---|---|---|---|
| LTO1 |
2000 |
LTO1 |
LTO1 |
| LTO2 |
2003 |
LTO1 LTO2 |
LTO1 LTO2 |
| LTO3 |
2005 |
LTO1 LTO2 LTO3 |
LTO2 LTO3 |
| LTO4 |
2007 |
LTO2 LTO3 LTO4 |
LTO3 LTO4 |
| LTO5 |
2010 |
LTO3 LTO4 LTO5 |
LTO4 LTO5 |
| LTO6 |
2012 |
LTO4 LTO5 LTO6 |
LTO5 LTO6 |
Flash media
Storage using flash media is gaining in popularity. Flash media, such as SSDs or USB stick flash drives, provide random fast access to data files. The media are very rugged and durable and do not contain mechanical moving parts that are prone to failure like those present in hard disk drives. The two main disadvantages of using flash media are:
- the lower capacity relative to hard disk drives and LTO, although capacities are available that are much higher than optical discs
- the cost per gigabyte, which is currently much higher than the other storage options
As time progresses, the capacity of flash media will continue to increase and the cost per gigabyte will continue to decrease and, at some point in the future, flash media will compare more favourably with other types of storage.
There is little data available as to the long-term stability of flash media. Some recent preliminary testingFootnote 28 has indicated very good stability under accelerated temperature and RH conditions, comparable to the highest stability gold metal optical discs. Note that, currently, it is uncertain as to how long this type of media can be stored on the shelf and be readable in the future.
Advantages of Digitization Set-up Two
- fairly simple system
- better quality can generally be obtained than DVD
- AVI files are easily editable
- only basic expertise required to set up the system and perform the work
- flexibility in the selection of player used for the VHS playback
- signal correction allows a better signal to be sent to the digitizing unit
- external (separate from the computer) capture devices have the advantage of not taxing computer functions with processing
- flexibility in the type of computer that can be used, depending on the requirements of the digitization device and software
- digitized video can be stored on different media and in a few different types of file formats
Disadvantages of Digitization Set-up Two
- more equipment required than Digitization Set-up One and therefore higher startup cost
- data compression is used and therefore
- some information (part of the signal) is lost and this lost data can never be restored
- video is more susceptible to visible corruption in case of “bit rot” or damaged data
- degradation of video will occur with poor compression
- decompressing the data with a program other than the one that created or encoded it may yield visible artifacts
- large file sizes for some of the conversion options
- capture devices that are low cost do not produce the best video possible
- flaws present in the original may be enhanced when encoding to MPEG-2 or, in other words, poor quality may be compounded
- editing may be problematic for MPEG-2 unless the interframe setting was selected for compression (note that interframe compression discards duplicate data within a single video frame and is a less efficient compression, resulting in larger files; intraframe compression discards duplicate information across several frames, resulting in smaller files and more efficient encoding, but making the video more difficult to edit)
- fairly powerful computer required to deal with the digitized video being fed to it from the capture device
Digitization Set-up Three: conversion to a digital file with an internal video capture card
The Digitization Set-up Three workflow is provided in Figure 19. This set-up makes use of an internal (within the computer) video capture card and provides the most flexibility in terms of selecting the file format and the quality of digitization. Although the capture card and associated software are set up with default settings, there are a lot more decisions that need to be made in setting up the process. Therefore, this set-up may only be suitable for those with existing knowledge of video digitization.
Despite the many options that are offered by capture cards, the focus will be on digitizing without compression, an option that has not been addressed in Digitization Set-up One or Two. The advantage of not using compression is that all the information from the original analog recording is maintained and future migrations are not likely to produce any artifacts or lead to losses. The drawback of using no compression is that large file sizes are created. This may pose a problem for some institutions in terms of data management. Nevertheless, producing uncompressed video may be the appropriate option in some cases, especially where the video is of high importance or value.
The use of a good capture card is a more expensive option than the other digitization equipment previously discussed.
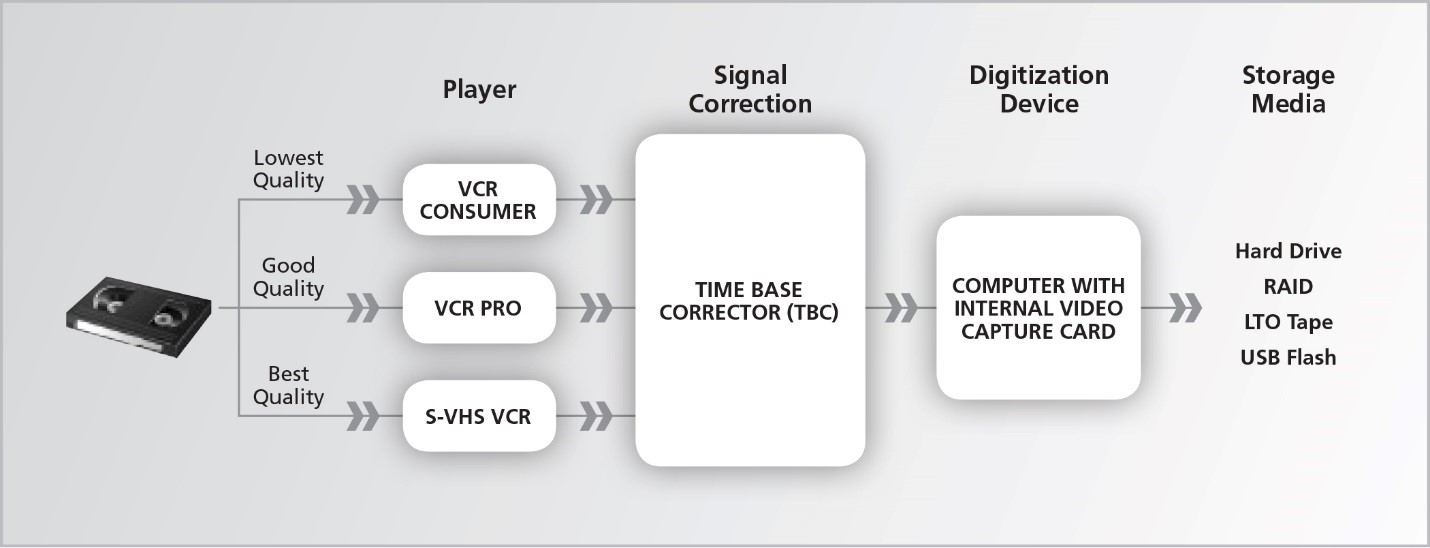
© Government of Canada, Canadian Conservation Institute. CCI 124014-0039
Figure 19. Workflow diagram for Digitization Set-up Three.
Equipment
Player
See Player section under Digitization Set-up Two.
Signal correction
See Signal Correction section under Digitization Set-up Two.
Digitization device
There are a variety of different internal capture cards that can be used. The capture cards are usually specific to one of the television broadcasting standards—NTSC, PAL or SECAM—but some cards may be able to toggle between the different standards. It is important to ensure you have the correct card or are using the correct standard for the type of VHS recording you plan to digitize.
Capture cards range in cost depending on the quality desired and the flexibility that is required. With these cards, analog video can be digitized into many different formats ranging from very low to very high quality. The options are too numerous to be discussed in detail and there is no specific recommendation on the type of card to use (see Internal Video Capture Cards in Appendix C for options). However, for this Technical Bulletin, the Digital Rapids DRC-500 single channel input PCI card for NTSC video will be used to describe the process.
Computer
See Computer section under Digitization Set-up Two. In addition, it is important to ensure that the computer used can accommodate the requirements of the capture card both in terms of base requirements and the actual installation of the card within the computer (i.e. a PCI slot needs to be available on the CPU).
Connections
The following connections are summarized in the diagram shown in Figure 20.
Standard TBCs have both composite and S-video connections available. Therefore, for a standard VCR, connect the Video Out from the VCR to the Input of the TBC using the yellow composite cable. Connect the Audio Out from the VCR to the Input of the TBC using the red and white composite cables. For an S-VHS machine, connect the Video Out from the S-VHS VCR to the Input of the TBC using an S-video cable and connect the Audio Out from the S-VHS VCR to the Input of the TBC using the red and white composite cables. Note that, instead of using the S‑video connection with S-VHS VCRs, there is also the option to use the yellow composite cable for video. However, the S-video cable will provide better quality.
The TBC is then connected to the digitization device which, in this case, is the capture card in the computer. If no TBC is used, then the VCR is connected directly to the capture card in the computer. Different cards provide different inputs and sometimes adapters may be required but, for the capture card used in this case, both composite and S-video connections are available. If the Input to the TBC is with composite cables, the Output of the TBC is connected to the capture card with yellow (video) and red and white (audio) composite cables; if the Input to the TBC is with an S-video cable, the Output is connected to the capture card with an S-video cable (for video) and red and white composite cables (for audio).
The TBC does not process audio but merely passes it through. Therefore, the audio connections may bypass the TBC and connect directly to the video capture card installed in the computer. In fact, some TBCs may not have any audio connections at all.
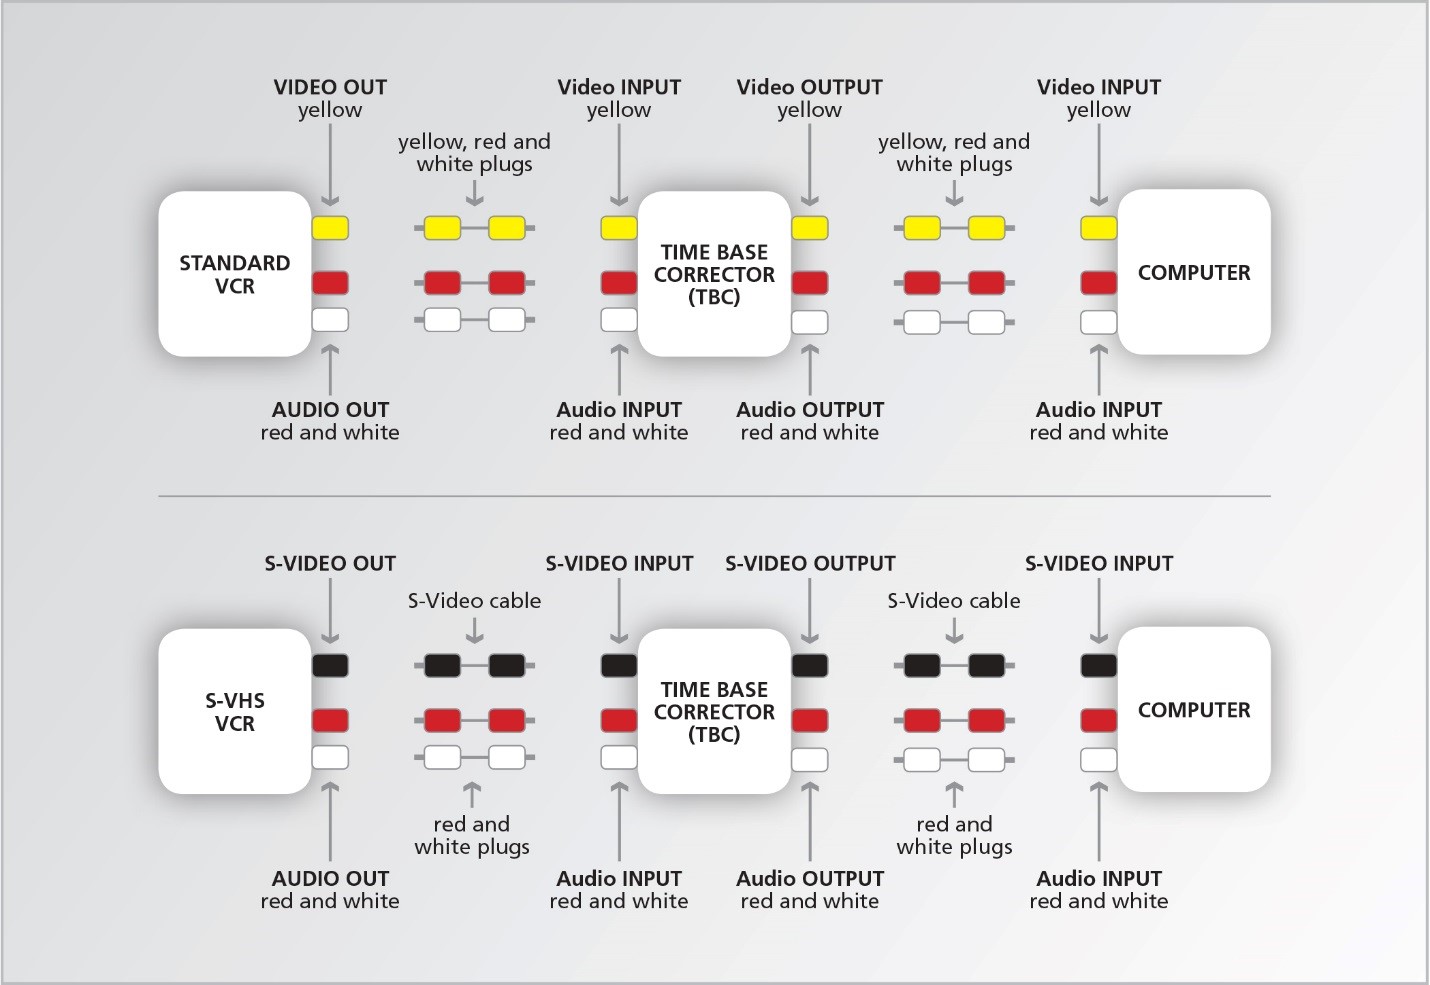
© Government of Canada, Canadian Conservation Institute. CCI 124014-0041
Figure 20. Connection diagrams for Digitization Set-up Three. Note that the audio connections from the VCR or S-VHS VCR can bypass the TBC and connect directly to the capture card in the computer.
Digitization procedure
The equipment is connected as described above under Connections.
The prepared tape, as discussed above under Evaluation of Tape and Cassette Condition and Playing the Tape, is inserted in the VCR or S-VHS unit, and the software associated with the capture card is launched. The VHS recording is played and cued to the spot where the capture is to begin using the capture window associated with the software used to monitor the playback, and then the VCR is stopped.
Note that software associated with different capture cards can vary substantially. It is important to study the manual and utilize manufacturer support in order to become familiar with the various settings that are available. A good understanding of the software and the abilities of the capture card is necessary in order to perform a successful digitization. Described below are basic set-up instructions using the Digital Rapids Stream LE Version 3.6.0.24 software. A newer version of the software may not follow these details exactly, but the steps described will illustrate what is involved when digitizing via this method.
Selecting the digital encoder
This digitization set-up focuses on selecting an encoder with no compression. Therefore, the Directshow AVI option is selected. Next, a pop-up window appears with some decisions to be made.
Media to be encoded
Ensure the option for encoding both Video + Audio is selected.
Video frame size
The default is 720 x 480, that is 720 pixels of horizontal resolution by 480 lines of vertical resolution. Whereas most full frame compressed formats have a vertical resolution of 480 lines, for master uncompressed files, some recommend the use of 486 in order to capture the full active image.Footnote 29 Footnote 30 A full frame of standard definition NTSC video includes the additional six lines of resolution. These lines are dropped in most compression schemes in order to simplify the encoding process. In order to reduce the size of the video file, some also recommend a 640 x 480 resolution.Footnote 10 Footnote 31 For this Technical Bulletin, it is recommended that the 720 x 486 option be selected.
Video compressor
Select Uncompressed Video and then specify the Video Format. The decision to be made is whether to go with 8-bit (256 available levels from black to white) or 10-bit (1024 levels from black to white) formats. Both produce excellent results, but the 10-bit option is better quality (four times the number of steps when compared to 8-bit), and results in an image with finer details and eliminates the appearance of contour or gradient lines. In other words, scenes with soft changes in colour may become harsher and create noticeable bands of colour or steps when 8-bit is used.Footnote 32 Using 10-bit is advocated by many, although several institutions also use 8-bit (see Appendix B). It is debatable whether 10-bit is required for VHS video but some believe that because of VHS’s shortcomings in the area of resolution, luminance and colour range, capturing the finer details becomes more important.Footnote 29 It is believed that capturing at higher quality will ultimately produce a better result if significant manipulation occurs, such as editing of files, and a better result if future compression of the file is necessary. Of course, capturing at 10-bit versus 8-bit produces larger files and, depending on the amount of content to be digitized, this could result in a large increase in the amount of data that needs to be stored. The recommendation is to perform tests to see if the 8-bit option is sufficient for the master digital files that will be created.
In addition, the type of colour encoding needs to be selected. There are several options presented in the drop down box, but the main options to consider are the following coding sequences: YUY2 and UYVY for 8-bit, which are essentially the same, and there is a UYVY 10-bit option as well. The Y represents the luma or luminance (brightness or black-and-white) portion of the image. The chroma (chrominance) or colour portion of the image is represented by U and V. The U is blue with the luma subtracted out whereas the V is red with the luma subtracted out.
All of these options have a chroma format or chroma subsampling of 4:2:2. What this means is that the luma portion of the signal (the “4” of the 4:2:2) is sampled at every pixel, whereas the chroma is sampled at every other pixel. In other words, the colour is sampled at half the rate of the luma. Ideally, a sampling of 4:4:4 would be best; however, this would lead to a much larger data file when compared to 4:2:2.Footnote 33 Fortunately, humans are more sensitive to brightness changes than colour changes and therefore the sampling of the chroma portion of the video signal can be reduced to lower storage requirements without sacrificing quality. Ensure that the sampling is set to 4:2:2 if this has not been automatically done by the video compressor selected above.
Audio compressor
Select the Uncompressed PCM Audio option. PCM refers to pulse-code modulation and is simply a way to digitally represent analog audio signals. This selection can be further defined. The sample rate should be 44.1, 48 or 96 kHz. The number of channels is set to Stereo. The bits per sample can be either 16 or 24. Generally, 48 kHz and 16 bits is sufficient for VHS recordings, although some do recommend 24 bits. Use of a 96 kHz sample rate is generally reserved for high fidelity recordings.
There is a difference in file sizes created by the 8-bit or 10-bit options and what type of digitization is selected for the audio information and these are summarized in Table 5. This may be a factor in determining what options are selected.
| Video Digitization Options |
Audio Digitization Options |
Approximate Size in GB for 1 hour of digitized video |
|---|---|---|
| YUY2 or UYVY 8-bit 720 x 486 |
48 kHz 16-bit |
71 |
| YUY2 or UYVY 8-bit 720 x 486 |
48 kHz 24-bit |
72 |
| YUY2 or UYVY 8-bit 720 x 486 |
96 kHz 24-bit |
73 |
| UYVY 10-bit 720 x 486 |
48 kHz 16-bit |
95 |
| UYVY 10-bit 720 x 486 |
96 kHz 24-bit |
96 |
| UYVY 8-bit 640 x 480 |
48 kHz 16-bit |
62 |
| UYVY 10-bit 640 x 480 |
48 kHz 16-bit |
88 |
Selecting the input
In this section, the Input Source has to be selected from a drop down box and, in this case, it is the DRC-500 capture card. Next, the Source Profile (i.e. the video and audio connections) has to be identified. The options available for the DRC-500 capture card are composite or S-video. Select the one that is being used. Ensure that the setting for Aspect Ratio is 4:3 and for Audio is Unbalanced. Unbalanced audio inputs are present on most domestic audio equipment and employ the composite connections as described above. Balanced audio inputs are found in professional machines and employ a 3-pin connector not usable in this case.
Selecting other options
There are a variety of other options available that can be selected or manipulated. The settings are defaulted to standard specifications and this may be acceptable for the digitization but they can be adjusted as needed. The following options are available with the DRC-500 capture card (note that more or less options may be provided by other types of capture cards):
- adjust audio levels, left and right channels
- adjust audio process—bass, treble, equalization, dynamic range
- adjust video process—cropping, brightness, contrast, saturation, hue, colour gain, gamma, colour balance, filtering and noise reduction
Adjusting these variables may significantly affect the quality of the digitized video and it can be argued whether they should be made at all for the master file. In general, these settings should only be altered by individuals experienced in making adjustments to audio and video signals. Alternatively, experimentation can determine what effects making adjustments have on the final product, but this can be time consuming and the results can vary depending on the source material. There always exists the option for altering the master file and saving this edited version separately.
There are some other variables that need to be properly set before beginning the work. Some of them may be already automatically set by the software/capture card.
Frame rate
This should be at or set to 29.97 or 30 frames per second for NTSC video.
Scanning type
Scanning refers to how the video image is assembled in the frame. There are two types of scanning—interlaced and progressive. For interlaced, the image is divided into two sets of even and odd numbered lines with the odd lines being displayed first and then the even lines filling in gaps afterwards. For progressive scanning, the lines are presented in sequence with no separation between odd and even lines. Progressive scanning produces more clarity and a smoother and more realistic motion. Issues such as motion blurring and combing, characterized by the presence of a series of lines in certain parts of the image resembling the teeth of a hair comb, arise when trying to view interlaced video on progressive scanning monitors. On a regular 4:3 television set, the interlacing issues are not noticeable because the television is designed to deal with these effects. For 16:9 widescreen plasma, liquid-crystal display (LCD) and light-emitting diode (LED) television sets, there is built-in de-interlacing circuitry that allows the interleaved video to be displayed properly on these progressive scanning television sets. For computer monitors, some may produce interlacing effects and some may not. It all depends on the video hardware and software associated with the computer and monitor and whether they have a de-interlacing capacity available.Footnote 34
The original analog VHS video recording is interlaced, and it is recommended that this is maintained when digitizing. Therefore, given the option of selecting interlaced or progressive, it is recommended that Interlaced be selected and not the De-interlacing option.
Output tab
The final step is to name the file and this is done under the Output tab.
Completing the digitization capture process
Once all of the above steps have been completed, click the Start button in the digitization software and play the cued VHS tape. The software contains a viewing option, usually an icon of a monitor that, when clicked, allows you to view the VHS video as it plays whether it is being digitized or not. The audio can be monitored using speakers associated with the computer. Once the content has been digitized, click the Stop button, stop the VCR, and the conversion process is now complete. Options in the software may be available to specify how long to digitize so that the process will automatically stop.
As with the other two digitization set-ups, playing back the created file in its entirety is recommended to ensure that no problems occurred with the process. Spot checking may miss portions that were not properly converted. Capture cards may also have additional features to verify the quality of the digitization. For example, the Stream software discussed above counts the number of Dropped Frames (or frames that contain no visible data) as the video is being converted to digital form, depending on the type of digitization performed. Other types of statistics may also be available from the software to help establish the calibre of the conversion. Certain quality control programs exist that may assist in the evaluation of the digital file produced and perhaps reduce the need to play through the complete digital file. Please see Quality Control Tools for Digital Files in Appendix C for an example of this type of software.
In addition, although the capture card discussed above does not possess a video output option in order to perform live monitoring of the digitized video with a reference monitor, other types of capture cards may provide this ability. This will allow quality control of the digitized content on a display other than the computer monitor, which can be quite limiting. Appendix C lists some video capture card suppliers that provide this feature on their cards.
The ability to edit the digitized video varies depending on the software package. The Stream software does not allow editing once the video has been converted to digital form. However, it does provide the ability to make adjustments either when previewing the video or during the digitization process, as discussed under Selecting other options above.
Storage media
See the Storage media section under Digitization Set-up Two. Note that, because of the large file sizes generated when the no compression option is selected, current capacities of optical discs render them unsuitable. The options for storing these files are limited to hard disk drives—either single separate external drives or as a RAID configuration—LTO data tape and, to a lesser extent, flash media (SSDs or USB stick drives). Although flash does have good capacity, the current high cost makes it a less suitable option for storage of these large files. See Appendix D for a look at costs for storing video files.
Advantages of Digitization Set-up Three
- no compression is used and therefore
- all information from the original analog recording is maintained
- no loss in quality for new uncompressed formats produced in the future from the master file
- master file can be compressed in the future and produce good quality video, whereas compressing an already compressed file will likely lead to artifacts and degraded video
- small amounts of “bit rot” or damaged data will result in no noticeable changes in the video
- AVI is a widely supported and used “container” for the uncompressed file
Disadvantages of Digitization Set-up Three
- large file sizes (>70 GB per hour) may present a challenge for some institutions in terms of managing them and may require the use of upgraded hardware
- although storage costs are falling annually, storing large quantities of very large files might be a financial burden
- internal capture cards required for producing uncompressed digital video are costlier than the digitization devices used in Digitization Set-ups One and Two
- some software may not readily playback certain uncompressed files
- less of a push-button operation because some key variables need to be properly selected prior to beginning the capture process
In order to reduce the amount of storage space required when digitizing uncompressed, a number of lossless formats are being used for digitizing analog video. Lossless formats reduce file size yet do not lose any of the original information as it is mathematically reconstituted in its entirety. The two principal lossless formats currently in use are Motion JPEG 2000Footnote 35 (used by Library and Archives Canada and the Library of Congress) and FFV1Footnote 36 (used by Austrian MediaTek, City of Vancouver Archives and North Carolina State University). Although neither is in widespread use, there is potential that these may become better options than uncompressed in the future because of the up to 70 percent decrease in the amount of storage space required.
For a comparison with what other institutions are doing for high quality digitization like Digitization Set-up Three, please refer to Appendix B.
Backups, Masters, Edited Masters and Access Files
Regardless of the digitization set-up or quality level and the type of storage media used for the digitized video, it is imperative that one or more copies of the master be made for security. The ideal strategy is to follow the 3-2-1 rule: three copies of the content on at least two different types of media and one of the copies should be stored off-site. The off-site copy should be geographically separated as much as possible in case of a catastrophic event. The selection of how many backups are necessary and the type of media the backups should reside on is usually determined by cost and how the media will be stored and managed. At minimum, at least one copy of the master is required.
In addition to the master file (i.e. the digital video generated directly from the original VHS recording without any changes), various other files may be created. For example, some corrections or enhancements may be made to the video and audio signals in the master, including colour correction, contrast or brightness adjustments, noise reduction, etc. A number of editing changes may also take place to produce a final product. All of these changes are very time consuming to perform and therefore it is prudent to save the final product as an edited master file. The original master file should not be altered and should always represent the video captured directly from the original VHS recording. The master and edited master can be used to generate various lower quality versions (distribution, access or use files) that can be used for distribution via the Internet, for previewing content or for promotional purposes. Creation of these files is beneficial for a number of reasons, but especially because it allows the master to be left untouched most of the time. The softwares listed in Appendix C under the heading Video Editing/Capture Software provide numerous options for producing these types of files. Thought should be given to saving copies of these other versions in addition to the masters, especially for those that required a lot of resources to produce.
For Digitization Set-up One, the end result is a video in the form of a DVD disc and not a data file that can be stored on various types of media. Therefore, backups can be made of the DVD using different brands of DVD-R discs. A second option is to save the .VOB file(s) on a different type of media. This is the “container” for the DVD video which exists as MPEG-2. The .VOB file will also contain the audio as well as other details such as subtitles, DVD menus and other content. Although simple .VOB files can be played by a variety of different software players, some players will not recognize them, and this may present readability problems in the future. These files are also difficult to manipulate should it be necessary to do so. Alternatively, extraction software (see Appendix C) is available to allow the DVD files to be extracted and saved into a different type of file that is more universally recognized by other programs. This type of extraction also ensures that all the related .VOB files are copied and the necessary information is maintained and not lost. Once again, this method allows the content to be saved on a medium different than DVD. The quality of the extracted video varies depending on the software being used and testing is therefore required in order to evaluate the results of the extraction.
Metadata and File Naming
As the digital video files are generated, it is important to capture any details that can help with their management now and into the future. Capturing this type of information is important for any digital file created from an analog format, and is also discussed in CCI Technical Bulletin 30 The Digitization of Audiotapes.
The extra information about a digital object is called “metadata”Footnote 37 and various types are designed for different purposes:
- Descriptive metadata provides the traditional cataloguing data essential for the identification and discovery of a recording. It specifies elements such as the subject, its producer and perhaps who appears in the recording so that users may perform searches based on these parameters.
- Administrative metadata covers a range of supplementary information, such as copyright and technical aspects relating to the source format and the digitization chain. These elements contribute to the maintained accessibility of the recording over time.
- Structural metadata can describe the internal structure of a file and can also depict relationships with other objects. This facilitates the logical presentation of related information so that files can be navigated as intended.
Many of the metadata elements contribute to the sustainability of a video file. The term "preservation metadata" is frequently used to encompass those aspects relevant to preservation.
It is often convenient to encode short lengths of metadata into the actual filename. For example, once the file is generated, it can be renamed to something like:
1988-03-01_Interview_with_Aboriginal_Elder_James_Smith.avi
The systematic use of meaningful file names can serve to:
- indicate the contents
- illustrate structural relationships among files
- supply the creation date
- link the file to the original analog item
- specify the intended use (preservation master, access copy, etc.)
- encode the digitization parameters
A filename can be up to about 240 characters, but keeping it to a more manageable length such as 60 characters or less and no more than about 100 characters ensures better readability. Do not use punctuation other than underscores (_), hyphens (-) and round brackets ( ), and do not use spaces. While other punctuation (e.g. @ # $ % & * : ” ’ < > ? /) works most of the time, it can confuse some Linux systems. Use the period (.) only to separate the filename from its extension. Also, use a consistent form for the date to allow for more accurate sorting.
The rest of the metadata should either be embedded in the video files (this is not possible for Digitization Set-up One when a DVD is made) or kept in a separate database or text-finding aid. Whether metadata can be added to the actual video files depends on the programs involved with digitizing or editing the video. Although not always necessary, the benefit of embedding the metadata within the actual file is that the basic data about the recording stays with the single video file, even if the database is corrupted. Appendix C lists some software that allows the addition of metadata to .avi files after they have been created.
As work progresses on a digitization project, additional descriptive data is sometimes discovered. This is often in the form of notes written on the cassette, the storage container or material placed inside. These details should be captured in the best way possible and stored with the digitized video. Unfortunately, the video files themselves cannot generally contain things like image scans of container labels or notes that were present with the cassette. The best strategy is to scan this information and place PDF or TIFF files in the same file system location as the video files, with filenames and folder structures that link this information to the videos. Recommendations for image scanning are beyond the scope of this Technical Bulletin, although, as a starting point, many archives scan to 300 dpi TIFF files.Footnote 38
Some examples on how to organize these “found” objects are presented below. Although these examples are good illustrations as to how file naming may be performed, they may not suit a particular organization. Therefore, any logical system of naming can be used, as long as the names contain a reasonable amount of metadata, sort well and link relevant elements together.
If an image scan or other non-video file is generated, giving it a name that is similar to the video will ensure it sorts together in Windows Explorer. For example, a VHS box with three miscellaneous notes on the box would require three separate scans and create three separate image files that could be labelled as follows:
- 1988-03-01_Interview_with_Aboriginal_Elder_James_Smith_box_scan_01.tif
- 1988-03-01_Interview_with_Aboriginal_Elder_James_Smith_box_scan_02.tif
- 1988-03-01_Interview_with_Aboriginal_Elder_James_Smith_box_scan_03.tif
Now, if there was a two-page letter in the tape box with a known date, the image scans could be filed in the proper location, for example:
- 1933-03-03_Letter_from_Aboriginal_Elder_James_Smith_ to_daughter_scan_p01.tif
- 1933-03-03_Letter_from_Aboriginal_Elder_James_Smith_ to_daughter_scan_p02.tif
However, naming these files in this way would break the link between the letter and the box where it was found. To avoid breaking these links, make text files. The content within the text files is unimportant. They can contain a brief description of the relationship between the items or not. For the sake of completeness, put something in the file and do not leave it empty (i.e. with 0‑bytes). Make two copies and name them as follows:
- 1933-03-03_Letter_from_Aboriginal_Elder_James_Smith_NOTE_see_interview_1988-03-01.txt
- 1988-03-01_Interview_with_Aboriginal_Elder_James_Smith _NOTE_see_letter_1933-03-03.txt
These files then sort with the related content and flag the existence of the other content or can be placed in year/decade folders within the file system. The system includes tools for searching for any specific string in the name. The text files used for cross references could contain additional annotation of any reasonable length.
Using a scheme such as this, it is possible to arrange data so that it will be easily found and grouped together. It is also useful to include an introductory file (usually a PDF) that includes a description and history of the collection digitized. Do not assume anyone finding these files will know anything about the content or place in history.
For additional guidance on file naming, the North Carolina Department of Cultural Resources’ Best Practices for File-NamingFootnote 39 contains useful conventions to follow.
Care of Tapes – Storage and Handling Requirements
Storage and handling recommendations for magnetic tape are outlined in ISO standards 18923:2000 and 18933:2012.Footnote 12 Footnote 21 These documents should be examined and followed as closely as possible to ensure magnetic tapes in storage and in use remain in good condition. Some brief and less detailed information is provided below.
In general, storage should be at a temperature set point between 8 and 23°C and an RH between 15 and 50%, without large fluctuations. Tapes stored at the upper end of these conditions, with the RH as high as 50% and the temperature as high as 23°C, are said to be stored under medium term conditions, meaning they will have a minimum lifetime of 10 years. Tapes stored at the lower end of these ranges will have greater longevity than those at the upper end. This increase in longevity is explained in Annex D of ISO 18923:2000, Imaging Materials — Polyester-base Magnetic Tape — Storage PracticesFootnote 40 :
Degradation of magnetic tape is caused by chemical reactions, whose rates are lowered with decreasing temperature and decreasing relative humidity […]. Consequently, the useful life of tape (x years) can be increased by lowering the storage temperature and/or storage humidity. Moreover, a lower storage temperature can compensate for a higher humidity to obtain the same life expectancy.
The inverse relationship between temperature and RH permits different combinations to be acceptable for extended-term storage and aims at providing a minimum lifetime of 50 years. The following three temperature/RH combinations provide suitable extended-term conditions and, in all cases, there should be minimal fluctuation in temperature and RH:
- temperature set point between 8 and 11°C / RH set point between 15 and 50%
- temperature set point between 8 and 17°C / RH set point between 15 and 30%
- temperature set point between 8 and 23°C / RH set point between 15 and 20%
Tapes being kept at a temperature set point between 8 and 11°C and RH set point between 15 and 20% will result in a longevity value much longer than the 50 years afforded by the three options outlined above. Although some research has shown that VHS tapes can be kept lower than 0°C without any damage,Footnote 41 in light of the lifetime values afforded by the standard conditions, there is no need to do so with this material. Note that storing materials at cooler conditions than the use environment can lead to moisture condensation problems, as indicated in the Playing the Tape section of this Technical Bulletin.
The other major rules for storing and handling videotapes include:
- keep tapes clean, which is best achieved by using the recordings in a clean environment that includes no eating or drinking in the use or storage areas, making sure the playback equipment is clean, and keeping tapes in their storage containers when not in use
- keep storage areas clean and debris-free as best as possible, for example, by avoiding the use of carpeting in these areas, using a sticky mat outside of the entrance, filtering incoming air so as to remove particulates, and by performing regular floor cleaning with dust retention mops or vacuums that will not exhaust debris into the air such as those with a HEPA filter
- keep materials off of the floor and on shelving that provides ample air circulation around the media
- do not touch the surface of tapes unless wearing lintless cotton gloves to prevent skin debris and oil contamination
- ideally, use inert solid plastic storage containers that snap shut and provide hub support; paper box containers are acceptable for use as long as they are in good condition, keeping in mind that they provide less protection than plastic containers; poor condition boxes will shed debris onto the tapes and should be replaced; capture any information on the container before discarding it
- vertically orient VHS cassettes on the shelves with the full spool down in order to prevent edge damage and other physical issues
- do not abuse cassettes and definitely do not drop them because they are precision devices and will not perform well when damaged
- break out write-protect tabs on cassettes if this has not already been done to prevent accidentally erasing the content
- do not rewind a tape to the beginning after playing it as this will cause the formation of popped strands and lead to deformation if the tape is maintained this way for an extended period of time
More details on handling can be found in ISO 18933:2012, Imaging Materials — Magnetic Tape — Care and Handling Practices for Extended Usage.Footnote 12
Representative examples of tapes in storage should be inspected regularly for signs of deterioration, damage or contamination. The inspection intervals should be performed every five years, according to ISO 18923:2000,Footnote 21 if storage conditions have been adequate. Inspections should be more frequent if the conditions have been substandard but can be extended to 10 years or more if they have been excellent.
Retention of Originals
The general rule followed by most is that the originals should always be retained. This is especially true if the digitization process is being carried out by volunteers or less-experienced technicians. Mistakes happen, and it is always good to be able to go back to the original if desired or necessary. Somewhere down the road a professional restorer might be able to obtain a better transfer of a particularly important segment than the volunteer who perhaps used less‑well‑adjusted equipment to obtain it during the mass digitization project. At minimum, the originals should not be thrown out immediately after the digital conversion and should be kept for a few years longer in order to verify that the process has been properly executed and the transition to maintenance of the digital files has been successful.
Storage conditions for the originals should follow the guidelines above, with the cooler and drier end of the recommended ranges being optimal. Even though the originals will continue to degrade over time, it is relatively inexpensive to retain them in reasonable conditions until they reach the point where they can no longer be played.
Technology Watch
Even after the analog VHS recordings have been converted to digital, saved in a data file and stored on some sort of media, the preservation task is not complete. Digital technologies change frequently, so it is essential to keep an eye on these advances. This is not difficult or expensive, as there are many technology-related Internet resources that provide this information. Once signs appear that the storage technology and/or associated software to read the media or file are becoming obsolete, migration to a new technology is imperative. Both the technology watch and future migration of the data are important elements in a preservation plan, and some thought and resources need to be put aside for these tasks. Failure to act when necessary to do so will result in the media and associated video files becoming unreadable in the future.
Appendix A: Problems That May Be Encountered When Playing Back VHS Tapes and Possible Remedies
Some of the following artifacts, or problems, can be reduced or eliminated with post-processing software if they are not dealt with prior to digitizing the video.
Dot Crawl
In composite video, the chroma (colour) and brightness (luma) data are carried via the same channel and occasionally one signal can be interpreted as the other.
Appearance
- a moving line of dots usually more evident on horizontal borders of objects with high levels of saturation
Remedy
- using a TBC with an integrated comb filter
- using S-video or component output for the video (if available) instead of the composite video output
Dropout
A dropout or brief loss of RF, or in other words video signal, occurs when a tape is not in close contact with the read heads of the playback equipment due to the presence of dust, dirt, fingerprints, other debris or physical damage, such as wrinkles. Losses of magnetic material due to binder degradation or scratches can also lead to dropouts since the information in the affected areas has been lost.
Appearance
- flash in video
- brief appearance of white or black streaks, lines or spots
- brief loss in audio signal
Remedy
- repairing loss of magnetic oxide is not possible and dropouts are permanent
- tape cleaning will reduce or eliminate dropouts caused by debris
- smoothing out of tape wrinkles can help reduce dropouts as well
Head Switching Noise
Heads are turned on when in contact with the tape and then turned off as they rotate off of it. This prevents significant noise in the image. Head switching noise is the result of the interval between the off and on switching of the playback heads of the VCR.
Appearance
- a distortion that appears at the bottom of the image
Remedy
- no remedy as this is part of the video signal
Low RF
Low RF is a low or poor quality signal coming off of the tape on playback. The causes can be dirty read heads (see Video Head Clog below) or read heads of the equipment not aligned properly with the recorded tracks on the tape (see Tracking Error below), poor tape quality or a recording that was poor to begin with.
Appearance
- no image present or very poor quality image
Remedy
- no remedy for a recording that was initially poor or for one where signal loss is due to poor quality tape
Skew Error
A skew error effect is caused by the stretching or shrinking of the tape that occurs over time.
Appearance
- a slanting or hooking of the top portion of the image
- a slanting to the left side indicates that the recorded video track on the tape is longer than the playback track length of the VCR
- a slanting to the right means the recorded video track on the tape is shorter than the playback length of the VCR
Remedy
- using a TBC may eliminate the skew error
- adjusting the VCR, such as tape tension or alignment, usually only performed by service technicians
Stiction
Stiction is the sticking of the tape in the tape path, preventing it from running smoothly. This affects both the audio and video signals on playback. If stiction is present, it may be due to tape contamination or hydrolysis degradation of the binder (“sticky shed syndrome”).
Appearance
- audible audio glitches and skewing of the image
Remedy
- cleaning of the tape and tape path of the VCR if debris is the issue
- treating the tape for binder hydrolysis if this is the cause of the stiction
Time Base Error
Timing is critical in order to obtain a good result when playing back video signals. At times, when playing back tapes on a machine different than what recorded them, there may be slight differences in timing due to motor speeds driving the tape through the path or perhaps the speed of rotation of the video heads. These timing differences can affect the image. In addition, the stretching, shrinking or distortion of tape caused by aging, tension in the machine or temperature and RH conditions can cause time base errors as well.
Appearance
- distortion of image, usually with the appearance of wavy lines
Remedy
- using a TBC
Tracking Error
A tracking error occurs when the read heads cannot properly follow the recorded tracks on the tape. This can be the situation when tapes are played back on a different machine than what recorded them. A problem with the cassette may also lead to improper tracking.
Appearance
- groups of horizontal noise lines that obscure a part of the image and may be vertically rolling
- when tracking is completely off, all that is visible is “snow”
Remedy
- optimizing the tracking, which is automatically performed by some VCRs
- manually adjusting the tracking to make the lines disappear by pushing the tracking button up or down on the remote or VCR until the lines disappear and the image is clear
- if tracking cannot be corrected, playing the cassette in another VCR can solve the problem; if the tracking issue is still present, there could be an issue with the tape, such as curvature, or the cassette shell, in which case the tape will have to be transferred to a new one
- if no other machine is available, aligning the tape path will have to be performed to match the recorded tracks
- Note: realigning the path may cause issues for other tapes since the problem may only be with one cassette
Video Head Clog
A video head clog is caused by the build-up of magnetic oxide debris on the read heads of the VCR, causing a separation between the tape and read heads.
Appearance
- partial loss of the image due to noise in moderate cases or complete loss of signal with more severe build up on the heads
Remedy
- cleaning the heads of the machine with a cleaning cassette
- manually cleaning the heads with a lint-free swab and suitable solvent
- Note: follow manufacturer’s recommendations for cleaning or have the machine serviced by a professional
Additional information on the problems above as well as on video artifacts with illustrated examples can be found in the following resources:
- A/V Artifact Atlas. What’s Wrong With This Picture? [online] [viewed October 8, 2015]. Available from: http://avaa.bavc.org/artifactatlas/index.php/A/V_Artifact_Atlas (This content is not available anymore.)
- Gfeller, J., A. Jarczyk and J. Phillips. Compendium of Image Errors in Analogue Video. Zürich, Switzerland: Scheidegger & Spiess, 2013.
Appendix B: Specifications for Digitizing Standard Definition Analog Video and Recommendations for Producing Digital Preservation Masters
The following specifications have been gathered from various heritage and archival institutions that have digitized videotape collections. They are useful as guides for developing your own project and for determining the level of quality for the digitized files.
National Archives and Records Administration
The following specifications are used by the National Archives and Records Administration in the United States to ensure that all significant video and audio information is captured when digitizing standard definition preservation analog masters:
- File wrapper/container: AVI (.avi)
- Frame size: 720 x 486
- Video codec: uncompressed
- Video frame rate: 29.97 f/s (feet per second)
- Colour encoding: YUY2
- Chroma format: 4:2:2
- Interlaced scan
- Audio: PCM, 48 kHz, 24-bit
Specifications taken from:
National Archives and Records Administration (NARA). Video Maximum Manual Capture - SD [VID-P1] [online]. College Park, MD: NARA, n.d. [viewed October 8, 2015]. Available from: www.archives.gov/preservation/products/products/vid-p1.html
Stanford University Libraries
The following specifications are used by the Stanford University Libraries to digitize a preservation master file from an analog source:
- File wrapper/container: QuickTime (.mov)
- Frame size: 720 x 486
- Video codec: uncompressed (10-bit)
- Video frame rate: 29.97 f/s
- Video bitrate: 27 MB/s fixed
- Chroma format: 4:2:2
- Audio: PCM, 48 kHz, 16-bit or 24-bit
They also used the following specifications to produce a quality access file:
- File format: MPEG-2
- Frame size: 720 x 480
- Video codec: 8-bit
- Video frame rate: 29.97 f/s
- Video bitrate: 27 Mb/s fixed
- Chroma format: 4:2:0
- Audio: MPEG-1 Layer 2, 384 kb/s, 48 kHz
Specifications taken from:
Stanford University Libraries. Moving Image Digitization Services at SMPL [online]. Stanford, CA: Stanford University, n.d. [viewed January 31, 2017]. Available from: https://library.stanford.edu/research/digitization-services/labs/stanford-media-preservation-lab/capture-specs
Rutgers Community Repository
The following specifications are recommended by the Rutgers Community Repository as the minimum for ensuring that a good preservation digital master of an analog standard definition video is produced:
- File wrapper/container: AVI (.avi)
- Frame size: 640 x 480 (assuming square pixels)
- Video codec: uncompressed
- Video frame rate: 29.97 f/s
- Video bitrate: 30 MB/s
- Chroma format: 4:2:2
Specifications taken from:
Rutgers Community Repository (RUCore). Recommended Minimum Standards for Preservation Sampling of Moving Image Objects, Draft Revision 3 [online]. New Brunswick, NJ: RUCore, 2007 [viewed October 8, 2015]. Available from: http://rucore.libraries.rutgers.edu/collab/ref/dos_avwg_video_obj_standard.pdf [PDF version]
Consortium of Academic and Research Libraries in Illinois (CARLI) Digital Collections Users’ Group Standards Subcommittee
The following specifications are recommended by the CARLI Digital Collections Users’ Group Standards Subcommittee as the best practice for digitizing analog video in order to create high-quality archival masters:
- File wrapper/container: MXF (.mxf)
- Frame size: 640 x 480
- Video codec: Uncompressed YcbCR (10-bit) or JPEG 2000 lossless encoding
- Chroma format: 4:4:4
- Progressive scan
- Video bitrate: 30 MB/s
The following specifications have been included as an acceptable practice but not ideal. They may be used under certain circumstances such as if there is insufficient storage space for the digitized video or if the material has less value or historical significance:
- File wrapper/container: AVI (.avi) or QuickTime (.mov)
- Frame size: 640 x 480
- Video codec: MPEG-4 AVC (H.264) or DV encoding
- Chroma format: 4:2:2 (10-bit)
- Progressive scan
- Video bitrate: 30 MB/s
Specifications taken from:
CARLI Digital Collections Users’ Group Standards Subcommittee. Guidelines for the Creation of Digital Collections: Digitization Best Practices for Moving Images [online]. Champaign, IL: CARLI, revised 2014 [viewed October 8, 2015]. Available from: www.carli.illinois.edu/sites/files/digital_collections/documentation/guidelines_for_video.pdf [PDF version]
City of Vancouver Archives
The following specifications are used by the City of Vancouver Archives for the production of digital preservation masters:
- File Wrapper/container: Matroska version 2 (.mkv)
- Video Codec: FFv1 (lossless)
- Frame Size: 720 x 486
- Colour encoding: YUV
- Chroma format: 4:2:2
- Bit Depth: 8 (yuv422p)
Specifications taken from:
McLellan, C. BC to KY and Back Again: Crossing Borders to Discover New Processes for Digital A/V [online]. PowerPoint Presentation. Beyond Borders: Annual Meeting of the SAA (Society of American Archivists), San Diego, CA. August 11, 2012 [viewed October 8, 2015]. Available from: http://files.archivists.org/conference/sandiego2012/607-McLellanC.ppt [PowerPoint version]
US Library of Congress
The following specifications were developed for the US Library of Congress Office of Strategic Initiatives for the reformatting of paper documents, still photographs, and audiovisual materials. These specifications are for capturing video at the highest quality possible with the goal of eventual migration to lossless JPEG 2000 with a MXF wrapper at some point in the future:
- File wrapper/container: AVI (.avi) or QuickTime (.mov)
- Frame size: 720 x 486
- Video codec: uncompressed (10-bit)
- Video frame rate: 29.97 f/s
- Colour encoding: YcbCr
- Chroma format: 4:2:2
- Interlaced/Progressive: as per original video
- Audio: PCM, 48 kHz, 24-bit
Specifications taken from:
Blood, G. Refining Conversion Contract Specifications: Determining Suitable Digital Video Formats for Medium-term Storage [online]. N.p.: n.p., 2011 [viewed October 8, 2015]. Available from:www.digitizationguidelines.gov/audio-visual/documents/IntrmMastVidFormatRecs_20111001.pdf [PDF version]
Appendix C: Suppliers
Note: The following is provided only to assist the reader. Inclusion of a company in this list does not in any way imply endorsement by CCI. Other companies may exist that offer similar products.
All websites viewed October 8, 2015.
AMIA Supplier Directory: A Global Directory of Services and Suppliers of Audiovisual Media
amianet.org/resources/global-supplier-directory/
This resource provides a list of companies that can provide consulting, digital archive storage and management services, education programs, hardware sales and service, media asset management sales and services, physical archival storage and management services, reformatting and restoration services, software sales and services, and supplies and equipment.
Computers, power conditioners, cables, video editing software, media
NAS units
Buffalo TeraStation
www.buffalotech.com
Drobo
www.drobo.com
Netgear ReadyNAS
www.netgear.com
Superior Computers
http://www.superiorcomputers.ca
Thecus N5200PRO
www.thecus.com
VCRs
New units are no longer sold and only used ones can be found. Alternatively, VCR/DVD or VCR/DVD-R combination units can be used.
VCR/DVD-R Combination Units
Funai
www.funaiamerica.com
Hammacher Schlemmer
www.hammacher.com
Magnavox
www.magnavox.com
Toshiba
www.toshiba.ca
DVD-R/HDD Combination Unit
Panasonic HDD/DVD Recorder
Available online at B&H
www.bhphotovideo.com
External Video Capture Devices
Grass Valley ADVC110 (referred to in Digitization Set-up Two)
www.grassvalley.com
Hauppauge USB-Live2
www.hauppauge.com
Honestech VHStoDVD
vidbox.company/
Pinnacle Dazzle DVD Recorder HD
www.pinnaclesys.com
Note that the Pinnacle 710-USB (referred to in Digitization Set-up Two) is no longer being sold new.
StarTech USB S-Video and Composite Video Capture Device Cable with Audio
http://ca.startech.com
Internal Video Capture Cards
AJA Video Systems
www.aja.com
Blackmagic Design
www.blackmagicdesign.com/ca
Digital Rapids DRC-500 (referred to in Digitization Set-up Three)
Matrox
www.matrox.com
VHS Tape Cleaning Equipment
TapeChek from Research Technology International
Oracle and Front Porch Digital
http://www.oracle.com/us/corporate/acquisitions/frontporchdigital/index.html
Waveform Monitor and Vectorscope Software
Adobe
https://helpx.adobe.com/premiere-pro/using/using-waveform-monitors-vectorscope.html
MultiscopeLite
www.homedvd.ca
Toolfarm
www.toolfarm.com/blog/entry/plug_in_qa_waveform_monitor_vectorscope_for_after_effects
Waveform Monitor and Vectorscope Hardware
TBC (moderately priced)
AV Tool AVT-8710
www.avtoolbox.com
Burst Electronics Pixie-FS
www.burstelectronics.com
Ensemble Designs BrightEye 5
www.ensembledesigns.com
Kramer FC-400
www.kramercanada.ca
tvONE 1T-TBC
www.tvone.com
Video Editing/Capture Software
The internal capture cards and external capture devices listed in this appendix may come with editing software. If not, there is a wide variety of software in various price ranges that can be purchased. Some examples are provided below.
Adobe Premiere Pro
www.adobe.com
Apple Final Cut Pro
www.apple.com
Avid Media Composer
www.avid.com
Corel VideoStudio Pro
www.corel.com
Cyberlink PowerDirector
www.cyberlink.com
Magix Movie Edit Pro
www.magix.com
Microsoft Windows Movie Maker
http://windows.microsoft.com/en-ca/windows-live/movie-maker
Pinnacle Studio
www.pinnaclesys.com
Sony Vegas Pro
www.sonycreativesoftware.com
DVD File Extraction Software
Cinematize
www.miraizon.com
DVDFab
www.dvdfab.cn
Handbrake
http://handbrake.fr/
MPEG Streamclip
www.squared5.com
Software to Add Metadata to AVI Files
Note that these programs may not allow the metadata to be searchable.
ABCAVI Tag Editor
http://download.cnet.com/abcAVI-Tag-Editor/3000-2169_4-10411621.html
AVI MetaEdit
https://github.com/usnationalarchives/AVI-MetaEdit
Metadata Touch
http://download.cnet.com/MetadataTouch/3000-10743_4-10965846.html
Quality Control Tools for Digital Files
Bay Area Video Coalition QC Tools
https://bavc.org/preserve-media/preservation-tools
Media Testing Software
CD/DVD/Blu-ray
Opti Drive Control
www.cdspeed2000.com
Flash
Flash Drive Tester v1.14
www.vconsole.com/client/?page=page&id=13
Hard Disk Drives
Data Lifeguard Diagnostic
http://support.wd.com
HGST Windows Drive Fitness Test
www.hgst.com
Seatools
www.seagate.com
Empty VHS Cassette Shells
Tape Center
www.tapecenter.com
Storage Containers for VHS Cassettes
Brodart
www.brodart.ca
Carr McLean
www.carrmclean.ca
Delta Media
www.deltamedia.com
Hollinger Metal Edge
www.hollingermetaledge.com
Tape Stock Online / Polyline Corp
www.polylinecorp.com
Tape Splicing Equipment and Supplies
Accel Materials
www.accelmaterials.com/splicingtapes.htm
Tape Center
www.tapecenter.com
VHS Digitization or Transfer
There are many commercial vendors that provide this service. An Internet search with the terms “VHS” or “video” combined with “digitization,” “conversion” or “transfer” should yield plenty of options. Note that many companies only offer a basic service of VHS to DVD conversion. It is best to discuss the factors mentioned in the Outsourcing the Digitization section of this Technical Bulletin in order to ensure that the service and quality of service being sought after is achieved.
VCR Repair
The first step in repair is to consult with the manufacturer, who should be able to provide a list of local repair shops. Alternatively, there are many repair shops that can be found via an Internet search. In some cases, it may be more feasible to buy a new VCR/DVD combo unit (new VCR‑only machines are no longer being manufactured) or to find a working used machine rather than to repair an older unit.
Appendix D: Approximate Capacity (TB) Required for Various Hours of Digitized Video and Cost of Media for Storage
Note that included in the prices below are the following costs for the equipment to record the media:
- $50 for a DVD recorder
- $100 for a Blu-ray recorder
- $2500 for an LTO tape recorder
For all other media types, the media are also the recorder (e.g. external hard disk drive, RAID, USB flash drive) and there is no equipment cost in addition to the media cost.
Keep in mind that at least two master copies are required and ideally three. This will increase the cost by an amount depending on what media are selected for the copies and how many are produced. Labour costs are not included in the figures, but generally about three hours of labour are required for each hour of video to be digitized.
Costs are in Canadian dollars and are based on 2014 prices.
| Capacity Required & Storage Media Options for Each Digitization |
1 |
100 |
500 |
1000 |
2000 |
5000 |
10000 |
|---|---|---|---|---|---|---|---|
| Digitization Set-up One: DVD |
|||||||
| Capacity Required |
0.00459 |
0.459 |
2.29 |
4.59 |
9.18 |
22.95 |
45.90 |
| Amount of DVD-Rs (4.7 GB or |
1 |
100 |
500 |
1000 |
2000 |
5000 |
10000 |
| Cost for Regular |
$50.40 $52.70 |
$90 $320 |
$250 $1400 |
$450 $2750 |
$850 $5450 |
$2050 $13550 |
$4050 $27050 |
| Capacity Required & Storage Media Options for Each Digitization |
1 |
100 Hours |
500 |
1000 |
2000 |
5000 |
10000 |
|---|---|---|---|---|---|---|---|
| Digitization Set-up Two: MPEG2 10Mb/s |
|||||||
| Approximate Capacity Required |
0.00258 |
0.258 |
1.29 |
2.58 |
5.16 |
12.9 |
25.8 |
| Amount of DVD-Rs |
1 |
57 |
282 |
563 |
1125 |
2811 |
5621 |
| Cost for Regular |
$50.40 |
$83 |
$163 |
$275 |
$500 |
$1174 |
$2298 |
| Amount of BD-Rs |
1 |
11 |
53 |
106 |
212 |
529 |
1058 |
| Cost for BD-Rs |
$101.25 |
$114 |
$166 |
$232 |
$365 |
$761 |
$1422 |
| Amount of External Hard Disk Drives |
1 |
1 |
1 |
1 |
2 |
4 |
7 |
| Cost for Hard Drives |
$200 |
$200 |
$200 |
$200 |
$400 |
$800 |
$1400 |
| Amount of RAIDs – Low Cost (15 TB) |
1 |
1 |
1 |
1 |
1 |
1 |
2 |
| Cost for RAIDs |
$1500 |
$1500 |
$1500 |
$1500 |
$1500 |
$1500 |
$3000 |
| Amount of LTO Tapes (1.5 TB) |
1 |
1 |
1 |
2 |
4 |
9 |
18 |
| Cost for LTO Tapes |
$2550 |
$2550 |
$2550 |
$2600 |
$2700 |
$2950 |
$3400 |
| Amount of USB Flash Drives |
1 |
3 |
11 |
21 |
42 |
104 |
207 |
| Cost for Flash Drives |
$250 |
$750 |
$2750 |
$5250 |
$10500 |
$26000 |
$51750 |
| Digitization Set-up Two: DV |
|||||||
| Approximate Capacity Required |
0.0125 |
1.25 |
6.25 |
12.5 |
25.0 |
62.5 |
125 |
| Amount of BD-Rs |
1 |
52 |
257 |
513 |
1025 |
2562 |
5123 |
| Cost for BD-Rs |
$101.25 |
$165 |
$421 |
$741 |
$1381 |
$3303 |
$6504 |
| Amount of External Hard Disk Drives |
1 |
1 |
2 |
4 |
7 |
16 |
32 |
| Cost for Hard Drives |
$200 |
$200 |
$400 |
$800 |
$1400 |
$3200 |
$6400 |
| Amount of RAIDs – Low Cost (15 TB) |
1 |
1 |
1 |
1 |
2 |
5 |
9 |
| Cost for RAIDs |
$1500 |
$1500 |
$1500 |
$1500 |
$3000 |
$7500 |
$13500 |
| Amount of LTO Tapes (1.5 TB) |
1 |
1 |
5 |
9 |
17 |
42 |
84 |
| Cost for LTO Tapes |
$2550 |
$2550 |
$2750 |
$2950 |
$3350 |
$4600 |
$6700 |
| Amount of USB Flash Drives |
1 |
10 |
50 |
100 |
200 |
500 |
1000 |
| Cost for Flash Drives |
$250 |
$2500 |
$12500 |
$25000 |
$50000 |
$125000 |
$250000 |
| Capacity Required & Storage Media Options for Each Digitization |
1 |
100 |
500 |
1000 |
2000 |
5000 |
10000 |
|---|---|---|---|---|---|---|---|
| Digitization Set-up Three: Uncompressed 8-bit UYVY or 8-bit YUY2 |
|||||||
| Approximate Capacity Required |
0.071 |
7.1 |
36 |
71 |
142 |
355 |
710 |
| Amount of External Hard Disk Drives |
1 |
2 |
9 |
18 |
36 |
89 |
178 |
| Cost for Hard Drives |
$200 |
$400 |
$1800 |
$3600 |
$7200 |
$17800 |
$35600 |
| Amount of RAIDs – Low Cost (15 TB) |
1 |
1 |
3 |
5 |
10 |
24 |
48 |
| Cost for RAIDs |
$1500 |
$1500 |
$4500 |
$7500 |
$15000 |
$36000 |
$72000 |
| Amount of LTO Tapes (1.5 TB) |
1 |
5 |
24 |
48 |
95 |
237 |
474 |
| Cost for LTO Tapes |
$2550 |
$2750 |
$3700 |
$4900 |
$7250 |
$14350 |
$26200 |
| Amount of USB Flash Drives |
1 |
57 |
288 |
568 |
1136 |
2840 |
5680 |
| Cost for Flash Drives |
$250 |
$14250 |
$72000 |
$142000 |
$284000 |
$710000 |
$1420000 |
| Digitization Set-up Three: Uncompressed 10-bit UYVY |
|||||||
| Approximate Capacity Required |
0.095 |
9.5 |
48 |
95 |
190 |
475 |
950 |
| Amount of External Hard Disk Drives |
1 |
3 |
12 |
24 |
48 |
119 |
238 |
| Cost for Hard Drives |
$200 |
$600 |
$2400 |
$4800 |
$9600 |
$23800 |
$47600 |
| Amount of RAIDs – Low Cost (15 TB) |
1 |
1 |
4 |
7 |
13 |
32 |
64 |
| Cost for RAIDs |
$1500 |
$1500 |
$6000 |
$10500 |
$19500 |
$48000 |
$96000 |
| Amount of LTO Tapes (1.5 TB) |
1 |
7 |
32 |
64 |
127 |
317 |
634 |
| Cost for LTO Tapes |
$2550 |
$2850 |
$4100 |
$5700 |
$8850 |
$18350 |
$34200 |
| Amount of USB Flash Drives |
1 |
76 |
384 |
760 |
1520 |
3800 |
7600 |
| Cost for Flash Drives |
$250 |
$19000 |
$96000 |
$190000 |
$380000 |
$950000 |
$1900000 |
Notes:
- Careful consideration should be given to the use of DVD-R gold discs. Although more stable than regular DVD-Rs, the high cost makes them an expensive option.
- USB flash drives and flash media in general are not a cost-effective option for storing video files as of 2014. Costs need to drop dramatically for this type of media to be a viable option.
- LTO is not a cost-effective option for lower quality level digitization (Digitization Set-up Two). However, when many hours (greater than 2000 hours) of high quality digitization need to be stored, such as those in Digitization Set-up Three, then LTO becomes the least costly choice.
- Use of low cost/low capacity RAIDs are not viable when many hours of high quality video (Digitization Set-up Two using DV, and Digitization Set-Up Three) need to be stored. Not only is this option not cost effective, but impractical because many individual RAID units would be required. A better alternative would be to have less RAID systems of much higher capacity. Costs of such units can vary substantially but are generally high.
Appendix E: Equipment Costs for Each Digitization Set-up
Costs are in Canadian dollars and are based on 2014 prices.
Digitization Set-up One
| Equipment |
Cost |
|---|---|
| VCR/DVD-R unit |
$250 |
| Monitor or Television |
$250 |
Digitization Set-up Two
| Equipment/Software |
Cost |
|---|---|
| VCR |
$150 |
| TBC |
$500 |
| Capture Device for DV only – Canopus ADVC110 |
$300 |
| Computer (monitor, keyboard, mouse, Firewire card) |
$2000 |
| External DVD recorder |
$50 |
| Windows Movie Maker software |
$0 |
| Editing software |
$300 to $1000 |
Digitization Set-up Three
| Equipment/Software |
Cost |
|---|---|
| VCR |
$150 |
| TBC |
$500 |
| Digital Rapids DRC-500 single channel input PCI card |
$1100 |
| Computer (monitor, keyboard, mouse, Firewire card) |
$2000 |
| LTO tape recorder |
$2500 |
| Editing software |
$300 to $1000 |
Note:
- Additional costs not included in the figures above are maintenance of the equipment and training to operate the equipment.
Outsourcing the digitization
Costs for outsourcing digitization of videotapes can vary considerably depending on the storage options selected (DVD or video files on a hard disk drive) and whether the conversion is direct or the source video is processed through signal correction equipment, etc. prior to being digitized. Generally, costs for 100 hours of content range from $1200 to $3000 for one copy and additional copies would result in higher cost. The lower end of the price range is for a direct transfer with little or no editing and signal adjustments, whereas the upper end price usually includes corrections to the video prior to digitization. However, this varies from company to company.
Further Reading/Resources
Association of Moving Image Archivists (AMIA) Preservation Committee. Video Preservation Fact Sheets [online]. Hollywood, CA: AMIA, n.d. [viewed October 8, 2015]. Available from: https://amianet.org/wp-content/uploads/Resources-Video-Preservation-Fact-Sheets-2002.pdf [PDF version]
A/V Artifact Atlas. What’s Wrong With This Picture? [online] [viewed October 8, 2015]. Available from: http://avaa.bavc.org/artifactatlas/index.php/A/V_Artifact_Atlas (This content is not available anymore.)
Blodgett, P., J. Brett, C. Carmack, A. Foster, L.U. Jackson, C.S. Weber, L. Whitaker and M. Wiget. Guidelines for Reappraisal and Deaccessioning [online]. N.p.: n.p., 2011 [viewed October 8, 2015]. Available from:
www2.archivists.org/sites/all/files/GuidelinesForReappraisalAndDeaccessioningDRAFT.pdf [PDF version]
Blood, G. Refining Conversion Contract Specifications: Determining Suitable Digital Video Formats for Medium-term Storage [online]. N.p.: n.p., 2011 [viewed October 8, 2015]. Available from: www.digitizationguidelines.gov/audio-visual/documents/IntrmMastVidFormatRecs_20111001.pdf [PDF version]
Brosseau, K., M. Choquette and L. Renaud. Digitization Standards for the CMCC: Scan and Artifact Photography [online]. Gatineau, QC: Canadian Museum of Civilization, 2006 [viewed October 8, 2015]. Available from: https://www.canada.ca/en/heritage-information-network/services/digitization/standards-canadian-museum-civilization.html
Consortium of Academic and Research Libraries in Illinois (CARLI) Digital Collections Users’ Group Standards Committee. Guidelines for the Creation of Digital Collections: Digitization Best Practices for Moving Images [online]. Champaign, IL: CARLI, 2010 [viewed October 8, 2015]. Available from: www.carli.illinois.edu/sites/files/digital_collections/documentation/guidelines_for_video.pdf [PDF version]
De Stefano, P., K. Tarr, M. Buchman, P. Oleksik, A. Moscoso and B. Moskowitz. Digitizing Video for Long-Term Preservation: An RFP Guide and Template [online]. New York, NY: New York University Libraries, 2013 [viewed October 8, 2015]. Available from: http://memoriav.ch/wp-content/uploads/2014/07/VARRFP.pdf [PDF version]
Elliott, A.-M. JVC Last to Stop Production of Standalone VHS Players [online]. Ascot, UK: Pocket-lint Ltd, 2008 [viewed October 8, 2015]. Available from: www.pocket-lint.com/news/90778-jvc-stops-production-vhs-players
Final Cut Pro User Group, Hungary archívuma. Interview With Matthew Causon, EMEA Business Manager at AJA Video Systems [online]. N.p.: n.p., n.d. [viewed October 8, 2015]. Available from: https://cpughu.wordpress.com/2009/12/10/interview-with-mathew-causon-emea-business-manager-at-aja-video-systems/
Gfeller, J., A. Jarczyk and J. Phillips. Compendium of Image Errors in Analogue Video. Zürich, Switzerland: Scheidegger & Spiess, 2013.
Guild, S., and M. MacDonald. “Mould Prevention and Collection Recovery: Guidelines for Heritage Collections.” Technical Bulletin 26 [online]. Ottawa, ON: CCI, 2004 [viewed October 8, 2015]. Available from: http://www.cci-icc.gc.ca/resources-ressources/publications/category-categorie-eng.aspx?id=18&thispubid=500
Hess, R., J. Iraci and K. Flak. “The Digitization of Audiotapes.” Technical Bulletin 30. Ottawa, ON: CCI, 2012.
International Organization for Standardization (ISO). ISO 18923:2000, Imaging Materials — Polyester-base Magnetic Tape — Storage Practices. Geneva, Switzerland: ISO, 2000.
International Organization for Standardization (ISO). ISO 18933:2012, Imaging Materials — Magnetic Tape — Care and Handling Practices for Extended Usage. Geneva, Switzerland: ISO, 2012.
Iraci, J. “Remedies for Deteriorated or Damaged Modern Information Carriers.” Technical Bulletin 27 [online]. Ottawa, ON: CCI, 2005 [viewed October 8, 2015]. Available from: www.cci-icc.gc.ca/resources-ressources/publications/category-categorie-eng.aspx?id=18&thispubid=511
Iraci, J. Longevity of Recordable CDs, DVDs and Blu-rays, revised. CCI Notes 19/1 [online]. Ottawa, ON: CCI, 2020 [viewed June 10, 2020]. Available from: https://www.canada.ca/en/conservation-institute/services/conservation-preservation-publications/canadian-conservation-institute-notes/longevity-recordable-cds-dvds.html
Iraci, J. “The Cold Storage of CD, DVD, and VHS Tape Media.” Restaurator 32 (2011), pp. 81–109.
Iraci, J. “The Stability of DVD Optical Disc Formats.” Restaurator 32 (2011), pp. 39–59.
Kula, S. Appraising Moving Images: Assessing the Archival and Monetary Value of Film and Video Records. Blue Ridge Summit, PA: Scarecrow Press, 2002.
Lacinak, C. Guide to Developing a Request for Proposal for the Digitization of Video (and More) [online]. New York, NY: Audiovisual Preservation Solutions, 2013 [viewed October 8, 2015]. Available from: www.avpreserve.com/wp-content/uploads/2013/10/AVPS_Digitization_RFP_Guide.pdf [PDF version]
Library of Congress. “FF Video Codec 1.” Sustainability of Digital Formats: Planning for the Library of Congress [online]. Washington, D.C.: Library of Congress, last updated May 2013 [viewed October 8, 2015]. Available from: www.digitalpreservation.gov/formats/fdd/fdd000341.shtml
Library of Congress. “Motion JPEG 2000 File Format.” Sustainability of Digital Formats: Planning for the Library of Congress [online]. Washington, D.C.: Library of Congress, last updated October 2014 [viewed October 8, 2015]. Available from: www.digitalpreservation.gov/formats/fdd/fdd000127.shtml
Lindner, J. “Video Restoration – Where Do I Start?” Abbey Newsletter [online] 18,6 (October 1994) [viewed October 8, 2015]. Available from: http://cool.conservation-us.org/byorg/abbey/an/an18/an18-6/an18-612.html
McDonough, J.P. “Preservation-Worthy Digital Video, or How to Drive Your Library Into Chapter 11.” Talk presented at the Electronic Media Group Annual Meeting of the American Institute for Conservation of Historic and Artistic Works in Portland, Oregon, on June 13, 2004.
McLellan, C. BC to KY and Back Again: Crossing Borders to Discover New Processes for Digital A/V [online]. PowerPoint Presentation. Beyond Borders: Annual Meeting of the Society of American Archivists. San Diego, CA, August 11, 2012 [viewed October 8, 2015]. Available from: http://files.archivists.org/conference/sandiego2012/607-McLellanC.ppt [PowerPoint version]
North Carolina Department of Cultural Resources. Best Practices for File-Naming [online]. Raleigh, North Carolina: North Carolina Department of Cultural Resources, 2008 [viewed December 15, 2016]. Available from: http://digitalpreservation.ncdcr.gov/filenaming.pdf [PDF version]
Perkins, M. “Interlaced Video and Computer Monitors.” Cardinal Peak Blog [online]. Lafayette, CO: Cardinal Peak, February 17, 2011 [viewed October 8, 2014]. Available from: https://www.cardinalpeak.com/interlaced-video-and-computer-monitors/
Rudin, L., P. Yu and J.-M. Morel. Sampling Theory for Digital Video Acquisition: The Guide for the Perplexed User [online]. Pasadena, CA: Cognitech, n.d. [viewed October 8, 2014]. Available from: www.cognitech.com/pdfs/samplingTheory.pdf [PDF version]
Rutgers Community Repository (RUCore). Recommended Minimum Standards for Preservation Sampling of Moving Image Objects, Draft Revision 3 [online]. New Brunswick, NJ: RUCore, 2007 [viewed October 8, 2015]. Available from: http://rucore.libraries.rutgers.edu/collab/ref/dos_avwg_video_obj_standard.pdf [PDF version]
Science and Technology Council of the Academy of Motion Picture Arts and Science. The Digital Dilemma 2: Perspectives from Independent Filmmakers, Documentarians and Nonprofit Audiovisual Archives. Hollywood, CA: Academy of Motion Picture Arts and Sciences, 2012.
Semple, K. For Movies, Some Immigrants Still Choose to Hit Rewind [online]. New York, NY: The New York Times Company, 2012 [viewed October 8, 2015]. Available from: www.nytimes.com/2012/05/29/nyregion/for-some-new-york-immigrants-vhs-is-king-for-movie-rentals.html?_r=1
Silva, R. Video Resolution: An Overview [online]. N.p.: About Technology, n.d. [viewed October 8, 2014]. Available from: http://hometheater.about.com/cs/television/a/aavideoresa_2.htm
Society of Motion Picture and Television Engineers (SMPTE). SMPTE Recommended Practice 103:1995 (Archived 2005): Care, Storage, Operation, Handling and Shipping of Magnetic Tape for Television. White Plains, NY: SMPTE, 1995.
Stanford University Libraries. Moving Image Digitization Services at SMPL [online]. Stanford, CA: Stanford University, n.d. [viewed January 31, 2017]. Available from: https://library.stanford.edu/research/digitization-services/labs/stanford-media-preservation-lab/capture-specs
Stauderman, S., and P. Messier. Video Format Identification Guide [online]. N.p.: Video Preservation Website, 2007 [viewed October 8, 2015]. Available from: http://videopreservation.conservation-us.org/vid_id/vhs.html
Ultrium LTO. What Is LTO Technology? [online], n.d. [viewed October 8, 2015]. Available from: www.lto.org/technology/what-is-lto-technology
US National Archives and Records Administration, The Video Maximum Manual Capture – SD [VID-P1] [online]. College Park, MD: The US National Archives and Records Administration, n.d. [viewed October 8, 2015]. Available from: www.archives.gov/preservation/products/products/vid-p1.html
ViPIRS Video Survey Instructions* [online]. New York, NY: New York University Libraries, n.d. [viewed November 25, 2014]. Available from: http://library.nyu.edu/preservation/movingimage/files/ViPIRS%20Manual-Video.doc [Word version]
* Includes visual and playback inspection procedures.
Vitale, T., and P. Messier.“Digital Migration Tools and Techniques.” VideoPreservation Website [online]. N.p.: n.p., 2007 [viewed October 8, 2015]. Available from: http://videopreservation.conservation-us.org/dig_mig/index.html#Introduction
Williams, B. VHS Versus Betamax: The Great Format War of Our Time [online]. N.p.: Totally 80s LLC, 2012 [viewed October 8, 2014]. Available from: www.liketotally80s.com/vhs-vs-betamax.html
Washington Times, The It’s Unreel: DVD Rentals Overtake Videocassettes [online]. Washington, D.C.: The Washington Times, LLC, 2003 [viewed October 8, 2014]. Available from: www.washingtontimes.com/news/2003/jun/20/20030620-113258-1104r/?page=all#pagebreak
Wheeler, J. Videotape Preservation Handbook [online]. N.p.: n.p., 2002 [viewed October 8, 2015]. Available from: https://amianet.org/wp-content/uploads/Resources-Guide-Video-Handbook-Wheeler-2002.pdf [PDF version]
Wikipedia. Sticky-shed syndrome [online] [viewed October 8, 2014]. Available from: http://en.wikipedia.org/wiki/Sticky-shed_syndrome
WRS Motion Picture and Video Laboratory. Care and Handling of Videotape [online]. Pittsburgh, PA: WRS Motion Picture and Video Laboratory, n.d. [viewed October 8, 2014]. Available from: www.wrslabs.com/videotape.html
© Government of Canada, Canadian Conservation Institute, 2020
Published by:
Canadian Conservation Institute
Department of Canadian Heritage
1030 Innes Road
Ottawa ON K1B 4S7
Canada
Corrected edition
First published in 2017
Cat. No.: CH57-3/1-31-2020E-PDF
ISSN 2562-0282
ISBN 978-0-660-35485-9