
Access Defence 365 on your unmanaged/personal Windows device
On this page
Introduction
This guide provides step-by-step instructions for accessing Defence 365 applications, such as Teams, SharePoint and Outlook on your unmanaged/personal Windows device. To ensure the security of sensitive information, certain security measures are mandatory.
Important Note: If you choose not to enroll in these security features, you can continue to access Defence 365 via your DWAN managed device or SSC mobile device.
Set up passwordless sign-in
Before accessing Defence 365 on an unmanaged/personal Windows device, you must set up passwordless sign-in using an iOS or Android mobile device. This can be done on both unmanaged/personal or SSC/DND-managed devices.
| Device Type | Purpose | Steps |
|---|---|---|
Unmanaged/personal |
Access Defence 365 and set up passwordless sign-in on the device |
Follow these guides: |
Unmanaged/personal or SSC/DND-managed |
Set up passwordless sign-in only on the device. |
Follow this guide: |
Once passwordless sign-in is configured, return to this guide to complete the Windows setup.
What to know before enrolling
- User Agreement: Before you begin, you must agree to the conditions in the Defence 365 user agreement for unmanaged/personal devices (Accessible only on the National Defence network).
- Unenrollment: You can unenroll your device from Intune at any point using Microsoft's instructions (You are now leaving the Government of Canada website).
- Know your password: Enrolling your desktop or laptop in the Intune Company Portal app requires your Windows user password. Not knowing the password may result in being unable to access your desktop or laptop during setup.
- Fingerprint sign-in: Enrollment in Intune may temporarily disable fingerprint sign-in. You'll need to re-enable it after the process is complete
- Visual Variations: These enrollment steps are for Windows devices. The screenshots shown on your device may look slightly different from the ones in this document depending on the version of the device you’re using.
Device Requirements
Before you begin, make sure your Windows device meets the following requirements:
- Device Type: Unmanaged/personal devices only, no DWAN managed devices or SSC mobile devices.
- Windows OS Version: Windows 10 22H2 (10.0.19045) or higher is required. To check your Windows version, select the Start menu, then type "winver" and press Enter. The version number will be displayed. If your version or build is lower, go to Settings > Update & Security > Windows Update and install updates.
- Windows 10 Support: Support for Windows 10 ends on October 14, 2025. After this date, Windows 11 will be required.
- Password Length: A minimum password length of 8 characters is required to install Intune. Your Windows device will prompt you automatically during set-up to verify your password meets this minimum length. Follow the on-screen instructions to update your password if necessary. To manually set your password, go to Settings > Accounts > sign-in options. Under Password, select Change and follow the prompts to update your password.
- Secure Boot: Secure Boot must be enabled. To check if Secure Boot is enabled, press Win + R to open the Run dialog box, type "msinfo32", and press Enter. In the System Information window, look for "Secure Boot State", and ensure it is set to "On". If disabled, restart your computer and enter the BIOS settings. Look for the Secure Boot option in the Security section. Enable it following the BIOS instructions if necessary.
- Firewall: The Firewall must be turned on. The Firewall settings can be found in the Control Panel, under System and Security, in the Windows Defender Firewall section. Ensure the Firewall is turned On. Click the Change settings button to make changes if necessary.
- Antivirus: Antivirus software must be installed and active. To check your antivirus status, open the Windows Security app, accessible from the Start menu, and navigate to the Virus & threat protection section. Ensure that real-time protection is turned On.
- Administrator: Must be logged in to your device as an Administrator.
- Antispyware: Antispyware software must be installed and active. Check your antispyware status in the same Windows Security app under the Virus & threat protection section. Ensure that real-time protection is turned On.
- Internet Access: A stable Wi-Fi or ethernet connection is required.
- Device Limit: You can enroll up to 5 devices in D365. To check your current devices, visit the MyInfo Portal (Accessible only on the National Defence network) on DWAN, then on the Devices tile, select “Remove registered devices” to view and remove any devices as necessary.
Enroll in Intune through Company Portal
- Open the Microsoft Store and search for the “Company Portal” app. Click “Get” to install.
- Once installed, select “Open”.
- Sign in to Company portal using your Defence 365 (ECN) email address (firstname.lastname@ecn.forces.gc.ca), select “Next”.
- Authenticate your sign-in.
- Once you’ve signed in you will receive a message to confirm automatic sign-ins to your apps. Select “Yes, all apps”. Note: Do NOT select “No, this app only”.
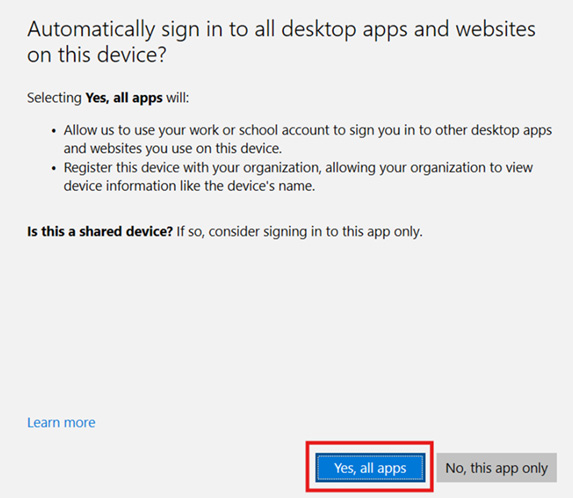
Caption
A screenshot of the introduction screen on the Company Portal app. A button labeled "Yes, all apps" is highlighted with a red outline.
- Select “Done”.
- Under “Your devices”, select “This device hasn’t been set up for corporate use yet. Select this message to begin set-up”.
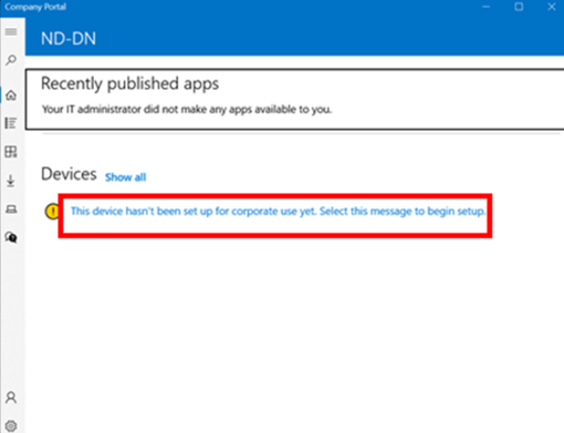
Caption
A screenshot of the Company Portal app during the setup process. A link labeled "This device hasn’t been set up for corporate use yet. Select this message to begin setup" is highlighted with a red outline.
- You’ll be directed to the “Set up your device” screen. Select “Next”.
- Click on the “Connect” button then click “Next”.
- Enter your Defence 365 (ECN) email address if it’s not already populated (firstname.lastname@ecn.forces.gc.ca).
- If prompted, in the second box (MDM Server URL), enter the following url: https://enrollment.manage.microsoft.com/enrollmentserver/discovery.svc
- Select “Next”.
- Select “Send notification” to send a notification to your Authenticator app. Enter the number shown on your desktop/laptop screen into your Microsoft Authenticator app on your mobile device.
- You may be prompted to Use Windows Hello with your account or set up a pin. Select “OK”.
- You will be asked to set up a pin if you don’t already have one.
- You will see a notification that your account has been found, select “Next” to continue.
- After setup is complete, select “Done”
- To confirm your enrollment, open the Company Portal app, select Devices menu item, choose your Windows device, and verify that the Device status indicates "Can access company resources.”