
Enabling Accessibility Fund: Flat rate information
On this page
- List of figures
- Flat rate description for construction projects
- How do flat rate costs work
- How will project location impact funding amounts
- Project planning and contingency
- Ramps
- Accessible doors
- Accessible washrooms
- Accessible lifts
- Elevators
- Pool lifts
- Multi-sensory environments
- Accessible playgrounds
- Accessible parking
- Accessible drop-off areas
- Accessible electric vehicle charging stations
- Accessible kitchens
- Accessible drinking fountains and hand-wash stations
- Accessible multi-purpose rooms
Alternate formats

Large print, braille, MP3 (audio), e-text and DAISY formats are available on demand by ordering online or calling 1 800 O-Canada (1-800-622-6232). If you use a teletypewriter (TTY), call 1-800-926-9105.
List of figures
- Figure 1: Ramps
- Figure 2: Accessible doors
- Figure 3: Accessible single occupant washroom general floor plan
- Figure 4: Washroom accessory heights
- Figure 5: Multi-stall washroom with accessible stall general floor plan
- Figure 6: Accessible stall general floor plan
- Figure 7: Barrier-free shower general floor plan
- Figure 8: How to choose between an accessible lift and an elevator to suit your accessibility needs
- Figure 9: How to choose the accessible lift that best suits your accessibility needs
- Figure 10: Inclined platform lift
- Figure 11: Vertical platform lift (with enclosure)
- Figure 12: How to choose the passenger elevator that best suits your accessibility needs
- Figure 13: Limited use, limited application elevator
- Figure 14: Hydraulic elevator
- Figure 15: Traction elevator
- Figure 16: How to choose the pool lift that best suits your accessibility needs
- Figure 17: Above-ground pool chair lift
- Figure 18: Permanent in-ground pool lift
- Figure 19: How to choose the multi-sensory space that best suits your accessibility needs
- Figure 20: Multi-sensory environment room
- Figure 21: Multi-sensory mobile station
- Figure 22: How to choose the accessible playground that best suits your accessibility needs
- Figure 23: Accessible playground – small
- Figure 24: Accessible playground – medium
- Figure 25: Accessible playground – large
- Figure 26: Accessible Parking – single – below grade
- Figure 27: Accessible parking – multiple – below grade
- Figure 28: Accessible parking – below grade vs at grade
- Figure 29: Accessible drop-off area
- Figure 30: Accessible EV charging station – single – at grade
- Figure 31: Accessible EV charging station – multiple – at grade
- Figure 32: Accessible EV charging station – single – below grade
- Figure 33: Accessible EV charging station – multiple – below grade
- Figure 34: Accessible kitchen general floor plan
- Figure 35: Accessible kitchen layout
- Figure 36a: Accessible kitchen - heights and clearances
- Figure 36b: Accessible kitchen - heights and clearances
- Figure 37: Indoor drinking fountain - wall-mounted versus free-standing
- Figure 38: Indoor drinking fountain - drinking fountain with bottle filling station versus bottle filling station only
- Figure 39: Outdoor drinking fountain - drinking fountain with bottle filling station versus drinking fountain only
- Figure 40: Outdoor drinking fountain - drinking fountain with bottle filling station and service animal basin
- Figure 41: Hand-wash station
- Figure 42: Accessible multi-purpose room general floor plan
Flat rate description for construction projects
When applying to the Enabling Accessibility Fund, an interactive calculator guides you through a series of options. This will help you determine the amount of eligible funding for:
- ramps
- accessible doors
- accessible washrooms
- accessible lifts
- elevators
- pool lifts
- multi-sensory environments
- accessible playgrounds
- accessible parking
- accessible drop-off areas
- accessible electric vehicle charging stations
- accessible kitchens
- accessible drinking fountains and hand-wash stations
- accessible multi-purpose rooms
How do flat rate costs work
The flat rate costs take many factors into consideration, such as:
- the essential items and components needed to meet accessibility standards
- the fair market value for materials and labour
- the construction materials that are standard commercial grade
- project location
- necessary permits and professional fees
How will project location impact funding amounts
Flat rate adjusts costs based on the project location. Using the Region tool in the calculator, you will enter the postal code of your project location, and the tool will assign a Region to your project accordingly. Flat rate costs will adjust based on how remote your project location is or how difficult it is to access.
Project planning and contingency
The flat rate costing model provides cost estimates with plus or minus 20% accuracy, as they are based on Class D estimates. Refer to this manual for more information on the difference between Class A, B, C, and D estimates. As a result, we recommend that you have a contingency budget of approximately 20% of your total project costs to offset unexpected costs. If you have remaining funds following the completion of your project, we will work with you to find additional accessibility features to add to your project, up to the approved value in the agreement you signed with ESDC. In addition, unexpected situations and costs are common with construction projects. We recommend that you consult certified professionals to scope your project.
Please note: Supply chain issues and labour shortages have the potential to impact construction projects beyond normal industry standards. Additional due diligence confirming project timelines, scope and costs with certified professionals is recommended when planning your accessibility project.
Ramps
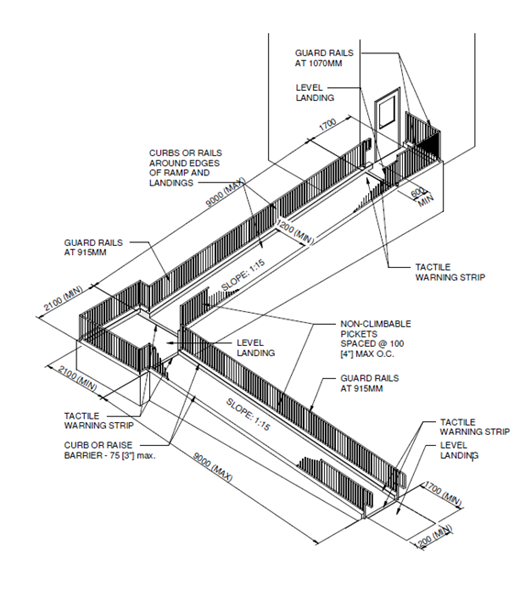
Figure 1: Ramps
- Source: Figure 34(a), CSA/ASC B651:23 Accessible design for the built environment. © 2023 Canadian Standards Association.
Text description of Figure 1
- The ramp starts at a level doorway and goes down a first slope until it reaches a landing. It has a 90 degree turn to go down a second slope and ends at a level landing
- Along the ramp, there are safety features to help people go up and down the ramp safely, such as:
- curbs
- guard rails
- handrails
- pickets
- tactile warning strips
A ramp is a slope or incline joining 2 different levels, at the entrance or between floors of a building. Ramps allow wheelchairs and other mobility aids to more easily access a building or navigate between areas of different heights. Along the ramp, there are safety features such as curbs, guard rails, handrails, pickets, and tactile warning strips.
These features help people go up and down the ramp safely. For example, tactile warning strips indicate the change in flooring at the entrance of the door and where the ramp curves:
- the grade of the ramp is no more than 1:15
- the width is a minimum of 3’9” (1200 mm) wide
- guard rails are 3’ (915 mm) high
- pickets are no more than 4” (100 mm) apart
Ramps include:
- ramp and landings
- curbs, guard rails, handrails, and pickets
- structural framing
- tactile warning/colour contrasting strips
- supportive foundation
Optional accessibility feature:
- weather cover for exterior ramps
Accessible doors
Figure 2: Accessible doors

- Source: Figure 23, CSA/ASC B651:23 Accessible design for the built environment. © 2023 Canadian Standards Association.
Text description of Figure 2
- A person using a cane is walking toward a door
- The door is at minimum 2’10” (860 mm) wide and has a glass window that is no more than 3’ (900 mm) from the ground. This increases visibility of persons in assistive devices, such as a wheelchair or scooter
- The door has an automatic door operator and controls powered by electricity. From the outside, guard rails are on each side of the doorway. A small vertical rectangular push button is at the top of the guard rail located on the right. The push button is between 3’ and 3’7” (900 mm to 1100 mm) from the ground
- The entrance flooring (threshold) is at no higher than 0.5” (13 mm)
Accessible doors have windows low enough for persons in assistive devices, such as wheelchairs and scooters, to be seen from the other side. They have an automatic door operator with push button or sensor controls powered by electricity. The controls are located either on a guard rail or wall. Guards or guard rails are on either side of the door, and are an optional accessibility and safety feature for persons with visual or mobility disabilities. Painting the door and door frame in contrasting colours helps with depth perception for those with visual disabilities.
If you are retrofitting or building a double door, please only enter 1 door into the calculator. The EAF only funds accessibility improvements to 1 out of the 2 doors.
Exterior doors include:
- insulated door with insulated glass window
- insulated steel frame
- door hardware set
- automatic door operator and controls
- electrical power connection
- colour contrasting painting and finishing
Interior doors include:
- non-insulated hollow metal door with non insulated glass window
- non-insulated pressed steel frame
- door hardware set
- automatic door operator and controls
- electrical power connection
- colour contrasting painting and finishing
Optional accessibility feature:
- cane detectable guardrails
Accessible washrooms
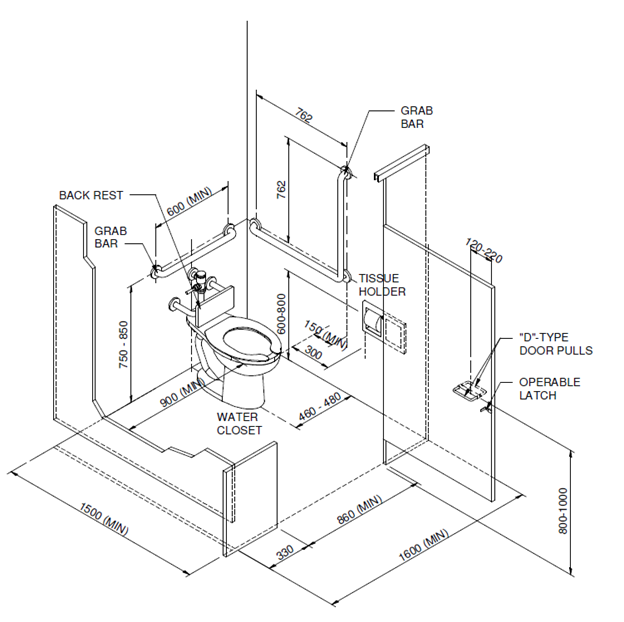
Figure 3: Accessible single occupant washroom general floor plan
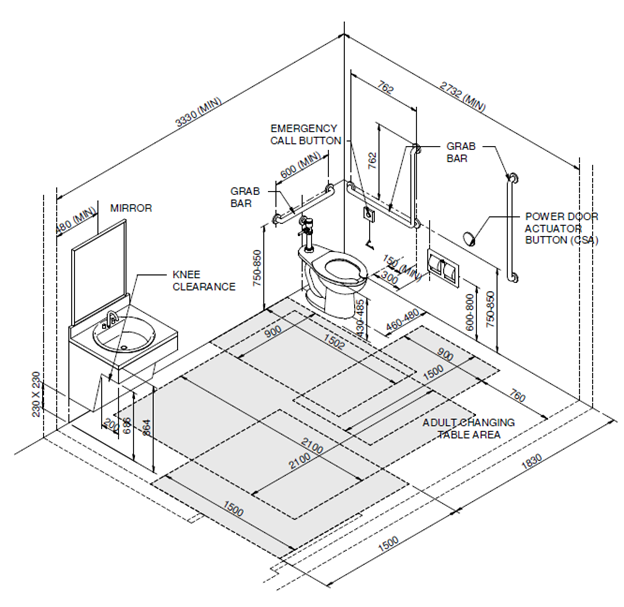
- Source: Figure 49(a), CSA/ASC B651:23 Accessible design for the built environment. © 2023 Canadian Standards Association.
Text description of Figure 3
- Across from the doorway is an accessible sink, vanity, and an accessible height mirror. There is space underneath the sink for a person with an assistive device to fit their knees. The sink’s insulated pipes protect the knees from the hot water supply
- Beside the sink, there is a clear area for a person to move from their assistive device onto the accessible manual flush toilet. The clear area is at least 3’ by 5’ (900 mm by 1500 mm)
- The toilet has a backrest and a grab bar fixed against the back wall. On the left-hand side of the toilet, there is:
- an emergency call button (optional)
- a horizontal grab bar
- a vertical grab bar
- a toilet paper dispenser
- a power door actuator button
- The grab bars are between 2’5” and 2’10” (750 mm to 850 mm) from the floor and between 2’ and 2’6” (600 mm and 762 mm) long
- Dimensions: 9’ by 10’11” (2732 mm by 3330 mm)
The size of an accessible single occupant washroom is approximately 9’ by 10’11” (2732 mm by 3330 mm). The sink or vanity has space underneath for a person with an assistive device to fit their knees. Insulated pipes protect the knees from the hot water supply. Beside the sink, there is a clear area for a person to move from their assistive device onto the toilet, which has a backrest and is surrounded by grab bars for support. Walls painted in a different colour than the door frames, floor, adjacent wall, or plumbing fixtures helps with depth perception for those with visual disabilities.
Accessible washrooms include:
- barrier-free toilet with 2 grab bars
- barrier-free sink and vanity with knee protection
- accessible angled mirror
- washroom accessories:
- soap dispenser
- toilet paper dispenser
- automatic paper towel dispenser or hand dryer
- napkin disposal
- sound insulation for walls and colour contrasting paint
- does not include new wall construction, only includes sound insulation and colour contrasting paint for new or existing walls
- sound insulation to a minimum rating of STC 42Footnote 1
- non-slip flooring
- minimal glare, no strong visual patterning
- colour contrasted to walls, door, etc.
- optimised HVAC (above code minimums)
- improved air quality
- acoustic absorption to a minimum rating of STC 45 and CAC 40Footnote 1
- in room controls at accessible level
- optimised lighting (above code minimums)
- anti-glare lighting with dimmer
- in room controls at accessible level
- optimised electrical (above code minimums)
- occupancy sensor
- increased capacity for receptacles and circuits
- minimum of 4 duplex receptacles in room
- room signage with text, graphic, and braille
- directional wayfinding sign placed elsewhere to direct users
Optional accessibility features:
- accessible urinal
- emergency call button
- power assisted adult change table
- barrier-free shower
- automatic door operator with controls and electrical hookup
Figure 4: Washroom accessory heights
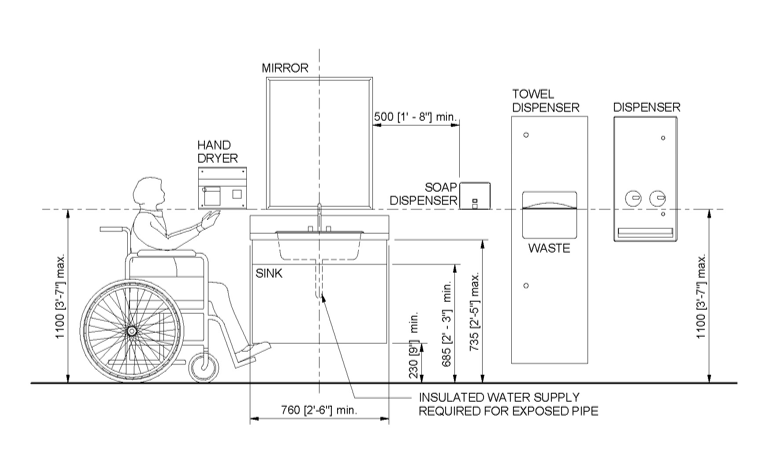
- Source: Figure 44, CSA/ASC B651:23 Accessible design for the built environment. © 2023 Canadian Standards Association.
Text description of Figure 4
- Starting from the left, a person in a wheelchair is using the hand dryer
- All washroom accessories are approximately at their eyesight level
- Beside the hand dryer, there is a sink and a mirror above it. The sink’s insulated water supply and drainpipes protect persons in wheelchairs from getting injured when their legs are under the sink
- Beside the mirror and sink unit is:
- a soap dispenser
- a towel dispenser
- waste bin unit
- a dispenser of various items (for example, menstrual products or other possible items)
All washroom accessories are approximately at eyesight level for wheelchair users. The sink’s insulated water supply and drainpipes protect persons in wheelchairs from leg injuries.
Accessories could include:
- an automatic hand dryer
- a soap dispenser
- an automatic paper towel dispenser
- waste bin
- a dispenser for various items (for example, menstrual products)
Figure 5: Multi-stall washroom with accessible stall general floor plan
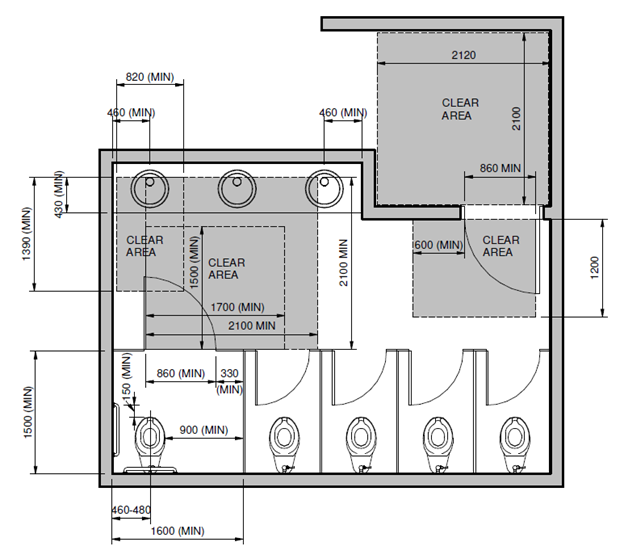
- Source: Figure 42(a), CSA/ASC B651:23 Accessible design for the built environment. © 2023 Canadian Standards Association.
Text description of Figure 5
- The shape of the multi-stall washroom is like a rectangle with a short hallway leading to an open entrance. The doorway is in the top right corner
- When standing in the doorway, there are 3 sinks on the right and 4 washroom stalls in front of them. Clear areas separate the sinks and the stalls. That gives enough space for a person with an assistive device, such as a wheelchair, to move around
- Of the 4 stalls, 3 are standard and 1 is an accessible stall, which is larger than the rest
- The standard sized stalls have doors that open inward
- The barrier-free stall has:
- a door that opens outward, which has a coat hook
- a "D" type door pull on the inside and 1 on the outside
The size of the multi-stall washroom with an accessible stall is approximately 90 sq ft (8.4 sq m). There are clear areas that separate the sinks and the stalls. This gives enough space for a person with an assistive device, such as a wheelchair, to move around.
The barrier-free stall has:
- a door that opens outward, which provides space for a person with an assistive device to enter the stall
- a “D” type door pull on the inside and 1 on the outside
Accessible stalls include:
- barrier-free toilet with 2 grab bars
- barrier-free sink and vanity with knee protection
- accessible angled mirror
- washroom accessories
- soap dispenser
- toilet paper dispenser
- automatic paper towel dispenser or hand dryer
- napkin disposal
- sound insulation for walls and colour contrasting paint
- does not include new wall construction, only includes sound insulation and colour contrasting paint for new or existing walls
- sound insulation to a minimum rating of STC 42Footnote 1
- non-slip flooring
- minimal glare, no strong visual patterning
- colour contrasted to walls, door, etc.
- optimised HVAC (above code minimums)
- improved air quality
- acoustic absorption to a minimum rating of STC 45 and CAC 40Footnote 1
- in room controls at accessible level
- optimised lighting (above code minimums)
- anti-glare lighting with dimmer
- in room controls at accessible level
- optimised electrical (above code minimums)
- occupancy sensor
- increased capacity for receptacles and circuits
- minimum of 4 duplex receptacles in room
- room signage with text, graphic, and braille
- 1 directional wayfinding sign placed elsewhere to direct users
Optional accessibility features:
- accessible urinal
- emergency call button
- power assisted adult change table
- barrier-free shower
- automatic door operator with controls and electrical hookup
Figure 6: Accessible stall general floor plan
- Source: Figure 46, CSA/ASC B651:23 Accessible design for the built environment. © 2023 Canadian Standards Association.
Text description of Figure 6
- The accessible stall has a door that opens outward with a “D” shape door pull on the outside. On the inside, there is also a “D” shape pull as well as a coat hook and an operable latch to lock the door
- The toilet has a back rest and a grab bar fixed against the back wall. When sitting down on the toilet, a person can find on their left-hand side a “L” shape grab bar and a tissue holder
- The grab bars are between 2’5” and 2’10” (750 mm and 850 mm) from the floor and between 2’ and 2’6” (600 mm and 762 mm) long
The accessible stall has a door that opens outward with a “D” shape door pull on the outside to accommodate a wide range of users, including persons with assistive devices.
Figure 7: Barrier-free shower general floor plan
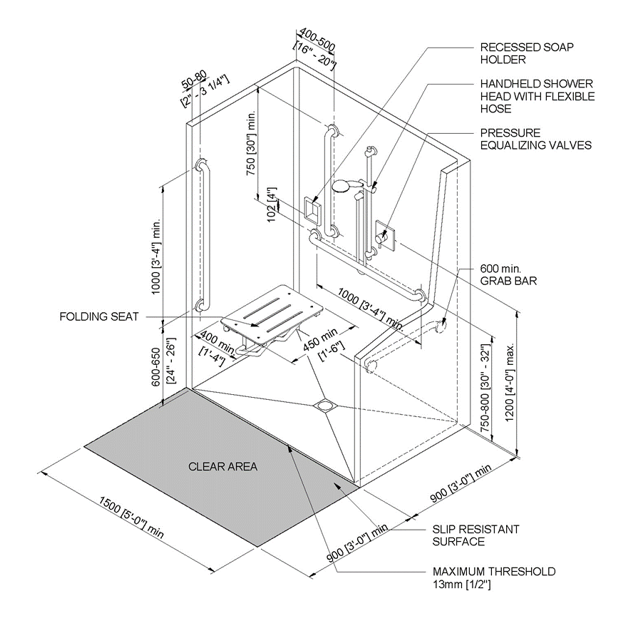
- Source: Figure 51, CSA/ASC B651:23 Accessible design for the built environment. © 2023 Canadian Standards Association.
Text description of Figure 7
- There is a clear area with slip resistant surface before going into the shower area. The clear area is at least 3’ by 5’ (900 mm by 1500 mm)
- A curb no higher than 0.5” (13 mm) separates the shower areas and the clear area
- When entering the shower area, there are 2 grab bars for support. The first one is a vertical grab bar attached to the left wall. The second one is a horizontal grab bar attached to the right wall
- There is also a folding seat attached to the left wall if a person needs to sit down
- On the back wall, there is:
- a recessed soap holder
- a vertical grab bar
- a horizontal grab bar
- a handheld shower head with flexible hose
Accessible showers include:
- shower kit
- handheld shower head and accessible controls
- recessed soap holder
- folding seat
- 4 grab bars
- non-slip flooring
Accessible lifts
Figure 8: How to choose between an accessible lift and an elevator to best suit your access needs

Text description of Figure 8
The flowchart asks you yes or no questions.
Question 1: Is your project interior or exterior?
- If your answer is "Interior", go to question 2
- If your answer is "Exterior":
- an accessible lift may accommodate your needs
Question 2: Do you need access for more than 2 levels?
- If your answer is "Yes":
- you are better served by a passenger elevator
- If your answer is "No", go to question 3
Question 3: Is access required for more than 1 person at a time?
- If your answer is "Yes":
- you are better served by a passenger elevator
- If your answer is "No":
- an accessible lift may accommodate your needs
Result:
- passenger elevators are more inclusive than accessible lifts
Figure 9: How to choose the accessible lift that best suits your accessibility needs

Text description of Figure 9
The flowchart asks you yes or no questions.
Question 1: Do you have a 60" x 60" space for a lift?
- If your answer is "Yes":
- you are better served by a vertical platform lift
- If your answer is "No", go to question 2
Question 2: Do you only have 1 staircase that is needed for an emergency exit?
- If your answer is "Yes", go to question 3
- If your answer is "No":
- you are better served by a vertical platform lift
Question 3: Is access required for more than 1 person at a time?
- If your answer is "Yes":
- you are better served by a vertical platform lift
- If your answer is "No":
- an inclined platform lift may accommodate your needs
Result:
- vertical platform lifts are more inclusive than accessible lifts
Figure 10: Inclined platform lift

- Source: NBC 2015 / CSA/ASC B651:23 / CSA B355:19.
Text description of Figure 10
- There is a set of stairs that leads to a landing before pivoting 45 degrees and continuing to the next flight of stairs
- The platform lift is 2’4” by 3’7” (724 mm by 1118 mm) and is in the middle of the first set of stairs and is attached my inclined rails. The clearance minimum clearance for the platform to move up the stairs is 5’ (1500 mm)
- At the bottom of the stairs is a call station button that is a maximum height of 3’11" (1200 mm) from the floor
- At the top of the landing is an audio-visual alert to let people know the lift is in use
- At the top of the second flight of stairs is another call button as well as a rectangle that houses the drive system machinery
A platform lift is attached by inclined rails to sets of stairs. At the bottom of the stairs is a call station button for assistance when needed. At the top of the landing is an audio-visual alert to let people know the lift is in use. At the top of the second flight of stairs is another call button as well as the drive system machinery.
Interior and exterior platform lifts include:
- platform lift unit
- controls
- inclined rails
- electrical power connection
Optional accessibility features:
- fire alarm integration
- lighting
- fold-down seat with seatbelt
- directional braille signage
Figure 11: Vertical platform lift (with enclosure)
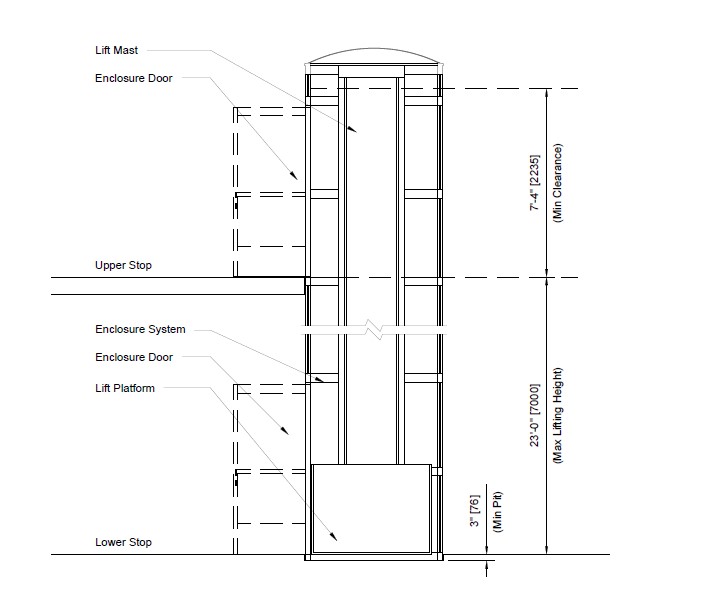
- Source: NBC 2015 / CSA/ASC B651:23 / CSA B355:19.
Text description of Figure 11
- There is a 2 story vertical lift with a door to enter the lift platform, which is at the lower stop
- The minimum pit under the lift is 3" (76 mm)
- The maximum lifting height for 1 stop is 23’ (7000 mm)
- The minimum clearance of the upper stop is 7’4” (2235 mm). The upper stop has an enclosure door as well as the lift mast machinery
Vertical platform lifts include:
- platform lift unit
- controls
- electrical power connection
- pit
- lift mast
For lifts that are over 8’ (2.5 m) or exposed to rain and snow, an enclosure will be automatically calculated in the flat rate cost.
Optional accessibility features:
- fire alarm integration
- lighting
- directional braille signage
Elevators
A panel of elevator controls should be located at eyesight level for better accessibility for persons with assistive devices, such as a wheelchair.
Figure 12: How to choose the passenger elevator that best suits your accessibility needs
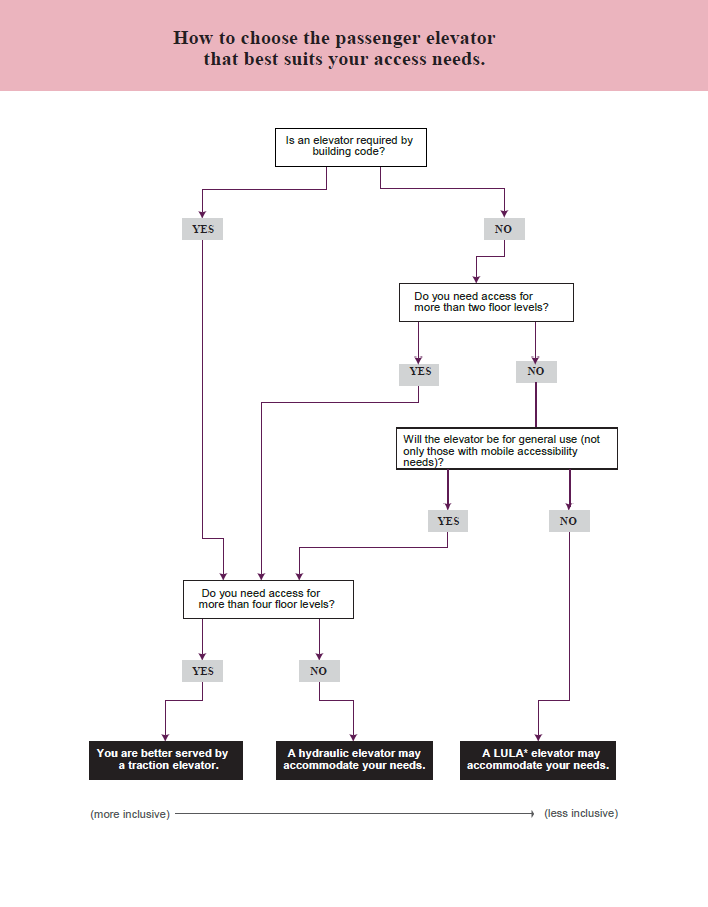
Text description of Figure 12
The flowchart asks you yes or no questions.
Question 1: Is an elevator required by building code?
- If your answer is "Yes", go to question 4
- If your answer is "No", go to question 2
Question 2: Do you need access for more than 2 levels?
- If your answer is "Yes", go to question 4
- If your answer is "No", go to question 3
Question 3: Will the elevator be for general use (not only those with mobile accessibility needs)?
- If your answer is "Yes", go to question 4
- If your answer is "No":
- a limited use/limited application (LULA) elevator may accommodate your needs
Question 4: Do you need access for more than 4 floor levels?
- If your answer is "Yes":
- you are better served by a traction elevator
- If your answer is "No":
- a hydraulic elevator may accommodate your needs
Result:
- traction elevators are more inclusive than LULA elevators
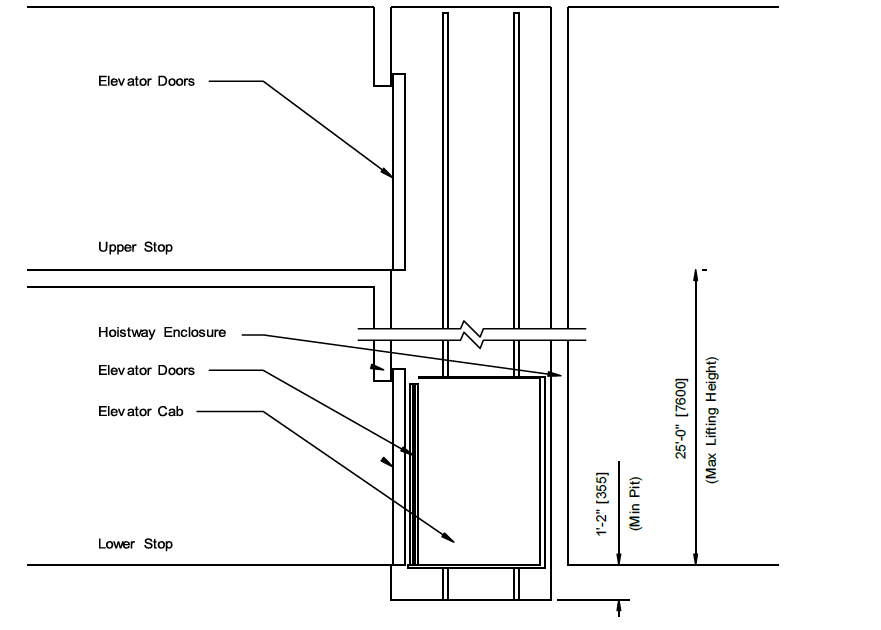
Figure 13: Limited use, limited application elevator
- Source: NBC 2015 / CSA/ASC B651:23 / CSA B44:16.
Text description of Figure 13
- Doors enclose a 2-stop elevator. The elevator cab is at the lower stop
- The minimum pit under the elevator is 1’2” (355 mm)
- The maximum lifting height per floor is 25’ (7600 mm)
- The upper stop has elevator doors
LULA elevators provide direct vertical access between 2 or more levels. The elevator cab can accommodate a limited number of occupants. These elevators require smaller pits and machine rooms, and are suitable for confined spaces.
Limited use, limited application elevators include:
- doors
- controls
- hydraulic cylinder, motor, and tank
- rails
- electrical power connection
- pit
- machine room
- hoist way (the enclosure of an elevator or shaft)
- elevator cab where the passengers ride
Optional accessibility features:
- directional braille signage
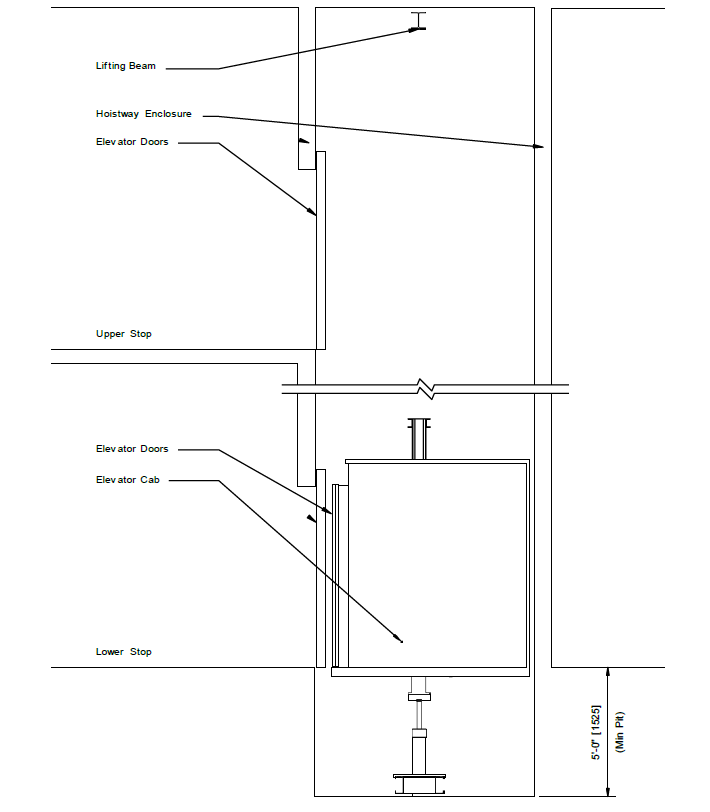
Figure 14: Hydraulic elevator
- Source: NBC 2015 / CSA/ASC B651:23 / CSA B44:16.
Text description of Figure 14
- Doors enclose a 2-stop elevator that has a lifting mechanism at the bottom. The elevator cab is at the lower stop
- The minimum pit under the elevator is 5’ (1525 mm)
- The upper stop has elevator doors and there is a lifting beam, at the very top of the elevator shaft
Hydraulic elevators provide direct vertical access between 2 or more levels. The elevator cab can be sized to accommodate a range of occupants. These elevators are suitable for low to mid-rise applications (up to approximately 5 stops).
Hydraulic elevators include:
- doors
- controls
- hydraulic cylinder, motor, and tank
- guide rails
- hoist way (the enclosure of an elevator or shaft)
- electrical service
- pit, fixed ladder, drain and sump
- machine room
- elevator cab with handrail and emergency telephone
Optional accessibility features:
- directional braille signage
- hearing loop
- fold-down seat
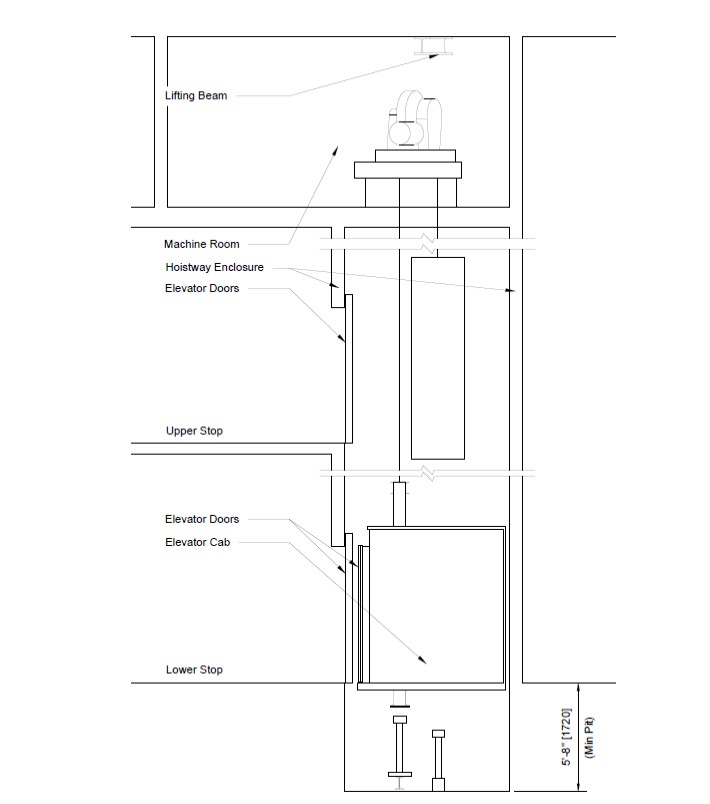
Figure 15: Traction elevator
- Source: NBC 2015 / CSA/ASC B651:23 / CSA B44:16.
Text description of Figure 15
- Doors enclose a 2-story elevator that has additional space above to house the machinery room and lifting beam. The elevator cab is at the lower stop
- The minimum pit under the elevator is 5’8” (1720 mm), which has 2 pistons to lift and lower the cab
- In the second story of the elevator shaft, there is a rectangular counter weight
- The upper stop has elevator doors
Traction elevators provide direct vertical access between 2 or more levels. The elevator cab can be sized to accommodate a range of occupants. These elevators are suitable for mid to high-rise applications (approximately 5 or more stops).
Traction elevators include:
- elevator cab with handrail and emergency telephone
- doors
- controls
- motor, counterweight
- guide rails
- suspension ropes
- travelling cable
- hoist way (the enclosure of an elevator or shaft)
- lifting beam
- electrical service
- pit
- fixed ladder, drain and sump
- machine room
Optional accessibility features:
- directional braille signage
- hearing loop
- fold-down seat
Pool lifts
Figure 16: How to choose the pool lift that best suits your accessibility needs

Text description of Figure 16
The flowchart asks you yes or no questions.
Question 1: Is your pool or spa in-ground?
- If your answer is "Yes", go to question 2
- If your answer is "No":
- a chairlift may accommodate your needs
Question 2: Do you need the lift to accommodate assistive devices (for example, wheelchairs)?
- If your answer is "Yes", go to question 4
- If your answer is "No":
- a chairlift may accommodate your needs
Question 3: Does your pool have room to accommodate a lift in the pool?
- If your answer is "Yes":
- you are better served by a permanent platform lift
- If your answer is "No":
- a removable platform lift may accommodate your needs
Result:
- permanent platform lifts are more inclusive than chair lifts
Figure 17: Above-ground pool chair lift
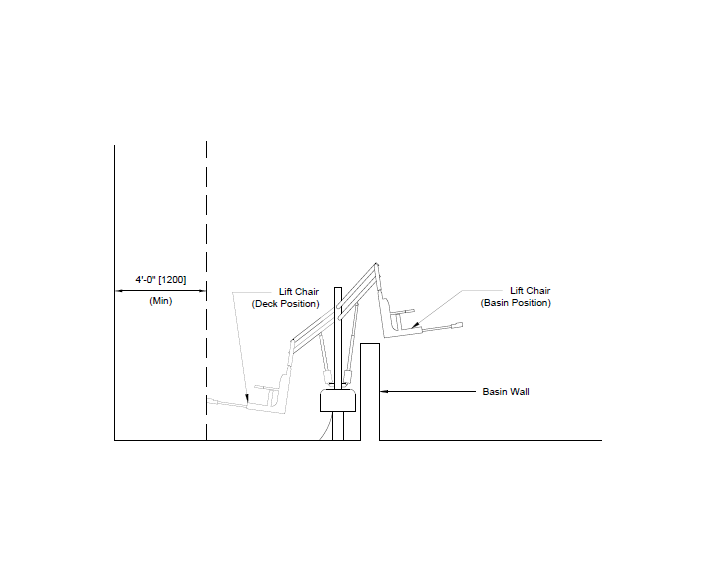
- Source: NBC 2015 / CSA/ASC B651:23.
Text description of Figure 17
- The seat of the chair swivels from the deck to the pool
- The chair is at least 4’ (1200 mm) from a wall to give adequate space for a person to get on the chair lift
- The chair lowers close to the basin wall to allow a person to disembark
A pool chair lift is a hard seat designed to carry a person in a seated position from the pool deck to the above-ground or in-ground pool. The chair swivels and lowers close to the basin wall to allow the person to exit.
Above-ground and in-ground pool chair lifts include:
- chair lift unit
- pool deck anchor
Figure 18: Permanent in-ground pool lift
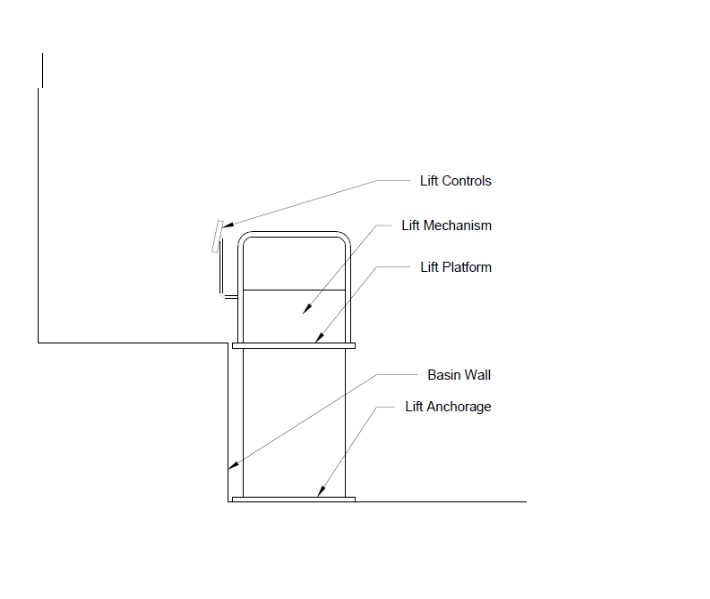
- Source: NBC 2015 / CSA/ASC B651:23.
Text description of Figure 18
- The lift is at the same height of the pool deck
- There is a lift control panel at the entrance of the platform, which has guardrails
- A lifting mechanism lowers the platform along the basin wall
- The lift is anchored to the floor of the pool
Platform pool lifts provide direct access between the pool deck and in-ground pool. The lift platform is designed to carry a person with a mobility device, so they can easily and autonomously get into the water. The lift controls can be operated by the occupant or attendee. The lift mechanism lowers the lift platform into the water along the edge of the basin wall.
Permanent and portable platform pool lifts include:
- platform lift unit
- pool deck anchor
- pool wheelchair
Multi-sensory environments
Where possible, a multi-sensory room is the preferred environment to create a controlled space that is adaptable to the needs of a variety of participants.
Figure 19: How to choose the multi-sensory space that best suits your accessibility needs
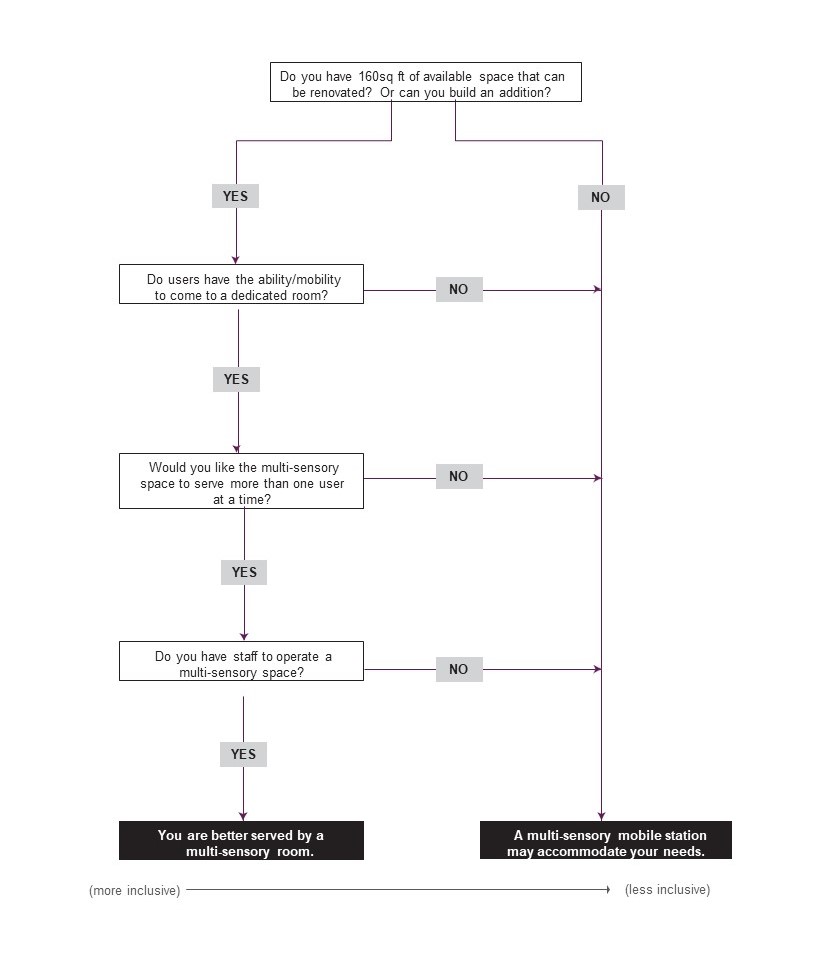
Text description of Figure 19
The flowchart asks you yes or no questions.
Question 1: Do you have a 160sq ft of available space that can be renovated? Or can you build an addition?
- If your answer is "Yes", go to question 2
- If your answer is "No":
- a multi-sensory mobile station may accommodate your needs
Question 2: Do users have the ability/mobility to come to a dedicated room?
- If your answer is "Yes", go to question 3
- If your answer is "No":
- a multi-sensory mobile station may accommodate your needs
Question 3: Would you like the multi-sensory space to serve more than 1 user at a time?
- If your answer is "Yes", go to question 4
- If your answer is "No":
- a multi-sensory mobile station may accommodate your needs
Question 4: Do you have staff to operate a multi-sensory space?
- If your answer is "Yes":
- you are better served by a multi-sensory room
- If your answer is "No":
- a multi-sensory mobile station may accommodate your needs
Result:
- if you answered yes to the questions, a multi-sensory room may accommodate your accessibility needs. They are the most inclusive option
Figure 20: Multi-sensory room
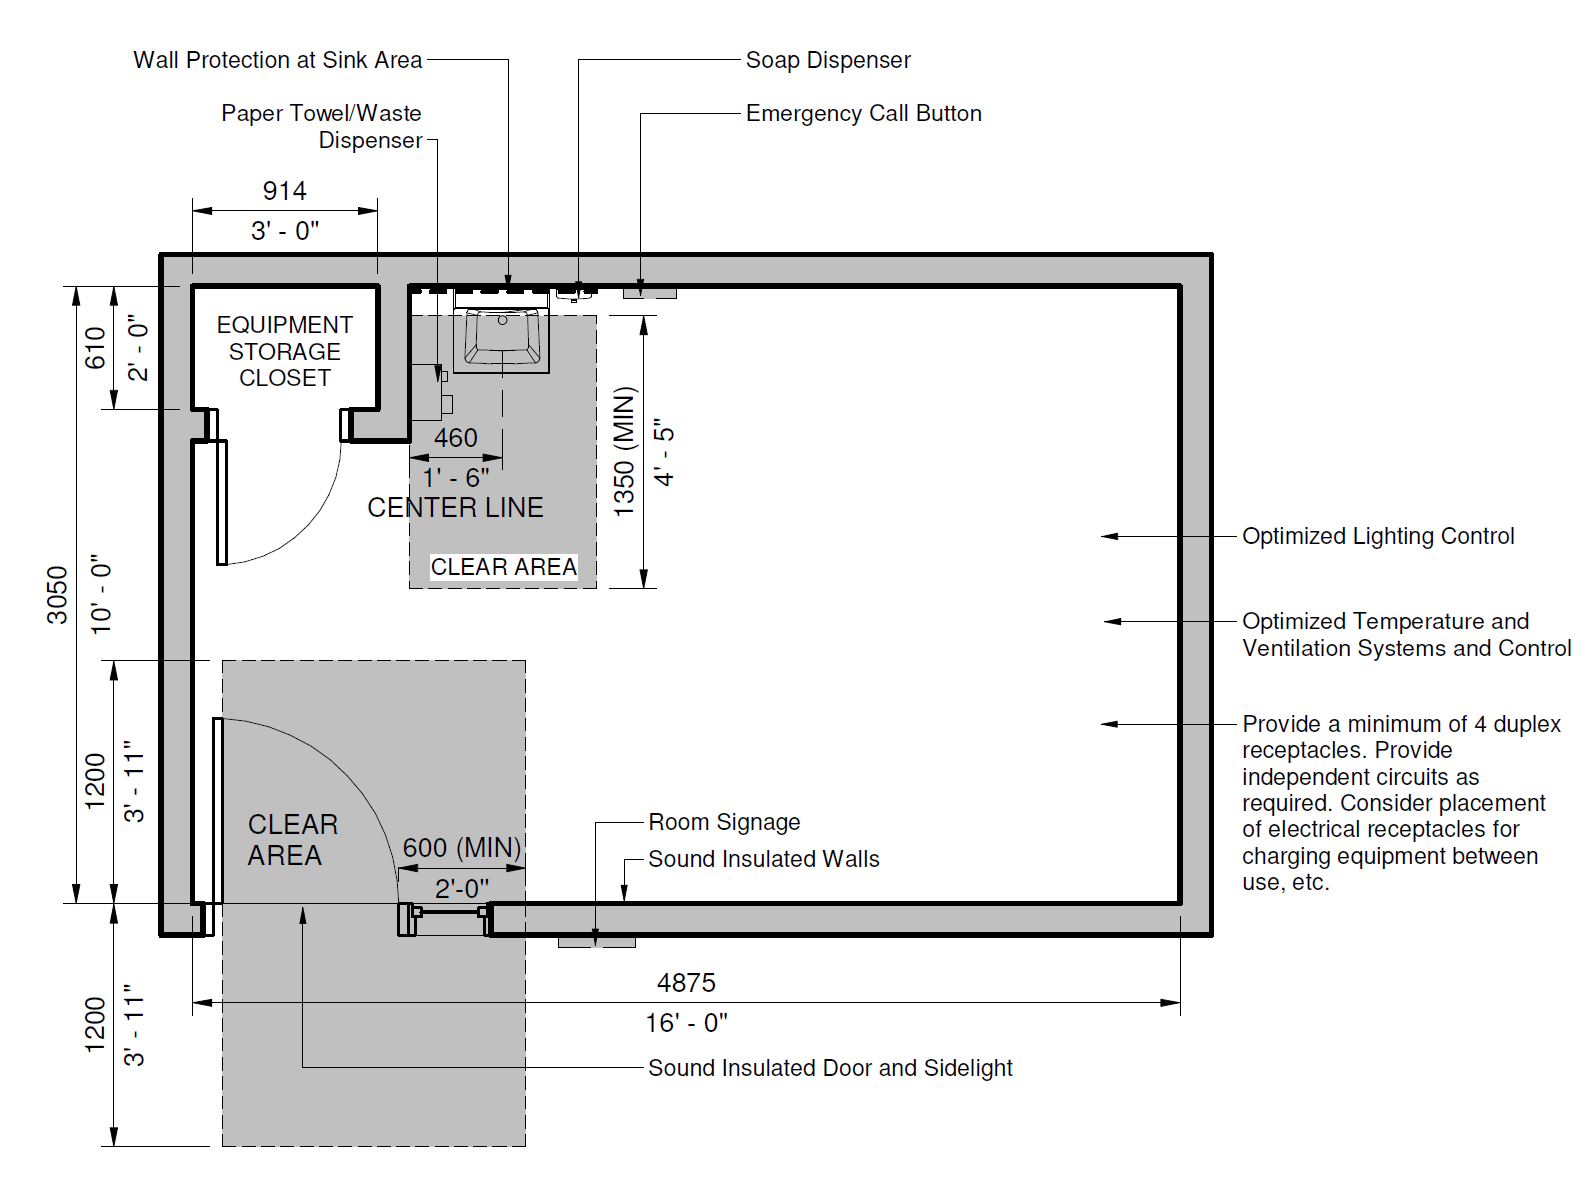
Text description of Figure 20
- A multi-sensory room includes finishing for approximately 160 sq ft (15 sq m) or 10’ by 16’ room that includes a clear area to enter and exit the room with a door on the left that opens inward and an equipment storage closet with a door across from it
- There is also a clear area to give access to the hand-wash area
- The sink has enough space underneath for persons in assistive devices to fit their knees, as well as protection from the hot water supply.
- The sink has wall protection, soap dispenser, and a paper towel/waste dispenser
- The room includes:
- optimized lighting, temperature, and ventilation with controls inside the room
- at least 4 duplex electrical receptacles (outlets). With a placement consideration for sensory equipment
- an emergency call button
- room signage
- sound insulated walls and door
Multi-sensory rooms create a controlled, safe space devoted to stimulating or calming the senses. They can be relaxing spaces to help reduce agitation and anxiety. They can also engage the user to participate in activities, stimulate reactions, and encourage communication. Generally, the room is adaptable to a wide range of participant needs.
It is important to consult professionals, such as architects, mechanical and electrical engineers to optimise the soundproofing, and systems within the space. Professional fees are included in the flat rate cost.
A multi-sensory room includes finishing for approximately a 160 sq ft (15 sq m) or 10’ by 16’ room that includes a clear area to enter and exit the room. There is also a clear area to give access to the hand-wash area. The sink has enough space underneath for persons in assistive devices to fit their knees, as well as protection from the hot water supply.
Multi-sensory rooms include:
- acoustic non-slip flooring
- rubber or non-slip vinyl with sound insulation layer underneath
- colour contrasted to walls, door, etc.
- sound insulation for walls and colour contrasting paint
- does not include new wall construction, only includes sound insulation and colour contrasting paint for new or existing walls
- sound insulation to a minimum rating of STC 48Footnote 1
- sound insulated door
- insulated steel frame
- door hardware set
- automatic operator with controls
- electrical power connection
- barrier free transition
- colour contrasting painting
- optimised HVAC (above code minimums)
- improved air quality
- acoustic absorption to a minimum rating of STC 45 and CAC 40Footnote 1
- in room controls at accessible level
- optimised lighting (above code minimums)
- anti-glare lighting with dimmer
- in room controls at accessible level
- optimised electrical (above code minimums)
- increased capacity for receptacles and circuits
- minimum of 4 duplex receptacles in room
- wall-mounted hand-wash sink
- installed with modifications to existing plumbing
- insulated piping or shroud
- wall protection
- soap dispenser
- paper towel dispenser
- waste bin
- storage closet for sensory equipment
- hollow metal door with steel frame
- door hardware set
- room signage with text, graphic, and braille
- 1 directional wayfinding sign placed elsewhere to direct users
Sensory tools and equipment
The following packages give examples of items you could purchase with the amount of funding included with each package selected. These are examples only. You may purchase similar sensory items of an equivalent value that best suits your users. The packages you select will depend on the needs of the users of the multi-sensory room.
It is important to consult specialists, such as an occupational therapist, physical therapist, speech pathologist among others, when purchasing sensory equipment to customize the space and programming for the intended users.
Auditory package: Items that produce music, tones, or other noises.
- 5 toy musical instruments, 4 games, 1 sound machine
Visual package: Items that produce light or other visual input.
- 1 light table, 4 games, 2 lamps, 4 light panels, 1 projector package, 1 fibre optic light
Vibration or Vibroacoustic package: Items designed to produce vibration. Vibroacoustic combines vibration and sound.
- 1 vibroacoustic chair, 1 vibrating cushion, 1 vibrating pillow, 1 vibrating mat, 1 vibrating oral toy, 1 vibrating handheld toy
Muscle sense (Proprioception) package: Items that activate joint and muscle involvement.
- 1 mini trampoline, 1 bouncy chair, 3 body socks (small, medium, large), 1 squeeze machine, 1 weighted blanket with adjustable weights, 1 weighted vest with adjustable size, 1 weighted toy for lap or over shoulders
Movement (Vestibular) package: Items designed to cause movement.
- 1 swing, 1 spinner, 1 beam, 1 scooter, 1 wobble cushion, 1 therapy ball, 1 rocker seat, 1 balance board
Sensory Dampening package: Items that allow user to reduce noise, visual input or other stimuli.
- 4 sets of noise cancelling headphones, 4 adjustable size eye masks
Optional accessibility features:
- acoustic ceiling treatments
- option 1) suspended acoustic ceiling tile in a grid, covering 100% of the ceiling area
- option 2) suspended acoustic ceiling baffles, covering approximately 50% of the ceiling area
- with either of these options, ensure that the acoustic ceiling treatment is rated to a minimum of NRC 0.55 and CAC 35Footnote 1
- hygienic wall cladding
- specialized seating and work surfaces
- a selection of chairs, mats, wedges
- tables or decks that are height adjustable
- emergency call button
- additional sound insulated emergency exit door
Figure 21: Multi-sensory mobile station
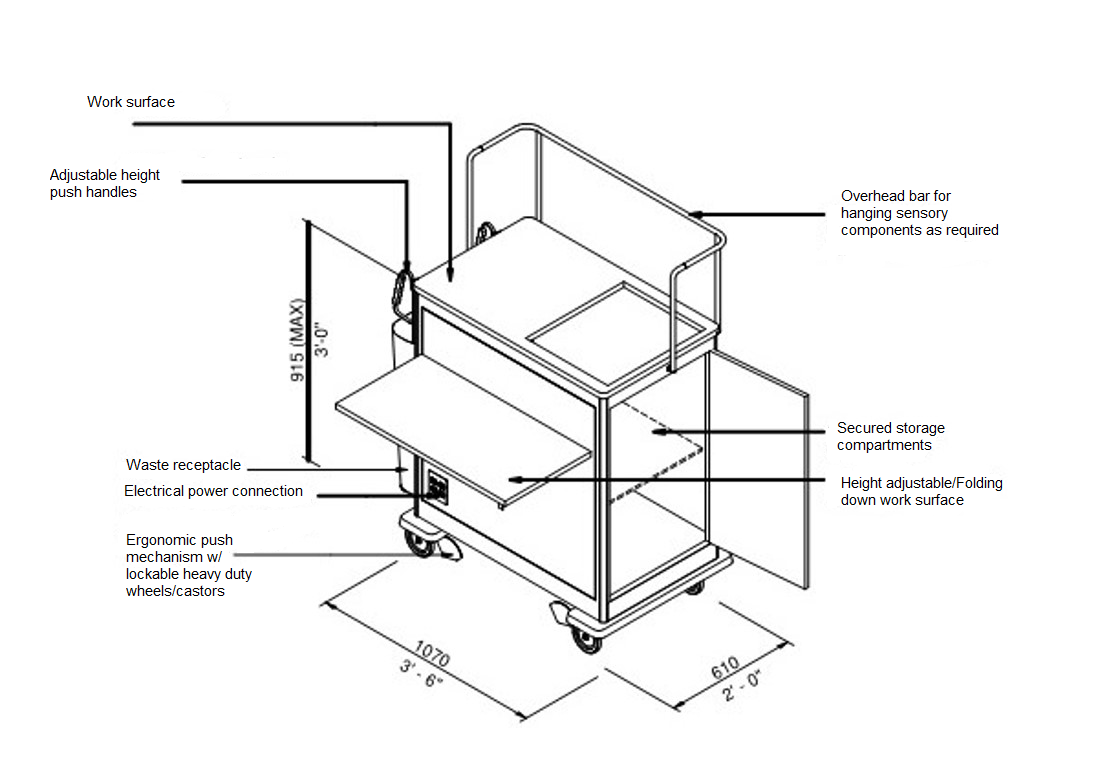
Text description of Figure 21
- The mobile station has 4 lockable heavy-duty wheels for easy transport
- At the top, there is an overhead bar for hanging sensory components as required
- There is a work surface with adjustable height push handles on the left-hand side, and a waste bin
- The shelf underneath has secured storage compartments with a height adjustable/folding-down work surface for those who are seated
- At the bottom of the cart, there is an electrical power connection outlet
A mobile station offers a multi-sensory environment where space or mobility of the users may be a consideration. The cart should be height adjustable to engage users while seated or standing.
A multi-sensory cart includes:
- height adjustable work surface
- height adjustable push handles
- heavy duty, locking wheels
- secure storage compartments
- overhead bar for hanging sensory components, as required
- electrical power connection with 4 outlets
- waste bin
Sensory tools and equipment
The following packages give examples of items you could purchase with the funding included with each package selected. These are examples only. You may purchase similar sensory items of an equivalent value that best suits your users. The packages you select will depend on the needs of the users of the multi-sensory station.
It is important to consult specialists, such as an occupational therapist, physical therapist, speech pathologist, among others, when purchasing sensory equipment to customize the space and programming for the intended users.
Auditory package: Items that produce music, tones or other noises.
- 5 toy musical instruments, 3 games, 1 sound machine
Visual package: Items that produce light or other visual input.
- 4 games, 1 lamp, 1 tabletop light panel or box, 1 projector package, 1 fibre optic light
Vibration or Vibroacoustic package: Items that produce vibration. Vibroacoustic combines vibration and sound.
- 1 vibrating cushion, 1 vibrating pillow, 1 vibrating mat, 1 vibrating oral toy, 1 vibrating handheld toy
Muscle sense (Proprioception) package: Items that activate joint and muscle involvement.
- 3 body socks (small, medium, large), 1 weighted blanket with adjustable weights, 1 weighted vest with adjustable size, 1 weighted toy for lap or over shoulders
Movement (Vestibular) package: Items designed to cause movement.
- 1 wobble cushion, 1 rocker seat, 1 balance board
Sensory Dampening package: Items that allow user to reduce noise, visual input or other stimuli.
- 2 sets of noise cancelling headphones, 2 adjustable size eye masks
Accessible playgrounds
Accessible playgrounds promote engagement and participation for all ages and abilities. They should provide a variety of play components. These components should give opportunities to challenge user’s abilities and play types, such as social, physical, and mental experiences. A number of ground-level play components should be included for persons who cannot access elevated areas. It is important to consult with a landscape architect or playground designer when designing, building, or renovating your accessible playground.
Figure 22: How to choose the accessible playground that best suits your accessibility needs
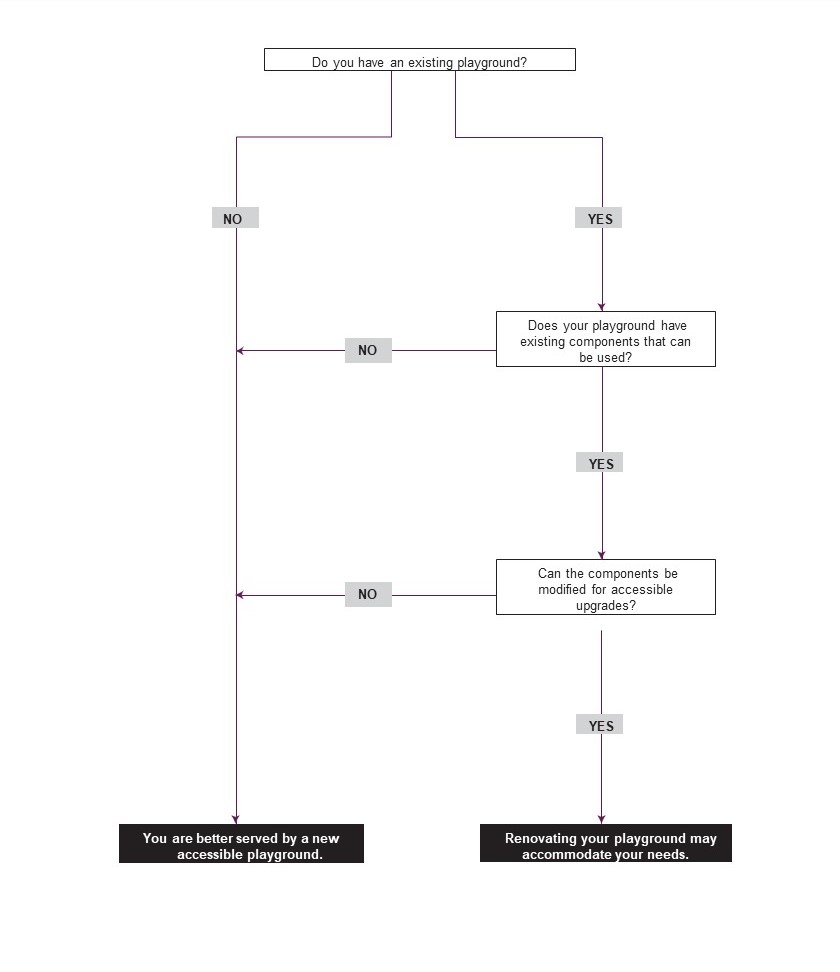
Text description of Figure 22
The flowchart asks you yes or no questions.
Question 1: Do you have an existing playground?
- If your answer is "Yes":
- go to question 2
- If your answer is "No":
- you are better served by a new accessible playground
Question 2: Does your playground have existing components that can be used?
- If your answer is "Yes":
- go to question 3
- If your answer is "No":
- you are better served by a new accessible playground
Question 3: Can the components be modified for accessible upgrades?
- If your answer is "Yes":
- renovating your playground may accommodate your needs
- If your answer is "No":
- you are better served by a new accessible playground
Result:
- if you answered no to the questions, a new accessible playground may accommodate your accessibility needs
Note that if you are renovating a playground and removing all the existing playground equipment to build a new playground, the costs of removing the existing equipment will be automatically calculated in the flat rate cost.
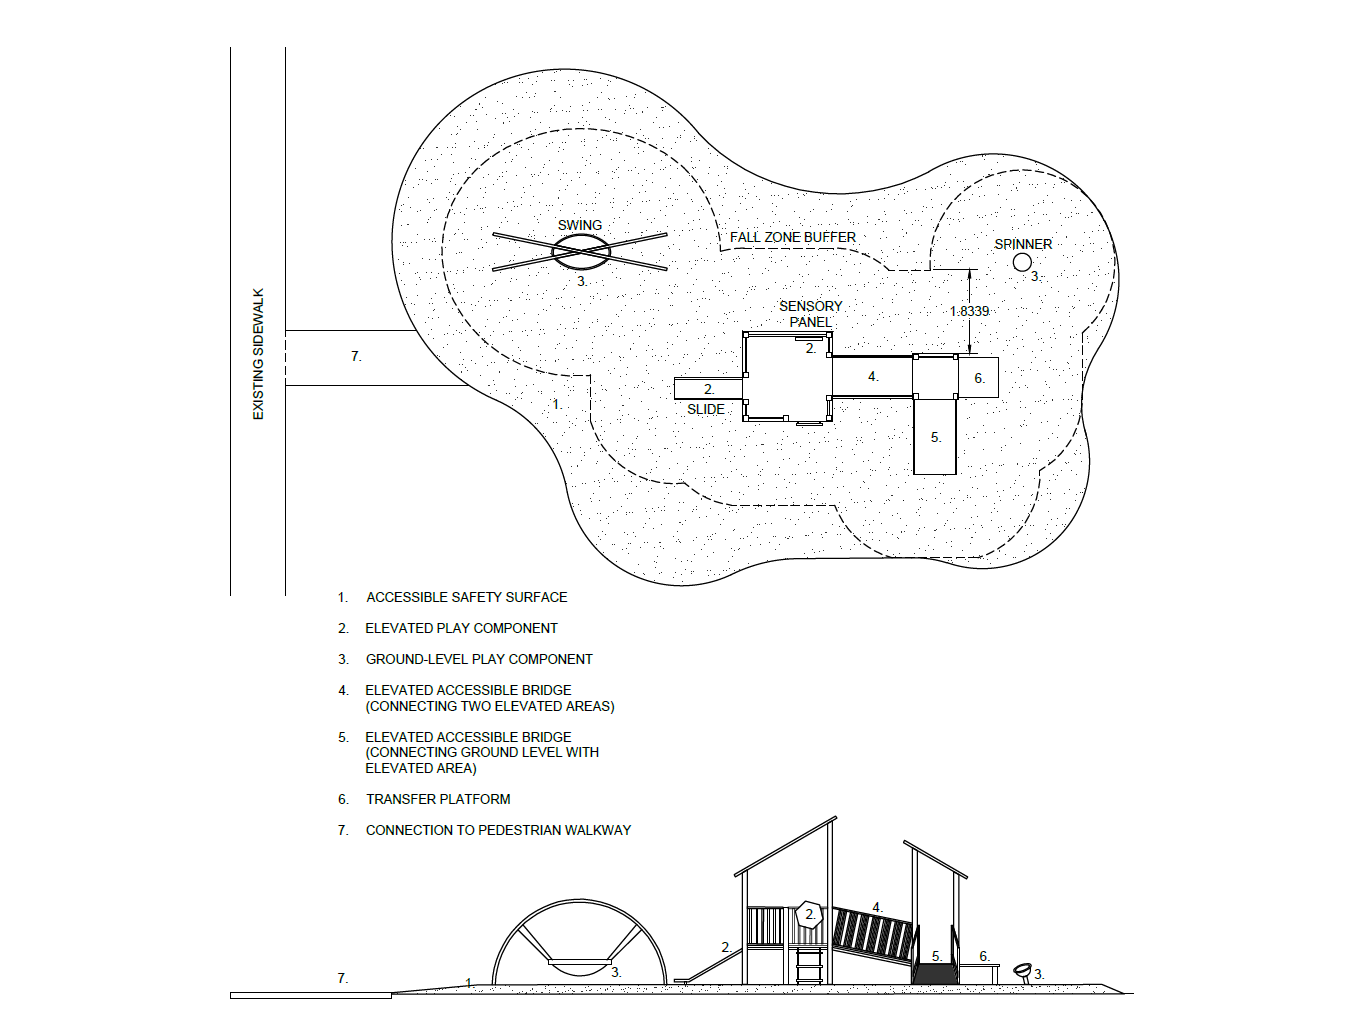
Figure 23: Accessible playground - small

Text description of Figure 23
- The layout of the playground is shown from a bird’s eye perspective as well as a side profile
- On the left side, there is an existing sidewalk with a new walkway that connects to the playground
- The walkway leads to accessible safety surfacing so persons with assistive devices can easily and safely access the playground
- There is a fall zone buffer which outlines the playground area
- The play structure is in the centre of the picture
- On the left side of the play structure, there is an elevated accessible bridge that connects the ground level with the elevated area
- Once on the play structure there are 2 play components, a slide and a play panel
- On the right side of the play structure, there is a transfer platform
- A ground level sensory panel is on the far-right edge of the playground
A path connects to an existing pedestrian walkway or sidewalk. It must be at least 150 mm wide and have a slope of no more than 5%. The accessible safety surface needs to be a certain depth based on fall heights to meet CSA requirements and for drainage. The surfacing has minimum border or “fall zone buffer” area that outlines the playground. Accessible bridges connect elevated areas to ground level components. A transfer platform allows persons to transfer from their assistive mobility devices to elevated play components. A tactile orientation map allows users with visual disabilities to navigate the play area.
Accessible playgrounds include:
- accessible safety surfacing
- engineered wood fibre
- pour-in place rubber (most accessible option for assistive devices, such as wheelchairs)
- elevated play components and/or ground-level play components such as,
- elevated
- climbers
- slides
- sensory play panels
- ground
- swings
- spring riders
- bouncers
- sensory play panels
- elevated
- elevated bridge and/or transfer platform to give access from the ground-level to elevated play components
- path connection to pedestrian walkway
Optional accessibility features:
- tactile orientation map
- sensory play panels
- accessible seating
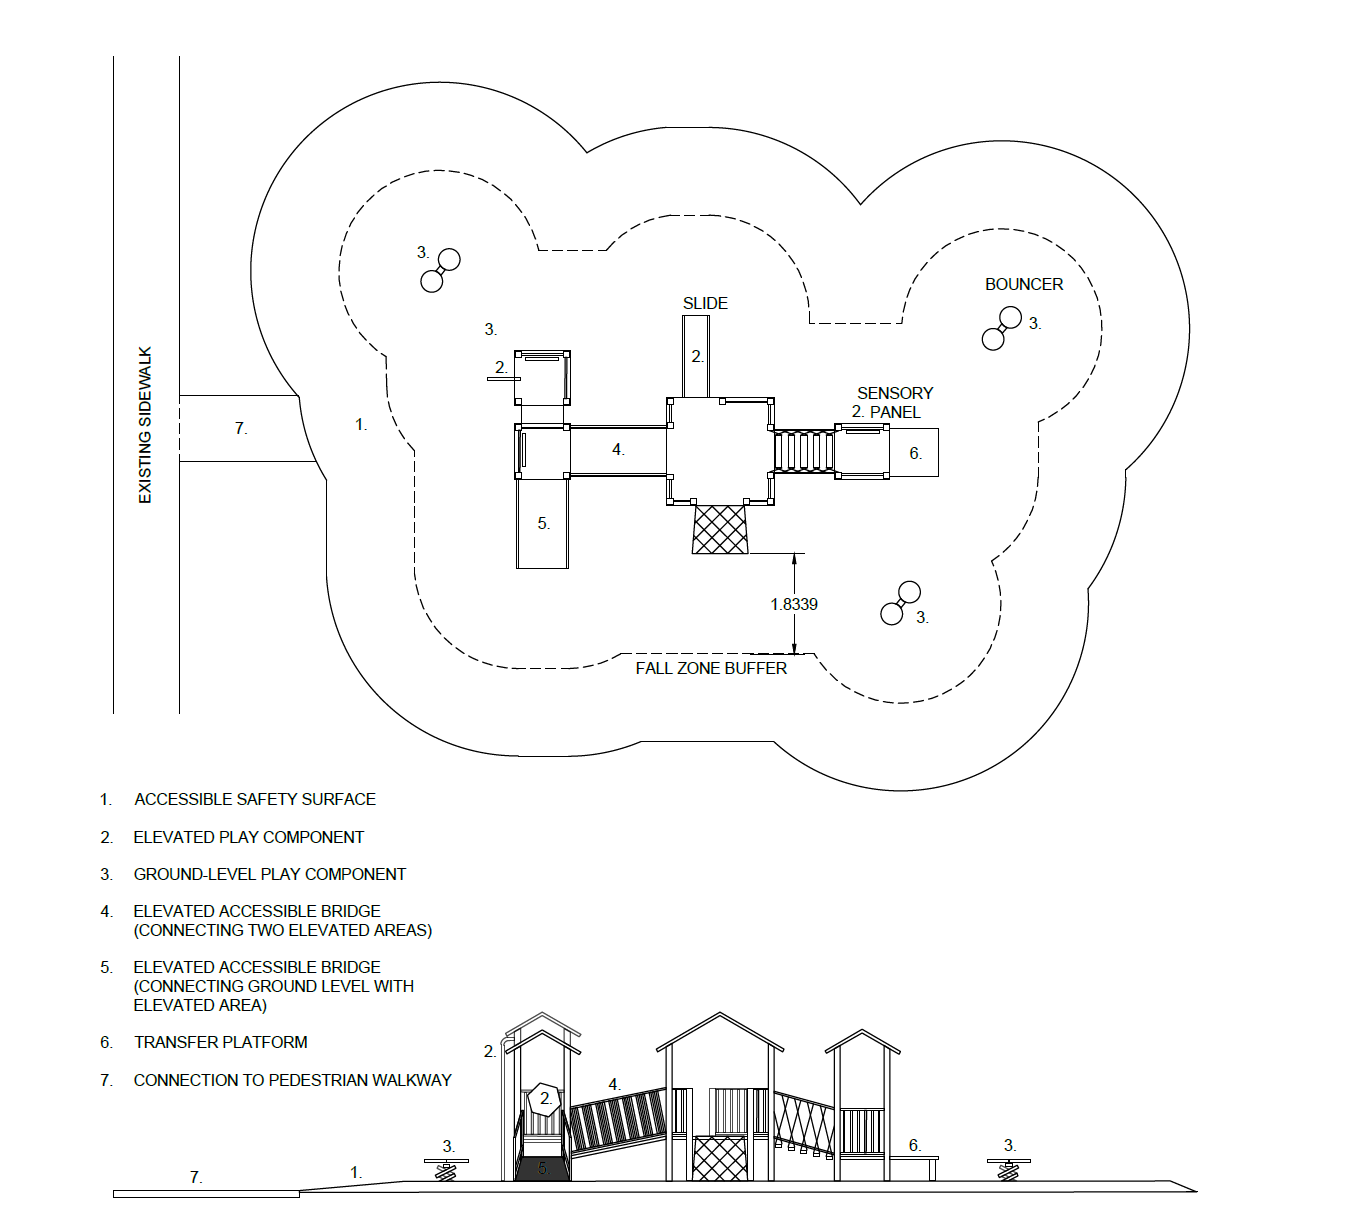
Figure 24: Accessible playground – medium
Text description of Figure 24
- The layout of the playground is shown from a bird’s eye perspective as well as a side profile
- On the left side, there is an existing sidewalk with a new walkway that connects to the playground
- The walkway leads to accessible safety surfacing so persons with assistive devices can easily and safely access the playground
- There is a fall zone buffer which outlines the playground area
- The play structure is in the centre of the picture
- On the left side of the play structure, there is an accessible swing
- To the right of the swing is the play structure. An elevated accessible bridge connects the ground level with the elevated area
- Once on the play structure, there are 2 play components, a slide and a play panel
- On the right side of the play structure, there is a transfer platform
- A ground-level spinner is on the far right edge of the playground
Figure 25: Accessible playground - large
Text description of Figure 25
- The layout of the playground is shown from a bird’s eye perspective as well as a side profile
- On the left side, there is an existing sidewalk with a new walkway that connects to the playground
- The walkway leads to accessible safety surfacing so persons with assistive devices can easily and safely access the playground
- There is a fall zone buffer which outlines the playground area
- On the top left side of the play structure, there is a ground-level component
- The play structure is in the centre of the picture
- There are accessible bridges that connect the ground-level to the play structure, as well as connects 2 elevated areas
- Once on the play structure, there are 3 elevated play components, such as slides and play panels
- On the right side of the play structure, there is a transfer platform
- There are 2 additional ground-level components, such as a spinner or bouncer, on the bottom right and top left of the playground
Accessible parking
To determine the recommended number of accessible parking stalls in relation to your existing number of parking stalls, see table below. Note that flat rate costs will only calculate up to 6 accessible parking stalls. Costs for more than 6 accessible parking stalls are the responsibility of the applicant.
| Number of parking stalls | Number of accessible parking stalls |
|---|---|
| 2 to 50 | 1 to 3 |
| 51 to 100 | 2 to 4 |
| 101 to 200 | 4 to 8 |
| 201 to 300 | 5 to 10 |
| 301 to 500 | 6 to 12 |
- Source: Table 10, CSA/ASC B651:23 Accessible design for the built environment. © 2023 Canadian Standards Association.
Accessible parking spaces should be located as close as possible to the accessible building/destination entrance, but no more than 164’ (50 m) away (best practice is no more than 98’5” (30 m) away).
Figure 26: Accessible parking – single – below grade
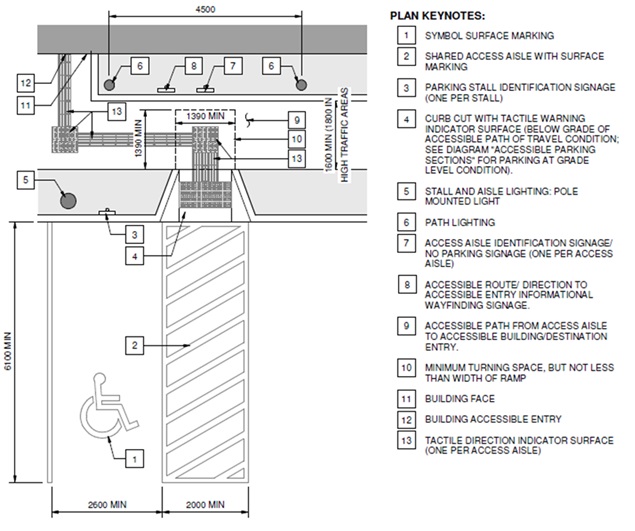
- Source: Figure 67, CSA/ASC B651:23 Accessible design for the built environment. © 2023 Canadian Standards Association.
Text description of Figure 26
- The layout of a single accessible parking stall is shown from bird’s eye perspective
- There is an accessible parking stall, an access aisle next to the stall, and a path connecting the access aisle to the accessible building entrance
- A symbol of a wheelchair user is painted on the ground to indicate the accessible parking stall, and diagonal lines are painted on the ground to indicate the access aisle
- Signs also indicate the accessible parking stall, and the access aisle
- Given the accessible parking stall is below grade, the access aisle is connected to the accessible path of travel by a curb cut and tactile bumps indicating a change in surface
- There is a pole mounted light to illuminate the stall and access aisle, and lighting along the path
- There are tactile bumps and lines along the centre of the accessible path to direct people with low vision to the accessible building entrance
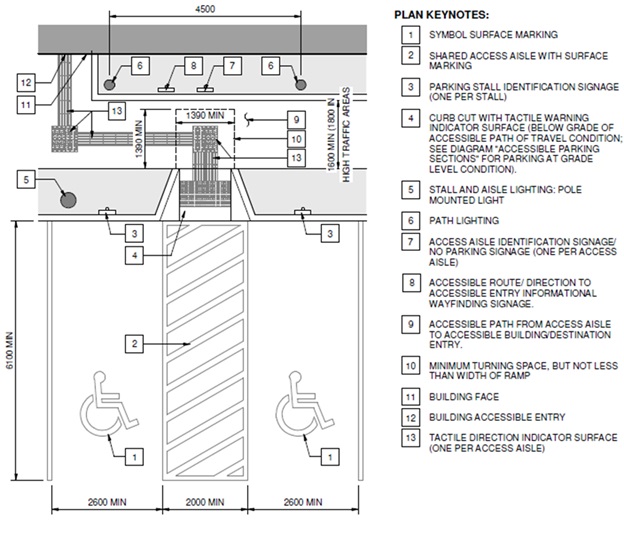
Figure 27: Accessible parking – multiple – below grade
- Source: Figure 67, CSA/ASC B651:23 Accessible design for the built environment. © 2023 Canadian Standards Association.
Text description of Figure 27
- The layout of multiple accessible parking stalls is shown from bird’s eye perspective
- There are 2 accessible parking stalls, a shared access aisle between the stalls, and a path connecting the access aisle to the accessible building entrance
- Symbols of a wheelchair user is painted on the ground to indicate the accessible parking stalls, and diagonal lines are painted on the ground to indicate the shared access aisle
- Signs also indicate the accessible parking stalls, and the shared access aisle
- Given the accessible parking stalls are below grade, the access aisle is connected to the accessible path of travel by a curb cut and tactile bumps indicating a change in surface
- There is a pole mounted light to illuminate the stalls and access aisle, and lighting along the path
- There are tactile bumps and lines along the centre of the accessible path to direct people with low vision to the accessible building entrance
Accessible parking stalls include:
- surface markings in high contrast paint for accessible stall and access aisle
- 2 posts and 1 wheel stop per stall OR 1 curb cut per access aisle
- depends on whether the parking stall is at grade (posts/wheel stop) or below grade (curb cut)
- 1 parking stall sign per stall
- 1 access aisle sign per access aisle
- 1 wayfinding sign per access aisle to direct people to accessible building/destination entrance
- architectural wayfinding leading people to accessible building/destination entrance
- for example, colourful painted arrows, tactile bumps or lines on ground
Optional accessibility features:
- surfacing in either concrete or asphalt
- lighting
- orientation cues/directional indicators at accessible building entrance
- for example, high contrast colour or material on building façade
- accessible path connecting the access aisle to accessible building/destination entrance, with options for:
- path lighting
- path edge detection
- additional curb cuts
Figure 28: Accessible parking – below grade vs at grade
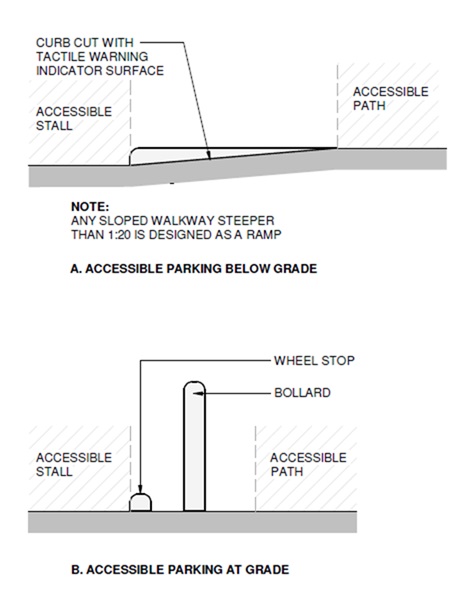
Text description of Figure 28
- A side profile shows the difference between an accessible parking below grade versus at grade
- Below grade shows the accessible parking stall connected to the accessible path of travel by a curb cut with a tactile warning indicator surface
- At grade shows the accessible parking stall separated from the accessible path of travel by 1 wheel stop and 2 posts/bollards
If your accessible parking stall is below grade, an additional curb cut with tactile bumps will be automatically included in flat rate costs. If your accessible parking stall is at grade, 1 wheel stop and 2 posts/bollards will be automatically included in flat rate costs.
Accessible drop-off areas
Accessible drop-off areas allow safer drop-off and pick-up of people who have difficulty walking long distances or have limited stamina, users of mobility aids, and people who travel with caregivers (for example, a person with vision loss).
Accessible drop-off areas should be located within 98’5” (30 m) of the accessible building/destination entrance, and away from traffic flow.
Figure 29: Accessible drop-off area
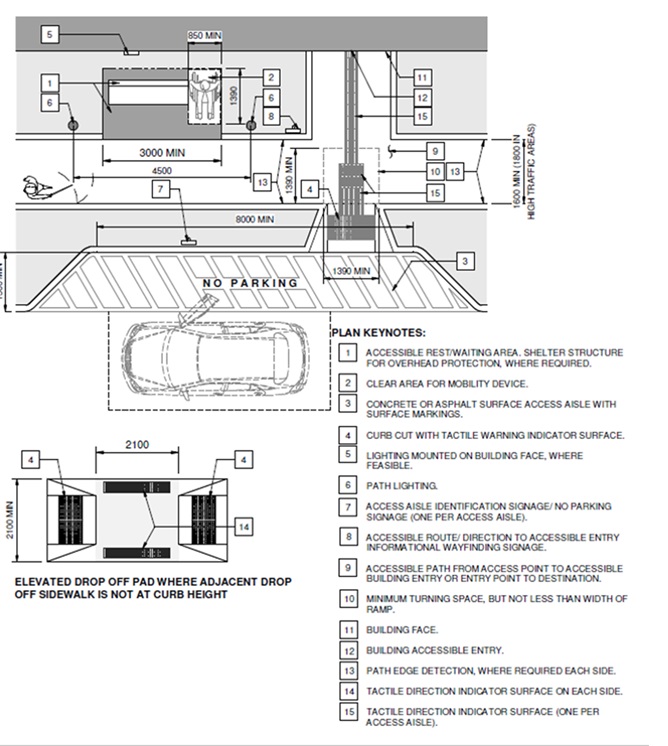
Text description of Figure 29
- The layout of an accessible drop-off area is shown from bird’s eye perspective
- A car is stopped next to the access aisle, which is indicated with diagonal lines and “No Parking” painted on the ground
- A curb cut connects the access aisle to the accessible path of travel
- There are tactile bumps and lines along the centre of the accessible path to direct people with low vision to the accessible building entrance
- On the left, there is a rest/waiting area with accessible seating and overhead protection from the elements
- There is a pole mounted light to illuminate the access aisle, and lighting along the path
- The layout of an elevated drop-off pad is also shown, with curb cuts on either end and tactile bumps and lines on each side
Accessible drop-off areas include:
- surfacing in concrete or asphalt (including removal of existing surfacing)
- surface markings in high contrast paint
- 2 posts and 1 wheel stop per stall OR 1 curb cut to join the drop-off area to a path
- depends on whether the drop-off area is at grade (posts/wheel stop) or below grade (curb cut)
- 1 accessible drop-off area sign
- 1 wayfinding sign to direct people to accessible building/destination entrance
- architectural wayfinding leading people to accessible building/destination entrance
- for example, colourful painted arrows, tactile bumps or lines on ground
- 1 rest/waiting area with accessible seating
Optional accessibility features:
- lighting
- orientation cues/directional indicators at accessible building entrance
- for example, high contrast colour or material on building façade
- accessible path connecting the accessible drop-off area to accessible building/destination entrance, with options for:
- path lighting
- path edge detection
- additional curb cuts
- elevated drop-off pad
- where curb height is not high enough to accommodate accessible transport (bus/van) lifts
- at least 6” (150 mm) thick concrete or asphalt with concrete curb, and curb cuts on either end
- overhead protection in steel or wood for rest/waiting area
- at least 5’11” by 9’10” (1800 mm by 3000 mm), with foundation
Accessible electric vehicle charging stations
Accessible electric vehicle charging stations allow independent use by drivers with disabilities, including people who have limited hand dexterity, limb differences, or limb amputations that require use of adaptive driving controls.
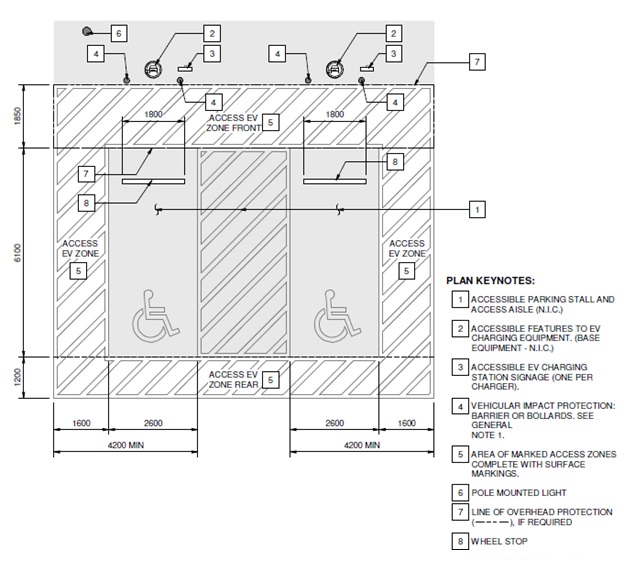
Figure 30: Accessible EV charging station – single – at grade
Text description of Figure 30
- The layout of a single accessible EV charging station is shown from bird’s eye perspective
- There is an accessible parking stall in the centre of the image, with an access aisle to it’s right. The costs for the parking stall and access aisle are not included in the costs for the accessible EV charging station
- To the front, left, and rear of the accessible parking stall, there are Access Zones marked with diagonal painted lines
- In front of the Front Access Zone, there is the EV charger, signage, and lighting
- The Front Access Zone is covered with an overhead shelter, to protect from rain, snow, etc.
- Given this accessible EV charging station is at grade, there is 1 wheel stop in the accessible parking stall, and 2 posts/bollards on either side of the EV charger
Figure 31: Accessible EV charging station – multiple – at grade
Text description of Figure 31
- The layout of 2 accessible EV charging stations is shown from bird’s eye perspective
- There are 2 accessible parking stalls in the centre of the image, with a shared access aisle in between them. The costs for the parking stall and access aisle are not included in the costs for the accessible EV charging station
- To the front, left, and rear of the accessible parking stalls, there are Access Zones marked with diagonal painted lines
- In front of the Front Access Zone, there is lighting, and 1 EV charger and sign per accessible parking stall
- The Front Access Zone is covered with an overhead shelter, to protect from rain, snow, etc.
- Given these accessible EV charging stations are at grade, there is 1 wheel stop in each accessible parking stall, and 2 posts/bollards on either side of each EV charger
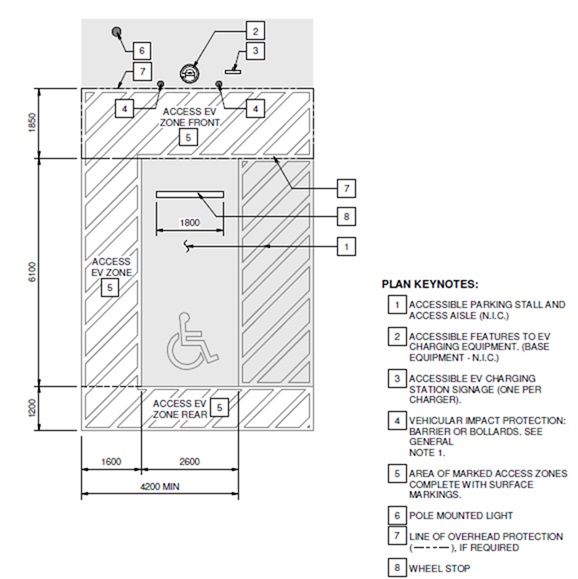
Figure 32: Accessible EV charging station – single – below grade
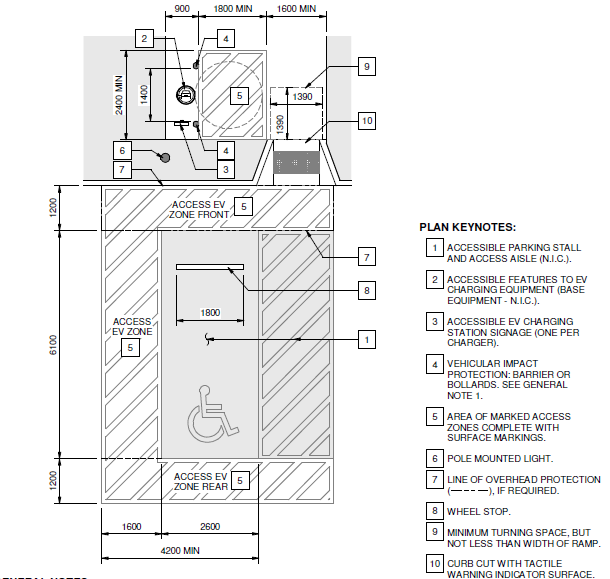
Text description of Figure 32
- The layout of a single accessible EV charging station is shown from bird’s eye perspective
- There is an accessible parking stall in the centre of the image, with an access aisle to it’s right. The costs for the parking stall and access aisle are not included in the costs for the accessible EV charging station
- To the front, left, and rear of the accessible parking stall, there are Access Zones marked with diagonal painted lines
- In front of the Front Access Zone, there is the EV charger, signage, and lighting
- The Front Access Zone is covered with an overhead shelter, to protect from rain, snow, etc.
- Given this accessible EV charging station is below grade, there is 1 wheel stop in the accessible parking stall, 2 posts/bollards on either side of the EV charger, and a curb cut connecting the Front Access Zone to the EV charger
Figure 33: Accessible EV charging station – multiple – below grade
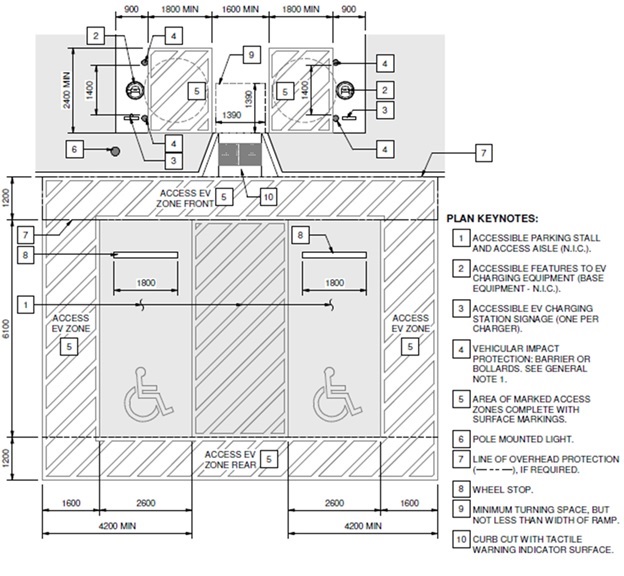
Text description of Figure 33
- The layout of multiple accessible EV charging stations is shown from bird’s eye perspective
- There are 2 accessible parking stalls in the centre of the image, with a shared access aisle in between them. The costs for the parking stall and access aisle are not included in the costs for the accessible EV charging station
- To the front, left, and rear of the accessible parking stalls, there are Access Zones marked with diagonal painted lines
- In front of the Front Access Zone, there is lighting, and one EV charger and sign per accessible parking stall
- The Front Access Zone is covered with an overhead shelter, to protect from rain, snow, etc.
- Given this accessible EV charging station is below grade, there is 1 wheel stop in each accessible parking stall, 2 posts/bollards on either side of each EV charger, and a curb cut connecting the Front Access Zone to the EV chargers
Accessible electric vehicle charging stations include:
- surface markings in high contrast paint for the area surrounding the accessible EV charger
- accessibility features of EV charger (not the entire EV charger) (refer to the below section “How to choose an accessible EV charger” for these features)
- wheel stop and posts to protect the charger from other vehicles
- 1 curb cut if the accessible EV charging station is below grade
- 1 accessible EV charging station sign per charger
Optional accessibility features:
- surfacing for Access Zones in concrete or asphalt
- lighting
- overhead protection in steel or wood covering Front Access Zone only
- includes maximum height clearance sign
How to choose an accessible EV charger*:
- look for chargers with:
- charging cable cord reel:
- a cord reel on the charging cable help reduce the weight of the cable should someone have difficulty carrying it to their vehicle
- reduced force needed to release the handle from the charger:
- ensure the releasing mechanism of the plug requires no more than 5lbs of pressure
- charging cable cord reel:
- avoid chargers with:
- perfectly round handles:
- can be difficult to grasp for someone with mobility issues
- bright flashing lights:
- can disorient people (especially at night)
- perfectly round handles:
*Note that the above features of an accessible EV charger are covered by flat rate costs.
Additional things to consider*:
- look for chargers with:
- speech output
- volume control
- braille instructions
- wireless or inductive chargers as they become available (currently there are no manufacturers that produce accessible wireless or inductive chargers)
*Note that the above things to consider are not covered by flat rate costs.
Accessible kitchens
Figure 34: Accessible kitchen general floor plan
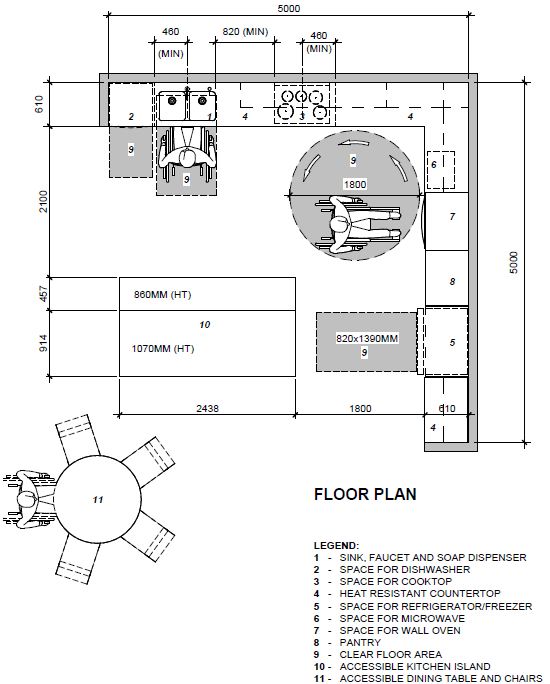
- Source: Figure 35(f), CSA/ASC B652:23 Accessible dwellings. © 2023 Canadian Standards Association.
Text description of Figure 34
- The layout of an L-shaped kitchen is shown from bird's eye perspective
- Along the right side and back wall are cabinets, with empty spaces for appliances (dishwasher, cooktop, refrigerator/freezer, microwave, and wall oven)
- A person using a wheelchair is at the barrier-free sink
- A kitchen island at two different heights is in the centre of the floorspace
- A person using a wheelchair is seated at an accessible dining table. There is enough space around the table to move around
Figure 35: Accessible kitchen layout
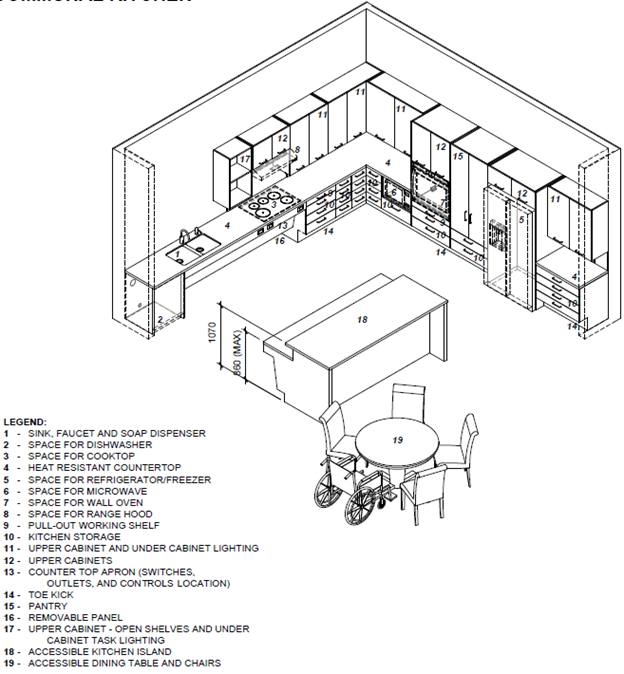
- Source: Figure 35(a), CSA/ASC B652:23 Accessible dwellings. © 2023 Canadian Standards Association.
Text description of Figure 35
- The layout of an L-shaped kitchen is shown from a three-dimensional perspective, showing the depth of various elements
- Along the side and back wall are upper and lower cabinets, with empty spaces for appliances (dishwasher, cooktop, refrigerator/freezer, microwave, and wall oven)
- There are no lower cabinets below the barrier-free sink and cooktop, to allow persons using wheelchairs to roll underneath
- A kitchen island at two different heights is in the centre of the floorspace. There are no lower cabinets below the island countertop, to allow persons using wheelchairs to roll underneath
- Near the kitchen, there is a dining table with chairs. The legs of the table do not interfere with a wheelchair user's ability to approach the table
Figure 36a: Accessible kitchen - heights and clearances
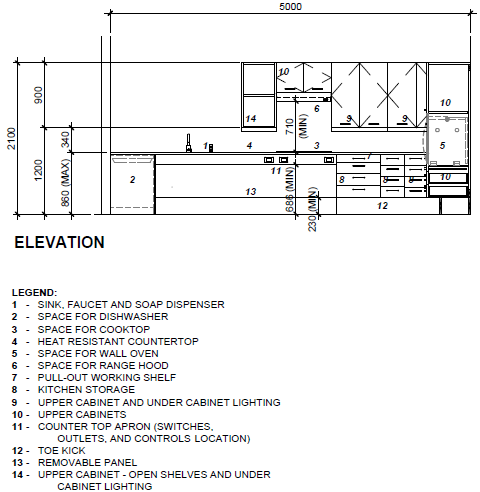
- Source: Figure 35(d), CSA/ASC B652:23 Accessible dwellings. © 2023 Canadian Standards Association.
Text description of Figure 36a
- A view facing the cabinetry shows the heights of the various elements for one half of an L-shaped kitchen (length of one wall)
- Moving from left to right, there is:
- space for the dishwasher
- barrier-free sink with panel for protection for knees from plumbing
- section of counterspace with no lower cabinets below, and open shelving above
- space for cooktop with panel protection for knees from wiring
- space for range hood above cooktop
- section of upper and lower cabinets, including a pull-out work shelf
- space for wall oven
Figure 36b: Accessible kitchen - heights and clearances
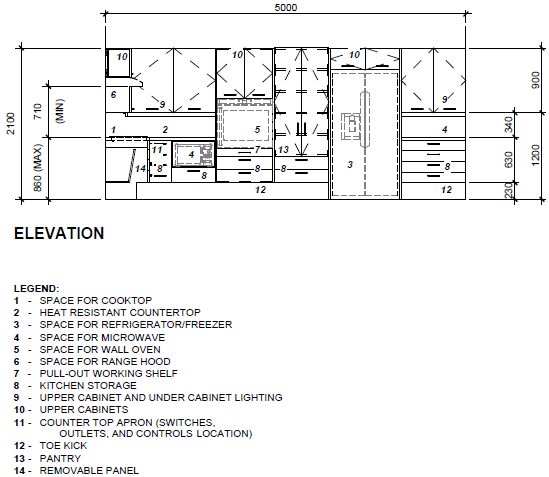
- Source: Figure 35(d), CSA/ASC B652:23 Accessible dwellings. © 2023 Canadian Standards Association.
Text description of Figure 36b
- A view facing the cabinetry shows the heights of the various elements for the other half of an L-shaped kitchen (length of one wall)
- Moving from left to right, there is:
- section of upper and lower cabinets
- space for microwave at accessible height in lower cabinets
- space for wall oven with upper cabinets above and lower cabinets below
- section of upper and lower cabinets (pantry)
- space for refrigerator/freezer with upper cabinets above
- section of upper and lower cabinets
An accessible kitchen includes finishing for an approximately 270 sq ft (25 sq m) room. The kitchen floor space has clear areas to give enough room for persons using mobility devices, such as wheelchairs, to move around. The sink and cooktop have enough space underneath for persons in wheelchairs to fit their knees, as well as removable panels for protection from the sink's hot water supply and cooktop's wiring. The oven is mounted on the wall with a nearby pull-out heat resistant shelf. The microwave is under the counter and integrated within the lower cabinets to ensure it is at an accessible height for seated users.
Accessible kitchens include:
- non-slip flooring
- minimal glare, no strong visual patterning
- colour contrasted to walls, cabinets, appliances, etc.
- 30' (9100 mm) of cabinetry with openings for appliances
- upper cabinets: if more than 1100 mm above floor, includes drop-down mechanism (manual or automatic)
- lower cabinets: drawer-style
- "D" shape drawer/door pulls and soft close hinges on all cabinets
- quartz countertops
- barrier-free sink
- stainless steel undermount sink
- manual or automatic telescopic faucet
- temperature indicator that limits hot water to 49 degrees C to prevent burns for users with sensory loss
- hands-free soap dispenser
- plumbing for sink and dishwasher
- optimised lighting (above code minimums)
- task lighting above countertops and sink (750 lumens) and overhead lighting (300 lumens) for rest of kitchen
- anti-glare lighting with dimmer
- in room controls at accessible level
- optimised electrical (above code minimums)
- increased capacity for receptacles and circuits
- wiring to accommodate appliances
- optimised HVAC (above code minimums)
- improved air quality
- acoustic absorption to a minimum rating of STC 45 and CAC 40Footnote 1
- in room controls at accessible level
- sound insulation for walls and colour contrasting paint
- does not include new wall construction, only includes sound insulation and colour contrasting paint for new or existing walls
- sound insulation to a minimum rating of STC 42Footnote 1
- 2 signs with text, graphics, and braille
- 1 sign at kitchen, and 1 sign elsewhere that directs people to kitchen
- large and small appliances are NOT included (refer to the below section "How to choose accessible kitchen appliances" for more information)
Optional accessibility features:
- kitchen island
- option 1) fully at lower height
- option 2) at 2 heights:
- full length of one side of island at lower height to accommodate seated users
- other half of island at higher height to accommodate standing users
- clear space (no lower cabinets) under countertop
- task lighting above countertop (750 lumens)
- sound-insulated automatic door
- insulated steel frame
- door hardware set
- automatic operator with controls
- electrical power connection
- barrier-free transition
- colour contrasting paint
- Wi-Fi infrastructure/cabling to accommodate smart appliances
- smart appliances include those that can be controlled from a mobile device or voice-activated, with safety features (for example, automatic shut-off, cool-to-touch, etc.)
- includes 1 data outlet, 8 m cable to data room, and 1 wireless router
- assumes facility/building has existing Wi-Fi
- accessible dining tables with seating
- at least 1 accessible seat with backrest per table
- located along barrier-free path of travel, with at least 2000 mm of clear area around all sides of table
How to choose accessible kitchen appliances:
Large and small kitchen appliances are not covered by flat rate costs. Costs of these appliances are your responsibility. The list below includes considerations to keep in mind when choosing accessible appliances.
- General:
- look for "smart" appliances that can be controlled from a mobile device, or voice-activated (can be controlled by virtual assistants)
- include safety features (for example, automatic shut-off, cool-to-touch, etc.)
- include high contrast, tactile, front-mounted controls with large print and/or graphics
- Refrigerator/freezer:
- full-size, either side-by-side or freezer integrated as pull-out drawer at bottom of refrigerator
- freezers integrated at top of refrigerator do not accommodate reach range of seated users
- have additional "smart" capabilities such as:
- internal cameras and sensors to view food items in real time and get alerts when they are running low or expiring
- smart home integration to create routines or alerts (assists those with dementia, memory difficulties, etc.)
- full-size, either side-by-side or freezer integrated as pull-out drawer at bottom of refrigerator
- Cooktop:
- induction is safest option, instead of electric or gas
- controls located in front or beside hot surface
- mounted in countertop, with separate wall oven
- Wall oven:
- built-in wall oven, separate from cooktop
- side swing door to accommodate seated users
- self-cleaning for easier cleaning by users with limited strength, mobility, and/or dexterity
- Range hood:
- controls located at accessible level, or via remote control
- Dishwasher
- side swing door OR drawer-type to accommodate seated users
- controls located on top or front of door
- quiet feature to reduce overall noise levels in kitchen
- water leak detection to avoid slippery surfaces
- Microwave
- located at accessible height (located on countertop or integrated in lower cabinet design instead of upper cabinet design)
- allow landing area of at least 381 mm by 406 mm on adjacent countertop surface
- Pot filler:
- consider including pot-filler above cooktop where cooktop cannot be located adjacent to sink
- enables users with limited strength, mobility, and/or dexterity to fill pots without needing to transport to cooktop when full
- consider including pot-filler above cooktop where cooktop cannot be located adjacent to sink
Accessible drinking fountains and hand-wash stations
Accessible drinking fountains should be located along a barrier-free path of travel, in alcoves to avoid blocking the path. Ensure the fountains and controls are colour contrasted to their surrounding environment, to help with depth perception for those with visual disabilities. Automatic controls are preferred over hand-operated controls, to increase accessibility for persons with mobility or dexterity disabilities. Outdoor drinking fountains should be within 15 m of a heated building to avoid freezing of pipes.
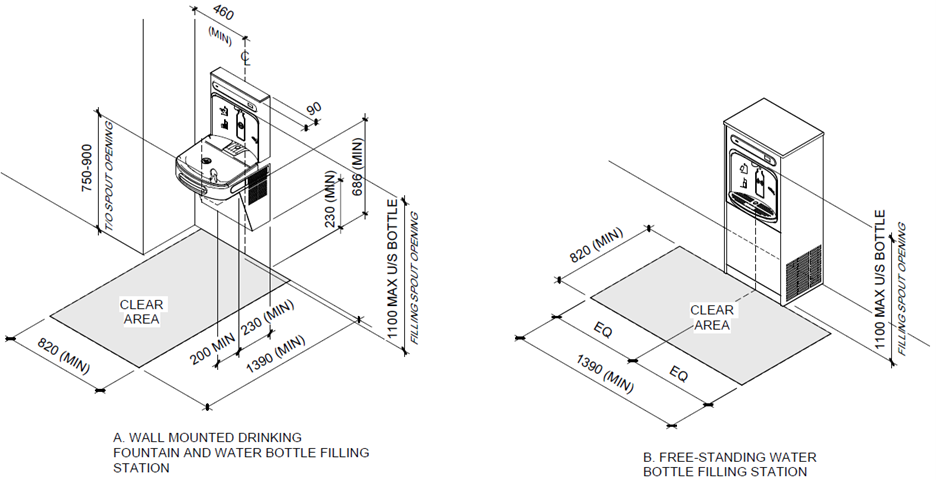
Figure 37: Indoor drinking fountain - wall-mounted versus free-standing

- Source: Figure 39(a), CSA/ASC B651:23 Accessible design for the built environment. © 2023 Canadian Standards Association.
Text description of Figure 37
- A three-dimensional view shows the differences between a wall-mounted indoor drinking fountain versus a free-standing one
- The wall-mounted fountain is mounted at an accessible height, with empty space below to give space for wheelchair users' knees. The controls are on the front and both sides of the fountain
- The free-standing fountain is low enough that the spout is at an accessible height for seated users, and the control is at the front of the fountain
- There is enough clear area (1390 mm by 820 mm) on the ground in front of the drinking fountain that people using mobility devices can approach and move around
Figure 38: Indoor drinking fountain - drinking fountain with bottle filling station versus bottle filling station only
- Source: Figure 39(a), CSA/ASC B651:23 Accessible design for the built environment. © 2023 Canadian Standards Association.
Text description of Figure 38
- A three-dimensional view shows the differences between a wall-mounted indoor drinking fountain with integrated bottle filling station versus a free-standing bottle-filling station only
- The fountain with bottle filling station is mounted at an accessible height, with empty space below to give space for wheelchair users' knees. The push button controls are on the front and both sides of the fountain, and the bottle filling station is operated by automatic sensor
- The bottle filling station is free-standing, operated by automatic sensor, and is low enough that the dispenser is at an accessible height for seated users
- There is enough clear area (1390 mm by 820 mm) on the ground in front of the fountains that people using mobility devices can approach and move around
Accessible indoor water fountains include:
- indoor drinking fountain (wall-mounted or free-standing) or drinking fountain with bottle filling station, colour contrasted to surrounding environment with automatic or push button controls
- 2 signs with text, graphics, and braille
- 1 sign at fountain, and 1 sign elsewhere that directs people to fountain
Optional accessibility features:
- lighting at 300 lumens
Figure 39: Outdoor drinking fountain - drinking fountain with bottle filling station versus drinking fountain only
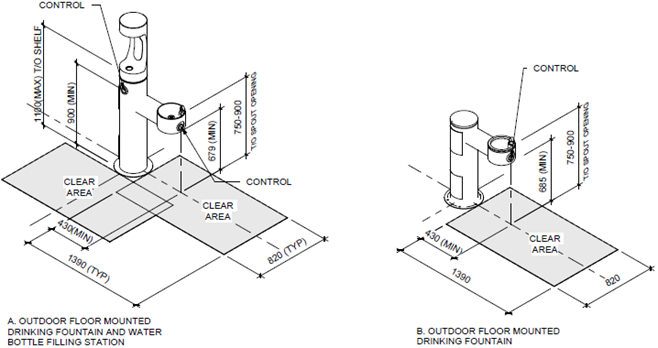
Text description of Figure 39
- A three-dimensional view shows the differences between an outdoor drinking fountain with integrated bottle station versus a stand-alone outdoor drinking fountain. Both fountains are mounted on the ground
- The outdoor drinking fountain with bottle filling station is in an L shape, with the drinking fountain forming the bottom of the L, and the bottle filling station forming the left side of the L
- The spouts for both the drinking fountain and the bottle filling are at accessible heights for seated users. The drinking fountain is positioned such that one person can use the bottle filling station and another person can use the drinking fountain at the same time
- The stand-alone outdoor drinking fountain is low enough that the spout is at an accessible height for seated users, and the control is at the front of the fountain
- There is enough clear area (1390 mm by 820 mm) on the ground in front of the bottle filling station and drinking fountain that people using mobility devices can approach and move around
Figure 40: Outdoor drinking fountain - drinking fountain with bottle filling station and service animal basin
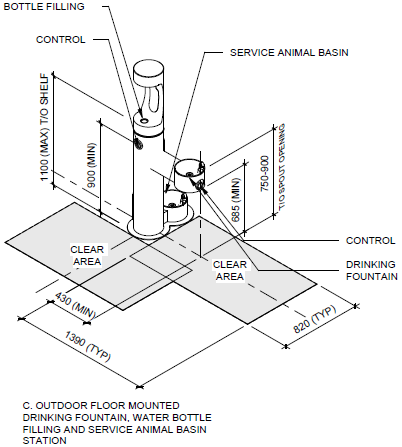
Text description of Figure 40
- A three-dimensional view shows an outdoor drinking fountain with integrated bottle filling station and service animal basin, mounted on the ground
- The outdoor drinking fountain with bottle filling station is in an L shape, with the drinking fountain forming the bottom of the L, and the bottle filling station forming the left side of the L
- The spouts for both the drinking fountain and the bottle filling are at accessible heights for seated users. The drinking fountain is positioned such that one person can use the bottle filling station and another person can use the drinking fountain at the same time
- The service animal basin is near the ground, and positioned such that it is facing the opposite way of the bottle filling station
- There is enough clear area (1390 mm by 820 mm) on the ground in front of the bottle filling station and drinking fountain that people using mobility devices can approach and move around
Accessible outdoor water fountains include:
- outdoor drinking fountain or drinking fountain with bottle filling station or drinking fountain with bottle filling station and service animal basin, colour contrasted to surrounding environment with automatic or push button controls
- 2 signs with text, graphics, and braille
- 1 sign at fountain, and 1 sign elsewhere that directs people to fountain
Figure 41: Hand-wash station
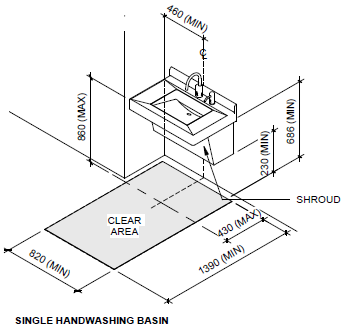
- Source: Figures 43(a) and 43(b), CSA/ASC B651:23 Accessible design for the built environment. © 2023 Canadian Standards Association.
Text description of Figure 41
- A three-dimensional view shows a wall-mounted hand-wash station, with faucet and soap dispenser
- There is space underneath the sink for a person with a device to fit their knees. The sink's insulated pipes protect the knees from the hot water supply
- There is enough clear area (1390 mm by 820 mm) on the ground in front of the hand-wash station that people using mobility devices can approach and move around
The sink has enough space underneath for persons in mobility devices to fit their knees, as well as protection from the hot water supply. If you are installing 2 or more hand-wash stations in a row, the centre line of each sink should be at least 820 mm apart.
Accessible hand-wash stations include:
- wall-mounted barrier-free sink
- hands-free faucet with temperature limit of 49 degrees C
- knee protection from plumbing
- wall protection (100 mm backsplash)
- hands-free soap dispenser, attached to counter
- hands-free paper towel dispenser, attached to wall
- lighting at 300 lumens, with controls mounted at accessible level
- 2 signs with text, graphics, and braille
- 1 sign at station, and 1 sign elsewhere that directs people to station
Accessible multi-purpose rooms
Figure 42: Accessible multi-purpose room general floor plan
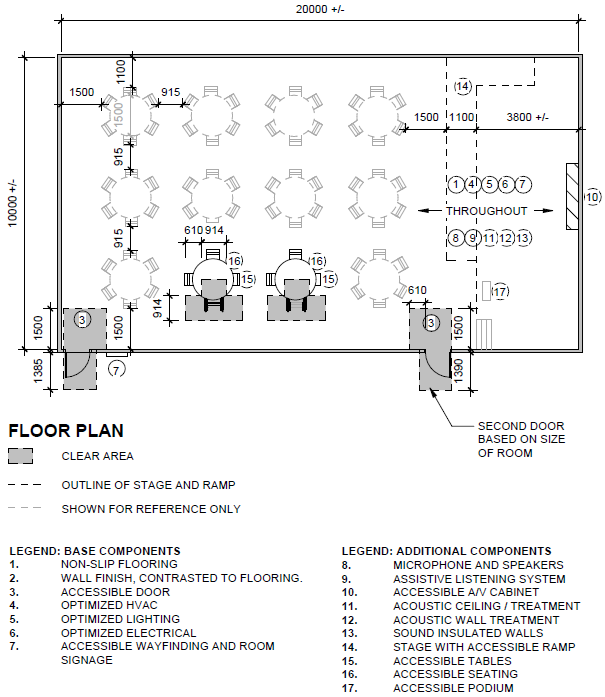
Text description of Figure 42
- The layout of a rectangular 20 m by 10 m (200 sq m) multi-purpose room is shown from bird's eye perspective
- On the left side of the room, 12 round tables are arranged in a grid. Two of these 12 tables are accessible with clear areas around the seating areas for wheelchair users
- On the right side of the room, there is a 40 sq m presentation area with an accessible cabinet nearby to hold audio/visual equipment, and an accessible podium. There are stairs and a ramp leading up to the stage
- The four walls of the room are built with sound insulation and acoustic wall treatments, and the ceiling is equipped with acoustic treatments
- There are two accessible doors providing entry and exit to the room, and a sign outside the room to identify it
Accessible multi-purpose rooms can vary in size between 25 sq m and 200 sq m. The diagram above shows an example configuration for the largest room size available under flat rate costs (200 sq m). It is important to consult certified professionals, such as architects and mechanical/electrical engineers, to optimise the soundproofing systems within the space. Professional fees are included in the flat rate cost.
Accessible multi-purpose rooms include:
- non-slip flooring
- minimal glare, no strong visual patterning
- colour contrasted to walls, door, etc.
- paint for walls
- colour contrasted to floor, door, etc.
- sound insulated door(s)
- insulated steel frame
- door hardware set
- automatic operator with controls
- electrical power connection
- barrier-free transition
- colour contrasting painting
- number of doors (1 or 2) will be automatically calculated according to room size
- optimised lighting (above code minimums)
- presentation area lighting independently controlled from overhead lighting in rest of room
- all lighting to be anti-glare and dimmable between 100-750 lumens
- in room controls at accessible level
- optimised electrical (above code minimums)
- increased capacity for receptacles and circuits
- wiring to accommodate audio/visual equipment from seated position, remote control, or voice activation
- optimised HVAC (above code minimums)
- improved air quality
- acoustic absorption to a minimum rating of STC 45 and CAC 40Footnote 1
- in room controls at accessible level
- 2 signs with text, graphics, and braille
- 1 sign outside room, and 1 sign elsewhere that directs people to room
Optional accessibility features:
- sound insulation for walls
- does not include new wall construction, only includes sound insulation to a minimum rating of STC 45Footnote 1
- acoustic ceiling treatments
- option 1) suspended acoustic ceiling tile in a grid, covering 100% of the ceiling area
- option 2) suspended acoustic ceiling baffles, covering approximately 50% of the ceiling area
- with either of these options, ensure that the acoustic ceiling treatment is rated to a minimum of NRC 0.8 and CAC 40Footnote 1
- acoustic wall treatments
- acoustic wall panels that cover approximately 50% of the surface of your walls
- ensure the panels are rated to a minimum of NRC 0.8Footnote 1
- microphone and speakers
- 1 wireless microphone
- 1 amplifier
- 1 transmitter/receiver
- ceiling-mounted speakers (quantity based on room area)
- assistive listening system with signage in text, graphics, and braille
- option 1) set of wireless group headphones
- includes headphones and transmitter with minimum 45 m of range
- the flat rate calculator limits the number of headphones to 20% of the maximum number of occupants of your multi-purpose room, based on the size of the room
- works best for people who would benefit from hearing enhancement but do not wear a hearing device (e.g., hearing aid, cochlear implant, etc.)
- note that shared headphones would have sanitation requirements in between users
- option 2) hearing loop system:
- connects a source of sound (e.g., microphone, television) directly to a person's hearing device via an audio frequency induction loop
- involves installing a wire in the shape of a loop around the perimeter of the seating area in your multi-purpose room
- more convenient for people using hearing devices, as they can customize their level of sound
- the number of people who can use the hearing loop system is not limited
- the costs for an FM loop system are not covered with this option, because an audio frequency induction loop is the preferred hearing loop system for multi-purpose rooms
- option 1) set of wireless group headphones
- cabinet to store audio/visual equipment
- only available if microphone and speakers or assistive listening system is added to your project
- reduces tripping hazard of cables (allows for barrier-free path of travel)
- 1,220 mm wide by 457 mm high by 610 mm deep
- plastic laminate material
- grommets (access points) for cables to escape cabinet and plug into outlets or equipment
- vents to allow heat from audio/visual equipment to escape
- "D" shape drawer/door pulls and soft close hinges
- accessible stage
- requires a room size of minimum 150 sq m
- stage size is 40 sq m
- height of stage is between 305 mm and 457 mm above floor
- includes stairs from floor to stage with treads
- includes sloped walkway from floor to stage (between 6.1 m and 9.14 m long)
- non-slip surface for stage, stairs, and walkways
- tactile warning strips at the top of the stairs, and top and bottom of sloped walkway
- accessible tables
- surface of table is between 730 mm and 860 mm above floor
- space under the table to fit a wheelchair user's knees (820 mm wide by 685 mm high by 480 mm deep)
- height adjustable with electrical power connection
- accessible seating
- seat is between 430 mm and 483 mm above floor
- backrest included
- height adjustable with electrical power connection
- accessible podium
- height adjustable with electrical power connection
Inclusive communication:
- consider adding a live captioning system in your multi-purpose room to increase accessibility for people who are deaf or people with hearing loss
- a live captioning system would include:
- 1 or 2 screens to display captions
- options for captions:
- provided manually by a professional captioner
- a hardwired encoder/decoder
- captioning software (note that some applications offer built-in automatically generated live captioning, for example Zoom, Microsoft Teams, Google Chrome, etc.)
- other uses for screens include:
- display graphics or other visual communication for people who would benefit from non-verbal communication
- display large format visuals for people with low vision
- display a sign language interpreter who is providing services virtually
Note that if you wish to include the items under inclusive communication in your project, they are not covered under flat rate costs but may be eligible for funding. Please treat these items as "Other Activities" in the flat rate calculator and follow the requirements outlined in the applicant guide for non-flat rate activities.
Additional things to consider:
- ensure a barrier-free path of travel throughout the room by avoiding obstacles on the floor or mounted on the wall
- if there are windows in your multi-purpose room, eliminate glare or other light reflection off the glass by installing window coverings or other treatments
- reserve seating near the front of the room (closest to the stage or presentation area) for people who are deaf, people with hearing loss, and people with low vision
- designate aisle seating with people who use service animals
Note that the above things to consider are not covered by flat rate costs.