
Framing a Painting – Canadian Conservation Institute (CCI) Notes 10/8
List of abbreviations and symbols
Abbreviations
- CCI
- Canadian Conservation Institute
- HTS
- handling-travel-storage
- portable document format
- PE
- polyethylene
- PEVA
- poly(ethylene-vinyl acetate)
- RH
- relative humidity
- SBR
- styrene-butadiene rubber
Symbols
- μW/lm
- microwatt per lumen
- cm
- centimetre
- ft.
- foot
- in.
- inch
- mm
- milllimetre
Introduction
Framing paintings is important both aesthetically and as a measure in preventive conservation. A frame protects and supports a work during handling, storage and display. In addition, a frame may carry a protective glazing (glass or acrylic). To ensure the safety of a painting and prevent damage, it is essential to use correct framing techniques.
Always consider the aesthetic and historical importance of the frame. In some cases, the original frame was chosen or prepared by the artist and must, therefore, be considered an integral part of the work. Furthermore, many frames carry vital information in the form of labels, inscriptions and stamps. For these reasons, the frame must be respected as an essential part of the painting’s history.
Whether framing is undertaken by museum or gallery staff or by a commercial framer, a number of guidelines should be followed. The basic procedure for framing paintings on canvas attached to auxiliary supports (stretchers or strainers) is outlined below. This is followed by special considerations for paintings on wood panels, rigid hardboards and rigid cards, as well as paintings that are not meant to be framed.
For some procedures, if you are not familiar with doing fine work with hand tools, seek help from a local cabinetmaker, qualified framer or a conservator.
Examination
Before proceeding with framing, examine the painting, the auxiliary support and the frame to ensure that they are structurally stable and in good condition (e.g. there is no flaking paint or loose decorative elements). (Consult CCI Note 10/7 Condition Reporting — Paintings. Part II: Examination Techniques and a Checklist.)
Ensure that all keys (wooden wedges) in the corners of the stretcher are present and well secured. A key should not be loose enough to fall out of its slot. Damage can result if a key falls between the lower stretcher bar and the canvas (consult the section Replacing and securing keys).
Choosing the proper frame
The frame must be strong enough to safely support the weight of the painting. If the frame has a liner, ensure that it is securely attached to the outer frame.
Some large contemporary paintings are framed with strip frames that are too thin or inadequately attached to the painting to support its weight. Modifying the framing method, or adjusting the placement of the hanging hardware, may be required. These modifications should be made on the advice of a curator and conservator.
If a painting is framed and the frame does not fit or appears insecure, unframing the painting to make improvements to the frame may be required (consult CCI Note 10/12 Removing a Painting from its Frame).
Fitting and modifying the frame
Place the frame face down on a clean, padded surface or on padded blocks (consult CCI Note 10/2 Making Padded Blocks).
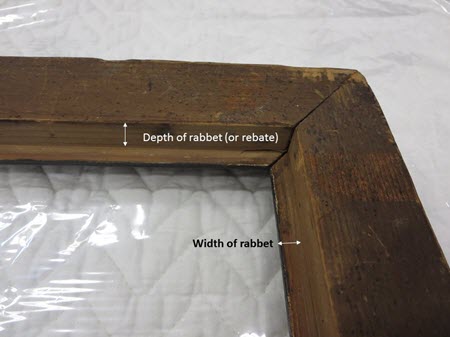
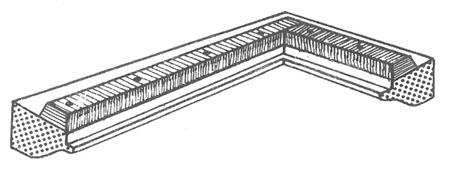
Measure the painting and compare the dimensions to the frame opening. If it appears to be a compatible fit, carefully place the painting in the frame and examine the fit. Observe whether the rabbet needs to be enlarged in width or in depth to accommodate the painting (Figure 1). The painting should not fit tightly. Allow 3 to 6 mm (1/8 to 1/4 in.) on all sides between the frame and the painting to allow the wood components to expand when relative humidity (RH) increases. The reverse of the painting should not protrude too far beyond the back of the frame. The depth of the rabbet may have to be increased if there is risk of damage to the fragile canvas of the tacking margins or if it is difficult to secure the painting in the frame.
Remove the painting from the frame and place in a safe location.
© Government of Canada, Canadian Conservation Institute. CCI 120729-0003
Figure 1. A frame, placed face down on a clean padded surface, showing the depth and width of the rabbet (also called the rebate).
Increasing the width of the rabbet
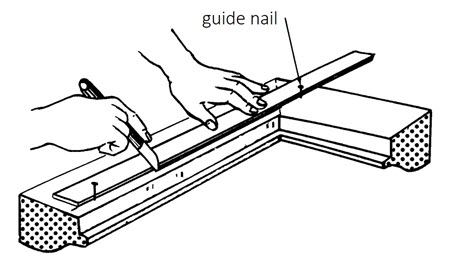
The width of the rabbet can be increased by carefully using hand tools (e.g. chisel, side-rabbet plane or router with a guide ring). It is best if the work is done by someone familiar with these tools. Working with tools near the frame’s thin rabbet must be done cautiously and without applying so much pressure that the thin face of the rabbet splits or its decorative coatings chip. Figures 2a, 2b and 2c describe one method of increasing the width of the rabbet.
© Government of Canada, Canadian Conservation Institute. CCI 120729-0010
Figure 2a. Insert two finishing nails into the frame with a pin punch. The nails serve as a guide to hold the straight edge in place. Using a metal straight edge and a sharp knife (e.g. a chip carving knife), score a line to mark the desired width of the rabbet. Do not remove more than 0.5 cm (3/16 in.) from the width at a time. Do not remove more than is necessary.
© Government of Canada, Canadian Conservation Institute. CCI 120729-0012
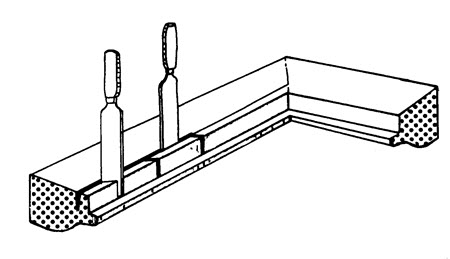
Figure 2b. The cut can be deepened by successive scoring with a knife, as shown in Figure 2a, or by using chisels. Diagonal cuts with a chisel should be made so that the wood can be removed in small sections.
© Government of Canada, Canadian Conservation Institute. CCI 120729-0013
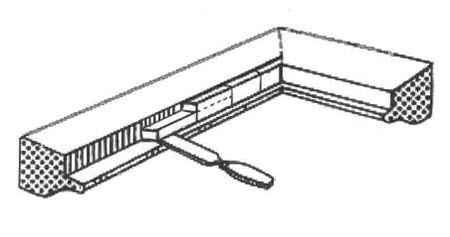
Figure 2c. Using the chisel or a veneer saw horizontally, remove the loose wood or remaining splinters from the enlarged section of the rabbet. It is often best not to remove the whole depth at once but to work through the depth in partial layers, gradually. Extra care is required when working along the rabbet. Tools should not be guided against the painted or gilded edge of the rabbet. This could chip the decorative coatings. When finished, the rabbet should be even and smooth.
Increasing the depth of the rabbet
The depth of the rabbet can be increased by adding wood strips attached with glue or with wood screws to the back of the frame (Figures 3a, 3b and 3c). If increasing the depth of the frame, add wood strips that are thick enough to be flush with the back of the auxiliary support.
© Government of Canada, Canadian Conservation Institute. CCI 120729-0014
Figure 3a. Increasing the depth of the rabbet.

© Government of Canada, Canadian Conservation Institute. CCI 120729-0001
Figure 3b. An extension added to the back of the frame to increase the depth of the rabbet and accommodate and protect the side edges of the painting.
© Government of Canada, Canadian Conservation Institute. CCI 120729-0015
Figure 3c. The painting, placed in the frame with the added extension, is now protected within the depth of the rabbet.
Decreasing the width of the rabbet
If the frame opening is slightly too large for the painting, fill a space larger than 3 mm (1/8 in.) with small strips of a stable foam (e.g. Ethafoam, Volara) or a piece of cork to prevent the painting from shifting in the frame. These materials are compressible and will permit some expansion of the wood when RH rises. It is not necessary to extend these strips the entire length of the rabbet. Attach the strips to the side of the rabbet with white glue or double-sided tape to keep them in place.
Protecting the painting’s edges and surface
Two options for protecting the painting’s surface and edges are described below: padding the rabbet and adding edge-strips to the sides of the painting. If the edges of the painting are not particularly fragile, padding the frame’s rabbet is usually preferable and more convenient.
Padding the rabbet
It is very important to prevent the paint surface from coming into direct contact with the frame’s rabbet so that the painting’s front edges are not damaged. If edge-strips are not present or are not appropriate, pad the frame’s rabbet. Padding the rabbet is often the most appropriate option as long as there is no raised impasto along the painting’s edges and the paint in contact with the rabbet can withstand some contact and pressure without crushing or breaking. Padding the rabbet should be done after confirming the fit of the painting in its frame and after making any necessary modifications to the frame.
Various materials are suitable for padding the rabbet to prevent abrasion to the painting’s surface. A colourfast, nylon velvet ribbon or synthetic felt can be attached to the rabbet using white glue. Some closed-cell, crosslinked polyethylene foams with integral skins (uncut surfaces) (e.g. Volara) would also be suitable and would provide a smooth, “slippery” surface that the painting can rest on without snagging. Foams having dimensions of 1 cm (25/64 in.) wide by 1.5 mm (1/16 in.) thick or 1.5 cm (19/32 in.) wide by 3 mm (3/32 in.) thick are useful and can be easily cut to the desired width of the rabbet. The foams can be attached to the rabbet using white glue, preferably acrylic, or double-sided tape. Double-sided tape must be stable, of high quality and possess a high tack. Ensure that continuous and strong adhesion can be achieved between either the ribbon, felt or foam and the rabbet’s wood surface. Ensure that the padding is thick enough to provide slight cushioning of the paint surface and is wide enough to cover the width of the rabbet but not be visible from the front when viewing the framed painting (Figure 4). Dark-coloured padding is much less visible along the edges of the painting than lighter colours.
If attaching the padding with glue, wait 24 hours before placing the painting in the frame to allow the glue to dry completely and the volatile compounds from the glue to dissipate.
© Government of Canada, Canadian Conservation Institute. CCI 125773-0150
Figure 4. Padding the rabbet. Apply a thin, smooth, stable padding material to the rabbet of the frame to prevent abrasion to the painting’s surface. A stable, polyethylene foam with an acrylic pressure-sensitive adhesive is being used in this photo. A colourfast felt, with a stable adhesive, can also be used.
Synthetic felts, with an acrylic pressure-sensitive adhesive on one side, can also be used as a padding or cushioning material. When ordering such products, specify that you need an acrylic or polyester felt and that a stable acrylic adhesive has been used. Fine-celled, crosslinked, closed-cell foams with integral skins (uncut slippery surface) (e.g. Volara) that have a stable acrylic adhesive are also suitable. Products with natural rubber adhesives may not be suitable to use near a paint surface. Manufacturers can change their product formulation; therefore, it is difficult to recommend a specific product. It is best to work with a supplier or manufacturer who can state with certainty the product’s composition and who understands and respects that only a stable product must be used near an artwork.
Edge-strips
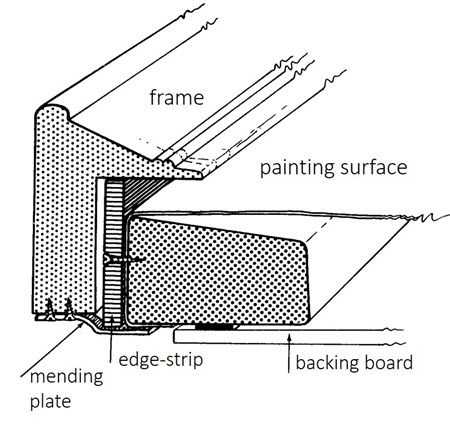
When used with a frame, edge-strips which extend above the surface of the painting will prevent the frame rabbet from damaging the fragile paint surface, particularly if there is fragile impasto around the edges (Figure 5). For a painting that is meant to be framed and for which a permanent frame is not yet available, adding edge-strips to the tacking edges of the auxiliary support (stretcher or strainer) can help protect a frayed tacking margin. They also prevent damage to the painting’s edges until it is framed. The disadvantage of using edge-strips is that additional screws need to be added to the tacking margin that will pierce the canvas support. An L-shaped edge-strip, which is attached to the painting on the reverse side of the auxiliary support, rather than on the tacking margin, is a good alternative.
Materials
Strips of 3 mm (1/8 in.) thick basswood, pine or plywood, or thin aluminum moulding can be used. L-shaped wood or metal strips, attached to the reverse of the stretcher or strainer, are good alternatives. They have the advantage of not piercing the tacking margin with screws.
Use matte, non-smudging, black paint (brush or spray application) or polyurethane varnish for wood as an optional coating for the edge-strips.
Use brass or stainless steel screws, 1.5 to 1.8 cm (1/2 to 3/4 in.) long, depending on the thickness of the edge-strip, to attach the edge-strips to the auxiliary support. (The screws should not have to penetrate the wood of the auxiliary support by more than 1 to 1.2 cm [3/8 to 1/2 in.].)
Procedure
Cut strips of wood or metal to the required dimensions. These edge-strips should project 3 to 5 mm (1/8 to 1/4 in.) beyond the surface of the painting. Sand the strips to produce smooth, slightly rounded edges and corners.
When attaching edge-strips, place the painting face up upon a clean surface to determine the placement of the points of attachment. With the painting placed face up, the edge-strip will automatically be flush with the back of the painting. Ensure the points of attachment do not interfere with tacks or staples along the edges. Away from the painting, pre-drill and, if possible, countersink holes in the edge-strips. Keep the number of holes to a minimum, but use enough attachment points to prevent the strips from bowing outward.
Brush or spray the edge-strips with the desired coating. Wait a few days to allow the coating to dry completely.
Attach edge-strips to the painting’s tacking edges using brass or stainless steel screws. Pierce the canvas with an awl, through the pre-drilled holes, before inserting the screws. (An L-shaped edge-strip, attached to the painting on the back of the auxiliary support, is an excellent alternative. This would avoid having to pierce additional holes in the tacking edges.)
© Government of Canada, Canadian Conservation Institute. CCI 120729-0016
Figure 5. Protective edge-strips (cross-section view).
For an unframed painting, or a painting that the artist did not intend to be framed during display, a handling-travel-storage (HTS) frame will protect its vulnerable edges and surface during handling and storage.
Replacing and securing keys
Replace damaged, broken or missing keys. It is difficult to remove keys that are wedged tightly into their slots. If keys cannot be removed using your fingers, it is better to leave them in place and consult a conservator for assistance.
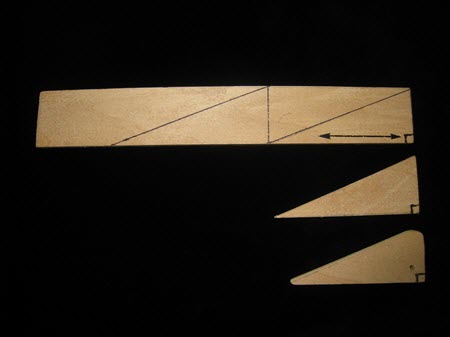
Make new replacement keys when necessary, using an original key as a guide. New keys of pine or basswood, usually 3 to 7 mm (1/8 to 1/4 in.) thick, should be cut along the grain to fit into the key slots (Figure 6). Round off the corners by sanding.
© Government of Canada, Canadian Conservation Institute. CCI 120729-0018
Figure 6. Cutting replacement keys.
Lay the painting face down on padded blocks placed diagonally at the corners (consult CCI Note 10/2 Making Padded Blocks) or on a suitably cushioned surface, if the painting can be safely placed upon its painted surface (consult CCI Note 10/7 Condition Reporting — Paintings. Part II: Examination Techniques and a Checklist).
Gently slide a protective card (2- to 4-ply matboard) between the canvas and the stretcher bar to temporarily protect the canvas while working with the keys. When inserting and removing the card, avoid exerting pressure against the canvas with either your fingers or the card.
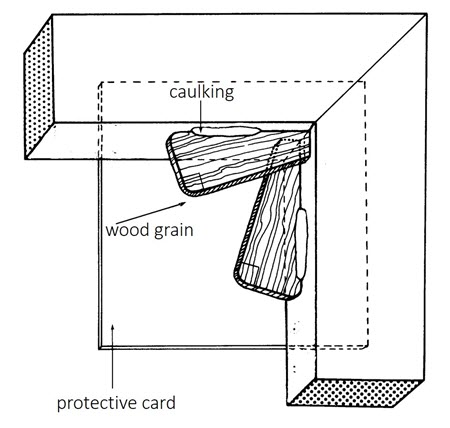
Insert the key into the slot using gentle thumb pressure so that the edge of the key, which is cut across the grain, is next to the stretcher bar (Figure 7). This orientation will help avoid breaking the keys during keying out.
If keying out is necessary, refer to CCI Note 10/9 Keying Out of Paintings. Please note: keying out can damage a painting. This is not a routine or basic procedure. Do not attempt keying out unless you have received training from a paintings conservator.
Keys are usually secured to stretchers with string, a stable, high-quality caulking or, more recently, a small piece of frame-sealing tape with good adhesion to the wood surfaces. A thin line of caulking, or a suitable frame-sealing tape, is recommended because it is a simple procedure and involves less tampering with the painting. A non-acidic silicone caulking can be used, but be very careful not to get any caulking on the canvas, the painting or any nearby surface. Acrylic caulking can also be used. Choose a high-quality product that is water-based and has a long-life guarantee.
With the protective card in place, use a small tube of caulking to apply a line of caulking neatly along the joint between the key and the stretcher (Figure 7).
Allow the caulking to cure for at least 24 hours before attaching the backing board (consult CCI Note 10/10 Backing Boards for Paintings on Canvas).
© Government of Canada, Canadian Conservation Institute. CCI 120729-0020
Figure 7. Keys should be inserted with the edge cut across the grain next to the stretcher member. A thin line of caulking has been used to secure keys.
Self-adhesive frame-sealing tapes, with a relatively strong adhesive, are now available. Short pieces of tape can be folded and secured in place against the key and the edge of the rabbet (Figure 8). The tape will help prevent the key from falling loose.
© Government of Canada, Canadian Conservation Institute. CCI 85733-0086
Figure 8. Using a small piece of self-adhesive frame-sealing tape to secure keys.
Replacing or adding a protective backing board
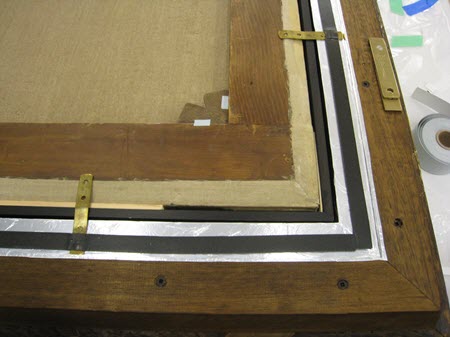
All paintings, particularly those on canvas, should have protective backing boards (Figures 5, 9a, 11 and 12). (Consult CCI Note 10/10 Backing Boards for Paintings on Canvas.)
Glazing
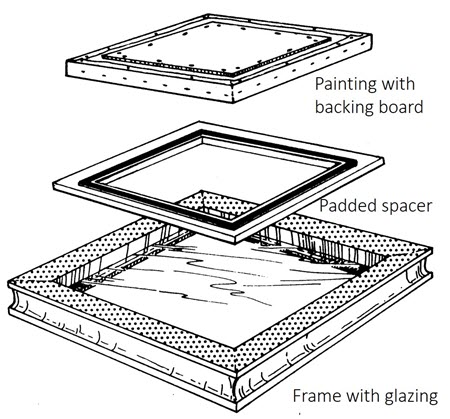
If glazing is used, never permit the glass or acrylic sheet to touch the paint surface. The framing method must include a spacer to hold the glazing away from the paint surface (Figures 9a, 9b, 9c, 10 and 13).
Glazing provides additional protection from accidental damage and also some air-tightness, which reduces the effects of dirt, dust, air pollutants and environmental fluctuations. Glazing is sometimes warranted for paintings with particularly fragile surfaces or for paintings that are particularly sensitive to RH fluctuations, e.g. that have a history of lifting, flaking paint. Glazing, in addition to a sealed backing board to create a sealed enclosure, may be warranted if there is the risk that the RH could fall below 30% (Michalski 2004).
Glass is readily available and will not scratch easily, but it is heavy and prone to breaking. For this reason, a clear acrylic sheet, which is less prone to breaking than glass, may be the best glazing material for a painting that will travel. Acrylic sheet, however, should not be used for objects with a powdery surface, such as pastel or chalk. Acrylic sheet may cause an electrostatic charge to build up, which may attract loose particles to the acrylic.
Glass or acrylic sheet, treated with an optical coating to reduce reflections, is available. Such glazing materials are nearly invisible from a normal viewing distance. Museum glazing materials with ultraviolet (UV) filters are available (consult CCI Note 11/3 Glazing Materials for Framing Works on Paper). This protection, and expense, may not be required if UV radiation in the display area has been eliminated or controlled at the source to below 75 μW/lm (consult CCI Notes 2/1 Ultraviolet Filters and 10/4 Environmental and Display Guidelines for Paintings). Laminated glass, which provides protection from breakage, is available with excellent optical qualities from specialty suppliers, however at a high cost. Contact a local gallery, framing shop or the Canadian Conservation Institute for information on suppliers.
To incorporate glazing, the frame must be strong and rigid and the surface of the rabbet, against which the glazing will be placed, must be level. Place the glazing in the frame. It should not fit tightly or it may break in response to movement of the wood with handling or RH fluctuations. As a general guideline, leave 3 mm (1/8 in.) between the glazing and all edges of the rabbet. However, frames with wood moldings wider than 10 cm (approximately 4 in.) may need more space. Place an inner wood frame, attached at its corners, against the glazing to act as a spacer between the glazing and the paint surface (Figures 9a, 9b and 9c). Alternatively, attach padded wood spacer strips to the glazing (Figure 10). The depth of the space, between the paint surface and glazing, will depend on the size, rigidity and nature of the painting’s surface as well as on the type of glazing used. Acrylic glazing, which has some flex, may require more space. Suppliers of glazing materials for artworks should be able to offer information on the space required. (The depth of the space could vary between 7 mm [1/4 in.] to 6.4 cm [2 1/2 in.] for small to moderately large paintings.) Pad this inner frame where it touches the paint surface, using the procedure described in the section Padding the rabbet.
A thin padding between the glazing and the wood rabbet may also be required, particularly if the wood surfaces are rough. Similar materials to those recommended for padding the rabbet can be used.
© Government of Canada, Canadian Conservation Institute. CCI 120729-0021
Figure 9a. A separate padded spacer preventing contact between the painting and glazing.
© Government of Canada, Canadian Conservation Institute. CCI 124932-0048
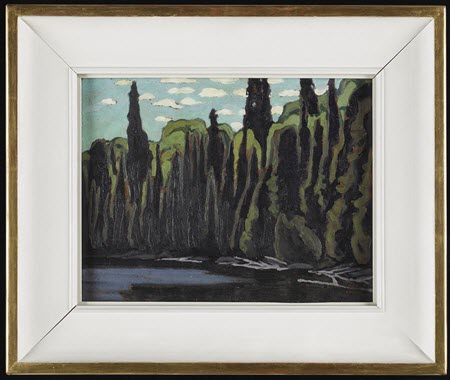
Figure 9b. This painting, titled Near Mongoose Lake, Algoma, from the McMaster Museum of Art has been framed behind a non-glare acrylic sheet.
© Government of Canada, Canadian Conservation Institute. CCI 124932-0050
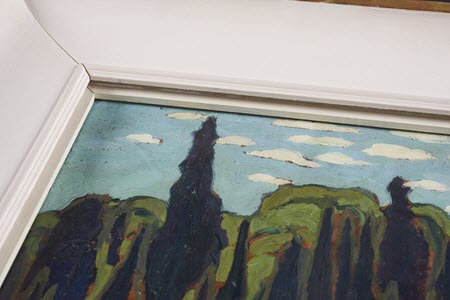
Figure 9c. This corner detail of the painting belonging to the McMaster Museum of Art shows a wooden spacer, padded where it contacts the paint surface.
© Government of Canada, Canadian Conservation Institute. CCI 120729-0005
Figure 10. Padded wood spacer strips adhered with double-sided tape to the glazing to separate the painting from the glazing.
Securing the painting in the frame
Do not place the painting in its frame until the paint and varnish are dry.
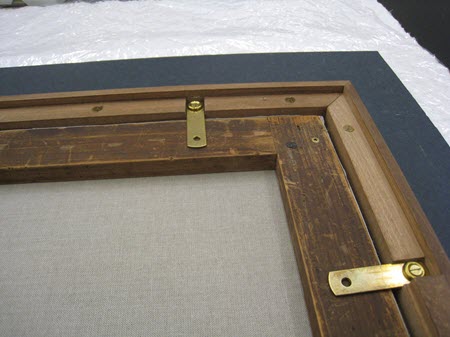
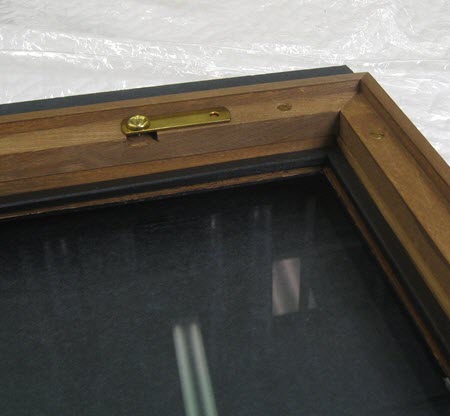
Never use nails when framing a painting. Use brass mending plates, screws and cup washers to secure the painting in the frame (Figures 5, 8, 11, 12, 13 and 14). Pre-bent brass mending plates are available from conservation suppliers. Metal mirror clips can also be used, but the required size and shape may be difficult to find.
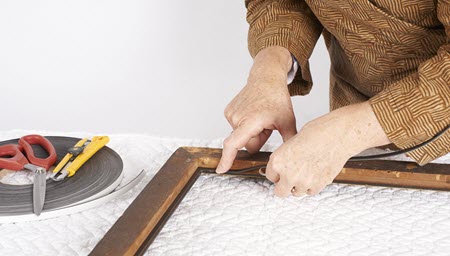
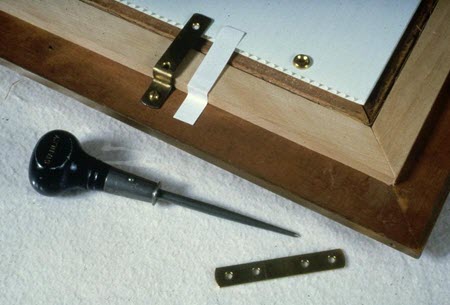
Brass mending plates are usually sold flat and may have to be bent if the back of the painting is not flush with the back of the frame. It may be helpful to make a paper template of the required contour (Figure 11). Mark the location of the bends on each plate. In an area away from the painting, using two sets of pliers or a hammer and vice, bend the mending plates to follow the contour of the template. Bends can also be made by holding the mending plate in square-nose pliers at the point where the bend is required. Then, placing the opposite end of the mending plate on a durable floor surface, use one’s weight to create a bend against the edge of the pliers.
© Government of Canada, Canadian Conservation Institute. CCI 120729-0006
Figure 11. A paper template is useful to help bend the mending plates to the desired shape.
If possible, use two screws to secure each mending plate to the frame only. Do not screw the mending plates to the stretcher or strainer using the empty holes at the other end of the mending plate. The mending plate should exert only slight pressure against the back of the stretcher or backing board.
© Government of Canada, Canadian Conservation Institute. CCI 120729-0007
Figure 12. Painting with attached backing board, secured in the frame with brass mending plates attached to the frame only.
Hanging devices
Attach a suitable hanging device to the frame (consult CCI Note 10/4 Environmental and Display Guidelines for Paintings).
Special cases
Wood panels and rigid hardboards
Many panel paintings—particularly those with pronounced warps or curvatures, or panels that are very large—require framing methods tailored to their needs. In these cases, contact a conservator for advice. Undistorted wood panels and hardboards, such as Masonite, also require special framing procedures that accommodate their size, weight and dimensional changes when RH fluctuates.
It is extremely important to provide space in the frame so that wood panels or hardboards can expand during periods of high RH. For the same reason, nothing should be attached to the panel itself. Failure to allow some movement of the wood or hardboard support can cause the painted panel to warp or split as the wood responds to RH fluctuations.
How the painting will fit in the frame depends on the time of year and, in particular, on the RH conditions when the framing is done. If the painting is framed when the RH is at a maximum, a minimum of space is required between the side of the rabbet and the work of art (3 to 6 mm or 1/8 to 1/4 in.). If the framing is done during a period of low RH, allow enough space for wood components to swell during periods of high RH. Use the numbers below as a guide (Table 1).
Hardboard can change as much as 0.5% in length and in width during a 50% change in RH. Thus, when framing hardboards of 60 to 120 cm (approximately 2 to 4 ft.), to be safe, allow a 3 to 6 mm space (1/8 to 1/4 in.) on each side between the edge of the rabbet and the work of art.
Solid wood panels can change in dimension up to 3% of the total width with a 50% RH change. The greatest change in dimension will occur perpendicular to the grain of the wood. The space required to permit unrestricted expansion of the wood across the grain during periods of high RH depends on the size of the panel. A panel painting 1 m by 1 m (approx. 3 ft. by 3 ft.) will require 1.5 cm (9/16 in.) of space on each side parallel to the panel’s wood grain. Similarly, a panel painting of 0.5 m by 0.5 m (18 in. by 18 in.) could expand by 1.5 cm (9/16 in.) and will, therefore, require 0.75 cm (9/32 in.) on each side parallel to the wood grain. However, as there will be no space between the painting and the bottom rabbet edge, allow for all the space in this direction to be between the top of the panel and the top rabbet edge.
| Panel type | Edge length | Minimum space required beyond panel on each side of rabbet |
|---|---|---|
| Hardboard (account for 0.5% expansion) |
200 cm 100 cm 50 cm |
5 mm 2.5 mm 1.25 mm |
| Panel type | Dimension across the grain | Minimum space required beyond panel on each side of rabbet (parallel to the grain of the panel) |
| Solid wood panel (account for 3% expansion) |
200 cm 100 cm 50 cm |
30 mm 15 mm 7.5 mm |
If the painting tends to shift within this space, a compressible material, such as Ethafoam, could be used to loosely fill the space. Wood panel and hardboard supports may warp due to RH fluctuations. Therefore, when glazing is incorporated into a frame, it is important to provide enough clearance between the painted panel and the glazing to prevent the two from touching should warping occur.
Pad the frame’s rabbet using the procedure described previously.
For small to moderate-sized panels or hardboard, place the painted panel in the frame, followed by a layer of 4-ply matboard. The matboard will help buffer fluctuations in RH. Layers of corrugated plastic sheet (e.g. Coroplast) cut to the size of the painting can be added until the level is flush with the back of the frame. Cut a final, rigid, supporting backing board of wood, hardboard or Plexiglas so that it extends over (or onto) the back of the frame (Figure 13). The backing board will hold the painting in the frame and will seal the painting against dust and dirt. For small, lightweight panels no larger than 0.5 m by 0.5 m (18 in. by 18 in.), a corrugated plastic sheet or a stable, heavy-duty foam board (e.g. Gatorfoam) may be enough of a supporting backing board.
Alternatively, the backing board can be inserted after the layer(s) of matboard such that the backing board is flush with the back of the frame. Frame-sealing tape can be used to create a seal between the backing board and the frame (Figure 14).
Hold the backing board in place with brass mending plates. Bend the mending plates as necessary. When possible, use two screws to attach each plate to the frame only. The rigid backing board should gently hold the painted panel in place (Figures 13 and 14).
Large, heavy panels may require a stronger attachment.
© Government of Canada, Canadian Conservation Institute. CCI 120729-0008
Figure 13. Framing a painting on panel or rigid card (cross-section view). The backing board is held against the back of the frame with bent mending plates, secured to the frame only.
Paintings on rigid card
Paintings on card supports should not be tightly wedged in the frame. Allow a 3 to 6 mm (1/8 to 1/4 in.) space on all sides between the rabbet edge and the work of art.
Pad the frame’s rabbet, following the procedure described previously. Velvet ribbon, synthetic felt, foam or acid-free matboard can also be applied to the side of the rabbet to reduce rubbing on the card's edges.
Place the painting in the frame. Add one or two pieces of acid-free matboard cut to the size of the painting. Add layers of corrugated plastic sheeting until the level is flush with the back of the frame. As previously described, finish with a firm, rigid board, such as corrugated plastic sheeting or a stable, heavy duty foam board cut to overlap onto the reverse of the frame (Figure 13).
Hold the backing boards in place under gentle pressure with brass mending plates that are attached only to the frame.
Alternatively, if a rigid backing board does not overlap onto the reverse of the frame but fills the rabbet and remains flush with the back of the frame, straight mending plates, attached only to the frame, can be used to hold the layers in place. In this case, a frame-sealing tape should be used as a dust seal (Figure 14).
As an alternative, paintings on rigid card can be matted using a sink mat and can then be framed. This technique is described in Merrily Smith’s Matting and Hinging of Works of Art on Paper (consult the Further reading section).
© Government of Canada, Canadian Conservation Institute. CCI 124932-0049
Figure 14. Framing a small painting on a panel or rigid card. In this example, the backing board, flush with the reverse of the frame, is sealed to the frame with a pressure-sensitive frame-sealing tape. Straight mending plates, secured to the frame only, exert slight pressure against the backing board to hold the artwork and backing board in place. (In this example, the frame has been modified with a wood extension on the reverse to increase the depth of the rabbet.)
Enclosed frame or case design
Specially designed enclosed frames or cases provide superior protection against dirt, mechanical damage, spills, air pollutants and sudden fluctuations in temperature and RH. A basic design incorporates glazing (which is held away from the paint surface) and a backing board. Both of these are sealed to the frame using methods appropriate for the situation (McKay 1990, Sozzani 1997 and Michalski 2004). To provide the greatest protection against the deteriorating effects of fluctuating environmental conditions, particularly RH, incorporate a humidity-buffering agent, such as silica gel in a suitable container, behind the painting within the enclosed frame. However, if the glazing and backing board are sealed properly to the frame, it should be possible to create an enclosure that will buffer RH fluctuations up to and including seasonal changes using little or no silica gel. Placing a 4 mm (5/16 in.) matboard buffer in a carefully sealed frame, or a silica gel pack, will provide excellent control during day–night and seasonal RH fluctuations.
An enclosed frame or case design is recommended for paintings exhibited in areas without adequate RH control. It is particularly useful for paintings on supports, such as ivory or wood, that are prone to damage resulting from the support material shrinking and swelling in response to environmental fluctuations. For more information on enclosed frame or case design, contact CCI.
Handling-travel-storage frame
An HTS frame (Figure 15), based on a design used at the National Gallery of Canada, is suitable for most paintings without frames (consult CCI Note 10/16 Wrapping a Painting). This is not a decorative frame but a functional frame for the handling, transportation and storage of the work of art.
© Government of Canada, Canadian Conservation Institute. CCI 120554-0002
Figure 15. Construction detail of an HTS frame.
Mending plates can be used to attach a painting to the HTS frame. If the painting is to be removed and replaced repeatedly, the screw holes may become incapable of holding the screws. Using threaded T-nut fasteners in the plywood of the HTS frame may prolong the use of the holes. Multi-purpose fasteners or hangers, such as Oz Clips or similar hangers used at the Tate galleries in England, have the advantage of being permanently attached to a painting. They are used in the closed position for display and in the open position for attaching the painting to an HTS frame. When measuring for this type of frame, allow adequate hand space between the sides of the painting and the travel frame so that the painting is easy to position, secure and remove. The sides of the frame should extend beyond the paint surface so that a protective sheet of polyethylene can be stretched across the front of the frame, without touching the paint surface.
Suppliers
Note: The following information is provided only to assist the reader. Inclusion of a company name in this list does not in any way imply endorsement by the Canadian Conservation Institute.
Caulking/sealant (clear silicone seal, GE Silicone II or an acrylic caulking described as long life [e.g. 35 year indoor/outdoor] and water-based):
- building supply stores
- hardware stores
Backing boards (corrugated twinwall plastic [polyethylene] board [e.g. Coroplast, Hi-Core, Cor-X], rigid heavy-duty foam/veneer boards [e.g. Gatorfoam, also known as Gator board], polycarbonate sheet [e.g. Lexan] or hardboard [Masonite]):
- lumber or plastics suppliers
- art supply stores
Acid-free (neutral pH or buffered) matboard:
- local art and drafting supply stores
- framing shops
Nylon velvet ribbon:
- fabric stores
Balsa wood:
- hobby stores
Synthetic felt with pressure-sensitive adhesive (acrylic or polyester felt with an acrylic pressure-sensitive adhesive would be suitable):
framing and exhibit suppliers
Please note: CCI analysis of a small number of self-adhesive products for padding rabbets has been undertaken. The felt fibres were found to be acrylic, polyester or nylon, all of which are considered chemically stable and should be safe to use against a painting’s surface. The adhesives were found to be acrylics composed of various components: natural rubber with hydrocarbon and/or rosin ester tackifier, and styrene-butadiene rubber (SBR) with rosin ester tackifiers. Acrylic adhesives should be safe to use. However, avoid rubber adhesives. Although some rubbers are stable, in others, the presence of sulfur and the oxidation and embrittlement of the rubber and tackifiers are problematic.
Foam tape:
- fine-celled, crosslinked, closed-cell foams with integral skins (uncut, slippery surface [e.g. Volara]) cut to the desired dimensions. A few self-adhesive products are available. Those composed of crosslinked polyethylene (PE) or crosslinked poly(ethylene-vinyl acetate) (PEVA) copolymer foams, with an acrylic pressure-sensitive adhesive, would be suitable.
- Thin foam tapes, as described above, may be suitable to pad surfaces between a smooth wood rabbet and glass (e.g. Volara, Lineco rabbet foam tape):
- Please note: Some companies may be able to custom produce a self-adhesive product suitable for your use. Specify that the product should be a polyester, acrylic or nylon felt with a double-sided tape, having a polyester carrier and a stable acrylic adhesive. Foam products should be crosslinked polyethylene (PE) or crosslinked poly(ethylene-vinyl acetate) (PEVA) copolymer foams, with an acrylic pressure-sensitive adhesive.
Double-sided tape (a high-quality tape having a stable adhesive with a high tack [e.g. 3M #415 double-sided tape]):
- conservation suppliers
Frame-sealing tape:
- archival suppliers
- mounting and framing suppliers (e.g. Larson Juhl)
Brass mending plates (available in various lengths [2, 3 and 4 in.]; plates that measure 3 or 4 in. will be more versatile for average to large-sized paintings):
- hardware stores
- specialty tool and hardware stores, e.g. Lee Valley
- Solid brass mending plates are becoming more difficult to find. Products sold are often brass-coated steel and are difficult to bend without breaking. Suitable mending plates are being supplied by some conservation suppliers who supply them flat, e.g. Sutherland and Power Fine Art Conservation; or bent to suit one’s needs or to suit different situations, e.g. Fraser/Spafford Ricci Art and Archival Conservation; some additional adjustment of pre-bent plates may be required to provide the right fit.
Brass screws, cup washers, mirror hanging brackets:
- hardware stores
Ethafoam:
- Ethafoam (Dow Chemical) is distributed through various local packaging firms.
Anti-reflection glass and acrylic sheets:
- framing shops
- suppliers of framing materials (e.g. Larson Juhl)
Oz Clips:
Please note: Préserv’Art (in French only), a preventive conservation website created by the Centre de conservation Québec, is an excellent resource to learn more about conservation supplies and on where to purchase them.
Bibliography and further reading
Bibliography
Michalski, S. “Risk Analysis of Backing Boards for Paintings: Damp Climates vs. Cold Climates.” In Minimo intervento conservativo nel restauro dei dipinti, CESMAR7, Secondo congresso internazionale Colore e Conservazione, Thiene (VI), 29–30 October 2004. Saonara, Italy: Il Prato, 2004, pp. 21–27.
Further reading
Dahlin, E., ed. PROPAINT – Improved Protection of Paintings During Exhibition, Storage and Transit: Final Activity Report (PDF format). Kjeller, Norway: Norwegian Institute for Air Research, 2010.
Hackney, S. “Framing for Conservation at the Tate Gallery.” The Conservator 14,1 (1990), pp. 44–52.
McKay, H. “A Sealed Frame-Case for a Painting.” Journal of the International Institute for Conservation - Canadian Group 15 (1990), pp. 9–11.
Smith, M. Matting and Hinging of Works of Art on Paper. Washington, D.C.: Library of Congress, 1981.
Sozzani, L. “An Economical Design for a Microclimate Vitrine for Paintings Using the Picture Frame as the Primary Housing.” Journal of the American Institute for Conservation 36,2 (1997), pp. 95–107.
By the staff of the Fine Arts division
Primary author: Debra Daly Hartin
Revised by Debra Daly Hartin and reviewed by Fine Arts staff in 2018.
Originally published in 1993
Également publié en version française.
© Government of Canada, Canadian Conservation Institute, 2018
ISSN 1928-1455