
Mounting Small, Light, Flat Textiles – Canadian Conservation Institute (CCI) Notes 13/6
(PDF Version, 1.37 MB)
CCI Note 13/6 is part of CCI Notes Series 13 (Textiles and Fibres)
Introduction
This Note describes the mounting of small, lightweight, flat textiles. Heavy textiles, such as tapestries and carpets, require a completely different approach (CCI Notes 13/4 Velcro Hanging Support System for Flat Textiles).
If a textile is soiled or in poor condition, it should not be mounted. In such cases, seek advice from a qualified textile conservator.
Rigid Backing Support
Small textiles, such as samplers, can be supported on acid-free 4-ply or 8-ply matboard.
Whether the textile is to be framed or is to remain unframed, the support should be a few centimetres larger all around than the piece. This will help protect the edges of the textile and facilitate its safe handling. A wider margin will be necessary for wider frames and if a window mat is to be used in framing.
Backing Fabric
Select a backing fabric of cotton or a cottonpolyester blend. If a coloured fabric is chosen, test it for washfastness. Do not use fabrics that have fugitive dyes because moisture or accidental wetting could cause a transfer of colour. Machine-wash the fabric once and then put it through two complete detergent-free cycles to remove sizing and detergent residues. Use a mild commercial detergent for the initial washing. Lay the wet fabric on a flat, smooth surface. Align warp and weft threads at right angles, and roll the fabric out with a brayer (a rubber-clad printmaker's roller). Place weights, such as glass paperweights without felt pads, around the edges of the textile to prevent it from distorting during drying. Select a backing fabric of cotton or a cotton-polyester blend. If a coloured fabric is chosen, test it for washfastness. Do not use fabrics that have fugitive dyes because moisture or accidental wetting could cause a transfer of colour. Machine-wash the fabric once and then put it through two complete detergent-free cycles to remove sizing and detergent residues. Use a mild commercial detergent for the initial washing. Lay the wet fabric on a flat, smooth surface. Align warp and weft threads at right angles, and roll the fabric out with a brayer (a rubber-clad printmaker's roller). Place weights, such as glass paperweights without felt pads, around the edges of the textile to prevent it from distorting during drying.
Optional Step
A thin layer of padding often makes it much easier to stitch the textile to the fabric-covered support. Before covering the rigid support with the prepared fabric, a piece of needlefelted polyester batting can be attached around the perimeter of the rigid support using double-sided tape (3M #415). The tape does not lie directly beneath the textile to be mounted (Figure 1).
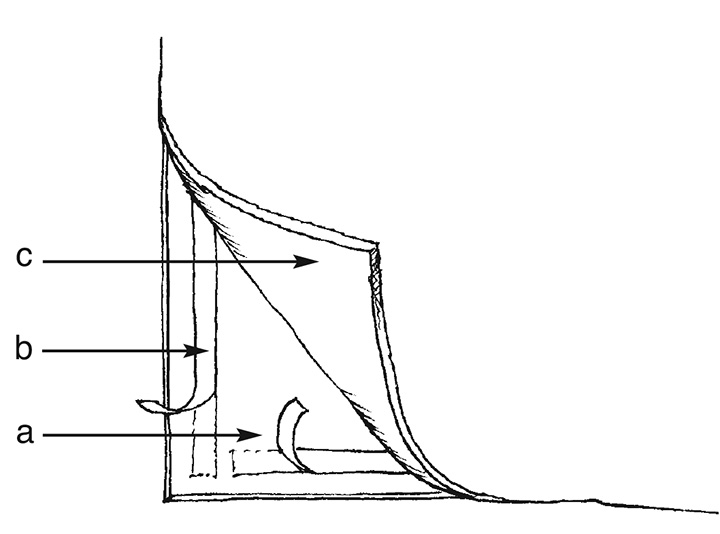
b, double-sided tape; c, needle felted polyester batting.
Attaching Fabric to Rigid Support
The fabric should be taut once attached to the rigid support. The grain should be straight and parallel to the edges of the support.
Place the prewashed backing fabric right-side-down on a smooth, clean surface.
Place the support on the wrong side of the backing fabric aligned with the fabric grain.
Using a brush, apply a band of white glue 5 cm wide along one edge of the back of the support. Take extreme care to keep the glue away from the edges and the front of the support (Figure 2a). Fold the fabric allowance onto the edge treated with glue and press down. Aligning the edge of the fabric to a pencil line on the back of the rigid support helps ensure that the grain of the fabric is straight. Place weights at each end of the glued, folded fabric (Figure 2b). Let the glue dry completely.
Repeat this procedure on the opposite side, pulling the fabric taut over the edge and following the straight-of-grain. Let the glue dry completely. Cut away and lift off the excess fabric (Figure 2c).
Repeat the above procedure on the remaining unglued edges, making sure that the corners are smooth and well glued (Figure 2d). Allow the glue to dry completely (Figure 2e).
Alternatively, insert straight pins into the outside edges of the rigid support through the fabric to hold it in place temporarily for gluing. The pins can be adjusted easily to ensure that the fabric is taut and on grain. Fold the pinned fabric back to apply the white glue and cut away excess fabric from the corners as outlined above (Figures 3a, 3b).
Positioning the Textile on the Prepared Support
Placing a textile that is in sound condition in the proper position on the prepared support does not usually present a problem. However, textiles that are in fragile condition must be handled as little as possible. To minimize direct handling of the textile, make a tracing of it on polyethylene sheet or Mylar. Cut out the tracing and use it to determine the optimum position for the textile. Mark the position temporarily with a few running stitches in the fabriccovered support. Place the textile, supported on tissue, over the marked position. Make any adjustments to the positioning by moving the tissue instead of the textile. When the textile is properly positioned, gently withdraw the tissue. Secure the textile by pinning it around its entire perimeter to the fabriccovered support. Insert the pins between the threads in the textile instead of through them. Similarly, pin through already existing openings in the textile such as those present in lace. Some adjustment of the pins may be necessary to align the textile properly. When the textile is pinned in place, remove the thread used to position it on the support.
Stitching the Textile on the Prepared Support
Using a fine straight or curved needle and colourfast sewing thread, stitch the outer edge of the textile to the fabric-covered support. A variety of stitches may be used depending upon the nature and condition of the edge of the textile. For example, frayed edges are best secured with a herringbone stitch, whereas a blind stitch can be used on hemmed edges. Running stitches or whipstitches can also be used to stitch the edges of the textile to the fabric-covered support (CCI Notes 13/10 Stitches Used in Textile Conservation). Remove the pins as the stitching proceeds (Figure 4). The interior area of the textile can be stitched to the fabric-covered support in different ways depending on the textile’s construction. For example, running stitches can be worked around the edge of decorative elements such as embroidery or appliqué. Large areas of undecorated ground fabric can be attached to the support with staggered lines of support stitches (Figure 5). When the support is placed vertically, the textile should remain in position and not form puckers. Use a small, almost invisible stitch on the surface of the textile and a longer stitch through the fabric covering the support. If there are weak areas or actual losses, secure these to the backing using a self-couching stitch (CCI Notes 13/10 Stitches Used in Textile Conservation). Once the textile is mounted, it may be framed. Allow time for the white glue to cure and off-gas completely before sealing the mounted textile into a frame.

Suppliers
Note: The following information is provided only to assist the reader. Inclusion of a company in this list does not in any way imply endorsement by the Canadian Conservation Institute.
Mounting board (acid-free):
art supply stores
Brayer (Hunt Speedball Brayer Nº 4117):
art supply stores
White glue (Lepage's Multi-Usage Bondfast):
hardware stores
Double-sided tape (3M #415):
conservation supply houses
Needlefelted polyester batting:
fabric stores
Bibliography
-
Bogle, M.M. The Mounting of Textiles for Storage and Display. Textile Conservation Notes Nº 15. North Andover, MA: Merrimack Valley Textile Museum, .
-
Finch, K., and G. Putnam. Caring for Textiles. New York, NY: Watson-Guptill Publications, .
-
Robinson, J., and T. Pardoe. An Illustrated Guide to the Care of Costume and Textile Collections. London, UK: Museums and Galleries Commission, .
By the staff of the Textile Lab
Originally published
Revised ,
Copies are also available in French.
Texte également publié en version française.
©Minister of Public Works and Government
Services Canada,
Cat. Nº NM95-57/13-6-2009E
ISSN 0714-6221
Printed in Canada