
The Digitization of Audiotapes – Technical Bulletin 30
By Joe Iraci, Richard Hess and Kimberley Flak
Revised by Joe Iraci
CCI Technical Bulletins
Technical Bulletins are published at intervals by the Canadian Conservation Institute (CCI) in Ottawa as a means of disseminating information on current techniques and principles of conservation of use to curators and conservators of Canada’s cultural objects and collection care professionals worldwide. The authors welcome comments.
Abstract
Many archives and heritage institutions possess audiotapes that are the only record of culturally significant information. Unfortunately, these analog audio storage formats have a finite technology lifetime. If the information is to remain accessible, it must be migrated to new technology. This Technical Bulletin provides information and procedures for digitizing cassettes and reel-to-reel tapes. It is intended to assist small to mid-size heritage institutions that lack the funds for professional digitization. Note that the procedures discussed herein are intended primarily for oral history collections; they will not capture all the fine details present in high-fidelity recordings.
Authors
Joe Iraci was a Senior Conservation Scientist at CCI from 1993 to 2019. He performed research on the disaster recovery of optical discs and magnetic tapes and disks, as well as the deterioration and stability of these media.
Richard Hess is an expert in the digitization of audiotapes. In 2004, he wrapped up a 21-year career with National TeleConsultants and opened his own business (www.richardhess.com) for audiotape restoration, repair and mastering in Aurora, Ontario. He was contracted by CCI to co-write this Technical Bulletin.
Kimberley Flak was a Conservation Scientist at CCI from 2009 to 2011. Her work focused on methodologies and techniques for the preservation of digital content.
Disclaimer: The information provided here is based on the current understanding of the issues presented. The guidelines given in this Technical Bulletin will not necessarily provide complete protection in all situations or protection against every possible adverse effect caused by digitizing cassettes or reel-to-reel tapes.
Table of contents
- List of abbreviations
- Introduction
- Overview of the digitization workflow
- Evaluation of tape condition
- Playback equipment and set-up
- Analog-to-digital conversion
- Playback of tape for digital capture
- Editing and quality control
- Storage
- Care of tapes: storage and handling requirements
- Outsourcing
- Technology watch
- Suppliers
- Appendix A: Reel-to-reel tape recorders that may be suitable for digitization
- Appendix B: Alternative digital capture options analysis
- Appendix C: Zoom H2 recommended settings for capture
- Appendix D: Equipment summary
- Appendix E: Cable connections between equipment
- Bibliography
- Further reading
- Endnotes
List of abbreviations
- µm
- micrometre
- BEXT
- broadcast audio extension
- BWAV
- broadcast wave format
- DAT
- digital audiotape
- LTO
- linear tape open
- NAS
- network-attached storage
- RAID
- redundant array of independent disks
- SD
- secure digital
- SDHC
- secure digital high-capacity
- UPS
- uninterruptible power supply
- VA
- volt-ampere
Introduction
Many small to mid-size archives and heritage institutions possess analog audiotapes (cassettes and/or reel-to-reel) that are the only copy of culturally significant information. These media have a finite technology lifetime. They cannot be stored indefinitely with the expectation that the information will always be retrievable.
Analog tapes are near their end of life
Audio cassettes were conceived as a “dictation-quality” format, but their ease of use made them popular for a wide variety of purposes. By the early 1980s, more commercial music was available on audio cassettes than on long-playing records. Although not as prevalent as cassettes, quarter-inch reel-to-reel tapes also saw widespread use and are generally capable of much higher fidelity.
A brief review of the history of audio cassettes and reel-to-reel tapes indicates that both are now near their end of life.
- Cassettes are no longer a mainstream medium, as reported in The New York Times on July 28, 2008.Endnote 1 The same can be said for reel tapes since the 1970s in the consumer marketplace and since the 1990s in the vast majority of professional applications.
- Players are becoming scarce. Excellent-quality cassette players were discontinued in the 1990s and even most good-quality ones are no longer produced. The last professional reel-to-reel players were manufactured in the 1990s.
- Magnetic tape is degrading, although the precise timeline for any given tape depends on the specific batch of tape and the long-term storage history.
It is clear that the information stored on these analog audiotapes needs to be migrated to a newer format if it is to remain accessible. The best option is digitization. In fact, there is effectively no alternative since there are no analog formats that are widespread and cost-effective and that have any significant expectation of future support.Endnote 2 Digitization of analog audio recordings will not only preserve them, but also make them more accessible to researchers and other interested parties.
Advantages of digitization
Although it may look as if archives and heritage institutions are being forced into digitizing audio assets, there are many advantages to digital storage.
- Digitization at even a mid-quality level is better than making more cassette copies; the digital version is much more likely to survive and be accessible in the future.
- Digitization allows for multiple copies with no further loss of quality. Once an item is digitized, further digital copies can easily be certified as “bit perfect” (every bit in the copy is the same as in the original). Instead of one master tape and inferior copies distributed to other archives, all digital copies are of the same quality. The quality of the digital copy far exceeds that of most cassettes that were recorded, so the original quality on the cassette is maintained throughout the digital process.
- Digitization allows for easy and remote access. As more and more Internet users have high-speed links, digital content can be distributed at a fraction of the cost of distributing physical media. Internet distribution is also faster. There is no waiting for the regular mail to arrive.
- No format is forever, but digitization enables, and also simplifies, ongoing mass transfers from one carrier to another and possibly even from one format to another later in time. In contrast, copying analog material is labour-intensive and can allow sonic degradations to creep in.
This Technical Bulletin provides information and procedures for digitizing cassettes and reel-to-reel tapes. It is intended for small to mid-size heritage institutions that lack the funds for professional digitization.
The emphasis is on oral history collections, which, since the late 1960s, usually reside on cassettes. Most of these comprise impromptu collections of music, such as campfire songs and small performances. Although some communities had audiophiles who created high-quality recordings, most of these recordings are far from high fidelity. The few tapes that were recorded with more care (using reasonable microphones and a good-quality recorder, for example) should be separated for superior digitization, as the guidelines provided herein are unlikely to capture all the fidelity present on these tapes.
Reel-to-reel tapes were generally used for oral histories in the 1950s. This usage declined with the growing popularity of cassettes, and the conversion to cassettes was probably complete by the late 1970s or early 1980s. The procedures for digitizing reel-to-reel tapes that are included in this Technical Bulletin are intended for oral history and similar quality recordings only. Reel-to-reel tapes that contain music recorded on professional machines should be separated for superior digitization.
Oral histories may also appear on other formats, including wire recordings, grooved (and possibly magnetic) discs, and grooved and magnetic dictation belts. However, these and other formats represent a very small percentage of the overall body of this type of work. They are beyond the scope of this Bulletin and should be sent to a professional specializing in the particular format.
Digitization for preservation should generally be performed at the highest quality possible, and many high-end and expensive approaches are available. However, the basic choices and processes suggested here should provide reasonable results. They offer a cost-effective way to create a robust archive of irreplaceable cassette and quarter-inch reel-to-reel recordings.
Overview of the digitization workflow
The following procedure for digitizing audio recordings (Figure 1) is cost-effective, scalable to allow for several tapes to be digitized at a time (by using additional playback equipment and digital recorders in parallel) and adjustable to a wide range of operator skills and project needs. While the directions are applicable to both cassettes and reels, reel tapes represent a steep learning curve for those who are newly introduced to the medium. Much of the material and support infrastructure that was available between the 1970s and the1990s is rapidly disappearing.
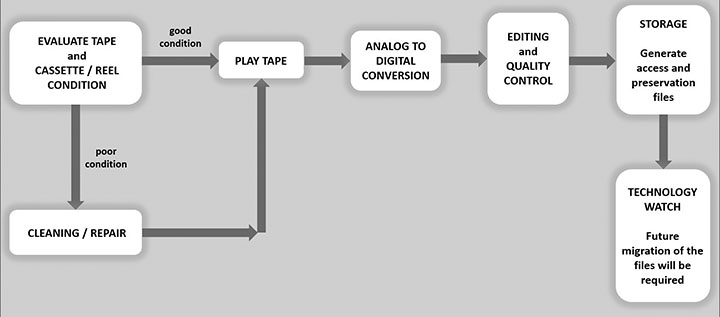
© Government of Canada, Canadian Conservation Institute. CCI 131907-0001
Figure 1. Workflow diagram for the digitization of audiotapes as discussed in this Technical Bulletin.
Description of Figure 1
The first part of the workflow diagram for the digitization of audiotapes involves evaluating the condition of the tape and cassette or reel. If these elements are in good condition, then it is safe to play the tape and digitize it. Alternatively, if these elements are in poor condition, then cleaning and/or repair is required prior to the tape being played and digitized. The signal from the tape being played is fed into an analog to digital conversion device in order to perform the digitization. The next step is editing of the digitized recording and performing a quality control assessment. Subsequently, access and preservation files are generated and these files are stored on media. A technology watch is required in order to determine when the future migration of the files will be required.
Evaluation of tape condition
All tapes should be visually inspected before they are played. This is necessary to identify tapes that could be damaged if played and those that could damage the playback equipment. The Further reading section refers to information on how to evaluate tape condition.
Contaminants
One of the first things to look for when visually inspecting a tape is contamination, which can take many forms:
- fungus or mould, which usually appears as fuzzy or thread-like growths that vary in colour but are commonly black, brown or dark yellow
- damage from pests, whose presence is typically revealed by droppings, urine stains and gnawing damage
- dust, dirt, debris or crystalline residue from lubricant breakdown
- adhesive residue from aged splices or labels
Chemical degradation of tape
Tape can be susceptible to hydrolysis, a reaction of the binder (the polymer material that holds the magnetic particles on the tape base) or the plastic base of the tape with water that leads to degradation. Binder degradation is more likely to occur in reel tapes than in cassette tapes. It can be identified by the presence of a pungent waxy or “dirty socks” type of odour, stickiness when the tape is unwound, squeals when the tape is played, and/or binder and magnetic particles readily flaking off the tape base. Degradation of the plastic base of tapes is also more likely to occur in reel tapes. For cassettes, in which the base is polyester, chemical degradation is not generally an issue under normal storage conditions. However, many reel tapes used acetate as the base material, and acetate is vulnerable to hydrolysis. Degradation in these tapes can be identified by the presence of a vinegar smell and/or physical distortion of the tape base.
Acetate tapes were the mainstay of the 1940s and 1950s. Polyester tapes were introduced in the 1950s, and acetate tapes were pretty much phased out by the late 1970s. Paper tape was used in the 1940s and was discontinued during the 1950s. Poly(vinyl chloride) (PVC) tape was not widely used in North America.
Physical damage to tape
Physical damage such as breakage, wrinkling, cupping or curving of the tape, edge damage and stretching may all be present. Tapes that are physically damaged will probably not play properly unless some remedial action is taken first. Attempting to play them could further harm the tape or damage the playback equipment.
Damage to cassette housing or reel
In addition to evaluating the tape itself, the cassette shell or reel should be examined for any kind of damage. Typical damage on cassettes includes broken or cracked housings and detached or missing pressure pads. For reels, damage is likely to take the form of bent or cracked flanges. Playing a tape with a damaged cassette or reel can ruin the tape and/or the playback equipment.
Preparing the tape for playback
Heavily contaminated tapes or tapes with mould require professional cleaning with specialized equipment. However, if the debris is not mould and has not infiltrated the wound tape layers, cleaning can be dealt with in-house. Vacuum or wipe off any debris prior to opening the tape box. Vacuum gently to remove debris from the cassette shell or the reel of tape, being careful not to pull the tape into the vacuum.
Tapes with physical or chemical damage require some form of treatment before they can be played. In most cases, successful recovery requires the services of a professional tape restorer. Some remedies can be performed in-house (Iraci 2005), but success depends on the experience of the individual and the degree of tape degradation.
Cassettes
Ensure that there is nothing on the cassette shell that can interfere with it properly sitting in the deck, such as adhesive tape or another substance. Even the label may need to be removed if it is interfering with playback; the label can be problematic when it is not situated in the recessed portion of the cassette shell, which is designed specifically for label placement.
Inspect the pack of the cassette tape. The tape may jam, and it will need to be monitored closely during play, if it exhibits any of the following characteristics: there are strands popping out, the wind is too loose or too tight, or there is evidence of coning. “Coning” means that the tape has wound into a shallow cone with the outer layers offset from or not in the same plane as the layers at the hub. A conical tape pack is rare, and, if it occurs, is most common on C-120 cassettes.
A poor wind can often be corrected by winding the tape through to the end, starting from the beginning and using the “Play” mode. However, this could make some conical-packed tapes even worse. With conical-packed tapes, carefully wind a bit of the tape using a pencil inside the hub to get a feel for the tension. If the tension is too high, or the tape binds, then reshell the tape into an empty cassette and rewind the tape to the beginning either in the machine or using a pencil. For advanced stages of coning, placing the tape into a screw-secured shell and loosening the screws slightly to allow more room for the tape may be the only solution. C-0 cassettes (cassette shells without any tape) are getting harder to find, but shells from discarded cassette tapes can be used, as long as they are in good shape.
A tape can also bind in its shell for several other reasons:
- grooves or other damage to the tape guides in the shell
- deformation of the shell
- degraded slip sheets between the tape pack and the shell
For these scenarios, transferring the tape to another cassette shell may once again be the only option to make the tape playable without jamming.
If the write-protect tabs at the top of the cassette are not already broken out, break them to prevent accidental erasing of the tape.
If your tape deck relies on the pressure pad built into the cassette, examine the pad and, if it is decayed or missing, reshell the tape. If your tape deck (for example, Nakamichi) lifts the pressure pad and provides its own tension, the condition of the pad is unimportant as long as it does not shed.
If the cassette shell is broken or cracked or if any splice has let go at the leader,Endnote 3 transfer the tape to another cassette shell prior to playing it.
Reels
Many of the rules for reel tapes are similar to those for cassettes. If tape strands are popping out of the tape pack or the tape pack is too loose or too tight or resting on the flanges, then the tape needs to be rewound and played from the beginning to the end to restore the proper tension in the tape pack prior to digitization. This should be performed at “Play” speed on a headless transport, if this is possible with the equipment on hand, in order to avoid wasting head life of increasingly rare and expensive tape heads.
Whether a tape should be rewound and played through also depends on existing issues with the tape and on whether the tape reel is in the heads-out or tails-out position. In the heads-out position, the beginning of the tape is on the outer portion of the reel; because the tape is already in the correct orientation to play, no rewinding is necessary. In the tails-out position, the beginning of the tape is at the inner portion of the reel, so rewinding is necessary before the tape can be played.
One big difference between cassettes and reel tapes is that the recording (magnetic coating) side of the tape is wound away from the hub on cassettes (B-wind) and towards the hub on most open-reel tapes (A-wind). Reel tapes are normally stored tails-out so when playback is finished, the tape is left with a nice play wind tension and a smooth pack. Tapes need to be rewound prior to playing. If the playback deck has a “Library Wind” mode, use that setting for winding.
Broken, cracked or distorted reels should be replaced prior to playing the tape.
In contrast to most cassette audiotapes, many reel tapes need to be “baked”Endnote 4 or treated in other ways before they can be successfully played. Baking (exposing the tape reels to moderate heat for several hours or even a day or more) can temporarily restore playability for many tapes suffering from binder degradation, although success depends on the experience of the user. Baking and other methods for treating tapes with binder degradation are not described in detail in this Bulletin, but more information is available elsewhere (Iraci 2005; Hess 2008).
If a tape has broken or if previous splices have failed (typically a problem for quarter-inch reel-to-reel tapes), repair it with splicing blocks and splicing tape. A splicing block allows clean and proper cuts to be made. Use only materials intended for audiotape repair, not general-purpose materials such as adhesive tape. Consult the Suppliers section for information on splicing material suppliers.
Playback equipment and set-up
The initial step in any digitization project is to set up a workstation or work area.
Selecting and outfitting the space
Professional studios generally have very strict requirements. However, for the type of audio transfers described in this Bulletin, any quiet, separate room that provides for a substantial degree of sound absorption (with carpet on the floor, acoustical tiles on the ceiling, soft office divider panels and wall-hung sound absorbers) is sufficient. The room should be equipped with a dedicated 15 A 120 V circuit to feed the audio and computer equipment. No other electrical source, such as lights, should be on this circuit. It is also a good idea to pull the desk out from the wall so that there is room to mount the monitor speakers a little way back from the operator.
Cassette playback machine
The first goal of any transfer workstation is to provide an optimum playback of the original tapes, which usually requires a high-end cassette player. The most prevalent brand is probably Nakamichi, although certain Nakamichi tape decks were superior to others. Other brands to consider include Sony, Kenwood, Tascam/Teac and Panasonic/Technics (which made good to very good tape machines), as well as Studer, Tandberg and a few other European manufacturers (which made very good to excellent tape machines).
Unfortunately, most high-end players are just as old as the tapes, and the challenge of finding a good used one is daunting. Good machines can sometimes be found on eBay, but the condition is often unsatisfactory. Local sources may provide a good machine that is still in working order or can be repaired. Some new cassette machines are still available, but the supply of these is fairly limited and availability becomes more of an issue as time passes. In the end, any readily available tape machine of reasonable quality and working condition is worth considering.
Even though the recording may have been made on a $20 drugstore machine, at least some—and we suspect most—machines recorded better than they played. For this reason, it is probably beneficial to play a tape on a better machine than the one on which it was recorded. Although some still argue that playing the tape on the machine on which it was recorded is best, most restorers believe that this is a failed concept and applies only in very special cases with high-end recorders.
Reel-to-reel playback machine
Obtaining a good-quality reel-to-reel playback machine is even more difficult than obtaining a competent cassette machine. The best option is to find the machine that was used to make the recordings in your archive and to see if it can be brought back to life. However, finding the original machine is unlikely, and it will probably be necessary to search eBay, Craigslist or similar outlets for a used reel-to-reel machine at a reasonable price. Asking in the local community is also a good idea. Once a machine has been acquired, it is important to test it with non-critical tapes before using it on archival tapes, as a malfunctioning machine can significantly damage the magnetic record on the tape.Endnote 5 This problem is more common with reel-to-reel machines than with cassette machines due to the greater age and less sophisticated design of older reel machines.
Appendix A provides a list of many different tape recorders, along with the authors’ opinions on which brands might or might not be suitable for digitization. However, please note that the list is not exhaustive. Machines that are not included may work very well, and bad units of the recommended brands may exist. When buying a used reel-to-reel tape machine, “Buyer beware!” is probably the best advice.
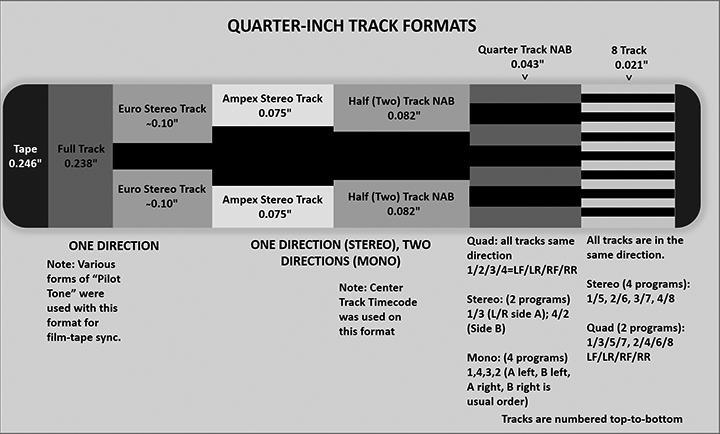
One of the most important factors with a reel-to-reel tape machine is matching the head to the recording on the tape. Two major systems were used: two-track and quarter-track. Figure 2 shows most of the major track configurations.
© Government of Canada, Canadian Conservation Institute. CCI 121696-0007
Figure 2. Schematic representation of the major track configurations on quarter-inch reel-to-reel audiotape.Endnote 6
Description of Figure 2
A quarter-inch audiotape has a width of 0.246 in. When a full-track recording is made, the width of the recorded track is 0.238 in. The euro stereo track is a two-track recording with each track similar to 0.10 in. in width. The tracks are separated by a guard band. Both the full and euro stereo track recordings are one-direction recordings. Note that for the full-track recording, various forms of “pilot tone” were used with this format for film-tape synchronization.
Other two-track formats include the Ampex stereo track, which has a recorded track width of 0.075 in. for each track, and the half-track (two-track) NAB format, where each of the two tracks is 0.082 in. in width. In both of these recording formats, the two tracks are separated by one spacer or guard band. For these recording formats, stereo recordings would be one direction only and mono would be two directions. Note for the NAB format that “center track timecode” was used.
The quarter-track NAB format has four tracks that are 0.043 in. wide. Each track is separated by a guard band. In quad recording mode, all tracks run in the same direction: 1/2/3/4 equals left front, left rear, right front and right rear. In stereo mode (two programs), tracks are paired as 1/3 (left and right, side A) and tracks 4/2 (side B). In mono mode (four programs), 1, 4, 3, 2, (A left, B left, A right, B right) is the usual order.
The 8-track format has eight tracks that are 0.021 in. wide; each is separated by a guard band. All tracks are in the same direction. For stereo recordings (four programs), tracks are paired as 1/5, 2/6, 3/7 and 4/8. For quad recordings (two programs), tracks are grouped as 1/3/5/7, 2/4/6/8, or left front, left rear, right front and right rear.
For both the quarter-track NAB and 8-track formats, tracks are numbered from top to bottom.
It is essential to confirm the format of a tape, because what is written on the box cannot always be trusted.
- One method is to use a magnetic image viewer, which is a simple device that allows one to see the recorded magnetic signal pattern on the tape. When using this method, it takes a minute or two for the image to come up, and it works much better if there is a loud segment.Endnote 7
- Another method is to use a four-channel tape reproducer. With experience, this technique works well to identify full-track, two-track (NAB) and quarter-track tapes. However, it does not identify other rarer formats nor does it provide much information about tapes that were improperly recorded.
Power conditioning
High-end power conditioning is not required, but plugging all of the equipment into a standard computer uninterruptible power supply (UPS) is a good idea. This will protect the equipment against power surges and against loss of data for short power interruptions. A 1000 VA or 1200 VA unit is more than adequate. The only time a higher-priced sine-wave inverter would be required is if a tape machine uses a motor connected directly to the AC line. Almost all cassette machines use DC motors, running off the internal power supplies. As such, they are immune to power supply anomalies that occur in the less costly computer-level UPSs.
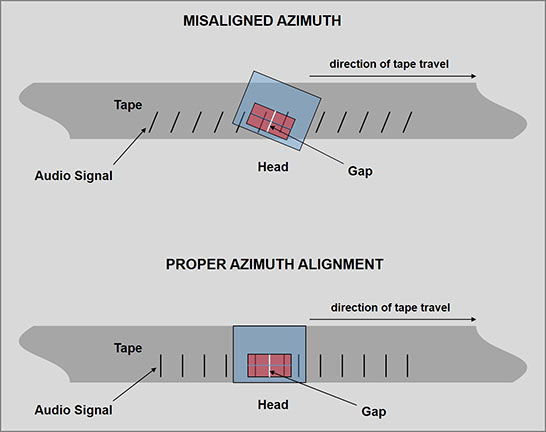
Azimuth adjustment
Proper playback of tapes is essential to produce a good-sounding digital audio file. If a poor-quality signal is fed into the analog-to-digital conversion device, the digitized output will also be poor. One of the most critical factors for the proper playback of tapes is the azimuth adjustment (Copeland 2008). Azimuth refers to the angle between the magnetic gap in the tape head and the direction of travel of the tape (Figure 3). If the recording was made with a misaligned azimuth of the record head, then the reproduce head must be intentionally misaligned so that it matches the misalignment of the original recording head to ensure proper playback of the recording. The misalignment of azimuth is greatly exaggerated in Figure 3. In reality, the angle of misalignment is usually very small and only a small change in the orientation of the head is required.
For cassettes, the recording azimuth of the tape is determined by the cassette shell, the recorder geometry and how it held the shell, and the actual alignment of the recording head. Ideally, this angle should be 90°. If the angle is the same in the recording machine and the playback machine, there should not be an azimuth issue. Therefore, if a tape is played on the machine on which it was recorded, there should, theoretically, be no azimuth-related problems as long as the player uses the same head for recording and playback. However, if the cassette shell warps, the head or guide components of the player become misaligned, or if the machine has separate record and playback heads, azimuth issues can arise even if the same machine is used.
In an institution that collects audiotape recordings, the playback equipment is rarely the same equipment that recorded the tape. Misalignment of the heads in the recording or playback machine, or in both, is a common occurrence. Unless the playback head is moved to achieve the proper angle, high-frequency content or treble will be diminished and the audio will sound muffled rather than crisp and clear.Endnote 8
© Government of Canada, Canadian Conservation Institute. CCI 131907-0003
Figure 3. Schematic representation of misaligned azimuth and proper azimuth alignment.
Description of Figure 3
For misaligned azimuth, the record head and, consequently, the gap within the head are not aligned properly relative to the tape or are at an angle relative to the edge of the tape. This results in audio signals that are not properly aligned; for example, the audio signals are at an angle to the edges of the tape and not perpendicular to the tape edges. The direction of tape travel in this illustration is from left to right.
For proper azimuth alignment, the record head and, consequently, the gap within the head are aligned properly relative to the tape or are perpendicular to the edge of the tape. This results in audio signals that are properly aligned; for example, the audio signals are perpendicular to the tape edges. The direction of tape travel in this illustration is from left to right.
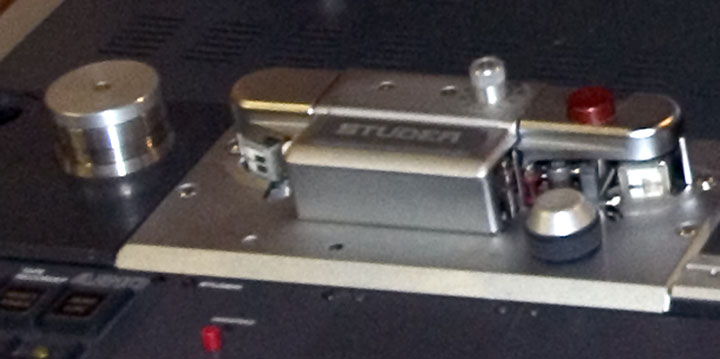
Azimuth adjustment varies depending on the type of playback equipment. For cassette players, a screw may be present in the area of the head. The addition of a small hole under the cassette door with access from outside the tape player’s chassis will allow easy access. Alternatively, the cassette door may have to be removed to access the azimuth adjustment screw, which resides on one side (usually the left side) of the playback/record head in a screw and spring type arrangement. For reel players, a screw on the head assembly, similar to that of a cassette player, may be present and clearly labelled as the azimuth adjustment screw (Figure 4). This screw is often inaccessible unless the head covers are removed. Drilling a discrete hole in the head cover will allow azimuth adjustments to be made without removing the cover, which is often an important shield against hum. Reel players may also have a clearly labelled knob for azimuth adjustment (Figure 5).
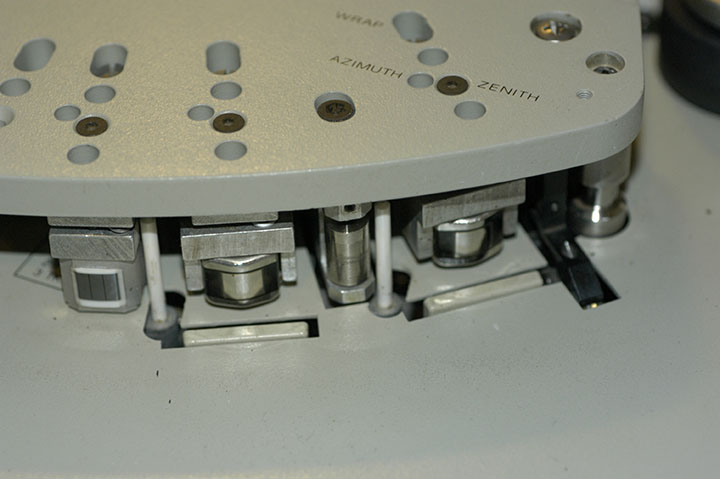
© Richard Hess
Figure 4. A full-track Sony APR-5000 head assembly with a Woelke erase head and a Nortronics record and play head. Note the labelling of the azimuth screw hole, which, in this case, requires a 2-mm hex driver. Most Studer machines have the azimuth on the base plate, and it requires a 2.5-mm hex driver.
© Richard Hess
Figure 5. Note the external azimuth adjustment knob (the silver cylinder) just behind the “R” of the Studer logotype on the head block.
Regardless of the method for adjusting the azimuth, the actual adjustment can be gauged by listening or, for more critical work, by using an oscilloscope or a real-time spectral analysis tool. For the procedure presented in this Bulletin, the listening option is adequate.
The operation is simple: tune for maximum highs and clear and crisp audio while listening in mono. For a stereo recorder, sum the two channels to mono setting (mix the left and right channels to make a mono program containing equal amounts of both the left and the right of the original program) to properly hear the azimuth misalignment and make the required corrections. Rocking the adjustment back and forth, akin to manually focusing a camera lens, is generally the best way to do this. Turning the adjusting screw about a quarter turn in each direction is usually all that is required. The screw does not need to be fully tightened. This is a mistake many first-time head adjusters make. Also, adjust only the azimuth screw and leave all the others set. Information on how to adjust the azimuth on a particular machine can be found in the machine’s service manual.
If azimuth adjustment is difficult on the playback equipment available, this step can probably be eliminated for oral history tapes. The results of the digitization may not be as good as they could be, but they should still be adequate. The quality will be determined by the match between the recording and play azimuths. If the recording machine and the playback machine are both close to the manufacturer’s specifications, the results should be good.
Note that the azimuth adjustment procedure discussed above is about adjusting the head to the actual recording on the tape. The recording head itself was often not properly adjusted. It should not be confused with aligning the play head to an alignment tape, which is far less useful, considering the high probability of a misadjusted record head when the original recording was made.
Analog-to-digital conversion
There is more than one way to capture the analog audio signal from a cassette or reel-to-reel playback machine. The procedure described in this Bulletin uses a stand-alone flash-memory-card digital recorder. The characteristics of this digital recording system are outlined in Appendix B, along with those of alternative systems.
The digitization quality of the flash recorder may not be the best possible, but there are many advantages to this approach. Among the benefits, the use of a flash recorder:
- simplifies cabling and reduces the risk of wiring-induced interference
- allows a digital recorder to be married to each playback machine, thus generating multiple ingest stations (Figure 6) *
- produces digital files that can be treated in any number of ways, including being copied directly, as files, to DVDs without any further processing
- allows easy gathering of additional material in a digital file format (as most of the compact recorders contain built-in microphones)
- does not require analog audio processing in the computer, eliminating the need for a costly high-quality computer sound card
* Note: ingesting (the process of inputting the analog audio signal into the digital recorder) is a real-time process. Multiple ingest stations will allow several tapes to be ingested at the same time, and this can significantly reduce the total ingesting time of the project. Multiple ingest stations also provide complete system redundancy and make it possible to cross-check tape quality. If the audio sounds bad on more than one machine, the tape quality probably is bad.
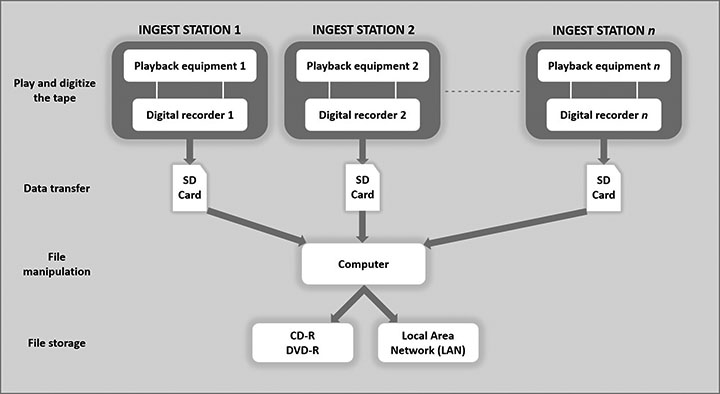
© Government of Canada, Canadian Conservation Institute. CCI 131907-0005
Figure 6. Audiotape digitization workflow with several ingest stations. Less cabling is required as data are transferred via SD cards. Several ingest stations can be set up, which reduces digitization time considerably.
Description of Figure 6
An audiotape digitization workflow can have several ingest stations, such as ingest station 1, ingest station 2 and all the way to ingest station n. To play and digitize the tape, ingest station 1 consists of playback equipment 1 and digital recorder 1, ingest station 2 consists of playback equipment 2 and digital recorder 2, and ingest station n has playback equipment n and digital recorder n. For each ingest station, data transfer to a computer occurs via an SD card. File manipulation occurs with the use of a computer. From the computer, the file storage is on either a recordable CD (CD-R), a recordable DVD (DVD-R) or a Local Area Network (LAN).
Digital recorder
As of this writing, a number of suitable stand-alone flash-memory audio recorders are available. The lower-cost versions of these devices mostly use Secure Digital (SD) cards, including the high-capacity versions (SDHC).
Examples of suitable recorders include the Zoom H1 and the Zoom H2, which have received much praise as a low-cost solution for making reasonable audio recordings. The Zoom H4n, which provides better connectors than the H2, and the Edirol R09HR are also options. Any of these should be more than adequate.
Basic specifications to look for in a suitable digital recorder include:
- signal processing up to 24 bits and 96 kHz
- ability to produce Waveform Audio Format (WAV) files
- SD memory card slot
More information on these and similar devices can be found under “Solid State Memory Card Recorders” in the Digital Audio Field Recording Equipment Guide from the Vermont Folklife Center.
Whichever digital recorder is selected, there will likely be adjustable recording settings available. To understand how these settings impact the quality and size of the digital files generated, a brief explanation of what it means to “digitize” the audio signal is required.
The point of digitization is to translate the audio signal into a computer-interpretable numerical representation. This is accomplished by repeatedly sampling the continuous analog signal and translating each sample into a numerical value. This process can be thought of as taking a series of measurements. The digital representation is therefore an approximation to the original signal, and the details of the sampling process determine how well the signal is captured.
There are two factors that affect the accuracy or fidelity of the digital recording: the sampling rate and the bit depth.
- The sampling rate refers to the frequency of sampling and is expressed in samples per second, or Hertz (Hz). The higher the Hz (the more frequently the signal is sampled), the better the fidelity will be.
- The bit depth refers to the precision of sampling. Each time a sample is taken, the signal is assigned a numerical value from a fixed set of possible values. If the set of possible values is small, the approximation will be crude. If the number of available values is greater (the measurement scale is finer), the approximation will better encode the original signal. The fineness of the measurement scale depends on how much storage space, expressed in bits, is allotted for each measurement (the bit depth).
Example: an audio CD is recorded at a sampling rate of 44.1 kHz and a bit depth of 16 bits. This means that the analog signal is sampled 44,100 times per second and the measurement can be any one of 65,536 (2 to the 16th power, or 216) possible values.
Higher sampling rates and bit depths will produce higher fidelity recordings. However, this comes at the cost of increased storage capacity requirements. The most commonly employed configurations are derived from the limitations of human hearing.
The available sampling rates and bit depths vary from recorder to recorder, but most allow the operator to select from a list of common configurations. Again, the selection impacts the size of the digital file. Table 1 lists the most common settings and shows the file sizes generated in each case.
| Sample rate / bit depth / type of recording | File size by recording time | |||
|---|---|---|---|---|
| 30 min | 60 min | 90 min | 120 min | |
| 44.1 kHz / 16 bits / mono | 151 MB | 303 MB | 454 MB | 606 MB |
| 44.1 kHz / 16 bits / stereo | 303 MB | 606 MB | 908 MB | 1211 MB |
| 44.1 kHz / 24 bits / mono | 227 MB | 454 MB | 681 MB | 908 MB |
| 44.1 kHz / 24 bits / stereo | 454 MB | 908 MB | 1363 MB | 1817 MB |
| 48 kHz / 16 bits / mono | 165 MB | 330 MB | 494 MB | 659 MB |
| 48 kHz / 16 bits / stereo | 330 MB | 659 MB | 989 MB | 1318 MB |
| 48 kHz / 24 bits / mono | 247 MB | 494 MB | 742 MB | 989 MB |
| 48 kHz / 24 bits / stereo | 494 MB | 989 MB | 1483 MB | 1978 MB |
| 96 kHz / 24 bits / mono | 494 MB | 989 MB | 1483 MB | 1978 MB |
| 96 kHz / 24 bits / stereo | 989 MB | 1978 MB | 1966 MB | 3955 MB |
The file sizes in Table 1 are a guide to selecting a memory card with the appropriate capacity. For example, recording a C-120 cassette at 48 kHz / 24 bits generates a 1.978 GB file, so a card of at least 4 GBEndnote 9is required, since the 1.978 GB file is not guaranteed to fit on a smaller 2 GB card. Not all memory cards are compatible with every flash audio recorder, so check with the manufacturer of your recorder to ensure you choose a suitable card.
The digital recorders mentioned above are capable of outputting digital files in WAV, which is a well-established target format for audio digitization due to its wide availability and its compression-free encoding option (consult endnote 2). These factors suggest that WAV files offer long-term accessibility, making them suitable for use as preservation masters. Broadcast Wave Format (BWAV), an extension of WAV, is also a popular choice for creating archival masters. These file formats are compatible, so look for either one when selecting a digital recorder. As WAV files do not undergo compression, master files are relatively large and less suitable for use as access copies. Typically, the master WAV file is used to generate highly compressed derivatives in MP3 format for access purposes. The Zoom H2 recorder has this conversion functionality built in. Note, however, that it is crucial to retain master copies in WAV as the MP3 conversion irreversibly discards information.
Zoom H2 recorders remember the set-ups on the removable media card, so it is possible to set up different capture configurations by having different SDHC cards. There are many possible user settings; Appendix C provides a recommended initial set-up.
A single SDHC card should be used for a full day, or at least a half day, to reduce wear on the card sockets in the recorders. The computer work on any given day should be the ingest from the previous day.
Note that the Zoom H2 recorder is meant to digitize mono or stereo recordings only; it is not suitable for multi-track recordings.
Connecting the equipment
Connecting a cassette machine to the digital recorder is a simple matter of obtaining an appropriate cable, which should be no more than 2 m in length. Electronics retailers or local music stores are a good source for low-cost cables (higher-priced cables are probably not a good use of limited resources).
Many of the preferred reel-to-reel recorders have professional balanced outputs. These put out more voltage than consumer gear and will overload consumer equipment. Plus, the proper connection varies from one model to another. Improper connection of these reel-to-reel recorders to an unbalanced input may create distortion or prevent the transfer of any signal. The easiest way to convert the professional balanced signals to consumer signal levels is to use an audio level interface (consult the Suppliers section to find a supplier of interface equipment).
Connecting the playback equipment to the digital recording device requires a suitable cable, which consists of an RCA end and a 3.5-mm end. This is usually provided with the digital recorder. An RCA cable is a standard type of cable used to transmit analog audio via red and white ends and analog composite video via a yellow plug. The RCA cable does not always have to be equipped with both audio and video plugs, and the cable supplied with the digital recorder usually has the audio plugs only. Connect the red and white ends of the RCA cable to the “Audio Out” plugs of the playback equipment and the 3.5-mm end of this cable to the “Line In” port of the digital recorder. Higher-end reel-to-reel players may require different cabling. Consult Appendix E for a cabling diagram.
Playback of tape for digital capture
Before playing a tape, confirm the playback head of the equipment is clean. In many cases, the leader on cassettes or reels provides adequate cleaning. If additional cleaning is necessary, apply a cotton swab moistened in 99% isopropyl alcohol to the head, being careful not to touch any rubber parts with the alcohol. These can be cleaned with a cotton swab or microfibre cloth slightly moistened with water. Ensure there is no lint from the cotton swab left behind on any part of the equipment. It is possible to over-clean, so clean only when necessary. Cassette and reel heads and guides should also be cleaned after playing a particularly problematic tape (one that is showing signs of shedding, squealing, etc.). As a general rule, once a day is often enough, although that may be too often in some circumstances.
Once the equipment is clean, it is a good idea to fast forward and then rewind the tape (provided it is not too fragile) before playing it. This will help to relieve stresses and also test the splice at the end. If the tape is misbehaving, skip this step and proceed with the transfer. Listen and watch the tape closely, and be ready to stop it if anything appears to be going wrong. If the tape jams, follow the procedures outlined in the Preparing the tape for playback section. Be sure to adjust the playback azimuth for maximum high frequency and clarity in the audio signal. Some of the computer software displays may be useful for this.
Once everything is moving smoothly, make sure that the tape is wound to the beginning and then start the transfer. Press “Record” on the digital recorder and “Play” on the cassette or reel player. After the first side is finished, turn the tape over if there is a second side. Although the azimuth setting should still be correct, check it to be absolutely certain.
General precautions and notes
- Use extreme caution with C-120 tapes. These are very thin tapes and many of the older, especially off-brand or cheaper tapes, are suffering from dimensional instability.
- Reel tapes come in four standard thicknesses:
- Standard play: 1.5 mils, 50 µm, 1200 ft. on a 7-in. reel, 30 min per track at 7.5 in./s.
- Long play: 1.0 mils, 35 µm, 1800 ft. on a 7-in. reel, 45 min per track at 7.5 in./s.
- Double play: 0.5 mils, 25 µm, 2400 ft. on a 7-in. reel, 60 min per track at 7.5 in./s.
- Triple play: 0.5 mils, 18 µm, 3600 ft. on a 7-in. reel, 90 min per track at 7.5 in./s.
Note that the mil measurement is common in North America and refers to the base film thickness, while the µm measurement is common in the rest of the world and refers to the total tape thickness. Both double play and triple play reel tapes are very fragile and prone to stretching.
- If the tape appears to be infested with mould, have it treated by a qualified professional experienced in dealing with problem audiotapes. Do not try this yourself. Very few restorers will handle mouldy cassettes, even if they handle mouldy reels.
- If many tapes need to be reshelled (consult endnote 3), purchase C-0 cassettes from a local duplication house as soon as possible because these are getting harder to obtain.
Editing and quality control
Computer workstation
All of the digitizing software outlined in this Bulletin can run on computers with a Windows XP operating system on a 3 GHz single-core processor with 1 GB of RAM or better. However, as software upgrades occur, it may be necessary to use a more current operating system to ensure compatibility with the software being used. It would also be wise to install an additional large-capacity hard drive (500 GB or larger) in the computer to store the audio data for current projects and to keep it separate from the operating system drive. The computer’s built-in audio system should be adequate, because it is only used for monitoring in this set-up. For recording, a quality CD/DVD recording drive with associated software in combination with good-quality media and proper recording techniques should produce optical discs with acceptably low error rates (Iraci 2010). Older recording drives and/or cheap poor-quality media can lead to CD-Rs or DVD-Rs with high error rates.
For this workflow to function smoothly, at least two SDHC cards are required for each recorder. This will allow one tape to be digitized while the operator moves the files from the other SDHC card to the final storage location, or manipulates or edits files, as required, before moving them to that location.
An SDHC card reader is also necessary. These are sometimes bundled with the cards. They are available to fit in drive bays or as table-top units.
Computer software
If the computer soundcard can handle the bit rate and sample depth of the recordings, something as simple as Windows Media Player can be used to audition files and ensure they are acceptable. In fact, the simplest procedure is to use the computer merely for copying files from the SDHC cards to the final storage locations. This means that no audio software other than Windows Media Player is required. Some minor editing of file names will likely be necessary to ensure audio files can be identified easily. Keeping an index and/or finding aid is useful in locating specific content.
Some institutions may want to acquire additional audio software to perform higher level processing of the digitized audio and better quality control or monitoring of the digitized audio content than that offered by Windows Media Player. Such software can allow for editing or manipulating files (such as cleaning up audio prior to making files for distribution or access purposes, or adding various types of metadata to the files). While archival transfers should be direct copies of the original recordings, access copies may be cleaned up to make high-quality MP3 files from the recordings. This may be absolutely necessary if the original recording has overwhelming hum or noise. Consult the Suppliers section for some audio software recommendations.
Metadata and file naming
As the digital audio files are generated, it is important to capture any information that can help with the management of the files. This extra information about a digital object is called “metadata,”Endnote 10 and various types are designed for different purposes:
- Descriptive metadata provides the traditional cataloguing information essential for the identification and discovery of a recording. It specifies elements such as the subject of the recording, its producer and its speakers so that users may perform searches based on these parameters.
- Administrative metadata covers a range of supplementary information such as property rights and technical aspects relating to the source format and the digitization chain. These elements contribute to the maintained accessibility of the recording over time.
- Structural metadata can describe the internal structure of a file and can also depict relationships with other objects. This facilitates the logical presentation of related information so that files can be navigated as intended.
Many of the metadata elements contribute to the sustainability of an audio file. The term “preservation metadata” is frequently used to encompass those aspects relevant to preservation.
It is often convenient to encode short lengths of metadata into the actual filename. For example, once the file is transferred from the digital recorder to the computer, it can be renamed to something like:
1978-03-01_Interview_with_Indigenous_Elder_James_Smith.wav
The systematic use of meaningful file names can serve to:
- indicate the contents of the file
- illustrate structural relationships among files
- supply the creation date
- link the file to the original analog item
- specify the intended use of the file (preservation master, access copy, etc.)
- encode the digitization parameters
For sample file naming conventions, refer to the section on local filenames in Best Practices for Audio Preservation.
A filename can be up to about 240 characters, but keeping it to a more manageable length of 60 characters or less, and no more than about 100 characters, ensures better readability. Do not use punctuation other than underscores, hyphens and round brackets, and do not use spaces. While other punctuation works most of the time, it can confuse some Linux systems. Use the period only to separate the filename from its extension(s).
The rest of the metadata should either be embedded in the audio files or kept in a separate database or text-finding aid. Metadata can sometimes be added into the audio files through the programs that record or edit them. This would be done by the computer, not the digital recorder. For WAV files, the “info” chunk can be used for metadata storage. This reserved section of the file can be easily accessed in various audio programs. The BWAV is a little different in that it has a BEXT chunk (extended information is allowed in the file header) for storing metadata. For this file format, specific software (Samplitude, Wavelab, etc.) is required to use the BWAV metadata options. There has been much talk about BWAV as the archival format, but the tools for easily accessing the metadata are not common.
In either case (WAV or BWAV), the procedure is similar: metadata is added via a drop-down menu in compliant software, and then the entire file has to be rewritten, which takes a while. Another option for embedding BWAV metadata is available from the Federal Agencies Digitization Guidelines Initiative.Endnote 11 Embedding metadata is not always necessary, but there are many resources that recommend it. The benefit is that the basic data about the audio stays with the single audio file, even if the database is corrupted.
As work progresses on an audio digitization project, additional descriptive information is sometimes discovered. This is often in the form of notes written on the tape containers or material placed inside. This information should be captured in the best way possible and stored with the digitized audio. Unfortunately, the audio files themselves cannot generally contain things like image scans of tape boxes or J-cards (cassette paper insert) or anything larger than a few kilobytes in size. The best strategy is, therefore, to scan this information and place PDF or TIFF files in the same file system location as the audio files, with filenames and folder structures that link this information to the audio files.
Tips and techniques for image scanning are beyond the scope of this Bulletin; nevertheless, as a starting point, note that many archives scan to 300 dpi TIFF files (Brousseau 2006). Some examples on how to organize some of these found objects are presented below.
If an image scan or other non-audio file is generated, giving it a name that is similar to the audio file will ensure that both files are sorted together in Windows Explorer. For example, a tape box with three miscellaneous notes on the box would require three separate scans and create three separate image files that could be labelled as follows:
- 1978-03-01_Interview_with_Indigenous_Elder_James_Smith_tape_box_scan_01.tif
- 1978-03-01_Interview_with_Indigenous_Elder_James_Smith_tape_box_scan_02.tif
- 1978-03-01_Interview_with_Indigenous_Elder_James_Smith_tape_box_scan_03.tif
Now, if there was a letter in the tape box with a known date, the image scans could be filed in the proper location, for example:
- 1933-03-03_Letter_from_Indigenous_Elder_James_Smith_ to_daughter_scan_p01.tif
- 1933-03-03_Letter_from_Indigenous_Elder_James_Smith_ to_daughter_scan_p02.tif
However, naming these files in this way would break the link between the letter and the tape box in which it was found. To avoid breaking these links, make text files. The content within the text files is unimportant. They can contain a brief description of the relationship between the items or not. For the sake of completeness, put something in the file; do not leave it as a 0-byte file. Make two copies and name them as follows:
- 1933-03-3_Letter_from_Indigenous_Elder_James_Smith_NOTE_see_interview_1978-03-01.txt
- 1978-03-01_Interview_with_Indigenous_Elder_James_Smith _NOTE_see_letter_1933-03-03.txt
These files then sort with the related content and flag the existence of the other content, or they can be placed in year or decade folders within the file system. The file system includes tools for searching for any specific string in the filename. The text files used for cross references could contain additional annotation of any reasonable length.
Using a scheme such as this, it is possible to arrange data so that it will be easily found and grouped together. It is also useful to include an introductory file (usually a PDF) that contains a description and history of the digitized collection. Do not assume anyone finding these files will know anything about their content or place in history of the files. That stage needs to be set as part of the collection.
Quality control monitoring equipment
Proper audio monitoring is important both in setting up the system and in day-to-day operation. Original recordings often contain hum, which should be reproduced in the archive copies. However, if the monitoring system cannot accurately reproduce hum, it cannot be detected. It is also important to know if your system is adding any additional hum, which should always be eliminated. One of the benefits of using the small digital recorders in the configuration described above is that there is very little chance that hum will be added to the recordings. Nevertheless, the tape machines and the digital recorders should be kept away from power panels, transformers, motors and appliances.
Speakers
Finding good speakers that can reproduce hum as well as the full range of sound is difficult, especially on a moderate budget. Some suggestions for speaker systems for quality control monitoring are provided in the Suppliers section. Less costly speakers can be used for simple continuity monitoring.
Headphones
In general, headphones are not a replacement for speakers for quality control monitoring. In some circumstances, though, a really good set of headphones could be used for monitoring. However, beware of headphones that have artificially boosted bottom and top ends. Listen for smooth response. Also note that constant use of headphones will cause ear fatigue for the operator.
Connecting the computer to the playback decks
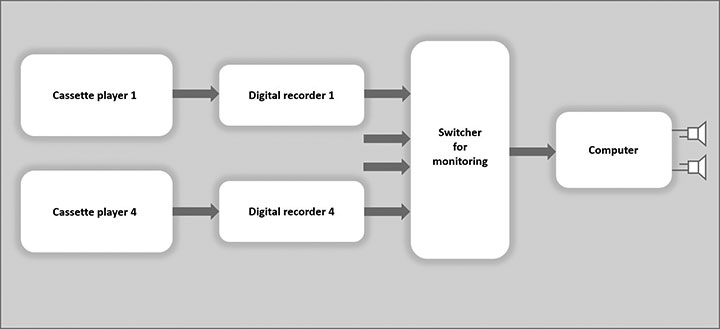
Monitoring of playback can be simplified, especially for azimuth setting, by running a stereo cable from the headphone/line output of the digital recorder to the line input of the computer (consult Appendix E). If there is more than one digitization chain, external switch boxes can be used (Figure 7). In this way, the good monitor speakers can be connected to the computer and the live feed from each deck can go through the computer so that the analysis tools in the software can assist in azimuth adjustment.
© Government of Canada, Canadian Conservation Institute. CCI 131907-0007
Figure 7. Monitoring of multiple playbacks using a switch box.
Description of Figure 7
The analog audio signals from cassette player 1 are fed into digital recorder 1. The analog audio signals from cassette player 4 are fed into digital recorder 4. The signals from digital recorder 1 and 4 and any other cassette player and digital recorder combinations are fed into a switcher device. The switcher is connected to a computer so that the multiple playback devices can be monitored.
Storage
Digital storage media
There are many choices for storing the digitized audio content. Table 2 summarizes some of the attributes of various formats. More information on other storage formats can be found in Technical Bulletin 31 The Digitization of VHS Videotapes.
| Description | Positives | Negatives |
|---|---|---|
| Red Book audio CD-R (the CD-R is produced according to the Red Book specification; files on the disc are in the same format as those found on commercial audio CDs) |
|
|
| Audio files stored on CD-R |
|
|
| Audio files on DVD-R |
|
|
| Files on stand-alone, external encased hard drives |
|
|
| Files in a RAID system |
|
|
The first thing to understand when addressing data storage is the impact of technology obsolescence and media degradation. Absolutely no format can be put on the shelf for 100 years with the expectation that it will remain accessible. Analog tapes (reels or cassettes), minidiscs, DAT tapes, and other digital tapes are all likely to be very difficult to play as they reach their century mark. Optical digital media such as CDs and DVDs are also in decline, albeit currently more slowly than the other formats.
The key to data longevity is continued management, be it on your own or with a data management partner such as a national archive.
The following sections look at the requirements for storing digital audio information using different physical formats. This discussion is based on a relatively small archive that needs to digitize about 100 C-90 stereo cassettes. If these are digitized at 44,100 samples per second and 24 bits, the storage files will be about 1.4 GB each; if digitization is done at 48,000 samples per second and 24 bits, the storage files will be about 1.5 GB each.
CDs
The recommended format is the CD-R. Those with a gold metal reflective layer and phthalocyanine dye (gold appearance from the base side of the disc) offer the best longevity (Iraci 2005) and generally produce discs with low error rates when recorded as recommended (Iraci 2010). CD-Rs with a silver alloy metal reflective layer and cyanine or azo dye (shades of blue to bluish-green in colour when viewed from the base side) can also produce recordings with low error rates, but they are more likely to degrade when exposed to light, heat and humidity. Erasable CDs (CD-RWs) are not recommended.
Whichever selection is made, it is best to avoid bargain or generic brands. When completed, the CD-Rs should be stored in jewel cases of standard thickness because these cases protect both surfaces from scratches and other types of physical damage.
Digital files can be stored as data CD-Rs or Red Book audio CD-Rs. There are two main differences:
- the way the data is written to the disc: a Red Book audio CD-R does not contain separate files but rather a continuous bit stream with pointers (track marks) showing where segments start; a data CD-R has a file system just like a floppy disk, USB drive or hard drive.
- the targeted reading device: a Red Book audio CD-R can be played in a computer CD/DVD drive or a stand-alone audio CD player; a data CD-R can be read in a computer drive but not in a stand-alone audio CD player.
The relatively small size of CD-Rs (0.65 or 0.70 GB) makes storage as data files generally impractical. Therefore, the focus is on making Red Book audio CD-Rs. The challenge with making audio CD-Rs in the Red Book format is the time it takes to make short accessible segments indicated by track marks (users expect this configuration because non-segmented 45-min tracks are difficult to navigate). Also, the audio content is limited to 80 min. This means that two discs are required for a 90-min or longer cassette. When this happens, it is a good idea to use dual jewel cases for storage in order to keep the digitized content from one 90-min cassette tape together.
When recording is done at 24 bits, the recording level can be set to accommodate loud signals without overloading the converter or sacrificing resolution for low-level signals. When a 24-bit file is reduced to 16 bits of level (amplitude) resolution, which is necessary for Red Book audio CD-Rs, the recorded 24-bit signal must be normalized (the highest peak must be increased to approximately 0.5 dB below full-scale, which also increases the level of all signals proportionately). Normalization is usually a separate function or command in the digital audio workstation software. In this way, the 16 bits are used optimally and there is little risk of losing low-level details in the reduced resolution of the 16-bit file as compared to the original 24-bit recording.
It is important to make more than one set of discs. In fact, three sets are recommended: two will serve as archival preservation masters, which will not be accessed except for periodic checks, and a third will serve as the access copy. Further, if there is substantial work done to clean up the access copy, a fourth set should be made so as not to lose that work if the access copy is damaged. Note that the additional sets of discs should be stored in separate locations, as space diversity is a good way to preserve the stored information in the event of catastrophic loss, which is generally isolated to a single building or compound. For rural areas, where an entire town could be wiped out by wildfire, it may be wise to store at least one set in a separate town.
Referring to our example, it can be seen that the small archive would require 200 CD-Rs and 100 jewel cases (two discs per case) to store the digital files from the 100 C-90 cassettes in the Red Book audio format. Making the necessary three sets of discs would require 600 CD-Rs and 300 jewel cases.
DVDs
DVDs offer more storage capacity per disc than CDs. A single-layer DVD can hold 4.7 GB of data, which means that one disc can hold complete files of a 2-h tape with 24-bit resolution (consult endnote 9). The recommended format is the DVD-R. A similar format (DVD+R) may also be used, but this format tends to experience more compatibility issues with different drives. Erasable DVDs (DVD-RWs or DVD+RWs) and dual-layer versions of the recordable DVDs are not recommended. One drawback of DVD-Rs is that they are not generally as stable as CD-Rs since they do not use the stable phthalocyanine dye that is found in some CD-Rs (Iraci 2005). However, choosing DVD-Rs with a gold metal layer will help to improve stability when longevity is an issue (Iraci 2011).
For our small archive audio digitization example, DVD-Rs offer a better storage solution than CD-Rs. As one DVD-R can hold the data from two, and sometimes three, 90-min cassettes, digitizing the 100 C-90 cassettes would require only 34 to 50 DVD-Rs, as opposed to the 200 CD-Rs that would otherwise be needed.
As with CD-Rs, at least two sets of DVD-Rs should be created, and three sets would be safer. If there are two writers in the computer, both sets can be created simultaneously with software that provides this feature. In addition to the data DVD-Rs, the files could be saved on a hard drive, which could serve as the third copy. The DVD-R sets should be stored in separate locations, preferably away from the hard drive, to protect against catastrophic loss.
Individual hard drives
Hard drives can be a cost-effective way to store many hours of digitized audio content. However, because they are susceptible to mechanical shock and can fail suddenly, archiving only on a single hard drive is not recommended. If hard drives are chosen as the storage format, the drives should be checked every year or so, and they should be replaced approximately every five years. Several different types of free software programs that can monitor hard drives for performance and errors are available on the Internet. For more information, consult CCI Note 19/2 Error Analysis and File Recovery Software for Digital Storage Media. Also, the data should be stored on at least three separate drives.
A simple backup scheme can be implemented as long as the audio workstation computer has a data drive (for example, 750 GB) on which the entire project can be held. To create the backup copies, obtain at least two separate USB hard drives with the same storage capacity as the workstation data drive. Bring one of these backup drives to the main workstation each day or week and copy all the new and updated files from the workstation hard drive to the backup hard drive. Copying the files once a week allows up to two weeks during which any damaged file can be identified, since one hard drive will contain one week of audio files and the second hard drive, the audio files from the previous week. If a file is damaged, the original can be retrieved from the older backup. Using backup software that does not delete files from the backups also protects against accidental erasure.
Software such as ViceVersaPro can compare two different drives and, depending on how it is set up, update one or both drives. However, deletes should not be propagated automatically to the backups. When a file is deleted from the source drive, it should have to be deleted manually from all of the backups. In this way, if a file is accidentally deleted on the source drive, the backup copies will not be lost. Few copy programs will allow this.
There are a number of factors to consider when choosing a hard drive. All of the major manufacturers (Hitachi, Samsung, Seagate/Maxtor and Western Digital) seem to make reliable drives, but all have had some that fail. If the drive is expected to run for many hours at a time, it is important to compensate for the heat produced, because heat can damage the drive. A drive in a heavy-duty aluminum case that dissipates heat well is preferable to one in a plastic case that acts like an insulating blanket and keeps the heat in. If the drive is expected to be moved frequently and the capacity is available, consider a laptop (2.5-in.) drive in a USB case. Laptop drives tend to be more resistant to damage from shock, since they are designed to be installed in equipment that is carried around. Again, if the hard drive is expected to run for many hours at a time, a unit in an aluminum case is preferable to one in a plastic case.
Referring to our small archive example, digitizing the 100 C-90 cassettes at 48,000 samples per second and 24 bits would create about 160 GB of data. This could be stored on a commonly available external USB hard drive in an easy and cost-effective manner.
RAID storage
RAID (Redundant Array of Independent Disks) arrays provide more storage than individual hard drives and offer some protection for failure of the individual hard drives. While inexpensive RAID arrays are becoming available, this technology is more expensive than the other choices.
A RAID array as referred to here is a stand-alone product that has multiple disk drives, a power supply and, typically, an Ethernet LAN connection. RAID can be built into computers, but the stand-alone array seems to be a better option for actual storage as it is generally running a robust but simplified Linux kernel and dedicated storage software. As a stand-alone product, it is generally referred to as a NAS (Network-Attached Storage) unit.
The two RAID configurations that could be considered are RAID-5 and RAID-6. In the case of RAID-5, the capacity of one disk drive is set aside for redundancy, and the array can tolerate the failure of one disk drive without the loss of any data. Once that disk is replaced, the system rebuilds the data on it and full protection is restored. RAID-6 is similar, but it can tolerate the failure of two disk drives, with the penalty that the capacity of two disk drives is earmarked for redundancy. These units are programmed to send an email if there is any anomaly. A RAID unit should be connected to a dedicated UPS via a data cable so that the unit can be shut down gracefully in the event of an electrical interruption.
Another RAID level to consider is RAID-1, where the data is mirrored across two drives. This is, in essence, the same as the individual USB drives in the section above.
Because an external or internal catastrophe could destroy a RAID array, it is recommended that two be provided. These can be connected, via fibre optics if the area is lightning prone, and should be in different buildings. RAID-5 is recommended if both arrays are powered and monitored, and RAID-6, if one or both arrays are powered down frequently and transported. Alternatively, a RAID system can be backed up with a data tape system. The most common data storage format using tape is the Linear Tape Open (LTO) format. However, data tape recorders such as LTO recorders are generally more expensive than basic RAID systems, and they provide slower access speed.
RAID arrays do not generally become cost-effective until the collection size increases past 1000 GB (about 650 90-min cassettes), so they are not a suitable storage format for the small archive with 100 C-90 cassettes.
Cost comparison of different storage media
As Table 3 shows, the stand-alone hard drives are the most cost-effective storage method. However, they are also probably the riskiest storage method, although additional copies can help reduce this risk. The NAS units are a safer choice; they are designed for 24/7 operation in a commercial environment and they monitor themselves.
| Description | 100 C-90 cassettes | 1000 C-90 cassettes |
|---|---|---|
| Red Book audio CD-Rs |
|
|
| Files on DVD-Rs |
|
|
| Files on stand-alone encased hard drives |
|
|
| Files in a RAID system |
|
|
Care of tapes: storage and handling requirements
Storage and handling recommendations for magnetic tape are outlined in two ISO standards (ISO 2012; ISO 2000). Recommendations in these standards should be followed as closely as possible to ensure magnetic tapes in storage and in use remain in good condition. Some brief and less detailed information is provided below.
In general, magnetic tapes should be stored at a temperature set point between 8 and 23°C and a relative humidity (RH) set point between 15 and 50%, with minimal fluctuations. Tapes stored at the lower end of these ranges will have greater longevity than those stored at the upper end. This increase in longevity is explained in Annex D of ISO 18923:2000, Imaging Materials – Polyester-base Magnetic Tape – Storage Practices:
Degradation of magnetic tape is caused by chemical reactions, whose rates are lowered with decreasing temperature and decreasing relative humidity. Consequently, the useful life of tape (x years) can be increased by lowering the storage temperature and/or storage humidity. Moreover, a lower storage temperature can compensate for a higher humidity to obtain the same life expectancy.
Similar behaviour exists for the degradation of polyester-base tape and the oxidation of metal particulate tape. These relationships permit several temperature/relative humidity combinations to be acceptable for extended-term storage conditions as specified in Table 1.
Table 1 in Annex D of ISO 18923:2000 shows that for medium-term storage, for a minimum of 10 years, the RH can be as high as 50% and the temperature as high as 23°C. However, if the tape is to be stored for an extended-term of at least 50 years, then more stringent conditions are required. The following three temperature and RH combinations provide suitable extended-term storage conditions (note that in all cases, there should be minimal fluctuation in temperature and RH):
- temperature set point between 8 and 11°C / RH set point between 15 and 50%
- temperature set point between 8 and 17°C / RH set point between 15 and 30%
- temperature set point between 8 and 23°C / RH set point between 15 and 20%
The other major rules for storing and handling audiotapes include the following:
- Keep the tapes clean. This is best achieved by using the tapes in a clean environment, making sure the playback equipment is clean and keeping the tapes in their storage containers when not in use.
- Do not touch the surface of tapes unless wearing lintless cotton gloves.
- Do not abuse cassettes and reels, and definitely do not drop the tapes.
- Break out write-protect tabs on cassettes, if this has not already been done, to prevent accidental erasing of the recording.
- Do not rewind a tape to the beginning after playing it. This will cause the formation of popped strands, which can lead to tape deformation if the tape is stored this way for an extended period of time.
- Do not use full-speed when winding reel tape. Most modern professional machines, such as Ampex ATR-100, Sony APR-5000 and Studer A80, A810 and A807, have a slower “Library Wind” mode that should be used instead.
More detailed handling information can be found in ISO 18933:2012, Imaging Materials – Magnetic Tape – Care and Handling Practices for Extended Usage.
Retention of originals
The original tapes should always be retained. This is especially true if the digitization process is being carried out by volunteers or less-experienced technicians. Mistakes happen, and it is always good to be able to go back to the original tape if desired or necessary. Somewhere down the road, a professional tape restorer might be able to obtain a better transfer of a particularly important segment than the volunteer with less-well-adjusted equipment obtained during the mass digitization project. Even though the original tapes will continue to degrade over time, it is relatively inexpensive to retain them in good storage conditions until they reach the point where they can no longer be played. Storage conditions should follow the guidelines above, with the cooler and drier end of the recommended ranges being optimal.
Outsourcing
Situations that might require outsourcing
In some cases, it may not be reasonable or cost-effective to digitize tapes in-house. Examples of these situations include:
- High-quality recordings on cassettes or reels, usually containing musical content, should be sent to a facility that will use a high-end machine to digitize the content.
- Problem cassettes, that is, when the cassette itself and/or tape inside it are not in good condition, could suffer further damage if they are played before the problems are remedied. In such cases, professional help or at least a consultation with a professional should be pursued before digitization is attempted.
- Reel-to-reel tapes are complex and difficult for novices to work with. Many things can go wrong with old tapes and/or old tape recorders. When in doubt, seek expert advice before attempting to digitize reel tapes.
- Small collections may not be able to justify the expense of setting up a transfer facility and learning to operate it effectively. In many instances, it may be more cost-effective for small collections to outsource the digitization, especially if no playback or other equipment is readily available. For small collections that have most of the necessary equipment, and for mid-sized to large collections, money can be saved by bringing the work in-house, but this is only true if at least a portion of the work is done by volunteers or in the spare time of people who also have other assignments. If the transfer operator is a full-time salaried employee, at the end of the day, this work might end up costing more than if it had been outsourced.
What to look for when outsourcing
If the decision is made to outsource the work, there are several options for finding a qualified vendor:
- Ask other archives for recommendations.
- Look at the Association for Recorded Sound Collections (ARSC) directory for a list of individuals who can digitize analog audio recordings and restore problem tapes.
- Search the Internet using terms such as “audiotape restoration,” “audiotape recovery” or “audiotape transfers” to find individuals who perform this type of work.
When outsourcing, look at the credentials and credits of the organizations under consideration. Ask for references. Talk with the people involved in doing the work. Do not be afraid to ask about specific challenges if you think your tapes are suffering from some ailment. Discuss all other issues related to outsourcing such as shipping of the masters to and from the outsourcing organization and all costs that are involved, especially when problem tapes are encountered. Dealing with problem tapes can raise the cost of outsourcing significantly, and this should be investigated prior to the work being performed. Ensure that a priority list of tapes is established for digitization; begin with the most valuable material and proceed to other material if funds remain or become available in the future. It is also prudent to do some trials with the outsource organization to test for quality before committing to a larger scale project.
Technology watch
Even after the analog tapes have been digitized, saved in a digital file and stored on some sort of digital media, the preservation task is not complete. Digital technologies change frequently, usually at intervals of 5 to 10 years, so it is essential to keep an eye on these advances. This is not difficult or expensive, as there are many technology-related Internet resources that provide this information. Once signs appear that your chosen storage technology and/or associated software are becoming obsolete, migration to a new technology is imperative. Both the technology watch and future migration of the information are important elements in a preservation plan; thus, it is necessary to think about these tasks and to put aside some resources for their realization. Failure to act will result in the digital media and associated digital audio files becoming unreadable in the future.
Suppliers
Note: The following information is provided only to assist the reader. Inclusion of a company in this list does not in any way imply endorsement by CCI. Other companies may exists that offer similar products.
Computer, data processing equipment and supplies, power conditioner, external switch boxes, cables:
NAS units:
Sources for high-end Nakamichi cassette decks:
Sources for more current cassette decks:
Repair of audio-video equipment:
- Ontario Audio-Video Service
Tel.: 905-791-2020 / 1-888-791-2899 (toll free)
Sources for remanufacture of and remanufactured professional reel-to-reel recorders:
JRF Magnetics in New Jersey
(heads, repairs, some machines)ATR Services in Pennsylvania
(Ampex ATR-100s and refurbishing other machines)Adolph Thal Audio Engineering (ATAE), California
(fully refurbished Studer A80 and A820 single-head reproducers)
Email: afthal@gmail.com
Information on the suggested Zoom H2 recording unit:
Software for editing audio files:
- Audacity
- Goldwave
- Samplitude
- Wavelab
- WavePad Sound Editor (allows input of metadata)
- BWF MetaEdit (allows input of metadata)
Software for burning optical discs:
Software for backups:
Quality control monitoring equipment:
- Blue Sky Media Desk 2.1 (speakers)
- Mackie MR-8 / Mackie MR-5 (speakers)
- AKG K242HD (headphones)
- Sennheiser HD238 (headphones)
Tape splicing equipment and supplies:
Audio level interface (to convert professional balanced signals to consumer signals):
Outsourcing digitization and/or recovery of problem tapes:
Gold metal layer CD-Rs and DVD-Rs:
Appendix A: Reel-to-reel tape recorders that may be suitable for digitization
Note: This list is not exhaustive. Machines that are not included may work very well, and bad units of the recommended brands may exist.
| Manufacturer | Model | Class | Comments (items in bold are recommended) |
|---|---|---|---|
| 3M | Any | Pro | The 1960s and 1970s 3M Mincom Pro machines are worthy of consideration if parts are available and they can be refurbished. Their “isoloop” drive made dramatic improvements in scrape flutter. |
| Akai | Any | Consumer | These can be a viable choice if they are in excellent condition. Good consumer quality. As with any brand, the three-head, three-motor units were usually top-of-the-line and would be the best choice. |
| Ampex | 300/350 | Pro | These are older tube-type machines that could work but might be rough on thin tapes and would probably require a lot of maintenance. |
| Ampex | 400 | Pro | Not recommended. |
| Ampex | 600 series | Pro Portable | When these were introduced in the mid-1960s, they were a breakthrough in portability and ruggedness. They are generally hard to restore, and while they can be used, they are not recommended for tape transfer today. |
| Ampex | AG-350 | Pro | Older than the 440, but slightly easier to maintain and slightly rough on thin tapes. |
| Ampex | AG-440 | Pro | A rugged workhorse but slightly rough on thin tapes. Overall, in many respects, the best Ampex machine for general tape transfer. Parts are available to some extent. There are reservations about these units, but if they work well or are properly refurbished and improved, they can do excellent work. |
| Ampex | Any | Consumer | Not recommended. |
| Ampex | ATR100 | Pro | A very expensive but very good machine. Some claim it is less friendly to aging tapes, while others claim this is a set-up problem. It is difficult to set up the transport the first time. |
| Ampex | ATR700 | Semi-Pro | Really a Teac 7030, but if in good condition, it could be useful. |
| Ampex | ATR800 | Pro | Ampex’s last machine, which is pretty good. It was made by Teac for Ampex, but it was Ampex’s design. |
| Ampex | MR-70 | Pro | Best tube machine by Ampex. Probably needs a lot of work to get it up and running. |
| Ampex | PR-10 | Pro Portable | Not recommended. It was a good portable unit in its day, but it really has no merits as a transfer machine today. |
| Crown | Any | Prosumer | This line was a good alternative in the 1960s to the more expensive Ampex and can be very good, but they are all quite old and parts are generally not available. |
| Fostex | Any | Prosumer | Fostex was one of the last manufacturers of reel-to-reel tape machines left standing, and they targeted garage bands. They helped lead the increase in track density. The machines are generally not well made, and many have parts that fail and that are very difficult to replace. If there is a working machine available, evaluate it. Do not seek out this brand. |
| Magnecord | Any | Pro | A pioneer in the field. All of their machines are probably at least 50 years old now and do not get better with age. It was an entry-level pro machine in the 1950s. Avoid using this machine today. |
| MCI | Any | Pro | MCI was bought by Sony in the early 1980s. Sony realized that the line was getting old and developed the APR-5000 (below). Probably not worth seeking out, but it can be quite good when working properly. |
| Nagra | III | Pro | Probably too old to rely on for transfer work. |
| Nagra | IV | Pro | One of the gems of tape recorder manufacture. These were field recorders of the highest quality and were generally used for on-location film sound work. It would be a top choice, although the 10.5-in. reel accessory is a bit unconventional. Adapters are very scarce, so do not rely on getting one if it is not included with the machine. Be careful of track format. Many of these are mono, full-track. Quarter-track does not appear to be available. |
| Nagra | T-Audio | Pro | This is an excellent machine. If one is available at an affordable price, it is worth getting it. |
| Otari | MTR-10 | Pro | These machines were designed for radio stations and day-in, day-out editing. Their performance is not as good as that of the more highly recommended machines. |
| Otari | MTR-15 | Pro | Possibly a good choice. However, other machines in the same class are generally better than Otari’s. |
| Otari | MX-5050 | Prosumer | This is an entry-level machine. Many were made and some may have survived in excellent condition. They are adequate for some transfer work but are not top-of-the-line. |
| Philips | Any | Consumer | A wide variety of Philips machines were imported into Canada. If one presents itself, it should be evaluated, but it is probably not a line worth seeking. |
| Revere | Any | Consumer | These consumer machines, made by 3M for part of their life, should probably be avoided. |
| Revox | – | – | Consult Studer-Revox. |
| Scully | Any | Pro | These were behind Ampex in the 1960s and 1970s. They are all getting old, but if one presents itself, it might work well or be restorable. |
| Sony | APR-5000 | Pro | One of the finest, and perhaps the last, pro tape machine to be designed. If a late model, especially a 5003V, is available, it is well worth considering. The standard head assembly will mount the somewhat widely available Nortronics heads to accommodate odd track formats. Try to obtain several. |
| Sony | Any | Consumer | The three-motor, three-head decks are well worth considering. If in good condition, the one-motor, three-head decks (although coming up on 50 years old) might be adequate for small transfer projects. |
| Studer-Revox | – | – | This company became the major supplier of both excellent prosumer machines and pro machines in the 1970s and took over the high-end world during that time frame. This is especially true in Canada, as the Canadian Broadcasting Corporation bought probably thousands of their machines. Only specific models that are widely available are listed here. |
| Studer-Revox | A77 | Prosumer | This breakthrough machine brought good performance to all at an affordable price. These machines are now all over 30 years old, but many were made. While not ideal, a machine that works or almost works might be a good candidate for a little money (there might even be one somewhere in your community). |
| Studer-Revox | B77 | Prosumer | The advanced upgrade to the A77, but still does not sound as good as the pro machines. |
| Studer-Revox | PR99 | Prosumer | A B77 with professional interfaces. |
| Studer-Revox | A700 | Prosumer | A serious upgrade to the A77, but now 35 years old and hard to service. |
| Studer-Revox | B67 | Pro | A pro version of the A700 and one of the few three-speed machines from Studer that does not use a microprocessor. |
| Studer-Revox | A80 | Pro | The A80, especially the A80-R or A80-RC versions, if refurbished, may be one of the best choices for this type of migration work. |
| Studer-Revox | A820 | Pro | The upgrade to the A80 and considered by most to be the best of the best. This machine commands very high prices that probably do not reflect the incremental improvement over the A80. |
| Studer-Revox | A810 | Pro | This is a radio station machine and a very popular one for transfer work. If in good condition, this can do very competent work. |
| Studer-Revox | A812 | Pro | This is a scarce (in North America) upgrade to the A810 and is a desirable machine. |
| Studer-Revox | A807 | Pro | This machine was a follow-up to the A810 and A812 and was meant to be more affordable. Some of the design choices make this machine a less-compelling choice than the above four. |
| Tandberg | Any | Consumer | These were high-quality consumer machines that garnered excellent reviews for many years. The last three-head, three-motor decks in the TD-20 series could accommodate 10.5-in. reels and are certainly worth considering. Some of the later (1970) single-motor decks with the “T”-handle transport control can also do a competent job in playback. |
| Tapesonic | Last | Semi-pro | These were made in the 1950s and 1960s, and the last 1960s model was quite good. However, because these machines were handmade in New York City, they lost out to the mass-produced Revox A77 (which was in the same price range but probably better). Early models had dynamic brakes and would spill tape in a power failure. |
| Tascam/Teac | BR20 | Pro | This is the last reel-to-reel machine they made and is reasonably good if it can be obtained inexpensively. |
| Tascam | Other | Pro & Prosumer | Many of these machines are at least 30 years old; nevertheless, some parts may still be available. While not worth seeking out, they might work if they are available and can be refurbished. |
| Teac | 7010 & 7030 & other | Prosumer | These 40-year-old decks might be worth considering, as are other large-format (10.5-in. reel), three-motor, three-head decks. |
| Teac | 1200 series | Consumer | Many of these decks are worn out and may not be worth refurbishing, but if one presents itself, it should be investigated. |
| Technics | Various | Prosumer | The RS-1xxx models that have the “isoloop” drive are worthy of consideration. Some reports indicate that the stock electronics could stand improvement. |
| Uher | 4200 & 4400 | Prosumer portable | These were the de facto field recorders for people who could not afford Nagras in the 1960s and 1970s. These last models are quite good, but only take up to 5-in. reels, which is a major drawback. |
| Uher | Other models | Prosumer portables | The older Report L and Report S models are 40+ years old. They are difficult to service and parts are scarce. Probably not worth pursuing. |
| Voice of Music | Any | Consumer | These consumer machines should probably be avoided. |
| Webcor / Webster-Chicago | Any | Consumer | These consumer machines should probably be avoided. |
| Wollensak | Any | Consumer | These consumer machines, made by 3M for part of their life, should probably be avoided. |
Appendix B: Alternative digital capture options analysis
| Description | Positives | Negatives |
|---|---|---|
| Stand-alone CD recorder |
|
|
| Stand-alone digital audio recorder |
|
|
| Ingest directly to a computer via an audio card |
|
|
| Ingest directly to a computer via a real-time USB cassette player |
|
|
| Ingest directly to a computer via a high-speed USB cassette player |
|
|
| Description | Audio CD-Rs | Data DVD-Rs | Files | Editing |
|---|---|---|---|---|
| Stand-alone CD recorder | Yes | No | No | No |
| Stand-alone digital audio recorder as input to a computer | Yes | Yes | Yes | Yes |
| Ingest directly to a computer via an audio card | Yes | Yes | Yes | Yes |
| Ingest directly to a computer via a real-time USB cassette player | Yes | Yes | Yes | Yes |
| Ingest directly to a computer via a high-speed USB cassette player | Yes | Yes | Yes | Yes |
Appendix C: Zoom H2 recommended settings for capture
Items in bold in the Menu section are the ones that require adjustment. The remaining items are pre-set to the recommended settings.
Menu
Lo cut – off
REC MODE – 44.1/24
AGC/COMP – OFF
FILE (ignore)
FOLDER – 01
MONITOR – OFF
PLUG-IN – OFF
PRE REC – ON
AUTO REC – OFF (just leave alone)
MONO MIX – OFF
L/R POSI – PLAYER
METRONOME (just leave alone)
TUNER (just leave alone)
PLAY MODE – ALL
AB REPEAT (just leave alone)
LIGHT – 30 s
CONTRAST – 5
BATTERY – ALKALI
SD CARD (just leave alone)
USB (just leave alone)
DATE/TIME (check)
Operating sequence
- Slide power on and then wait
- Press record (LED flashes)
- Press record again (LED steady)
- Record the program
- Press record to stop and then wait
- Slide power off
Note: Storage of 15 MB / min equals about 1.0 GB / h
Appendix D: Equipment summary
This first group must be duplicated for each audio ingest workstation.
- Best quality cassette deck or quarter-inch reel-to-reel player that is available or can be purchased, rented or borrowed
- Digital recorder – Zoom H2 Handy Recorder
- SDHC cards (two)
- RCA to 3.5 mm stereo cable
Cost per digitization station: Most of the cost is determined by the type of playback equipment that is purchased. If the equipment is available in-house or can be borrowed from another institution and is in good condition, then the audio digitization station can be set up at very little cost.
The second group is the central operations area.
- Switchbox – only required if more than one audio ingest workstation is set up
- Digital audio workstation – a computer with at least a 750 GB internal drive, computer monitor, and two 750 GB external USB hard drives
- Speakers and/or headphones
- SDHC card reader
- Various miscellaneous cables, where required
Cost for central operations area: The cost to set up this area will vary widely depending on available computer hardware, storage requirements, etc.
Appendix E: Cable connections between equipment
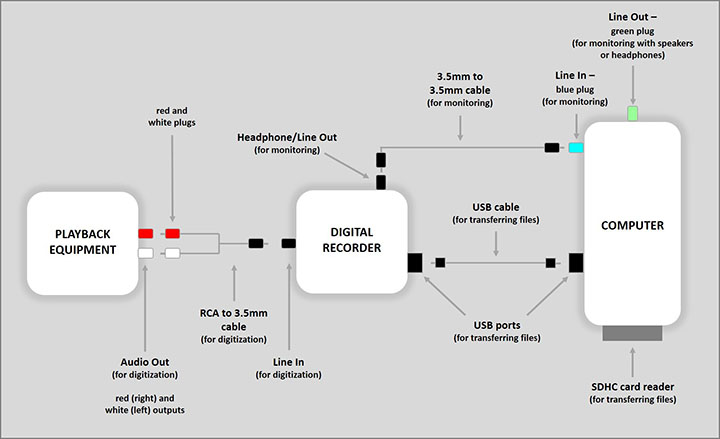
© Government of Canada, Canadian Conservation Institute. CCI 131907-0009
Figure 8. Diagram showing the cable connections between the playback equipment and digital recorder using an RCA cable, and between the digital recorder and computer using a USB cable.
Description of Figure 8
Playback equipment has audio out connections (for digitization) that consist of red (right) and while (left) outputs. These outputs are connected to the digital recorder with a RCA to 3.5 mm cable (used for digitization). The cable consists of red and white plugs on one end, which connect to the red and white outputs of the playback equipment. The other end of the cable connects to the “Line In” (for digitization) input of the digital recorder. The digital recorder has two outputs. The first is a “Headphone/Line Out” (for monitoring) and connects to the “Line In” blue plug (for monitoring) of the computer with a 3.5 mm to 3.5 mm cable (for monitoring). The second output of the digital recorder is a USB port (for transferring files). This port connects to the USB port of the computer using a USB cable (for transferring files). The computer is equipped with a “Line Out” green plug (for monitoring with speakers or headphones) and a SDHC card reader (for transferring files).
Bibliography
Brosseau, K., M. Choquette, and L. Renaud. Digitization Standards for the Canadian Museum of Civilization Corporation (PDF format). Gatineau, QC: Canadian Museum of Civilization, 2006.
Casey, M., and Gordon, B. Sound Directions: Best Practices for Audio Preservation. Bloomington, IN, and Cambridge, MA: Trustees of Indiana University and President and Fellows of Harvard University, 2007.
Copeland, P. Manual of Analogue Sound Restoration Techniques. London, U.K.: The British Library, 2008.
Hess, R.L. “Tape Degradation Factors and Challenges in Predicting Tape Life.” (PDF format) ARSC Journal 39,2 (Fall 2008), pp. 240–274.
International Organization for Standardization. ISO 18923:2000, Imaging Materials – Polyester-base Magnetic Tape – Storage Practices. Geneva, Switzerland: International Organization for Standardization, 2000.
International Organization for Standardization. ISO 18933:2012, Imaging Materials – Magnetic Tape – Care and Handling Practices for Extended Usage. Geneva, Switzerland: International Organization for Standardization, 2012.
Iraci, J. Remedies for Deteriorated or Damaged Modern Information Carriers. Technical Bulletin 27. Ottawa, ON: Canadian Conservation Institute, 2005.
Iraci, J. “The Relative Stabilities of Optical Disc Formats.” Restaurator 26 (2005), pp. 134–150.
Iraci, J. “The Stability of DVD Optical Disc Formats.” Restaurator 32 (2011), pp. 39–59.
Iraci, J. Longevity of Recordable CDs and DVDs, revised. CCI Notes 19/1. Ottawa, ON: Canadian Conservation Institute, 2019.
Further reading
General
Anctil, M.-C., et al. Recueil de règles de numérisation (PDF format) (in French only). Montréal, QC; Paris, France; and Gatineau, QC: Bibliothèque et Archives nationales du Québec, Bibliothèque nationale de France and Canadian Museum of History, 2014.
International Association of Sound and Audiovisual Archives Technical Committee. Guidelines on the Production and Preservation of Digital Audio Objects, 2nd ed. Edited by K. Bradley. Auckland Park, RSA: International Association of Sound and Audio Visual Archives, 2009.
International Association of Sound and Audiovisual Archives Technical Committee. The Safeguarding of the Audiovisual Heritage: Ethics, Principles and Preservation Strategy, 4th ed. Edited by W. Prentice and L. Gaustad. London, U.K.: International Association of Sound and Audio Visual Archives, 2017.
New York University. ViPIRS Compact Cassette Survey Instructions (PDF format) (includes visual and playback inspection procedures), 2006.
New York University. ViPIRS Quarter Inch Open Reel Survey Instructions (PDF format) (includes visual and playback inspection procedures), 2006.
Audio file formats
Arms, C.R., C. Fleischhauer and K. Murray. Format Descriptions for Sound, 2017.
Centre informatique national de l’enseignement supérieur. Guide méthodologique pour le choix de formats numériques pérennes dans un contexte de données orales et visuelles (PDF format) (in French only), 2011.
Wikipedia. Audio file format, 2019.
Wikipédia. Format de fichier audio (in French only), 2019.
© Government of Canada, Canadian Conservation Institute, 2020
Published by:
Canadian Conservation Institute
Department of Canadian Heritage
1030 Innes Road
Ottawa, ON K1B 4S7
Canada
Revised and corrected edition
First published in 2012
Cat. No.: CH57-3/1-30-2020E-PDF
ISSN 2562-0282
ISBN 978-0-660-34559-8