
Caring for photographic materials
Greg Hill
Caring for photographic materials is part of CCI's Preventive conservation guidelines for collections online resource. This section presents key aspects of managing the care of plastic film-based negatives and photographs in heritage collections based on the principles of preventive conservation and risk management.
Table of contents
- Understanding photographic materials
- Causes of damage to photographic materials and preventive conservation strategies
- Preventive conservation strategies by main agents of deterioration
- Examples of preventive conservation practices
- Bibliography
- Glossary
List of abbreviations and symbols
Abbreviations
- CCI
- Canadian Conservation Institute
- DOP
- developing-out paper
- IPI
- Image Permanence Institute
- ISO
- International Organization for Standardization
- PAT
- photographic activity test
- POP
- printing-out paper
- RH
- relative humidity
- UV
- ultraviolet
Symbols
- cm
- centimetre
- in.
- inch
- mm
- millimetre
- pH
- potential hydrogen
Understanding photographic materials
Since conventional photographic negatives and prints are made of composite materials with diverse, discrete layers, their care requires an in-depth understanding of these materials. This includes identifying the process that was used to make them, becoming aware of the differences in their structure and basic material components, and recognizing their inherent vulnerabilities. These requirements are outlined in the information below.
Brief history of photographic materials
Historical photographs come in a wide range of types and a variety of materials. A brief outline of the history of photographic materials will help explain this diversity.
In the early 1830s, William Henry Fox Talbot, a British scientist, began experimenting with the well-known tendency of silver nitrate to blacken when exposed to light, and he succeeded in creating his first photographic image circa 1835. Talbot's patent of 1841 for what he called the "calotype" explained the process of exposing a semi-transparent paper soaked in silver nitrate to light, developing the invisible latent image and, finally, fixing it by means of chemical treatment. This negative image could then be printed as a positive by laying the first image in tight contact with a second sheet of sensitized paper, exposing them to light and developing the resultant image. The modern process of photography was thus born and, within the decade, both amateur and professional photography developed rapidly, particularly in the realm of portraiture. From 1844 to 1846, Talbot published The Pencil of Nature in six parts, introducing a new genre—the photographically illustrated book. His 1845 publication Sun Pictures in Scotland became the first example of photo-tourism. This publication was followed in 1846 by A Series of Calotype Views of St. Andrews by David Octavius Hill and Robert Adamson, thus solidifying the genre.
Meanwhile, in continental Europe and the United States, Talbot's method was overshadowed by the work of Louis Daguerre. In January 1839, François Arago formally announced to the French Academy of Sciences that Daguerre had, in 1838, developed a process using sensitized silver salts on silver-plated copper plates to create a photographic image. Daguerre had worked on this process since approximately 1826. He worked in conjunction with Joseph Nicéphore Niépce between 1829 and 1833, the year of the latter's death. Niépce had made the first heliographic photograph in 1826 or 1827, using a sensitized pewter plate. After a decade of experimentation, Daguerre eventually discovered that a stable image could be made by exposing an iodized silver plate in a camera, developing the image using fumes of mercury and fixing it with salt. This process produced more finely detailed images than Talbot's paper process, but it was toxic due to the mercury development. Furthermore, the images were readily tarnished and disfigured by oxidation, and they were not reproducible. However, their novelty was seen as a valuable selling point, as was their use of the precious metal silver, so the process was widely adopted and remained popular into the 1860s. Daguerreotype portrait studios were established in Paris and New York as early as 1840, and by the 1850s, itinerant studios, particularly at popular tourist destinations such as Niagara Falls, were commonplace.
Frederick Scott Archer developed the collodion wet-plate process in 1851, which quickly became popular, adopted by studio and landscape photographers alike. The process involved coating a glass plate with a solution of collodion (gun cotton dissolved in ether and alcohol), followed by sensitization with silver salts. For reasons of sensitivity, the plate was exposed in the camera while still wet, followed immediately by fixing, hence the name "wet plate." The plate was used in conjunction with albumen paper, which consisted of a fine smooth writing paper coated with egg albumen and sensitized with silver nitrate. The popularity of the process soared due to its exquisite fine detail, lower cost, potential to make large images, reduced exposure times, ease of printing copies and pleasing image tone. By the end of the 1850s, the wet-plate and albumen print process predominated.
By the turn of the 20th century, collodion was replaced with gelatin as the primary photographic emulsion binding medium and glass plates were largely replaced with flexible plastic sheets. Gelatin was and still is an ideal binding medium: it is chemically stable and thus has no impact on the image silver; it is permeable to processing chemicals; it readily conforms to textured baryta layers (described in more detail under Prints); and it allows even distribution of silver salts within the emulsion. Due to these properties, it facilitated the development of pre-sensitized papers, plates and, later, films. The shift from glass to flexible plastic as the emulsion support brought monumental changes to the industry; the era of the multiple exposure roll film was launched, and the motion picture and the amateur photographic stills industry were born, both surviving intact for almost a century until the advent of the digital age at the end of the 20th century.
Cellulose nitrate, the first flexible film base, was soon determined to be chemically unstable, prompting the development of different plastic substrates, from cellulose diacetate to cellulose triacetate to polyester, each progressively more stable. The colour film industry made significant changes to the image-forming substance, but the basic film and print structures remained constant. Many innovations in colour dyes were prompted by the search for more stable images. In fact, the evolution of the photographic industry can be seen as a search for the permanent image. Even if they are relatively recent, digital output media are no different. Continuous research aimed at producing a permanent print has altered the digital world. For example, the light-sensitive and water-soluble dyes first used have been replaced by much more stable pigments and insoluble binding mediums.
With the advent of the fine art photograph and the ever-increasing value of the photograph as historical record, the monetary value of photography has steadily risen, as has the concern for preservation. No longer considered ephemeral, photographs are now being treated as long-term records.
For information on the dates, materials and specific vulnerabilities of common photographic processes, consult the four tables under Stability and deterioration issues by type of photographic material.
Structure
Photographic materials are made up of various parts, and preserving them depends on an understanding of their structure and components, which are explained below.
Prints
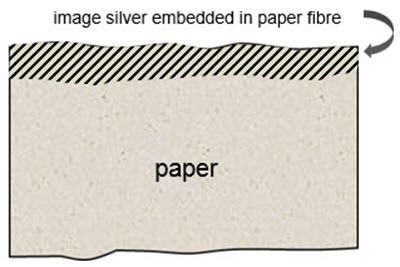
A photographic print on paper, in its most basic form, is exemplified by the salted paper print developed by Fox Talbot in the 1830s and 1840s, consisting of an image-forming substance, in this case metallic silver, embedded in the top layers of the paper fibre (Figures 1 and 2). Since the image-forming substance is not a discrete layer on the paper (i.e. it is embedded in the same layer as the paper), the clarity of the image is somewhat compromised by the paper fibre. This is the same basic structure as the one used for many non-silver-based processes, including platinotypes, palladiotypes, cyanotypes, Van Dyke prints, argentotypes, crystalotypes and numerous other 19th-century innovations. Known as "printing-out papers," the image develops strictly through the action of light, without chemical development.
© Government of Canada, Canadian Conservation Institute. CCI 129982-0001
Figure 1. Cross-section of a salted paper print wherein an image-forming substance, such as metallic silver, is embedded in the top layers of the paper fibre.

© Greg Hill
Figure 2. Detail of the surface of a salted paper print. Note that the clarity of the image is somewhat obscured by the paper fibres.
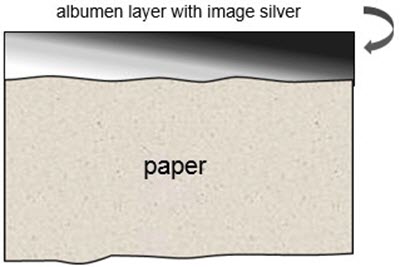
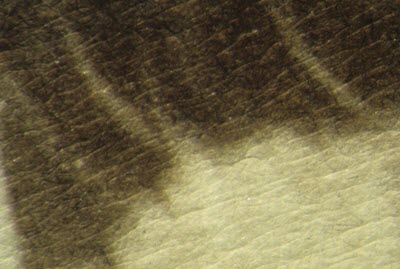
Following salted paper prints, the next innovation introduced the use of a binding medium for the image-forming substance, which lifted the image off the paper fibre and protected it from physical damage (Figure 3). The most successful and widely used binding medium in the 19th century was egg albumen. Since the albumen print's fine image detail and rich tones were unparalleled, it was extremely popular between 1850 and 1890 and represented, by far, the bulk of 19th-century print materials. On close examination, the surface of an albumen print exhibits, over its entirety, characteristic fine cracking (Figure 4). This can be used as a means of identification; under a microscope, the paper fibre is visible through the albumen layer. Albumen prints are also printing-out papers.
© Government of Canada, Canadian Conservation Institute. CCI 129982-0003
Figure 3. Cross-section of an albumen print showing how the image-forming substance, such as metallic silver, is fixed on the paper fibre with a binding medium, such as egg albumen, and not embedded within it.
© Greg Hill
Figure 4. Close-up of an albumen print surface that shows the signature overall fine cracking.
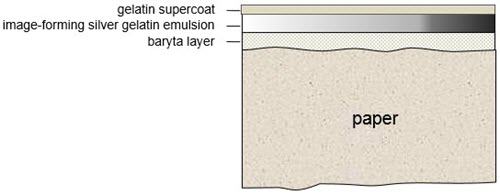
A third structural type of print material is characterized by the inclusion of a baryta layer below the emulsion. The emulsion is comprised of the image-forming substance and the binding medium. Composed of barium sulfate and gelatin, the baryta layer provides a smooth opaque white backdrop for the image and masks the paper fibre (Figure 5). First introduced in silver gelatin print materials in the late 19th century, it was subsequently used in collodio-chloride prints. Conventional colour materials are structured similarly, except for the three distinct dye layers. Collodio-chloride prints and early gelatin prints are printing-out papers, while most later gelatin materials are "developing-out" papers, meaning that the image is formed by the development of a latent image through very brief exposure to light, followed by chemical development wherein the latent image is converted to metallic silver, forming the black and white image.
© Government of Canada, Canadian Conservation Institute. CCI 129982-0005
Figure 5. Cross-section of a black and white baryta paper print showing how the baryta layer is placed between the print paper and the emulsion. The baryta layer provides a smooth opaque white backdrop and masks the paper fibre of the print paper.
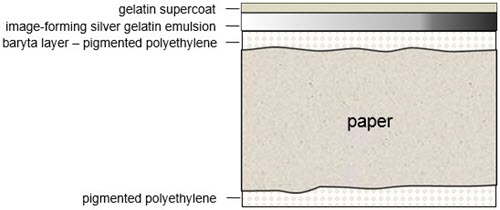
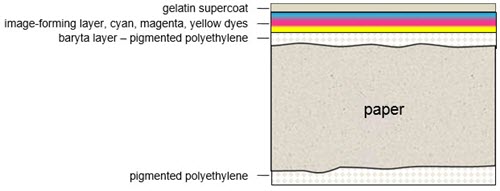
Until the early 1970s, when resin-coated papers were marketed, the baryta layer was the basic structure of all gelatin prints. The difference between the two is the inclusion of a layer of polyethylene applied to either side of the paper support (Figure 6). The white opaque layer is still referred to as the "baryta layer," but it is now made from a layer of pigmented polyethylene. This seals the paper fibres from contact with processing chemicals, thus greatly reducing the required wash times and, therefore, sources of potential chemical deterioration of image silver. For fibre-based (non-resin-coated) silver prints, residual processing chemicals are a major source of contamination. Colour photographs are also multi-layered materials, the majority of which today are produced on resin-coated paper and consist of distinct dye layers (Figure 7). Chromogenic materials, which make up the bulk of both the amateur and professional colour markets, have been produced almost exclusively on resin-coated paper since the 1980s. Chromogenic dyes are also used in both negative and transparency materials.
© Government of Canada, Canadian Conservation Institute. CCI 129982-0007
Figure 6. Cross-section of resin-coated gelatin black and white paper showing the added layer of polyethylene to either side of the print paper.
© Government of Canada, Canadian Conservation Institute. CCI 129982-0009
Figure 7. Cross-section of resin-coated colour print paper showing the distinct dye layers between the baryta layer and the gelatin supercoat.
Negatives
Different types of negatives can be identified by both their base material—paper, glass or a flexible plastic—and by their binding medium, either no binder, collodion or gelatin. All negatives use silver salts as their light-sensitive image-forming substance. Paper negatives, now very rare, were essentially salted paper prints, often waxed to increase their translucency.
Throughout the 1840s, the most widely used negative was Talbot's calotype with no binding medium (i.e. the image-forming silver sat directly on the paper fibre).
A wet collodion negative consists of an emulsion poured onto one side of a sheet of glass, which is then coated with a clear protective lacquer. It is easily differentiated from a gelatin dry plate by the positive created when viewed on a black background, and it is essentially the same emulsion as applied to tintypes and ambrotypes.
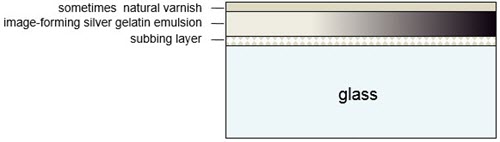
Glass plate negatives with a gelatin silver emulsion were called gelatin dry plates. They were commercially produced, pre-sensitized and had a stronger emulsion layer than wet collodion negatives. Their production was discontinued in the late 1990s. Due to their dimensional stability, they were primarily used for scientific purposes during the last 80 years of their production. In cross-section, the glass plate is coated first with a layer of gelatin and/or various polymers, referred to as a "subbing layer," followed by the emulsion, another protective layer of gelatin; finally, in the 19th century, a protective lacquer layer was often added (Figure 8).
© Government of Canada, Canadian Conservation Institute. CCI 129982-0011
Figure 8. Cross-section of a gelatin dry plate negative showing the subbing layer, the image-forming substance and gelatin layer above it and the sometimes applied varnish layer on top.
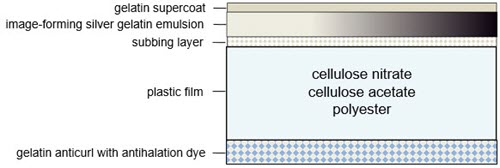
The basic structure of roll or motion picture film begins with a flexible plastic base material coated on one side with a subbing layer for better adhesion of the subsequent emulsion layer (Figure 9). The difference between colour film (negative and positive) and black and white film is the emulsion layer; colour emulsions consist of generally three distinct dye layers, while black and white prints consist of one uniform layer. A supercoat, or topcoat, of clear gelatin is applied on top of the emulsion layer for protection. A layer of gelatin is applied to the verso of the film base, which is called the anticurl backing. Anticurl layers incorporate an antihalation dye that helps control light from refracting within the matrix during exposure. It generally appears as blue or red in the unexposed and unprocessed films. The dye is rendered clear and colourless during processing.
© Government of Canada, Canadian Conservation Institute. CCI 129982-0013
Figure 9. Cross-section of a black and white plastic-based film showing the gelatin anticurl added to the verso of the film, and the subbing layer, image-forming substance and gelatin supercoat placed on top of the film to form the image.
Causes of damage to photographic materials and preventive conservation strategies
Photographs are composite objects and, as such, are vulnerable to all 10 agents of deterioration in a wide range of combinations. This section discusses the typical symptoms of deterioration for photographic materials, their stability and the effects of the chief damaging agents on them, namely physical forces, pollutants, light and ultraviolet (UV), incorrect temperature and incorrect relative humidity (RH).
Typical symptoms of deterioration
Modern black-and-white silver gelatin materials that have been correctly processed are remarkably stable under favourable environmental conditions. It was recognized early on that contaminants in paper contributed to rapid deterioration of the image and, consequently, photographic papers have traditionally been of the highest quality. Metallic silver, in the absence of oxidizing agents, is also very stable. The baryta layer and the gelatin binding medium are both relatively chemically inert. The problem lies in providing a pollution-free, stable environment. Ideal storage conditions are rare, so all photographic materials are subject to some degree of deterioration, which can be attributed to two main causes: chemical and mechanical deterioration. The following are typical symptoms of deterioration and are explained below:
- image silver deterioration
- film base deterioration
- colour photographic dye fading
- resin-coated paper cracking
- hand-colouring and retouching media fading and loss
- poor-quality mounting materials and coatings
Image silver deterioration
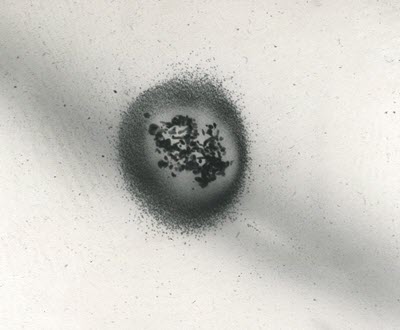
When metallic image silver is oxidized, silver ions are formed, which are highly reactive and able to migrate and disperse themselves through the gelatin emulsion. In Figure 10, a micrograph from a transmission electron microscope shows the ionized silver having migrated away from the silver grain in all directions.
© Government of Canada, Canadian Conservation Institute. CCI 129982-0015
Figure 10. A microscopic view of the migration of silver ions. The lighter shaded ions are dispersed in all directions, away from the darker shaded silver grain at the centre.
The result of this migration, if it continues under conditions that enable the reaction, is the total loss of the silver grain. This chemical altering of the silver image is due to exposure to strong oxidizing agents, such as peroxide bleaches from poor-quality paper boxes and sulfur dioxide from air pollution, in the presence of moisture. Three things can happen:
- Silver ions can combine with a variety of compounds, forming salts. Sulfur predominates, appearing as brown or yellow staining and fading of the image (Figure 11).

© Greg Hill
Figure 11. The metallic image silver on this print has been converted to silver sulfide, resulting from oxidation by various sulfur compounds found in the atmosphere and in poor-quality mounting boards. The reaction causes fading and staining of the image.
- Silver ions can migrate to the surface of the gelatin and combine with other silver ions to form a layer of visible metallic silver. This is referred to as "silver mirroring" (Figures 12 and 13).
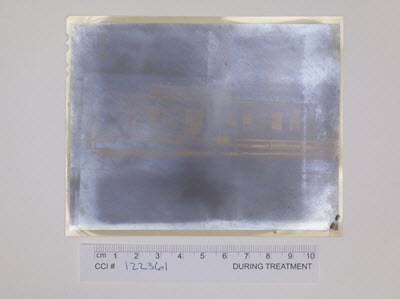
© Government of Canada, Canadian Conservation Institute. CCI 122361-0015
Figure 12. Silver ions have migrated to the surface of this plastic film-based negative and have combined with other silver ions to form a layer of visible metallic silver (silver mirroring).
© Government of Canada, Canadian Conservation Institute. CCI 129982-0016
Figure 13. Having undergone the same phenomenon as the negative in Figure 12, this print shows silver mirroring on the surface.
- Silver ions can also form colloidal silver, which has a characteristic orange colour (Figures 14 and 15). This is particularly prevalent in resin-coated papers, where the migrating ions are not absorbed by the polyethylene baryta layer and do not reach the surface. They remain dispersed inside the emulsion layer, reflecting their bright orange tone.

© Estate of Klaus Hendriks
Figure 14. The silver ions in this print formed colloidal silver, giving it an orange tint characteristic of this type of damage.
© Estate of Klaus Hendriks
Figure 15. The silver ions in this print formed colloidal silver, giving it spots of orange colour, characteristic of this type of damage.
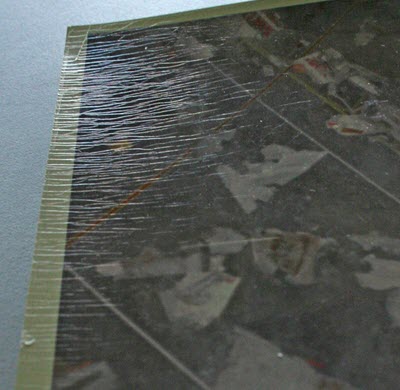
Film base deterioration
Early negatives on cellulose nitrate and cellulose acetate plastic film bases, both sheet and motion picture film, are inherently chemically unstable in general, especially early ones made of cellulose nitrate. The lack of manufacturing standards when these materials were being made resulted in a wide range of problems. While some materials degraded quickly, others remain in good condition today.
In the mid-1920s, cellulose acetate replaced cellulose nitrate and, although it was not flammable like nitrate, it proved to be less inherently stable, particularly cellulose diacetate. Other forms of cellulose acetate, such as triacetate, are proving to be more stable but will eventually degrade in poor environments.
The rate and degree of deterioration of all materials depend on existing storage conditions and past influences. Cold, sub-zero Celsius storage is generally considered essential for degrading cellulose nitrate- and cellulose acetate-based films in order to arrest the deterioration process. Cool, dry environments are generally recommended for plastics that appear to be stable.
Cellulose nitrate
The inherent chemical instability of cellulose nitrate is a major concern. In the presence of elevated temperatures and humidity, it can decompose rapidly, emitting harmful vapours that will damage other materials in its vicinity. It is also a considerable fire hazard. The greater the degree of deterioration, the lower the temperature of combustion. There are many examples of collections spontaneously combusting under inappropriate storage conditions. However, perhaps a greater danger is the threat of fire from accident or arson spreading to a cellulose nitrate collection. As a by-product of combustion, cellulose nitrate releases oxygen, allowing it to sustain a fire in the absence of outside air, making it virtually impossible to extinguish.
Due to a lack of industry standards at the time of their introduction and use, cellulose nitrate products varied widely in stability. Regardless of their initial stability, once they start to deteriorate, the process is rapid. The decomposition is autocatalytic, meaning that the higher the concentration of decomposition products, the faster the rate of decomposition (Figure 16). Consult Caring for plastics and rubbers for information on how to care for cellulose nitrate films and store such films, including instructions on the cresol red test to detect and monitor the presence of degrading cellulose nitrate.
Cool and cold storage are useful options for storing cellulose nitrate films. The benefits of low temperature storage outweigh the risks of potential thermal damage. This method is often used to prevent degradation of cellulose nitrate, cellulose acetate and cellulose acetate propionate negatives until they can be copied onto a less reactive format. Consult Caring for plastics and rubbers - Incorrect temperature for more details.
© Government of Canada, Canadian Conservation Institute. CCI 122361-0037
Figure 16. A high concentration of acids in the cellulose nitrate as a result of the manufacturing process caused severe decomposition of the plastic.
Cellulose acetates
Cellulose diacetate-based films were developed as a replacement for cellulose nitrate bases. They were used extensively in the 1920s and 1930s until it became apparent that they, too, have serious instability problems (Figure 17). Volatilization of plasticizers in the film base results in its shrinking, causing blistering and creasing of the emulsion layers. The smell of acetic acid in storage boxes is a sure sign of decomposition. This is known as "vinegar syndrome." Just like in the case of cellulose nitrate film, the decomposition is autocatalytic. Cellulose triacetate began to replace cellulose diacetate in the 1940s and, although much more stable, it will eventually degrade like all forms of cellulose acetate, particularly in adverse environments.
© Government of Canada, Canadian Conservation Institute. CCI 122361-0023
Figure 17. A cellulose diacetate-based film negative showing blistering and creasing as a result of the inherent instability of the materials.
Polyester
Polyester film, introduced in the 1960s, is the only film considered stable and inert. Unfortunately, due to its high cost, it did not completely replace cellulose acetate, which can still be found in many films manufactured today. Also, due to its inherent strength, polyester is not the preferred base material for motion picture film as it does not readily break when jams occur in the equipment (e.g. the projector), often leading to equipment damage. Cellulose acetate, by comparison, readily breaks, is easily repairable and does not result in equipment damage.
Colour photographic dye fading
Most colour photographic dyes are considered to be unstable to some extent. The most common type of colour photographic material is the chromogenic (or dye-coupler print) negative or slide, where the dye colours are synthesized in the film during processing. This type represents by far the bulk of both the amateur and professional photographic markets. While many dyes fade under exposure to light, chromogenic dyes have the added disadvantage of also fading in dark conditions.
"Dark fading" is a general term that describes the kinds of colour fading and staining of emulsions that take place when light is not present. The rates of chemical reactions involved in dark fading are governed by temperature and, to a lesser extent, RH; the higher the temperature and RH, the faster the rate. With many types of colour prints, dark-fading rates approximately double for each 6°C increase in temperature. When colour prints are exposed to light, light and dark fading occur simultaneously, making the material extra susceptible.
The rate of fading of the different dyes varied greatly in early colour material, resulting in a visual imbalance (Figure 18). Prints can fade to an overall magenta, cyan or yellow, depending on which of the dyes is the more stable. Many modern digital output media, such as inkjet and laser prints, are subject to severe colour loss due to the instability of their dye-based inks.
© Estate of Klaus Hendriks
Figure 18. The colours in this print are visually imbalanced (i.e. faded in some areas and vibrant in others) due to some dyes fading more easily than others.
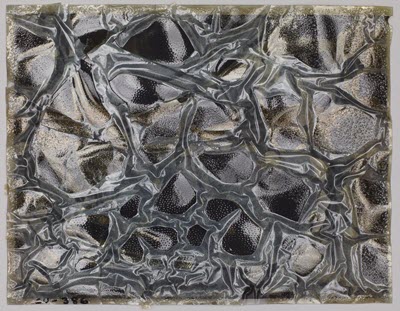
Resin-coated paper cracking
Early resin-coated papers, which include both black and white and colour, can be very unstable. They can exhibit severe cracking of the polyethylene resin baryta layer between the emulsion and the paper. Titanium dioxide (TiO2), a white pigment, was added to the polyethylene resin layer on the face side of the print to make it pure white and more reflective. When exposed to light, the pigment absorbs light energy and generates ozone, a very active form of oxygen that attacks the resin layer, causing cracking (Figure 19) and many of the metallic silver deterioration problems noted above. Industry addressed this problem by adding antioxidants and peroxide scavengers to the polyethylene layer, but some of these proved to be unstable themselves, causing yellowing, particularly around the borders. Later, this problem was addressed by altering the composition of the antioxidants.
© Estate of Klaus Hendriks
Figure 19. Surface cracking of resin-coated papers caused by extended exposure to light, known as "photochemical degradation."
Hand-colouring and retouching media fading and loss
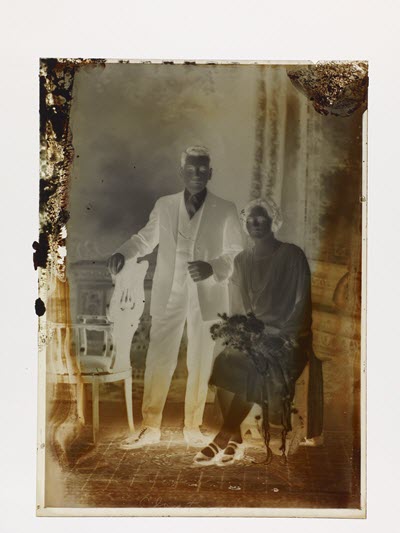
Hand-colouring of monochrome photographic images (Figure 20) has had a long and varied history. Three of the most commonly encountered techniques are:
- Enhancing a portrait by applying a touch of colour to the cheeks or gold-coloured paint to jewellery.
- Overpainting, often completely, with chalk, pastel, charcoal and/or watercolour. Referred to as crayon enlargements, these types of photographs consist of lightly printed salted paper prints and can look deceptively like hand-drawn portraits. Their media are generally friable and easily mechanically damaged.
- Using watercolours, which, although more tightly bound to the photograph surface, can still be easily scuffed or scratched.
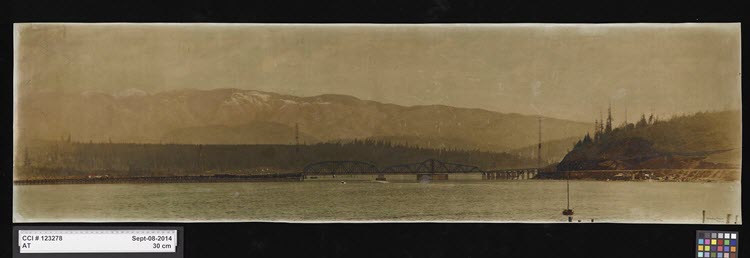
© Government of Canada, Canadian Conservation Institute. CCI 123278-0006
Figure 20. This black and white photograph was lightly hand-tinted with oil-based pigments, and graphic detailing was also added with paint. The photograph is entitled How the Second Narrows Will Look When Spanned by Bridge and is dated before 1925.
Virtually all of the colourants used on photographs are light sensitive and fade noticeably in a short period of time. In most cases, the colour is applied in thin transparent layers; so when one of the colours fades faster than another, there is a visual imbalance.
Consult Caring for paper objects for more information on friable media and their storage, matting, framing and handling requirements.
Poor-quality mounting materials and coatings
Dry mounting is a technique that is no longer recommended for preserving photographic materials due to the risk of damaging the print, the irreversibility of the treatment and the existence of safer, more reversible alternatives. Many mounting adhesives currently on the market are chemically unstable, fail often and cause staining of originals. In the past, the dry mounting of photographs was quite common, as it intended to eliminate planar distortions from prints. Fortunately, many older, traditional, heat-set dry mounting tissues have proven to be remarkably benign. The exceptions are when too high a temperature and/or pressure are used in the press during the mounting process or when unstable adhesives are used.
Often, photographers coat photographs, either by lamination or the application of waxes and resins, in an attempt to protect the surface. Certain laminates are chemically stable and some are not, nor are they easily removable. Beeswax has proven to be remarkably successful in protecting an image both chemically and mechanically, but other coatings used over the years have not proven as beneficial. For example, most natural and synthetic resins, such as shellac and cellulose nitrate, readily discolour, particularly with prolonged exposure to light. Coatings must be used very judiciously. It is important to know the product precisely and what its long-term impact will be on the photograph before choosing to use one.
Stability and deterioration issues by type of photographic material
Common deterioration problems and stability issues are provided below for a broad range of photographic materials that may exist in collections. Also provided is information useful for identification purposes, including the substrate, date ranges within which the photographic process was in most common usage, whether the image is a positive or negative and whether the image-forming substance is made of silver or not.
Paper-based photographic processes
Table 1 provides the most common stability and deterioration issues for paper-based photographic processes.
| Process name and time frame when process was used | Image processed as a positive or negative | Image-forming substance: silver or non-silver | Specific types of deterioration and stability issues |
|---|---|---|---|
| Salted paper prints (1840–1855) | Positive | Silver | Fading, oxidation of image silver, tears, biological attack |
| Waxed paper negative (1840–1855) | Negative | Silver | Tears, fading, staining, discolouration, biological attack |
| Calotype (1842–1851) | Negative and positive | Silver | Tears, fading, discolouration, staining, biological attack |
| Albumen prints (1850–1910) | Positive | Silver | Tears, fading, oxidation of image silver, emulsion cracking, staining, discolouration, biological attack |
| Collodio-chloride prints (1890–1910) | Positive | Silver | Tears, fading, oxidation of image silver, staining, iridescent sheen to emulsion, discolouration, biological attack, silver mirroring |
| Silver gelatin, printing-out papers / Kodak Studio Proof (1880s–1990s) | Positive | Silver | Tears, fading, oxidation of image silver, staining, discolouration, biological attack, silver mirroring, flaking and tearing at edges |
| Silver gelatin, developing-out prints (1910–present) | Positive | Silver | Tears, fading, oxidation of image silver, staining, discolouration, biological attack, silver mirroring |
| Chromogenic colour prints (mid-1940s–present) | Positive | Non-silver | Tears, image dye fading, staining, biological attack |
| Cyanotype prints (1842–present) | Positive | Non-silver | Tears, fading, alkaline sensitivity, biological attack |
| Platinum /palladium prints (1873) | Positive | Non-silver | Tears, staining of paper, biological attack |
| Chrysotype (gold) (1842) | Positive | Non-silver | Tears, staining of paper, biological attack |
| Pigment process, gum bichromate and carbon prints (1858) | Positive | Non-silver | Tears, staining, fading, biological attack, cracking in the dark image areas |
| Digital output media: ink jet (1990 to present) | Positive | Non-silver | Tears, paper staining, fading of image dyes, biological attack, humidity sensitivity |
| Digital output media: laser (mid-1970s to present) | Positive | Non-silver | Tears, staining, fading, biological attack |
Metal-based photographic processes
Table 2 provides the most common stability and deterioration issues for metal-based photographic processes.
| Process name and time frame when process was used | Image processed as a positive or negative | Image-forming substance: silver or non-silver | Specific problems and stability issues |
|---|---|---|---|
| Daguerreotypes (1939–1860) | Positive, in-camera | Silver | Extremely fragile image layer, easily abraded, oxidation of silver |
| Tintypes (1853–1940s) | Positive, in-camera | Silver | Iron corrosion, emulsion flaking, oxidation of image silver |
Glass-based photographic processes
Table 3 provides the most common stability and deterioration issues for glass-based photographic processes.
| Process name and time frame when process was used | Image processed as a positive or negative | Image-forming substance: silver or non-silver | Specific problems and stability issues |
|---|---|---|---|
| Ambrotype (1851–1880s) | Positive, in-camera | Silver | Breakage, flaking lacquer, oxidation of image silver, biological attack |
| Collodion wet-plate negatives (1850–1890s) | Negative | Silver | Breakage, emulsion flaking, lacquer discolouration, biological attack, oxidation of image silver |
| Silver gelatin dry-plate negatives (1870s–late 1990s) | Negative | Silver | Breakage, image silver oxidation, staining and discolouration |
| Lantern slides – some contain plastic-based film (1850s–1930s) | Positive | Silver | Breakage, image silver oxidation, staining and discolouration, plastic film deterioration, humidity sensitivity, fading of hand-colouring |
| Autochromes (1903–1930s) | Positive, in-camera | Silver, coloured starch grains | Breakage, staining, lacquer deterioration and flaking, highly water-sensitive |
| Silver gelatin dry-plate positives (1870s–late 1990s) | Positive | Silver | Breakage, image silver oxidation, staining and discolouration, biological attack, fading of hand-colouring |
Plastic-based photographic processes
Table 4 provides the most common stability and deterioration issues for plastic-based photographic processes.
| Process name and time frame when process was used | Image processed as a positive or negative | Image-forming substance: silver or non-silver | Specific problems and stability issues |
|---|---|---|---|
| Cellulose nitrate black and white negatives (1889–1951) | Negative | Silver | Plastic deterioration, flammability, oxidation/discolouration of image silver, biological attack |
| Cellulose diacetate black and white negatives (1909–1940s) | Negative | Silver | Plastic deterioration, vinegar syndrome, embrittlement of emulsion layer, oxidation or discolouration of image silver |
| Cellulose triacetate black and white and colour negatives (1935–present) | Negative | Silver | Plastic deterioration, potential vinegar syndrome, embrittlement of emulsion layer, oxidation or discolouration of image silver |
| Polyester black and white and colour negatives (1942–present) | Negative | Silver | Oxidation or discolouration of image silver |
| Acetate chromogenic transparency film (1930s–present) | Positive | Non-silver | Image dye fading, plastic deterioration (such as warpage and planar distortions) |
Preventive conservation strategies by main agents of deterioration
The main agents of deterioration that attack the entire range of photographic materials are:
- physical forces
- water
- pollutants
- light and ultraviolet
- incorrect temperature
- incorrect relative humidity
Physical forces
As with all paper-based materials, physical damage to photographic materials can result in tears, creases, losses and broken corners (Figure 21) of both primary and secondary supports (discussed more fully in Caring for paper objects). Oversized photographs, such as panoramas, are particularly vulnerable when they are being transported.
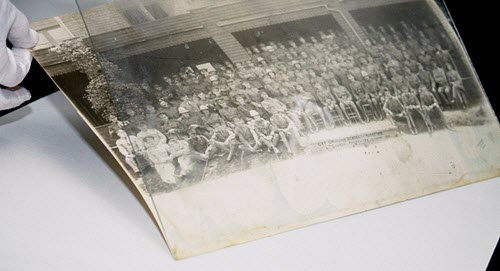
Many early photographic print materials were solidly mounted onto rigid decorative boards that displayed the photographer's studio stamps and services offered (Figures 22a and b). These boards are generally poor-quality laminates that become very brittle over time and cause weakening of the photographic paper. They can be easily broken by rough handling, which would damage the photograph in the process.
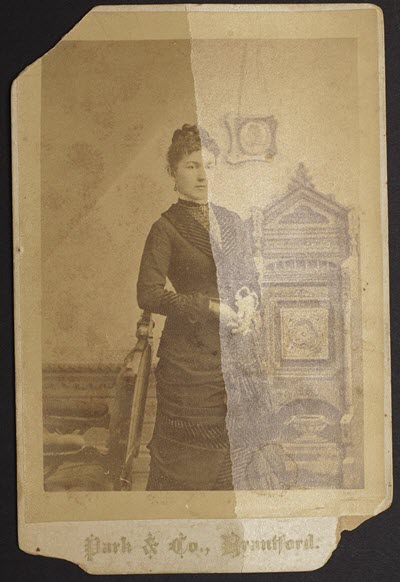
© Government of Canada, Canadian Conservation Institute. CCI 123731-0010
Figure 21. Albumen print circa 1867 of young Adelaide Hunter that shows a large vertical crease through its centre and losses at three corners.
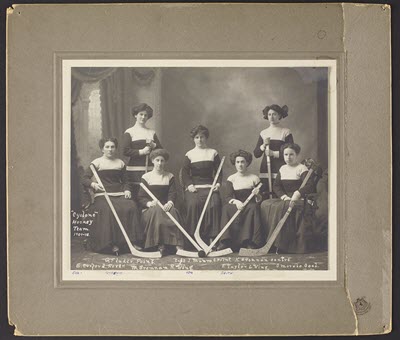
© Government of Canada, Canadian Conservation Institute. CCI 123338-0011
Figure 22a. A 1910 photograph of the Cyclone women's hockey team from Eastern Ontario. The photograph was solidly mounted onto a rigid decorative board that displays, in the bottom right corner, the photographer's studio stamp.
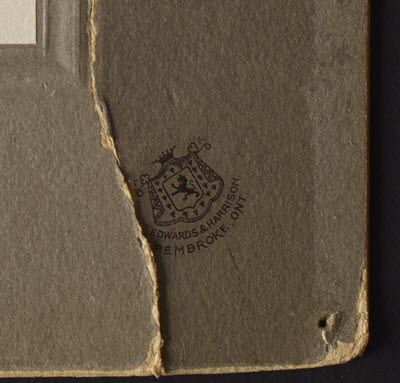
© Government of Canada, Canadian Conservation Institute. CCI 123338-0011
Figure 22b. Detail of the photographer's studio stamp on the mounted board in Figure 22a.
Recommendations
- Handle objects as little as possible, and wear white cotton, nylon or vinyl gloves.
- Support large, unmounted photographs on a rigid board when moving them or turning them over.
- House photographs in protective enclosures, such as clear plastic sleeves (Figure 23). For example, polyester (Melinex, Mylar) or polyethylene sleeves are commonly used (consult Technical Bulletin 32 Products Used in Preventive Conservation for guidance on choosing plastic sleeves and related enclosures).
- Do not use plastic sleeves if the emulsion is damaged or if hand-colouring is friable; static electricity will easily detach fragile media.
- Keep objects in protective sleeves when providing access to them by researchers.
- Use a rigid support, such as heavier paper or acid-free board, to handle or move larger and more fragile photographs.
- Store oversized works flat in folders, either in horizontal metal cabinets or on wide metal shelves.
- Store objects in archival-quality document storage boxes—larger items should be stored flat (e.g. 8 in. x 10 in. [20.32 cm by 25.4 cm] unmounted and 11 in. x 14 in. [27.94 cm by 35.56 cm] mounted items), while smaller ones can be placed vertically, ensuring that they are properly supported within the box to prevent slumping.
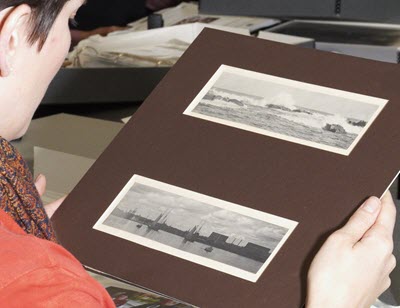
- House photographs, especially fine art photographs or valuable display items, in window mats (Figure 24), as applicable and practical, or in inert plastic sleeves or heavyweight folders. These provide maximum protection without direct handling and can be used to view and transport the work.
- Frame photographs, where appropriate. The frame will provide additional protection from damage due to handling, will act as a buffer from minor fluctuations of RH and will prevent the intrusion of dust and airborne particulates. Ensure that the image is not touching the glass of the frame by using spacers or a window mat.
- Use archival storage boxes, shelving and cabinets to provide additional protection for photographs housed in folders, sleeves or window mats.
- Reformat (by photocopy, photographic film copy or digital image), where appropriate, for photographs that are too fragile to handle, are used heavily or are required for publications or reference.
© Government of Canada, Canadian Conservation Institute. CCI 97858-0025
Figure 23. A collection of stable negatives on a polyester base can be kept in individual archival-quality polyester (Melinex) sleeves. This is better than storing them in a box.
© Government of Canada, Canadian Conservation Institute. CCI 123764-0006
Figure 24. Housing photographs in acid-free window mats reduces the risks associated with handling during consultations.
Water
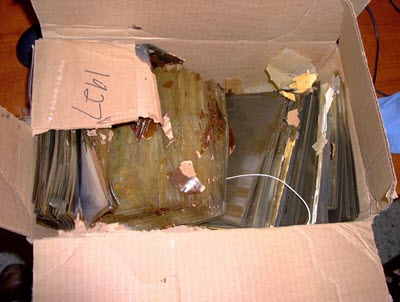
Photographic prints and negatives are very susceptible to damage from water. The gelatin, paper and enclosure materials are very absorbent, and immersion in water will cause the dissolution of both the gelatin and paper. Even small amounts of water can soften gelatin to the point that it sticks to any surface in contact with it. Floods are particularly devastating to photograph collections, as the water is usually full of dirt, which will embed in the softened gelatin (Figure 25). Once softened or partially dissolved, the gelatin layers will fuse with their enclosure or other photographs in contact with them. If left wet, photographs can become rich sources of nutrients for mould, which will eventually contaminate and destroy them.
© Government of Canada, Canadian Conservation Institute. CCI 129982-0017
Figure 25. A box of glass plate negatives salvaged from a flood in 2004 at the Peterborough Museum & Archives.
Recommendations
- Avoid storing collections in basements or near windows.
- Avoid storing collections in facilities sitting in flood plains. Be aware of the risks associated with a chosen storage site for collections.
- Place extremely fragile objects, such as cased photographs, ambrotypes and daguerreotypes, in watertight containers. Only place vulnerable items on upper shelves.
- Have a disaster response plan in place and practise it.
Pollutants
One of the leading causes of image silver deterioration is oxidation. This deterioration mechanism is catalyzed by the presence of several different oxidizing agents, even in small concentrations. These oxidants are common in airborne pollution and include sulfur dioxide, nitrous oxides and ozone. All of these pollutants oxidize metallic silver in black and white photographs and degrade gelatin emulsions, paper and film supports. High humidity facilitates the oxidation by making gelatin emulsions more permeable to chemical agents.
Photographs can be damaged from prolonged contact with chemically unstable storage and display materials as well as from volatile degradation products from paper itself. Gaseous contaminants can be emitted by wood, coatings, acidic enclosures and boxes or other objects found within the museum. This is particularly dangerous if deteriorating cellulose nitrate and cellulose acetate films are stored in their proximity. Untreated wood, plywood shelving, degrading rubber floor tiles and oil-based paints emit harmful peroxides and organic acid vapours (Tétreault 2003 – Table 3, p. 26).
Recommendations
- Wear white cotton, vinyl or nylon gloves while handling objects.
- Make sure that materials in contact with photographs are chemically stable (Figures 26, 27a and 27b). Paper enclosures (mats, folders and boxes) made of cotton rag or chemically purified wood pulp with a 3% calcium carbonate alkaline buffer are suitable for most photographs. Exceptions include certain materials that are sensitive to alkali, such as cyanotypes.
- Use inert plastic enclosures that are free of plasticizers and slip agents.
- Avoid materials and finishes that are sources of pollutants.
- Store objects in chemically stable enclosures, such as buffered pure fibre papers or plastics like polyester and polyethylene.
- Use photo corners or other non-invasive mounting techniques, wherever possible, to avoid the use of adhesives.
- Seal display and storage cases made of wood or wood products with high-quality water-based acrylic latex paints.
- Seal windows and doors tightly in collection storage areas.
- Store items in window mats and high-quality rigid storage boxes.
- Use powder coated metal shelving and cabinets.
- Sleeve negatives individually (Figure 28) in paper, polyester or polyethylene, and place in boxes of acid-free cardboard or fluted polypropylene.
- Use boxes, display cases or airtight cases with barrier coatings and films (foil-based), where appropriate.
- Use microenvironments for sensitive items.
© Government of Canada, Canadian Conservation Institute. CCI 99153-0005
Figure 26. Storing cellulose nitrate negatives in an acidic box can contribute to their deterioration.
© Government of Canada, Canadian Conservation Institute. CCI 99948-0002
Figure 27a. Similar to cellulose nitrate negatives, cellulose acetate negatives will more readily deteriorate when stored in acidic boxes.
© Government of Canada, Canadian Conservation Institute. CCI 99948-0010
Figure 27b. The same cellulose acetate negatives as in Figure 27a are now properly stored in individual archival-quality paper sleeves in an acid-free box.
© Government of Canada, Canadian Conservation Institute. CCI 124045-0005
Figure 28. Photographer Yousuf Karsh's 1941 original negative of his famous portrait of Winston Churchill is stored in a paper sleeve made entirely of pure alpha-cellulose paper that is non-buffered, neutral pH, sulfur-free and lignin-free. The sleeve is stored in a folder and then in a box.
Light and ultraviolet
Exposure to visible light and UV can discolour and weaken paper, fade photographic dyes (Figures 29 and 30) and result in photochemical degradation of most organic materials, including photographic gelatin. It will also cause fading of hand-applied media, such as watercolours and pastels, which are generally very fugitive. Many early photographic papers were lightly dyed overall, and these too are highly sensitive. In addition, surface coatings that might have been applied by the photographer, such as waxes and resins, can yellow.
Light damage is determined by the exposure time, intensity and wavelength of light. The damage is cumulative and irreversible. Sunlight, some fluorescent lights and halogen lights emit UV light, which is high in energy and causes damage (most commonly, yellowing and weakening).
© Government of Canada, Canadian Conservation Institute. CCI 129982-0018
Figure 29. Dye fading due to light exposure. Part of the image has been covered while the remainder was exposed, causing localized dye loss.
© Government of Canada, Canadian Conservation Institute. CCI 123279-0011
Figure 30. Detail of a historical photograph that was originally framed with a window mat that covered the edge of the image. Below the mat, the image was protected and not significantly discoloured, whereas the exposed area has significantly yellowed, probably due to exposure to a UV-containing light source (e.g. daylight).
Colour photographic emulsion dyes, specifically chromogenic materials from the 1940s to the 1990s, tend to be rather inherently unstable. They are very sensitive to light fading, as illustrated in Figure 29, but also fade due to a phenomenon termed "dark fading." Colours will shift or fade in the absence of light, resulting in prints appearing overly blue, magenta or yellow as seen in Figure 31. One dye or two dyes can be less stable than the rest, leaving one predominate tone.
© Government of Canada, Canadian Conservation Institute. CCI 129982-0019
Figure 31. Colour shift or dye loss due to dark fading and light fading.
To minimize light damage, the intensity, duration and UV content of the light should be controlled by establishing optimum levels. Fading rates of the various photographic dyes and colourants should be estimated, and exposure times and schedules established. The entire object should be included, and the sensitivity level for each of its components should be measured (e.g. dyes, print paper, frame). With this information, a decision regarding exposure time can be made. For example, even at low light and UV levels, extremely sensitive photographs could be restricted to no more than a cumulative six months of display over a five-year or longer period. This approach recognizes that displaying vulnerable images will cause them to fade and attempts to balance the need to preserve the collection with the need to exhibit it. Keeping track of the cumulative exposure time for each photograph is essential.
Consult Agent of deterioration: light, ultraviolet and infrared for details on controlling exposure to light and UV in heritage collections.
Recommendations
- Reduce exposure to light and UV by rotating objects on display. Keep some representative objects out of the rotation so that they remain pristine indefinitely, for future research and to make facsimiles.
- Block daylight with curtains, blinds and shutters.
- Use facsimiles for display, where appropriate.
- Avoid high UV sources.
- Use timers and task lighting to prevent unnecessary exposure to light.
- Turn off lights in storage areas when not in use.
- Turn gallery lights on only during exhibition hours.
- Cover display cases with curtains that can be pushed aside for viewing.
- Frame artworks behind UV-filtering glazing.
- Establish exposure times and schedules based on light-sensitive materials (e.g. known to be fugitive [hand-coloured, etc.] or moderately stable [modern, well-processed black and white gelatin on fibre-based paper]; consult Wagner et al. n.d.).
- Monitor and record light and UV levels in all exhibition areas.
- Install motion detectors in storage and exhibition areas to switch on lights on demand.
- Place UV filters on light sources, exterior windows and skylights.
- Valuable unstable colour materials dating from 1940–1990 should be stored in cool or cold storage to slow the rate of dark fading.
Incorrect temperature
Heat accelerates chemical reactions (such as oxidation and hydrolysis), which leads to degradation of all organic materials, including paper, photographic dyes and gelatin. High temperatures (over 25°C) are inappropriate for materials such as acidic paper, cellulose acetate-based film and any other inherently unstable material that can chemically self-destruct within a human lifetime. Even at room temperature (20°C), these chemical reactions will take place and lead to visible deterioration easily within a few decades. The lower the ambient temperature, the slower the rate of deterioration. Cool or cold storage is always preferable for long-term preservation. Although the International Organization for Standardization (ISO) standards recommend lower temperature storage for colour materials than for black and white, all materials benefit greatly from lower temperature storage.
Recommendations
- Define correct temperature ranges for various objects.
- Do not store objects in attics or basements.
- Do not use incandescent spotlights, especially those of high wattage, as they can increase heat in galleries. Do not use lighting that noticeably warms the object. Test the temperature of lighting by using a simple thermometer or your hand in the light beam.
- Block or screen skylights (in particular any sunbeam) to eliminate the UV and heat from infrared radiation and to achieve suitable visible light levels.
- Keep objects away from radiators or heating ducts.
- Install measuring instruments, and monitor and interpret data.
- Provide cool or cold dry storage, where appropriate, for sensitive materials. For example, store unstable films and negatives in freezers, as described in Agent of deterioration: incorrect temperature – Vignette 2.
- Consult the following reference guides from the Image Permanence Institute (IPI) for recommendations on ideal storage temperatures for photographs. Each guide is available on the IPI web page Storage Guides.
- IPI Storage Guide for Acetate Film (1993)
- Storage Guide for Color Photographic Materials (1998)
- IPI Media Storage Quick Reference, 2nd Edition (2010)
- IPI Guide to Preservation of Digitally-Printed Photographs (2014)
Incorrect relative humidity
Many chemical processes require the presence of water, so the higher the humidity, the greater the rate of deterioration. Low RH will slow many degradation reactions, such as acid hydrolysis, and will decrease the permeability of gelatin emulsions to gaseous pollutants. However, if too dry (e.g. below 20–30% RH), desiccation can lead to brittleness, causing gelatin emulsions to crack. Also, due to the different expansion and contraction rates of layers within composite materials like photographs, rapid shifts in humidity can result in severe planar distortions: curling, cupping, cracking, etc. This can be extremely problematic for framed works restrained by mats, mounts and glazing.
High humidity can result in softening of gelatin, causing it to stick to glass or any other material it comes into contact with (Figure 32); in particular, stacked or closely packed negatives or prints risk adhering together into a block. Also, at elevated humidity, gelatin can become a rich nutrient for mould. The safe zone for preventing both softening of gelatin and mould growth over the long term is below 65% RH.
© Estate of Klaus Hendriks
Figure 32. Mounted improperly, this photograph was in direct contact with the glass of its frame. If the RH level becomes high enough to soften the gelatin (over 60%), the gelatin emulsion will stick firmly to the glass plate, causing losses to the image.
Recommendations
- Avoid storing collections in basements, attics or near windows or exterior walls.
- Correct any damp problems, if present. If it is not possible to eliminate dampness in storage, use portable dehumidifiers, where possible, but only if their regular maintenance can be ensured.
- Use microenvironments, proper boxing and enclosures and appropriate absorbent materials. Boxes, envelopes, sleeves, matboards and tissue all help to buffer changes.
- Store objects in boxes, or mat and frame objects. Frames and storage enclosures provide some protection from minor short-term fluctuations but will not protect paper from long-term or seasonal changes unless special care is taken by sealing the back and front.
- Use cabinets as a further enclosure layer for boxed or enclosed objects and for fragile and oversized items.
- Use humidity-buffering materials, such as silica gel or paper such as matboard, to moderate RH fluctuations. These can be placed in the back of frames as well as in boxes, cases and crates.
- Allow packing cases to reach room temperature before opening.
- Define and implement the correct RH for the collection or for specific parts of the collection.
- Install RH measuring instruments, and monitor and interpret the data.
- Use tightly sealed display cases.
Correct processing of new photographic images
When processing new images, either negatives or prints, care should be taken to achieve maximum stability. All processing steps should be carried out attentively, as outlined in Table 5. This includes the use of a hypo clearing agent to remove residual thiosulfate (fixer or hypo) and adequate wash times. Studies by industry and independent researchers have concluded that the final step in the processing procedure should be a toning bath. By the late 1840s, this was already known and the gold toning of photographic images, including daguerreotypes, was widely practised. Gold, being a more noble metal, provided the metallic silver image with some protection against oxidizing agents and was responsible for the characteristic purple-black tone of most 19th-century prints. Of course, as evidenced by the deterioration of many of these prints, this was not the only, or final, solution to the problem. Many other toners were experimented with and several are recommended even for contemporary silver gelatin materials. Selenium and sulfur-based toners are the most popular ones, not only for their ease of use but also for their greater efficacy in converting the silver to more stable compounds.
Recommendations
Basic control
- When new photographs are produced for incorporation into a permanent collection, strictly follow the manufacturers' recommendations for processing, particularly the use of fresh fixer, full fix times and full wash times (consult Table 5).
- Use proper storage environments.
- Control temperature and RH according to recommended levels in storage and display.
Optimum control
- When acquiring new images from artists, discuss the processing steps and the materials used to ensure that archival processing has been done. The use of a toner is essential.
| Steps in the photo development process | Time for each processing step – plastic support (film) | Time for each processing step – paper support (print) |
|---|---|---|
| 1. Development | Varies according to film type and manufacturer's recommendations; 4–9 minutes; agitation at regular intervals | Between 60 and 120 seconds |
| 2. Stop bath | 15 seconds | 30 seconds |
| 3. Fixing | 5 minutes in a hardening fixer; 2 minutes in a non-hardening rapid fixer; agitation at regular intervals | For most prints, use two fixing baths, the second of which must contain fresh fixing solution; 5 minutes in each with regular agitation |
| 4. Washing |
|
|
| 5. Toning |
|
|
| 6. Drying | Dry suspended in air in a dust-free environment | Dry, emulsion side down, on a fibreglass screen in a dust-free environment |
Examples of preventive conservation practices
This section provides practical examples in the care of photographic materials.
Fading and discolouration
Problem:
This case involves a collection of black and white prints dating from the 1930s and 1940s, as well as colour prints from the 1960s and 1970s, all of which appear to be fading. Although some of the black and white images are in very good condition, some are yellowing and the light tone image detail seems to be disappearing. Virtually all the colour prints appear to be fading and seem to have a blue or pink cast to them. How can this process be stopped and, hopefully, reversed?
Solution:
The fading and discolouration of black and white print materials are generally the result of oxidation of the black image silver whereby it is converted, most often, to silver sulfide. Because silver sulfide is yellow-brown in colour, the image tone changes and, because it is considerably lighter in colour, it appears to be fading, particularly in the highlights where there is much less black image silver (Figure 33). This can result from incomplete washing of the prints, allowing processing chemicals to be left in the emulsion. Pollution and poor-quality housing materials are also rich sources of oxidizing agents.
Removing the prints from poor-quality, highly acidic enclosures, envelopes, mats, etc. and placing them in good-quality acid-free envelopes will help eliminate sources of contaminants. A cooler, drier environment will also help slow down the deterioration process. Damp basements can greatly increase the rate of deterioration. This damage is irreversible but can be slowed.
In the case of the colour prints, most photographic dyes from this period are chemically unstable and readily break down, causing loss of colour. However, the different colour dyes in the prints do not fade at the same rate, resulting in a shift in the colour balance (Figure 34). For example, when there is a loss or diminishing of the yellow and magenta dyes, the image appears to be turning blue since it is the only colour remaining in any quantity. If there is a loss of yellow and cyan dyes, the image appears to be turning magenta overall. This damage is also irreversible but can be slowed by placing the objects into cool or cold storage. Due to the need for humidity control in cold storage, proper procedures must be followed to protect the object, and a photo conservation specialist should be consulted. Making good-quality working copies of both black and white and colour prints for display and handling can considerably help reduce the risks to the originals.
© Government of Canada, Canadian Conservation Institute. CCI 129982-0020
Figure 33. A sulfided black and white print wherein the black image silver has oxidized to silver sulfide, making the image appear yellow-brown and causing areas of fading, particularly where there is much less black image silver.
© Government of Canada, Canadian Conservation Institute. CCI 129982-0021
Figure 34. A faded colour print with a distinctive overall colour shift toward magenta caused by the loss of yellow and cyan dyes.
Gelatin emulsion sticking to glass
Problem:
In a small exhibit area in a research room, it was recently noticed that some framed items had stuck to the glass, both black and white and colour prints (Figure 35). The room was rather humid during the summer months, and the photographs were in frames, pressed against the glass to hold them in place. Can they be safely removed from their frames and the glass? How can this type of damage be prevented in the future?
© Government of Canada, Canadian Conservation Institute. CCI 129982-0022
Figure 35. A section of this black and white photograph has become stuck to the glass of its frame as a result of the gelatin in the emulsion softening in high humidity.
© Government of Canada, Canadian Conservation Institute. CCI 129982-0023
Figure 36. When framing a photograph under glass, use a window mat or spacers to provide a clear gap between the photograph and glass.
Context:
The vast majority of photographs today, both black and white and colour, use gelatin as the emulsion binding medium. It works extremely well in this capacity, but it is hygroscopic and subject to softening in high humidity. As a result, under the conditions described, it is no surprise that the prints stick to the glass of their frames. Another source of water or moisture may be from water seeping in or around the edges of the glass when wet rags or sprays are used on the frame to clean the glass. Water can wick into the space between the print and the glass and soften the gelatin enough that it can stick to the glass.
Solution:
Remove the frames from the wall and carefully attempt to remove the prints from the frames. Some will very easily become detached, but if there is any resistance, do not force them, because you will end up ripping the emulsion from the print. A photo conservator should be consulted on the proper method of removing the items, but keep in mind that permanent damage might have been done. It may not be possible to remove them from the glass and, if they do come off, there will likely be some permanent damage to the surface of the gelatin in the form of blotches, shiny patches and overall planar distortion. When reframing the prints, ensure that they are placed in mats, providing a space between the glass and the gelatin surface (Figure 36).
Bibliography
Adelstein, P.Z. IPI Media Storage Quick Reference, 2nd ed. Rochester, NY: Image Permanence Institute, 2009.
Baldwin, G., and M. Jürgens. Looking at Photographs:A Guide to Technical Terms. Malibu, CA: J. Paul Getty Museum, 1991.
Barnier, J. Coming Into Focus: A Step-By-Step Guide to Alternative Photographic Printing Processes. San Francisco, CA: Chronicle Books, 2000.
Burge, D.M. IPI Guide to Preservation of Digitally-Printed Photographs. Rochester, NY: Image Permanence Institute, 2014.
Burke, J., W. Henry, P. Messier, T. Vitale and Stanford University Libraries and Academic Information Resources. Albumen Photographs: History, Science and Preservation, 2000.
Cartier-Bresson, A. Le vocabulaire technique de la photographie. Paris, France: Marval/Paris musées, 2008.
Chicago Albumen Works, 2011.
Hendriks, K., and J. Iraci. Care of Encased Photographic Images, revised. CCI Notes 16/1. Ottawa, ON: Canadian Conservation Institute, 2007.
Hendriks, K., and J. Iraci. Care of Black-and-White Photographic Glass Plate Negatives, revised. CCI Notes 16/2. Ottawa, ON: Canadian Conservation Institute, 2007.
Hendriks, K., and J. Iraci. Care of Black-and-White Photographic Negatives on Film, revised. CCI Notes 16/3. Ottawa, ON: Canadian Conservation Institute, 2007.
Hendriks, K., and J. Iraci. Care of Black-and-White Photographic Prints, revised. CCI Notes 16/4. Ottawa, ON: Canadian Conservation Institute, 2007.
Hendriks, K., and J. Iraci. Care of Colour Photographic Materials, revised. CCI Notes 16/5. Ottawa, ON: Canadian Conservation Institute, 2007.
Hendriks, K., and J. Iraci. Processing Contemporary Black-and-White Photographic Films and Papers for Maximum Permanence, revised. CCI Notes 16/6. Ottawa, ON: Canadian Conservation Institute, 2007.
Image Permanence Institute (IPI). DP3: Digital Print Preservation Portal, 2014.
Image Permanence Institute (IPI), 2015.
Image Permanence Institute (IPI). Graphics Atlas, 2015.
International Organization for Standardization. ISO 18917:1999, Photography – Determination of Residual Thiosulfate and Other Related Chemicals in Processed Photographic Materials – Methods Using Iodine-amylose, Methylene Blue and Silver Sulfide. Geneva, Switzerland: International Organization for Standardization, 1999.
International Organization for Standardization. ISO 18918:2000, Imaging Materials – Processed Photographic Plates – Storage Practices. Geneva, Switzerland: International Organization for Standardization, 2000.
International Organization for Standardization. ISO 18916:2007, Imaging Materials – Processed Imaging Materials – Photographic Activity Test for Enclosure Materials. Geneva, Switzerland: International Organization for Standardization, 2007.
International Organization for Standardization. ISO 18911:2010, Imaging Materials – Processed Safety Photographic Films – Storage Practices. Geneva, Switzerland: International Organization for Standardization, 2010.
International Organization for Standardization. ISO 18934:2011, Imaging Materials – Multiple Media Archives – Storage Environment. Geneva, Switzerland: International Organization for Standardization, 2011.
International Organization for Standardization. ISO 18920:2011, Imaging Materials – Processed Photographic Reflection Prints – Storage Practices. Geneva, Switzerland: International Organization for Standardization, 2011.
International Organization for Standardization. ISO 18929:2012, Imaging Materials – Wet-processed Silver-gelatin Type Black-and-white Photographic Reflection Prints – Specifications for Dark Storage. Geneva, Switzerland: International Organization for Standardization, 2012.
International Organization for Standardization. ISO 18928:2013, Imaging Materials – Unprocessed Photographic Films and Papers – Storage Practices. Geneva, Switzerland: International Organization for Standardization, 2013.
Jürgens, M.C. The Digital Print: Identification and Preservation. Los Angeles, CA: Getty Conservation Institute, 2009.
Lavédrine, B., J.P. Gandolfo and S. Monod. A Guide to the Preventive Conservation of Photograph Collections. Translated by S. Grevet. Los Angeles, CA: Getty Conservation Institute, 2003.
Lavédrine, B., J.P. Gandolfo, J. McElhone and S. Monod. Photographs of the Past: Process and Preservation. Translated by J. McElhone. Los Angeles, CA: Getty Conservation Institute, 2009.
Library of Congress. Care, Handling, and Storage of Photographs, n.d.
McCabe, C., ed. Coatings on Photographs: Materials, Techniques, and Conservation. Washington, D.C.: Photographic Materials Group, American Institute for Conservation, 2005.
Nadeau, L. The Encyclopedia of Printing, Photographic and Photomechanical Processes: A Comprehensive Reference to Reproduction Technologies Containing Invaluable Information on Over 1500 Processes. Fredericton, N.B.: Atelier Luis Nadeau, 1989.
National Park Service. Conserv O Grams, Series 14: Photographs. Washington, D.C.: National Park Service, various dates.
Norris, D.H., and J.J. Gutierrez, eds. Issues in the Conservation of Photographs. Los Angeles, CA: Getty Conservation Institute, 2010.
Northeast Document Conservation Center (NEDCC). NEDCC Preservation Leaflets, n.d.
Pénichon, S. Twentieth-Century Color Photographs: Identification and Care. Los Angeles, CA: Getty Conservation Institute, 2013.
Reilly, J.M. Care and Identification of 19th-Century Photographic Prints. Kodak Publication G-2S. Rochester, NY: Eastman Kodak Company, 1986.
Reilly, J.M. IPI Storage Guide for Acetate Film. Rochester, NY: Image Permanence Institute, 1993.
Reilly, J.M. Storage Guide for Color Photographic Materials. Albany, NY: University of the State of New York, New York State Education Department, New York State Library, the New York State Program for the Conservation and Preservation of Library Research Materials, 1998.
Ritzenthaler, M.-L., and D. Vogt-O’Connor. Photographs: Archival Care and Management. Chicago, IL: Society of American Archivists, 2006.
Roosa, M. Care, Handling and Storage of Photographs. Revised and updated by A. Robb. International Preservation Issues 5. Paris, France: International Federation of Library Associations and Institutions Core Activity on Preservation and Conservation, 2004.
Stulik, D., and A. Kaplan. The Atlas of Analytical Signatures of Photographic Processes. Los Angeles, CA: Getty Conservation Institute, 2013.
Tétreault, J. Airborne Pollutants in Museums, Galleries, and Archives: Risk Assessment, Control Strategies, and Preservation Management. Ottawa, ON: Canadian Conservation Institute, 2003.
Valverde, M.F. Photographic Negatives: Nature and Evolution of Processes . Rochester, NY: Mellon Advanced Residency Program in Photographic Conservation, 2005.
Wagner, S., C. McCabe and B. Lemmen. Guidelines for Exhibition Light Levels for Photographic Materials (PDF format). Washington, D.C.: National Park Service, n.d.
Wilhelm, H., and C. Brower. The Permanence and Care of Color Photographs: Traditional and Digital Color Prints, Color Negatives, Slides, and Motion Pictures. Grinnell, IA: Preservation Publishing Co., 1993.
Wilhelm Imaging Research, n.d.
Williams, R.S. Display and Storage of Museum Objects Containing Cellulose Nitrate. CCI Notes 15/3. Ottawa, ON: Canadian Conservation Institute, 1994.
Glossary
* Some terms (e.g. calotype and daguerreotype) designate both the process and the resultant image.
- Autocatalytic reaction
- Chemical reaction occurring without outside stimulation. A reaction where the product of the reaction acts as a catalyst for a further or continuing reaction.
- Antihalation dye
- A dye incorporated into the anticurl layer on the base material of a photographic film. The dye is designed to absorb light that would otherwise be reflected back into the already exposed emulsion and would cause halation or a blurring of the photographic image. During the processing of the film, the dye is rendered colourless or washed out.
- Baryta coating
- A coating of barium sulfate in gelatin applied as the foundation to fibre-based photographic printing papers (i.e. non-resin-coated). It is an interlayer between the emulsion and the paper.
- Calotype*
- The first viable negative/positive process, invented by W.H. Fox Talbot in 1839. The paper was coated with silver iodide and a solution of silver nitrate and processed in gallic acid following exposure. The process was perfected by photographers in France during the 1840s.
- Cased photograph
- Images that were placed in small cases, usually daguerreotypes, ambrotypes and tintypes. It is a continuation of the tradition of placing portrait miniatures in small cases designed to be held in the hand and easily transported.
- Cellulose acetate
- Acetate safety films were first introduced in the early 1900s. The various types include diacetate and triacetate, which are often difficult to distinguish from one another.
- Cellulose nitrate
- Cellulose nitrate, developed in the 1880s, was the first flexible film support. It was highly flammable and often very chemically unstable. It was replaced by "safety" film, cellulose acetate, in the 1920s, although it continued to be produced until 1950.
- Collodion wet plate
- Although experimented with by several people, Frederick Scott Archer (1813–1857) from Britain was the first to use collodion successfully in photography, publishing his work in 1851. Cellulose nitrate in the form of collodion, combined with, first, iodide and, at times, bromide salts, was poured over a glass plate, which was completely transparent, flat and very smooth. While still damp, but not dry, the plate was sensitized in a bath of silver nitrate, resulting in the formation of light-sensitive silver iodide. Again while still damp, the plate was exposed in the camera, hence the name wet plate, followed by development and fixing.
- Crayon enlargement/Solar print
- A photographic print, typically a portrait, in which the image has been enlarged using a solar enlarger onto paper and then reinforced with pastels or an airbrush.
- Daguerreotype*
- Daguerreotypes were the first practical and commercial photographic process, introduced by Louis Daguerre in 1839. The light-sensitive material consisted of silver iodide deposited on a polished silver-plated copper base. A positive image was produced by camera exposure and mercury development, which turned light-struck halides grey-white. The image was made permanent by immersing the plate in a solution of sodium chloride. The images are generally extremely sharp and clear but also very vulnerable to physical damage.
- Developing-out paper (DOP)
- Developing-out paper is sensitized paper that is exposed in the darkroom to a projected negative image or in contact with a negative. The light exposure is very brief, creating a latent image which is then chemically developed in a developer bath. Once the image appears while in the developer bath, it is then placed in a fixer bath which removes the light-sensitive salts that have not been exposed to light.
- Gelatin
- Gelatin is a natural protein used as a transparent medium to hold light-sensitive silver halide crystals in suspension, binding them to the printing paper or film. In aqueous solutions, it swells to allow the entry of photographic processing chemical solutions.
- Gelatin dry plate
- Gelatin dry plate is a term used to describe gelatin-coated glass plate negatives in the days when wet collodion glass plate negatives were in use. In contrast to wet plates, dry plates could be purchased pre-sensitized, exposed in a camera and then processed at a later time. They were available until the late 1990s for scientific photography because they were very dimensionally stable.
- Heliograph
- The word itself was coined by Joseph Nicéphore Niépce, who made the first known permanent photograph, View from the Window at Le Gras (circa 1826). The process used bitumen of Judea, a naturally occurring asphalt, as a coating on glass or metal. It hardened in proportion to its exposure to light. When the plate was washed with oil of lavender, only the hardened areas remained.
- Hypo clearing agent
- Pre-wash for photographic prints to assist in the removal of photographic fixer, significantly reducing wash times. It is primarily made up of sodium sulfite.
- Image silver
- Metallic silver that composes photographic images in conventional black-and-white silver halide photography. Silver salts that have been reduced to metallic silver upon exposure to light. This also refers to the image.
- In-camera positive
- A positive image created in a camera. An in-camera positive is a unique item, as there is no negative. Examples include tintypes, ambrotypes, autochromes, slides and diapositives, and Polaroids, both "peel-apart" and SX70 prints.
- Lantern slide
- Small positive transparent image on a glass support that can be projected onto a screen using a magic lantern. Lantern slides were introduced in the 1840s and were made from negatives, either by contact or enlargement. The silver image emulsion on the lantern plate can be made from albumen, collodion or gelatin binders. Standard plate sizes from Britain were 3 1/4 in. x 3 1/4 in. (82 mm x 82 mm) and from the United States, 3 1/4 in. x 4 1/4 in. (82 mm x 102 mm). Both sizes would have been found in Canada.
- Oxidation
- A chemical process where a compound combines with oxygen to form a different compound. The oxidation of photographic image silver results in the formation of more stable silver compounds such as silver sulfide. Consult Caring for paper objects – Deterioration of paper for information on the oxidation of cellulose.
- Photographic activity test (PAT)
- A PAT is based on a worldwide standard (ISO 18916:2007, Imaging Materials – Processed Imaging Materials – Photographic Activity Test for Enclosure Materials) that is used for determining archival-quality in photographic enclosures. Developed by the Image Permanence Institute, this test predicts possible interactions between photographic images and the enclosures in which they are stored. The PAT is also used to test the components of enclosures, such as adhesives, inks, paints, labels and tapes. The test involves incubating materials in temperature- and humidity-controlled chambers to simulate aging and takes from four to six weeks to complete. After incubation and sample evaluation, a final report is provided on the stability of the materials. It also refers to a reactivity test.
- Printing-out paper (POP)
- Paper that is sensitized with a light-sensitive salt such as silver nitrate, placed in contact with a transparent negative and exposed to daylight. The image develops strictly due to the action of light on the light-sensitive salt. No chemical development is required; however, a fixing bath is necessary to dissolve the silver salts that have not been exposed to light. Other sensitizing agents include platinum salts (platinotypes) and iron salts (cyanotypes).
- Sodium thiosulfate
- Photographic fixer used to remove unexposed silver halides (i.e. light-sensitive silver salts).
- Subbing layer
- Layer of gelatin and/or various polymers that act to adhere photographic negative emulsions to their bases, either plastic or glass.
- Supercoat
- Protective layer of hardened gelatin applied over the photographic emulsion. A supercoat can be found on both prints and negatives.
- Vinegar syndrome
- Vinegar syndrome refers to the process of decomposition of cellulose diacetate and triacetate. High temperature and particularly high humidity catalyze the decomposition of acetate, also referred to as deacetylation. The distinct vinegar odour of this phenomenon is produced when acetate ions react with moisture to form acetic acid.
© Government of Canada, Canadian Conservation Institute, 2018
Published by:
Canadian Conservation Institute
Department of Canadian Heritage
1030 Innes Road
Ottawa, ON K1B 4S7
Canada
Cat. No.: CH57-4/6-12-2018E-PDF
ISBN 978-0-660-28017-2