
ROE Web payroll extract guide
On this page
- Introduction
- Section 1 - Uploading a Payroll Extract File
- Section 2 - Viewing the Status of Your ROE Payroll Extract Submission
- Section 3 - Printing Issued ROE(s)
- Section 4 - Submitting Passed ROE(s)
- Section 5 - Viewing and Correcting Failed ROE(s)
- Section 6 - Importing ROEs that were issued through a ROE Payroll Extract File
- Section 7 - Amending ROEs that were issued through a ROE Payroll Extract File
- Section 8 - Deleting Issued ROEs
- Section 9 - Looking for Newer Versions of Stored Pages
Note: Screens may change from the way they look.
As the Record of Employment (ROE) Web system is enhanced, some of the screens may change from the way they look in this guide.
Introduction
The ROE Payroll Extract option allows you to submit large numbers of ROEs to Service Canada in files extracted from your internal payroll information systems. You can also transfer multiple files at the same time.
Once submitted, the ROEs are validated automatically. You will be able to view whether or not the ROEs passed the validation rules. Those that have passed will be given a serial number starting with the letter W. If a ROE has not passed, you will be able to see where an error was made and correct it accordingly.
This user guide does not explain how to program ROE Web Payroll Extract functionality into your company’s payroll system. For more information, please visit the User Requirements for the Record of Employment on the Web.
Please note this user guide does not explain how to fill out a ROE form. For that information, please select the How to Complete a ROE menu link from the ROE Web application.
Section 1 - Uploading a Payroll Extract File
1.1 Choose the I want to Upload a Payroll Extract File option, which is the second Quick Link on the ROE Web Main page.
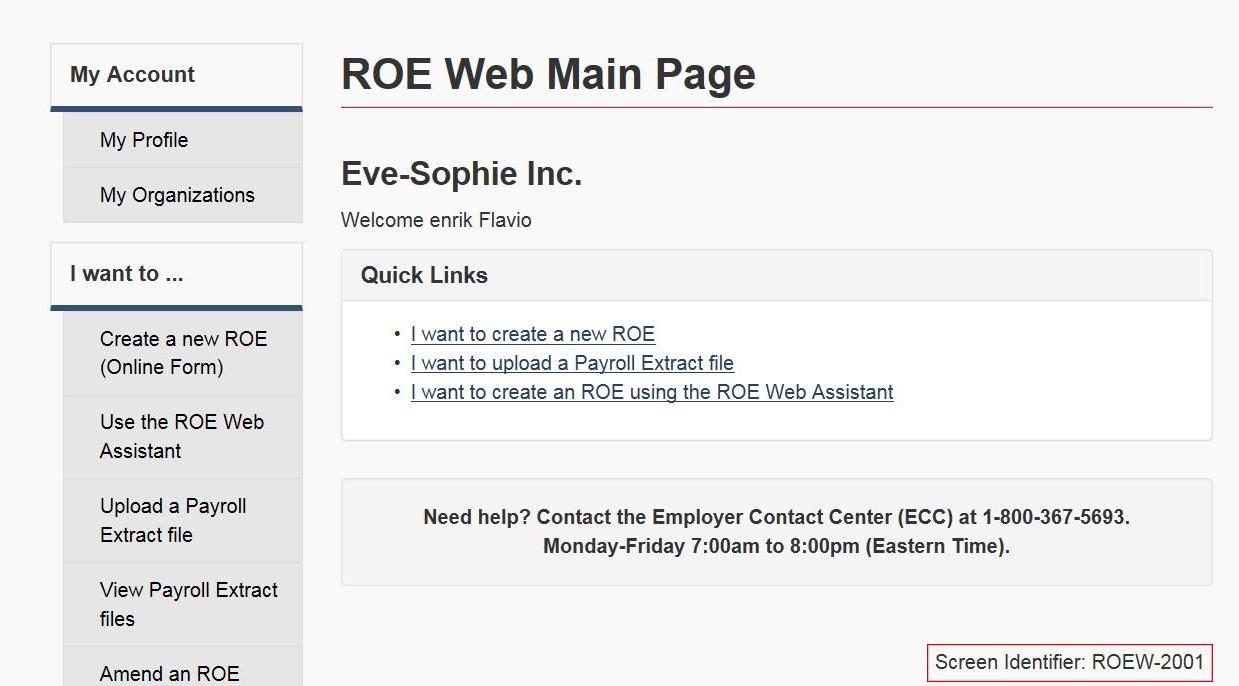
Text description of Figure 1:
The ROE Web Main Page includes the Quick Links as well as the My Account, I want to… and Help and Support menu options
1.2 ROE Web users are presented with the Personal Information Collection Statement (PICS) when their ROE Web user profile is created. If you wish to read the PICS after your ROE Web profile is created, simply select the link Personal Information Collection Statement (PICS) displayed at the top of each ROE Web page on which personal information is collected from users.
1.3 For security reasons, a ROE-Web session can only stay inactive for a maximum of 18 minutes. When there are two minutes remaining on the session, an alert will pop up asking the user to choose the OK button if he wishes to continue working in ROE-Web. If the user chooses the Cancel button or OK after the 2 minutes has expired, he or she will have to log back in to the application.
1.4 Once you select the I want to Upload a Payroll Extract file link, the Upload ROE Payroll Extract File screen will appear.
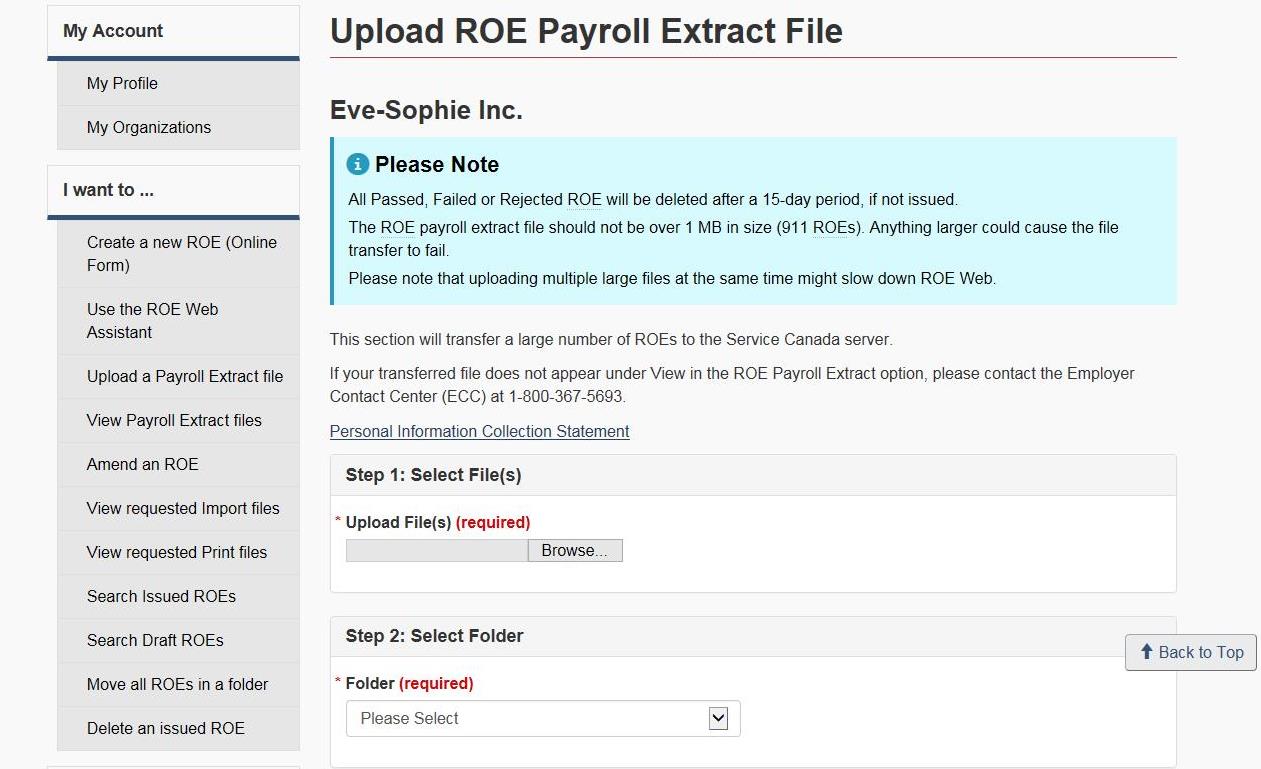
Text description of Figure 2:
The Upload ROE Payroll Extract File is where users upload an XML file into ROE Web.
1.5 Step 1 - Select File
Select the Browse button in order to locate the ROE Payroll Extract File you wish to upload on your computer. Select the file to be uploaded and select the Open button.
Users can now upload up to 10 Payroll Extract files at once. In order to upload multiple files, use the Ctrl button when selecting multiple files from your computer.
1.6 Step 2 - Select Folder
This step only appears if the user has access to at least one folder within an organization.
Choose from the following options in the drop-down menu:
- No folder or folder specified in Payroll Extract File (default option); or
- Any folder you have access to from the list.
If the folder code is missing or empty, the ROE will be issued as if no folder was chosen. If a payroll extract contains a folder ID which is now inactive or invalid, the ROE will not be submitted and will be displayed in the Rejected column. Choosing the hyperlinked number in the Rejected column will display the reasons for the reject (Folder Inactive, Folder Invalid or BN (Business Number) Invalid). Refer to section 2.6 on Rejected ROEs for more information.
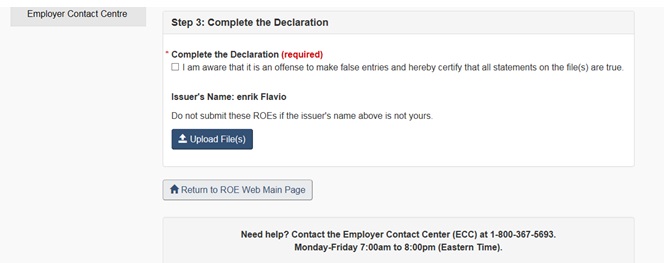
1.7 Step 3 - Complete the declaration
In order to upload a Payroll Extract File, you must also attest to the trueness of the data, as well as confirm you are the user named on this screen. This is done by checking the appropriate box at the bottom of the screen. If you do not check this box, an error message will appear advising that you must attest to the information by checking the box in order to issue the file.
Choosing the Upload File button at the bottom of the screen will begin the transmission. The Upload ROE Payroll Extract File - Confirmation screen is displayed with the message “Thank you for submitting your Payroll Extract File(s). Please click on View Progress link to see the status of your ROEs”.

Text description of Figure 3:
A Confirmation of Upload message is presented to the user when the file upload is completed
1.8 To submit another file, select the I want to Upload a Payroll Extract File link another time. You may also select the Upload a Payroll Extract file option from the left hand side menu follow the procedure described above. Repeat as often as required for every ROE Payroll file you wish to upload.
Section 2 - Viewing the Status of Your ROE Payroll Extract Submission
This section explains how to view if the ROE Payroll Extract file you uploaded was submitted successfully.
2.1 To view the status for each file uploaded, select the View Payroll Extract files option from the left hand side menu.
2.2 The most recent file uploaded appears at the top of the list.

Text description of Figure 4:
The View ROE Payroll Extract Files screen displays the files that have been uploaded
Note: View ROE files
You can view any ROE file that you have uploaded by choosing a page number to be brought directly to that page. You may also use the Filter Items field located at the top of the table where you can enter the name of your Payroll Extract file which will then appear in the table.
2.3 Column headings and their descriptions
- File Name: Shows the names of the files that you have transmitted via ROE Web.
- Date of Transfer: Shows the date each file was transferred.
- Status: Indicates the status of the file as it is being transmitted.
- Total of ROE: Indicates the total number of ROEs in the file sent.
2.4 Statuses and their descriptions
- Received: Your file has been received and is waiting to be processed.
- Processing: Your file is being validated.
- Process Completed: Your file has been processed and is available under View.
- Invalid File: Your file has been processed but the format is invalid - you will have to reopen the file and review it for possible errors. For example, you have not used a “RP” extension in the Business Number included in the XML file.
- Transfer Failed: Please re-send your file - you will have to reopen the file and review it for possible errors.
2.5 Actions which can be performed on the screen
Choosing the blue Update Status button will update the table with the latest information.
Choosing a hyperlinked file name will display the View ROE Payroll Extract Files screen which has two sections: the File Summary and the File Contents.

Text description of Figure 5:
The View ROE Payroll Extract Files page allows users to see their File Summary and their File Contents
Choosing one of the hyperlinked statuses will display the File Summary for the selected status.
Once the user chooses one of the hyperlinked statuses, ROE Web will verify if the user has access to the ROEs within that specific status (ROE Issued, ROE Passed, ROE Failed and ROE Rejected). If the number/total contains ROEs for which the user does not have access to (because he does not have access to the BN or the folder), those ROEs will not be displayed in the summary.
The File Contents section tells you exactly how many ROEs are in each status:
- The number of ROEs Issued displays the number of ROEs that were successfully validated and submitted.
- The number of ROEs Passed displays the number of ROEs that were successfully validated and saved as a draft.
- The number of ROEs Failed displays the number of ROEs that contain at least one error and need to be corrected.
- The number of ROEs Rejected displays the number of ROEs that were submitted with an invalid or missing Canada Revenue Agency (CRA) BN.
You can also import your files. The Import All button at the bottom of the screen allows you to create a file with the serial numbers of the ROEs you sent in a particular ROE Payroll Extract file. It allows you to go back and amend any ROEs from a ROE Payroll Extract file that may contain errors. You can obtain more information in Section 6 - Importing ROEs that were issued through a ROE Payroll Extract File.
2.6 Rejected ROEs
One of the reasons ROEs can reject is that a user tried to submit a ROE to a BN or folder to which they do not have access. Those Rejected ROEs are saved without business information since ROE Web is only aware of which businesses the user has access to. You cannot view individual ROEs that have been rejected; you can only view the SIN, Employee Name and Payroll Reference Number of Rejected ROEs.
2.6.1 Reason for Rejection Messages
When viewing the records which were rejected during the upload of a Payroll Extract File, users are now presented with an additional column that provides an explanation of why the record was rejected.
Records are rejected when they contain non-recoverable errors, such as attempting to amend a SIN, when access is denied to the Business or Folder referenced, when the SN being amended has previously been amended or when the SN being amended does not exist or is not accessible to the user.
Note: List of SINs/Names and Payroll Reference Numbers
Only the user who submitted the payroll extract file can see the list of SINs/Names and Payroll Reference Numbers in that file.
2.7 Actions to be performed on the File Contents screen
From the File Contents Screen of Passed ROEs, Issued ROEs and Failed ROEs, you can perform the following actions.
- Select All: Places a checkmark next to all the ROEs displayed on the current page.
- Clear Selection: Clears the previously selected ROEs.
- Import: Allows you to import your ROEs.
- Move to folder: Allows you to move the selected ROEs to a specific folder.
- Print: Allows you to print single or multiple ROEs.
- Print Options: Allows you to select the language of the ROE(s) to be printed as well as if the information found on page 2 of the ROE should be printed or not. The back page of the ROE contains useful information for people applying for Employment Insurance (EI) benefits.
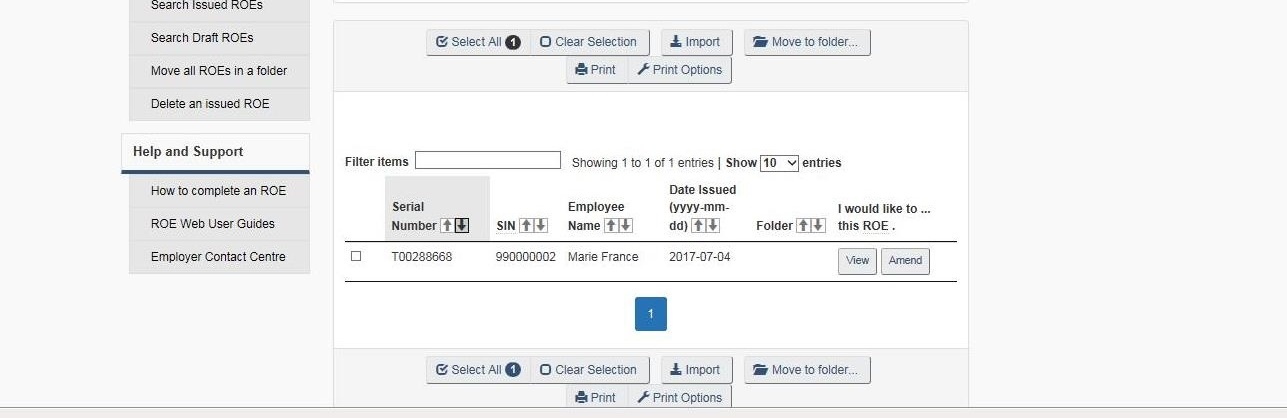
Text description of Figure 6:
The File Contents screen allows users to:
- Select All;
- Clear Selection;
- Import;
- Move to folder; and
- Print ROEs
Section 3 - Printing Issued ROE(s)
3.1 Print Options and Print button
On the File Content screen of a selected status, choose the Select All Current button to select all the ROEs displayed on the current page or select individual ROEs by placing a checkmark in the far left column. You now have the ability to select ROEs from different pages and you can also select more than 50 ROEs to print at a time.
After selecting the ROEs you wish to print, choose the Print Options button if you wish to select the language in which the ROE(s) will be printed or if you wish to print the back page of the ROE. Select the Print button.
The File Download window will appear. Select Open to view the ROEs in a PDF format. You may also select Save the ROEs on your computer or Cancel the report.
Text description of Figure 7:
The ROE Issued page shows a list of all ROEs issued in the Payroll Extract file.
The PDF version of a ROE looks exactly like the paper form ROE and all the selected ROEs will appear in PDF on the same screen. Choose the Print icon on the toolbar at the top of your screen to print the ROEs.
Note: File contains more than 50 ROEs
If your file contains more than 50 ROEs or if you have selected more than 50 ROEs to print, you will be redirected to the View Requested Print files page where your Print Request will be available for a period of 7 days.
Section 4 - Submitting Passed ROEs
4.1 The File Content screen for ROE Passed will display all the ROEs that have passed the validations but have been saved as drafts.

Text description of Figure 8:
The ROE Passed page shows a list of all Draft ROEs in the Payroll Extract file that passed the ROE validations.
4.2 You can select all the drafts ROEs or just those you wish to send on the ROE Passed page. To submit only a portion of the Passed ROEs in the file, place a checkmark in the appropriate boxes of the table (far left column). To send all the ROEs, choose the Select All button which will place a checkmark in the boxes beside all the ROEs currently displayed on the screen.
Choose the Submit Selected option after you have checked the box by which you attest of the trueness of the data being sent and confirm that you are the user named on the screen to submit the ROEs to Service Canada. Repeat this process if the file contains more than 50 draft ROEs, as only 50 ROEs can appear on the screen at one time.
4.3 If the draft ROE is error free, it will be submitted successfully. Please note that a serial number beginning with the letter W will be assigned to the ROE. Choose the Print button if you wish to view and/or print the ROE.
4.4 You can also edit a ROE from this page by choosing the Edit button for the appropriate SIN.
Section 5 - Viewing and Correcting Failed ROE(s)
5.1 From the View Payroll Extract Files screen, the number of ROE(s) that have failed the validations will appear under the ROE Failed heading (under File Contents).

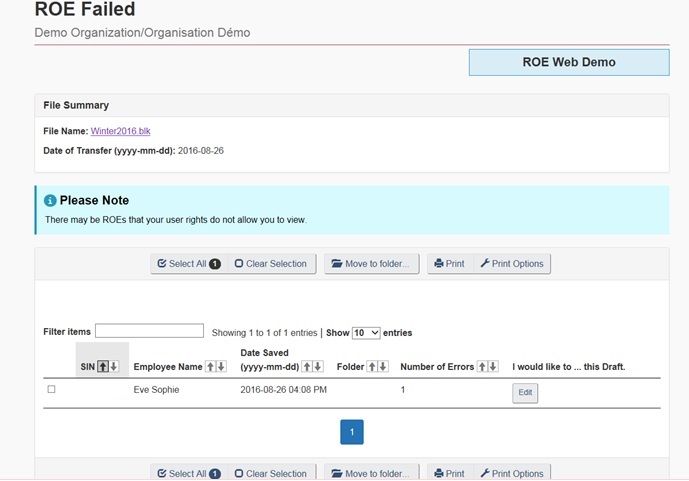
Text description of Figure 9:
The View ROE Payroll Extract Files page allows users to see their File Summary and their File Contents (ROE Failed).
5.2 If the number of failed ROE(s) is not zero (0), choose the appropriate hyperlinked number next to “ROE Failed” and the ROE - Failed screen will appear.
Text description of Figure 10:
The ROE Failed page shows a list of all ROEs that failed in the Payroll Extract file.
The Number of Errors column indicates how many errors are on the ROE. Choose the Edit button for the ROE you wish to correct and the ROE Online Form will appear on the screen.
All ROE fields that failed the ROE validation will be marked in red at the top of the ROE Online Form itself.
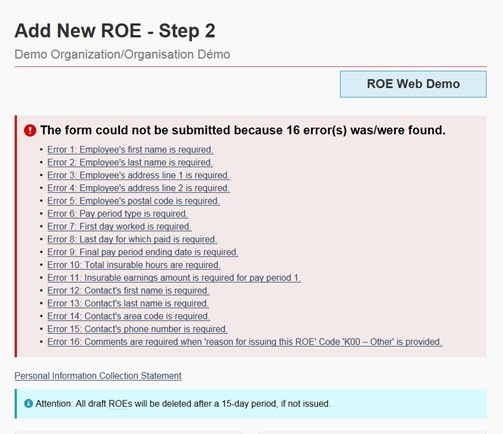
Text description of Figure 11:
ROE Web lists all errors on a ROE
5.3 Choosing the link of one of the error will bring you directly to the field containing the error. Details of the error will appear in red in the box itself.
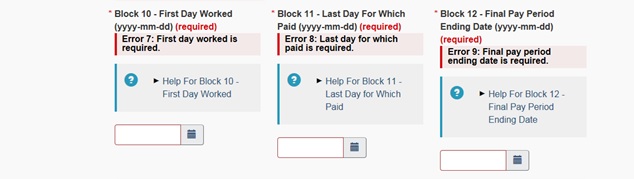
Text description of Figure 12:
The errors are also shown on the specific blocks of the ROE
5.4 If the ROE passes all the validations, choose the Submit at the bottom of the page in order to submit the ROE. Once you have successfully resubmitted the ROE, a serial number (starting with a W) will be assigned to the ROE.
Section 6 - Importing ROEs that were issued through a ROE Payroll Extract File
6.1 As mentioned in Section 2.5 above, the Import All feature on the View ROE Payroll Extract files screen helps users amend ROEs they have already submitted via ROE Payroll Extract files if the payroll software they use enables them to do so. With this feature, users can display the details of any ROE(s) they submitted in a ROE Payroll Extract file, whether the ROE was issued a serial number, was saved as a draft, failed or was rejected.
6.2 Employers may also import all or some Serial Numbers of ROEs they have issued by choosing the Import button on the ROE Issued screen. In order to import one or a few ROEs issued, place a checkmark in the appropriate boxes to the left of the table. In order to import all ROEs, select the Select All button which will place checkmarks next to all the ROEs on the screen. Select the Import button.

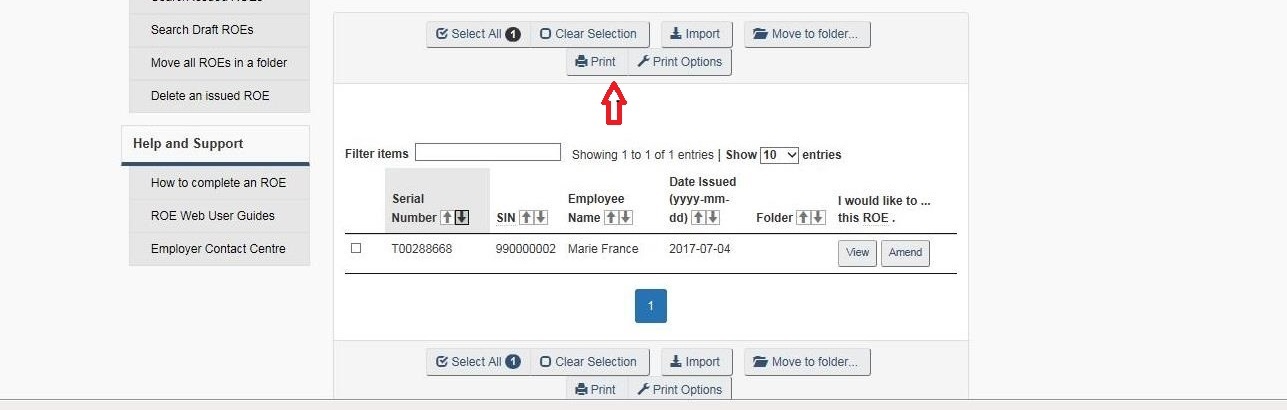
Text description of Figure 13:
The ROE Issued page shows a list of all ROEs issued in the Payroll Extract file.
An arrow in this image points to the Import button that is used for downloading ROEs.
Choosing the Import button will display the File Download window. Select Open to view the ROEs in a PDF format. You may also select Save the ROEs on your computer or Cancel the report.
6.3 Once you have chosen the Open button, the XML file(s) of the ROE(s) will be displayed. The example below shows one ROE that have been issued, therefore the Issued Count equals “1”. It also shows eight (8) pieces of information from the ROE, including: Serial Number, Date Issued, Business Number, SIN, First Day Worked, Last Day for Which Paid, Final Pay Period End Date and Total Insurable Earnings.
Note: How this information is used depends on if the type of payroll software you use allows you to amend ROEs that were issued by a ROE Payroll Extract file.
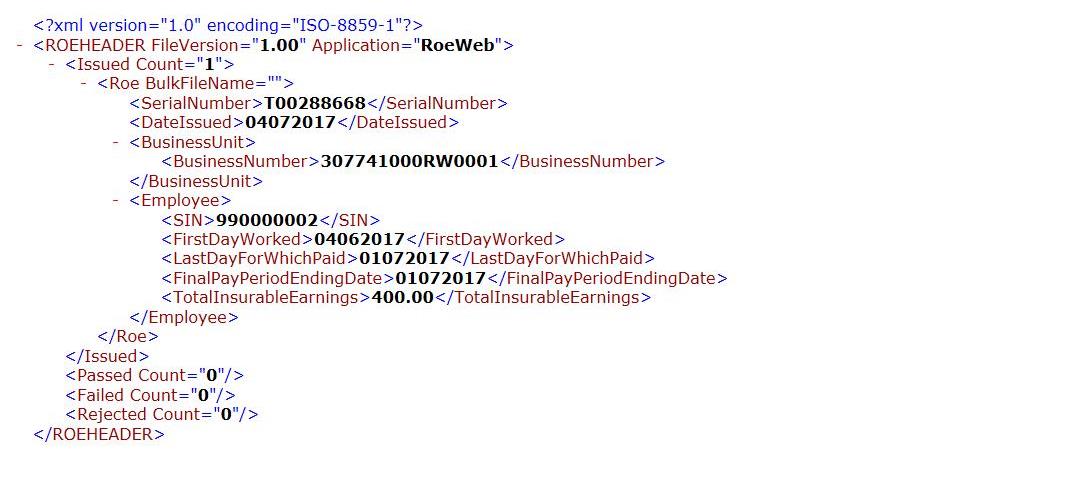
Text description of Figure 14:
A sample of an XML code file.
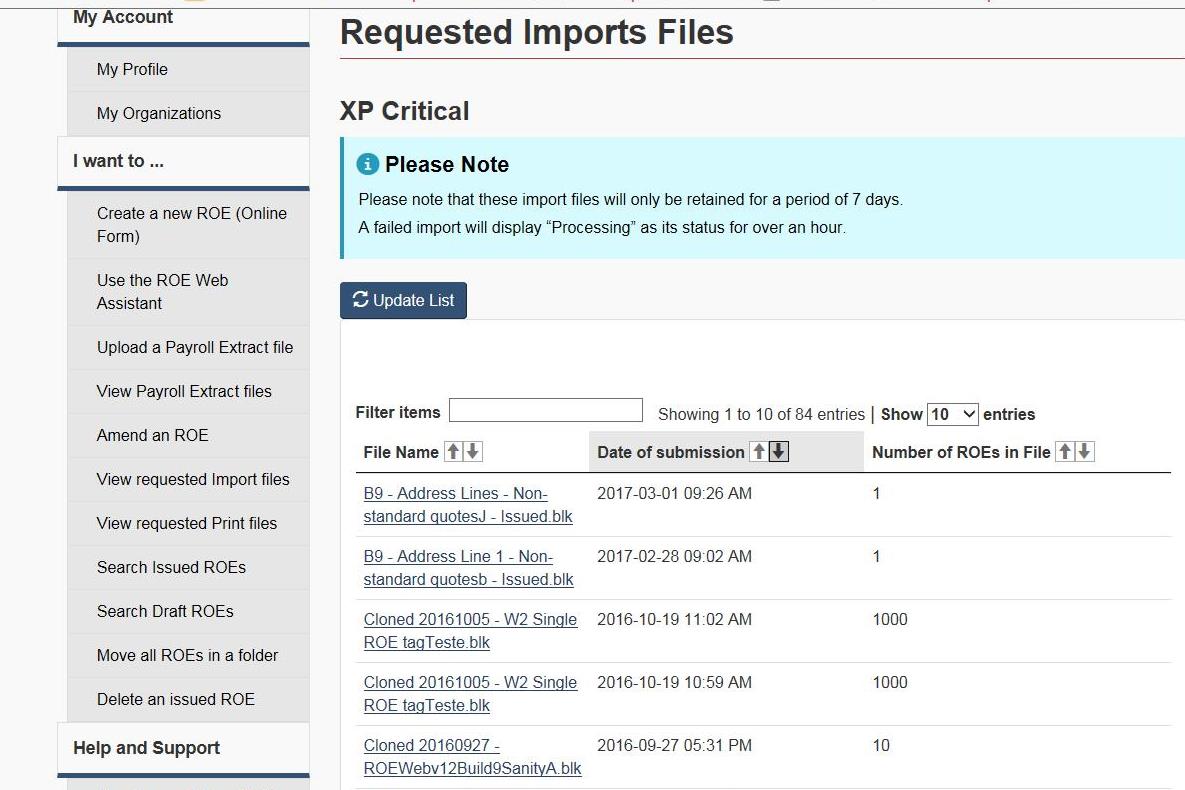
6.4 Requested Import Files Page
Each time a user requests to import ROEs, that import request will be available on the View Requested Import files for a period of seven (7) days. This page can be accessed from the left hand side menu.
Text description of Figure 15:
The Requested Imports Files page shows all Import files requests in the last seven days.
Section 7 - Amending ROEs that were issued through a ROE Payroll Extract File
Invariably there will come a time when a ROE you submitted needs to be amended either because you have received new information or a mistake was made that was not detected by the system. ROE Web lets you amend a ROE whenever necessary.
Users can use the ROE Web online form in order to amend ROEs issued by a ROE Payroll Extract file.
To amend an existing ROE, choose the Amend button for the appropriate ROE on the ROE Issued screen. Only ROEs for which a serial number was assigned can be amended. You may also use the Amend a ROE button available in the left hand-side menu which will direct you to the Search ROE Issued page where you can search for the ROE you wish to amend.

Text description of Figure 16:
The ROE Issued page shows a list of all ROEs that were issued in the Payroll Extract file.
An arrow in this image points to the Amend button that is used to amend a ROE.
The ROE form for the chosen ROE will be displayed.
Note:
If employers need to amend ROEs submitted in formats that have been decommissioned on August 31, 2016, they will have to do so using the 53-week Online Form, the 53-Week ROE Web Assistant or Version 2.0 of the Payroll Extract file. This means that employers will have to provide the equivalent of 53 weeks of pay period information in Block 15C of the ROE.
Section 8 - Deleting Issued ROEs
8.1 Introduction
ROE Web now provides users with the ability to delete ROEs meeting the following criteria:
- ROEs issued by ROE Web;
- ROEs that have not been used in the calculation of an EI claim;
- Original ROEs that have not been amended or are amendments;
- ROEs that have not been corrected by Service Canada
- ROEs that have been issued within 3 months of performing the search to delete the ROE; and
- Only the user who submitted the ROE to be deleted can delete it.
8.2
In order to delete a ROE, select the Delete an Issued ROE option from the left-hand side menu. The Search for a ROE to Delete page will appear.
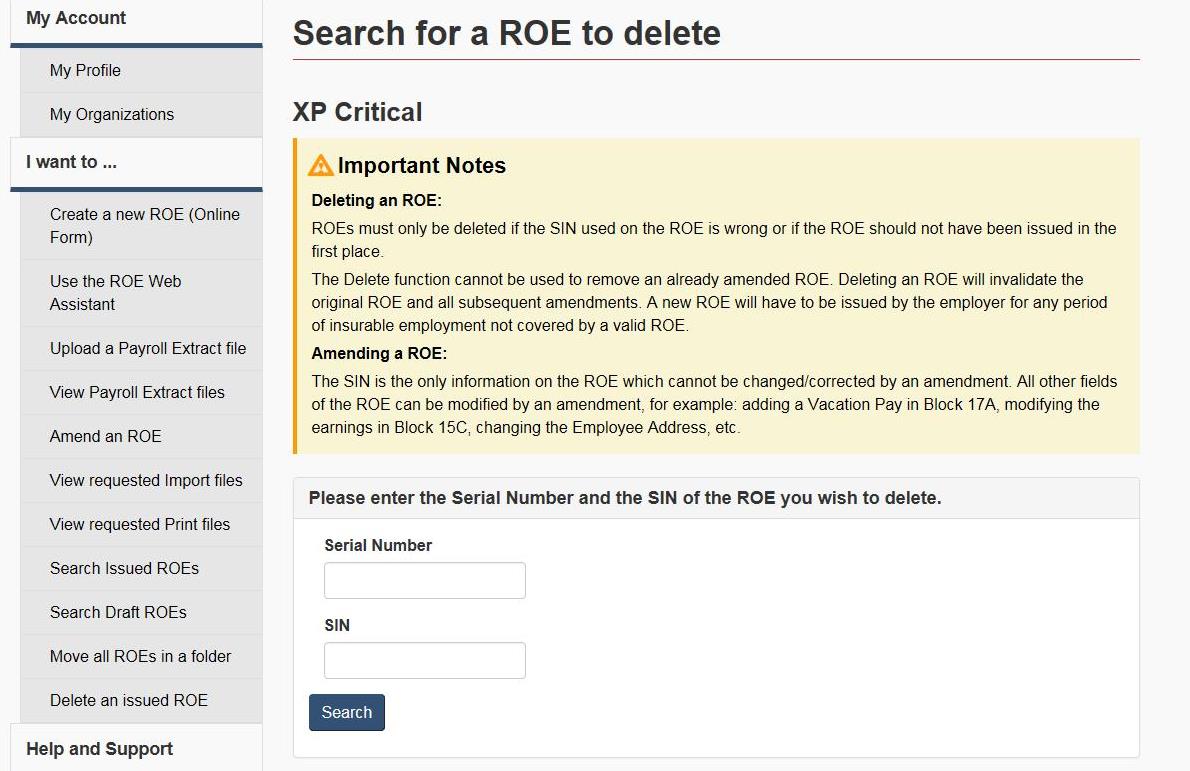
Text description of Figure 17:
The Search for a ROE to delete page allows users to input the Serial Number and the SIN of the ROE they wish to delete.
Once the Serial Number and SIN of the ROE to delete is entered and that the user has selected the Search button, ROE Web will present the ROE if it meets all of the criteria outlined above.
The user can then review the ROE information to ensure that it really must be deleted. A reason must be selected in the drop down menu at the bottom of the page. The reasons available are:
- The ROE was submitted with the wrong SIN;
- The ROE was submitted in error;
- The employee has a new SIN; and
- Other (please enter the reason).
If the user selects “Other”, a reason must be entered in the text box provided to that effect.
Note:
Deleting a ROE can have serious consequences on EI claims. Therefore, if you need to modify information on the ROE, ensure that you are amending the ROE instead of deleting it.
8.3
ROE Web will delete the ROE if it meets the criteria listed above. If the ROE does not meet one or more of the criteria listed above, the user will be presented with a message informing him that the ROE cannot be deleted and that they can contact the Employer Contact Centre (ECC) should they wish to obtain additional information.
Section 9 - Looking for Newer Versions of Stored Pages
When a Web page is viewed, data is cached in the Temporary Internet Files folder. This determines how Internet Explorer checks whether it has the latest version of a cached file when the user returns to a previously viewed page. If a user experiences problems printing a ROE or if old information is displayed while preparing a ROE, the user must look for newer versions of stored pages.
The procedure will depend on which browser version is used.
9.1 Internet Explorer 9 or higher
- On the menu bar, click on Tools and select Internet Options.
- On the General tab of the Internet Options dialogue box, click on the Settings button in the section Browsing history.
- On the next dialogue box, select the option Every visit to the webpage.
- Click on OK and on OK again.