
Emergency Treatment of Water-damaged Paintings on Canvas – Canadian Conservation Institute (CCI) Notes 10/5
In the event of an emergency, call a conservator as soon as possible. Survey the affected area to assess the situation and ensure personal safety, and undertake procedures to prevent further damage.
A condensed plan of action has been provided in an Appendix to this Note. It can be copied and posted in an accessible location to use during an emergency.
Introduction
Water can cause serious damage to a collection of paintings. It is usually the result of leaking or burst water pipes, flooding, sewer back-ups or efforts to extinguish a fire. Because, for most paintings, exposure to water may immediately cause damage as well as predispose the artwork to short or long-term damage, every possible precaution should be taken to eliminate this risk.
The effects of water contact may not occur immediately but may take minutes to hours to develop. Simple air drying may not be suitable for most wet paintings because layers will react at different rates, and paint flaking and loss are likely. Thus, it is important to deal with water-affected paintings through immediate controlled drying. Because water-damaged paintings are likely to be in an extremely vulnerable state, contact a conservator as soon as possible. However, if expert assistance is not available, non-conservators can carry out the specific emergency procedures outlined here.
This Note describes actions that can reduce the immediate effects of water damage. The steps below, summarized in a condensed plan of action at the end of this Note, can be followed in an emergency situation. The information provided can also be used to help prepare an emergency response plan tailored to your institution's collection.
Background: emergency preparedness
We strongly recommend putting an emergency preparedness policy and disaster plan in place before an emergency or disaster occurs (see CCI Notes 14/1 Emergency Preparedness for Cultural Institutions: Introduction and 14/2 Emergency Preparedness for Cultural Institutions: Identifying and Reducing Hazards). Considering the devastating effect water has on a collection of paintings, it is wise to take all measures to prevent an occurrence from happening or to reduce its effects. It is therefore important to be prepared with supplies and a plan of action that includes personnel contact numbers, roles and responsibilities; a current list of suppliers; and sources of disaster-recovery equipment.
Organization and planning are essential to effectively recover collections.
The effects of water on paintings
The most significant risks are the expansion, shrinkage and subsequent deformation of painting supports, as well as flaking and loss of image layers.
Commonly used painting supports that react to moisture include canvas, wood, hardboard and laminated card. Canvas supports can shrink dramatically when wet, causing paint and ground layers to crack, buckle and flake off. Wood products can swell and warp. The layers of laminated cards can separate and distort. Wooden stretchers will also swell and may warp, possibly causing distortions and tears in the canvas. Ground and paint layers can swell in the presence of water and then separate from the underlying canvas. Paint and varnish surfaces can also blanch. Some binders are water-sensitive and can dissolve. Wooden frames swell, and water-sensitive layers and ornamentation on frames can be lost. There is also a significant risk that mould will develop in warm, damp conditions, especially if the paintings, stretchers and frames are slow to dry.
The first steps in salvage from flood
Refer to your institution's disaster plan for specific guidance.
1. Emergency response
Call in the emergency response team and begin emergency safety procedures to ensure that no harm comes to the individuals involved in the recovery (e.g. check for electrical hazards and gas leaks from ruptured pipes; ensure that the area is physically safe to enter; inform oneself of potential health hazards such as mould and contaminated water; obtain protective clothing, close-fitting vinyl or nitrile gloves and appropriate personal protective equipment [PPE]).
Define and outline the roles of each team member. (Emergency authorities will not allow you to enter the building until they have declared it safe.)
2. Contact a conservation professional for advice and possible assistance
3. Move affected paintings to a dry place
When lifting a painting, tilt it to allow excess water to drain off.
Observe safe handling practices. Hold paintings with both hands. Two people should carry large paintings. Avoid touching paint or canvas surfaces or a frame's decorative moldings. Make sure that the route is clear, and prepare a location for temporary placement (e.g. a dry surface or a safe, dry location where the painting can lean against a wall, raised on padded blocks; see CCI Notes 10/13 Basic Handling of Paintings and 10/2 Making Padded Blocks).
The temperature in this location should be relatively cool, and the relative humidity (RH) should be moderate (e.g. 40–60% RH).
4. Stabilize paintings while drying tables are prepared
Manually remove loose debris that may be caught on the surface of the painting, taking care not to remove any paint.
If the frame of a painting is actively distorting (twisting), or if the wooden stretcher of an unframed painting is actively distorting, the corners will need to be weighted to prevent twisting. Lay the painting face up on a clean, flat surface. Place blocks 10–15 cm high (4–6 in.) under the corners of the painting to permit air circulation on all sides. Place soft weights, such as sandbags, at the extreme edges of the four corners. Always place a non-textured interleaf, such as white tissue or blotter, between the paint surface and the weight.
If there are signs of mould growth, obtain the required personal protective equipment (PPE) (see CCI Technical Bulletin 26 Mould Prevention and Collection Recovery: Guidelines for Heritage Collections) and contact a conservator for advice on any immediate action that may be taken.
5. Begin the drying procedures as quickly as possible
Prepare the work area for the drying process
- If possible, work in an area that is isolated from the collection and not affected by water damage.
- Obtain assistance to prepare two work areas: one for unframing and one for the drying process. Keep floor and table surfaces dry.
- Place fans in the work area. If the RH is maintained at a suitable level, increased air circulation will discourage mould growth. Fans will also accelerate the drying process and should be left on 24 hours a day until the paintings are dry.
- Dehumidifiers can assist the drying process and maintain a suitable RH. Try to maintain the environment within an acceptable range of RH for paintings (between 40% and 60% RH). Be aware that dehumidifiers may not operate efficiently below certain temperatures (e.g. 18°C/65°F) or below 35% RH. However, some dehumidifiers equipped with desiccant wheels will work efficiently below 18°C (65°F). The dehumidifier must be properly sized for the space, and the drip pans must be cleaned regularly.
- To protect the delicate surfaces of frames, the unframing table can be padded with a packing blanket and covered with polyethylene. Padded blocks (covered with polyethylene), placed under the four corners of the frame, can also be used (see CCI Note 10/2 Making Padded Blocks).
- Prepare the drying tables by covering them first with a thin, even layer of padding with no overlaps or creases. Packing blankets, towels, blankets or 4-mm felt may be used. Paintings with impasto require extra padding, twice the thickness of the highest paint projection, so that the impasto does not press against the hard table. Cover the padding layers with thin Mylar or plastic to prevent the padding from becoming damp. In this way, the potential for mould growth is reduced and the possibility of dirt or dye transfer from the padding is eliminated.
Keep the following materials on hand, where possible, to help dry paintings:
- wet/dry vacuum cleaners to remove the water from the floor
- fans for air circulation
- dehumidifiers
- work gloves, choose close-fitting nitrile or vinyl gloves for good dexterity
- folding or portable work tables
- large blankets or towels, white cotton sheets, felt fabric or packing blankets to pad tables
- padded blocks
- Mylar or plastic sheeting to cover padding
- white tissue or clean (unprinted) newsprint paper to use between a painting and the prepared table surface
- large quantity of white blotting paper, or sheets or rolls of clean (unprinted) newsprint paper
- rigid boards such as plywood or hardboard, or acrylic sheets can be cut to fit the inside dimensions of each stretcher (but access to a power saw will be needed to cut boards)—please note: corrugated twinwall plastic sheets are easier to cut, but two layers of the 4-mm sheets may be needed to provide the necessary rigidity that will distribute the weight evenly over the surface
- a variety of weights, e.g. bricks or large, well-sealed plastic bottles filled with water; and/or soft weights such as small sandbags
- a variety of basic tools to take the painting out of its frame
6. Drying water-damaged paintings
In a large-scale disaster situation, the following procedures may not be practical due to the number of objects affected. However, in any case, it is important to set priorities.
Priorities
Where a number of paintings are involved, you must establish a system of priorities. Attention should be directed as follows:
- first to the paintings of greatest value to the collection (these should be identified ahead of time in a disaster plan);
- next to the paintings that are wet or are actively distorting.
Procedure
- Paintings with signs of flaking, lifting or curling paint layers, or with softened or dissolved paint or ground layers should be placed face up on a table, raised on blocks placed under the corners to provide some air circulation behind the painting and allowed to dry untouched.
- Paintings with high impasto (over 0.5 cm [approx. 1/4 in.]) or fine, sharp peaks of impasto should not be placed face down. As described above, paintings with low, rounded impasto require extra padding so that the impasto does not press against the hard table when placed face down. The extra padding should be twice the thickness of the highest paint projection.
- Paintings that do not exhibit flaking or lifting and do not have high impasto should be dried face down and kept flat by the procedure outlined below (Figure 1):
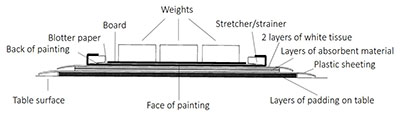
© Government of Canada, Canadian Conservation Institute. CCI 122307-0001
Figure 1. Cross-section view illustrating the placement of each item when drying a water-damaged painting.- In the unframing area, carefully pick off bits of loose debris that may be on the surface of the painting (if not already done).
- Document with photography and written notes. Photograph the front and back of the painting, including details of labels and inscriptions.
- Remove backing boards and hanging wire that might restrict access to the back of the painting.
- Paintings with wet supports or wet frames should be unframedFootnote 1 but should not be removed from their stretchers. If the painting appears to be stuck in the frame, or if it has lifting, flaking or highly textured paint or delicate impasto, do not unframe it; set it aside and seek the advice of a conservation professional.
- On the drying table (described above in Prepare the work area for the drying process), place several layers of blotting paper or newsprint (or in the case of very large paintings, a cotton, flannel sheet or even-textured, absorbent blanket) over an area large enough to lay the painting you are working on. Then place two layers of white tissue paper on top.
- Ensure that all layers that will be under the painting are perfectly flat, not creased and without overlaps. Wrinkles and unevenness can transfer to the painting's surface when the painting is subjected to pressure.
- Paintings on canvas
- Place each painting (that has neither lifting or flaking paint nor a highly textured or delicate impasto surface) face down on the drying table prepared with the absorbent padding and tissue paper. Weights should be placed on the stretcher corners to reduce warping.
- Cover the back of the canvas with blotting paper, gently inserting the edges under the stretcher bars. If it is necessary to use more than one piece, place sheets edge-to-edge. Do not overlap the sheets because any unevenness can deform the paint surface. If there are tears in the painting, make sure that the edges are flat before putting the blotter in place.
- Cut a rigid board to fit the inside dimensions of the stretcher. Place the board on top of the blotting paper to hold the canvas flat during drying. If there are keys in the corners of the stretcher, simply cut the corners of the board diagonally to fit. Do not attempt to force the board under the keys.
- Place a number of weights evenly on the board, applying slight pressure to help keep the canvas from distorting during drying. The amount of weight required will vary from one painting to the next and should be just enough to hold the canvas flat. When using less rigid boards, such as 4-mm corrugated twinwall plastic sheet, use two sheets to distribute the weight.
- Change the blotting paper under the weighted boards every 20 minutes at first, until the blotting paper on the back remains almost dry. Then change the blotters every hour until the blotters are dry to the touch. Shiftwork during this crucial procedure may be necessary to maintain dry blotters. Please note: it may take longer to dry the area under the stretcher bars. At this point, the blotters and tissue under the front of the painting may need to be changed. If damp, replace them with dry absorbent padding. If the tissue sticks to the paint surface, do not attempt to remove it. Leave it in place until it can be removed by a paintings conservator.
- Finally, replace all blotting paper on the back of the canvas, reapply the board and weights, and leave for 24 hours, maintaining air circulation with fans. Check after 24 hours and continue as necessary. (It could take several days for a thoroughly wetted stretcher to dry out. This will also affect the drying rate of its canvas.)
- Paintings on paperboard supports, such as laminated cards or on canvas boards, can be dried following a similar procedure to that described above.
- Place each painting (that has neither lifting or flaking paint nor a highly textured or delicate impasto surface) face down on the drying table prepared with absorbent padding and tissue paper.
- Minor rippling, or separation of the paper plies of the support, can be gently pressed flat. The front of the painting can rest on absorbent materials while the back is covered with a rigid board and weights. Change the blotters as described above.
- Supports that are extremely distorted can be creased if forced flat. These will have to be placed face up and allowed to dry untouched.
- Paintings on wood panels or processed wood boards, such as plywood or hardboard, that have absorbed water may be exhibiting out-of-plane distortion and the accompanying flaking paint and joint problems. Water-sensitive gesso ground layers tend to be soft after exposure to moisture. A conservator should be called in to advise.
7. Final steps
As soon as possible, arrange to have a paintings conservator assess the extent of damage, deal with possible mould growth and advise regarding treatment. Mould can be hazardous to human health; thus, it will be necessary to take precautions during future handling and storage (see Guild and MacDonald 2004). The affected storage or exhibition area should be cleaned, disinfected and brought back to recommended environmental conditions before the paintings are returned. Contact the Canadian Conservation Institute if further advice is required.
Once the situation is under control, it will be necessary to coordinate a more thorough assessment of the facilities and condition of the collection. Object records will need to be updated with a brief description of condition and the work undertaken (see CCI Notes 10/6 Condition Reporting – Paintings. Part I: Introduction and 10/7 Condition Reporting – Paintings. Part II: Examination Techniques and a Checklist).
Suppliers
Note: The following information is provided only to assist the reader. Inclusion of a company name in this list does not in any way imply endorsement by the Canadian Conservation Institute.
- Blank newsprint:
-
newspaper offices or art supply stores
-
- Blotting paper(100% cotton fibre, acid-free, widest size available):
-
local paper distributors, art supply stores or stationery stores
-
- Corrugated twinwall plastic sheet, e.g. Coroplast, Hi-Core, Cor-X (a lightweight, fluted plastic sheet available in several thicknesses and colours):
-
local framing shops, plastics suppliers, art supply stores and some packaging firms
Coroplast
Matra Plast Industries Incorporated (Hi-Core)
-
- Mylar (0.5 mm thick):
-
art supply stores, conservation suppliers or plastics suppliers
to obtain names of local distributors, contact the manufacturer, DuPont Teijin Films
-
- Polyethylene sheeting (products that do not feel "greasy" to the touch):
-
hardware stores, local packaging suppliers or paint distributors
N.B. Thin uncoated polyethylene can be found in many home improvement centres where it is sold as painter's plastic. Some polyethylene films have a greasy/dirty feel due to the presence of release agents and plasticizers on its surface. Clean "uncoated" polyethylene is preferable for use with museum or gallery objects. (A quick test: adhesive tape should stick well to uncoated polyethylene.)
-
- Environmental monitoring equipment:
-
simple hygrometers are available at most hardware stores
hygrothermographs and psychrometers are available from scientific equipment suppliers or from conservation supply firms
environmental monitoring equipment is available on loan from the Canadian Conservation Institute (see CCI's Environmental monitoring equipment loans program).
-
- Tissue (thin Japanese paper or commercially available non-coloured wrapping tissue):
-
local art and drafting supply stores
suppliers of conservation and archival materials
-
Appendix: A condensed plan of action – treatment of water-damaged paintings
(PDF version, 328 KB)
The following is a condensed plan of action to reduce the immediate effects of water damage on paintings. Drying procedures should be started as quickly as possible.
- Call in the emergency response team and begin emergency safety procedures to ensure that the area is safe to enter and no harm comes to individuals.
- Contact a local conservation professional.
- Name and phone number of local conservation professional:
- Contact the Canadian Conservation Institute if further advice is required: 613-998-3721
- Move affected paintings to a dry place with good air circulation, a cool temperature and moderate RH (40–60% RH); hold paintings with both hands.
- When lifting paintings, tilt the painting to allow excess water to drain off.
- Avoid touching the paint or canvas surfaces or the frame's decorative moldings.
- Paintings can be placed face up on a dry surface, on raised blocks at the corners or leaned upright against a wall, on blocks, until drying tables are prepared. (Avoid stacking paintings.)
- While drying tables are prepared, document the paintings with photographs and written notes, and manually pick off loose debris that may be caught on the surface of the painting. If the frame or stretcher/strainer is actively distorting, weight the corners as described below.
- Get help to prepare the area for the drying procedure.
- Place fans in the work area to encourage drying and discourage mould growth.
- Dehumidifiers can be used to maintain an RH between 40% and 60%.
- Pad unframing tables and cover with polyethylene, or obtain padded blocks.
- Pad drying tables with an even layer of padding (blankets, towels, etc.), followed by thin Mylar or polyethylene.
- Contact suppliers (insert below) to obtain the required materials and equipment, if not already on hand.
-
Establish priorities for the drying process: focus first on the paintings of highest value to the collection; next focus on those that are wet or are actively distorting.
For paintings with active deterioration or high impasto (highly textured):
- If the frame is actively distorting, place the painting face up on a dry surface, on blocks, and place sandbags, on tissue, on the corners to provide moderate restraint.
- If the wooden stretcher of an unframed painting is actively distorting, place the painting face-up on blocks, and place sandbags at the extreme edges of the four corners. Place white tissue between the paint surface and the weight.
- Paintings with flaking, lifting or curling paint layers, or softened or dissolved paint or ground layers, should be placed face-up, on blocks and allowed to dry untouched.
- Do not place paintings with high impasto or fine, sharp peaks of impasto face-down.
Paintings on canvas without flaking or lifting paint or high impasto should be dried and kept flat using the following procedure:
- Unframe paintings with wet supports or wet frames. Remove backing boards and hanging wire. Remove the remaining debris from the back of the support. Label the frame. If the painting appears stuck in the frame, do not unframe it. Instead, seek the advice of a conservation professional.
- Place several layers of blotting paper, newsprint, cotton or flannel sheets, or even-textured, absorbent blanket over the padded table surface and place two layers of white tissue paper on top. All layers must be flat (without creases or overlaps). Paintings with low, rounded impasto require extra padding (twice the thickness of the highest paint projection).
- Move the unframed painting to the prepared drying surface. For paintings on canvas, place the painting face-down on the tissue paper. Weights should be placed on the stretcher corners to reduce warping.
- Cover the back of the canvas with blotting paper, gently inserting the edges under the stretcher bars. Place sheets edge-to-edge; overlaps can deform the paint surface.
- If tears are present, make sure that the edges are flat before putting the blotter in place.
- Cut a rigid board to fit the inside dimensions of the stretcher. Place the board on top of the blotting paper to hold the canvas flat during drying. (When using less rigid boards, such as 4-mm corrugated twinwall plastic sheet, use two sheets to distribute the weight.)
- Place a number of weights on the board to help keep the canvas from distorting during drying. Change the blotting paper under the boards and weights every 20 minutes at first, until the blotting paper on the back remains almost dry.
- Then change the blotters every hour until the blotters are dry to the touch.
- If the absorbent material on the front is damp, replace them with dry material. If the tissue sticks to the paint surface, leave it until it can be removed by a paintings conservator.
- Next, replace all of the blotting paper on the back, reapply board and weights, and leave for 24 hours, maintaining air circulation with fans. Check after 24 hours and continue as necessary. (It could take several days for a wetted stretcher to dry out, which will affect the drying rate of the canvas.)
Paintings on paperboard supports, such as laminated card or canvas boards, without flaking or impasto, can be dried following a similar procedure. Minor rippling or separation of the support plies can be gently pressed flat and the front will rest on absorbent material while the back will be covered with a rigid board and weights. Supports exhibiting extreme distortion will have to be placed face-up and allowed to dry untouched.
Paintings on wood panels or processed wood boards, such as plywood or hardboard, which have absorbed water, may be exhibiting out-of-plane distortion accompanied by flaking paint and joint problems. Water-sensitive gesso ground layers tend to be soft after exposure to moisture. A conservator should be called in to advise.
- As soon as possible, arrange to have a paintings conservator inspect the paintings to assess the extent of damage, deal with possible mould growth and advise regarding treatment.
Bibliography
Ball, C., and A. Yardley-Jones. "Salvage Techniques: Water-Damaged Paintings on Canvas." In Help! A Survivor's Guide to Emergency Preparedness. Edmonton, AB: Museums Alberta, 2001, pp. 161–162.
Guild, S., and M. MacDonald. Mould Prevention and Collection Recovery: Guidelines for Heritage Collections. Technical Bulletin 26. Ottawa, ON: Canadian Conservation Institute, 2007.
Hutchins, J.K., and B.O. Roberts. eds., First Aid for Art: Essential Salvage Techniques. Lenox, MA: Hard Press Editions, 2006, pp. 39–45.
Keck, C.K. "On Conservation: Instructions for Emergency Treatment of Water Damages." Museum News 50,10 (June 1972), p. 13.
Walsh, B. Salvage Operations for Water Damaged Archival Collections: A Second Glance (PDF format). [N.p]: Canadian Council of Archives, 2003. Also printed in WAAC Newsletter 19,2 (May 1997).
Many cultural and conservation organizations have published online resources including useful lists of supplies and response guidelines for salvage and recovery operations following recent disasters. Use your web browser to search for information posted by major museums, galleries or conservation professionals.
by Barbara Klempan
Revised by staff of the CCI Fine Arts Section in 2016
Originally published 1986
Également publié en version française.
© Government of Canada, Canadian Conservation Institute, 2017
ISSN 1928-1455