
Velcro Support System for Textiles – Canadian Conservation Institute (CCI) Notes 13/4
(PDF Version, 487 KB)
CCI Note 13/4 is part of CCI Notes Series 13 (Textiles and Fibres)
Introduction
When displaying flat textiles vertically, they must have sufficient support to prevent stress-related damage. Large textiles are sometimes hung by sewing a set of rings to the top edge of the reverse side and slipping the rings over a supporting rod or onto hooks. This provides a non-uniform support that distorts the textile and that may become impossible to correct. Tacks, staples, or nails can also cause distortion, as well as tears and staining from metal corrosion, and therefore must not be used. However, a support system using Velcro eliminates these problems.
An alternative method of support for smaller, lightweight textiles is discussed in CCI Notes 13/6, Mounting Small, Light, Flat Textiles.
Velcro is a two-part fastening system consisting of "hook" and "loop" tapes. When pressed together, the hooks and loops interlock to form a strong bond. Velcro is available in widths from 1.9 cm to 5 cm. Choose an appropriate width based on the weight and size of the textile. Velcro is recommended for the following reasons:
- It distributes support evenly across the width of the textile
- It is fast and easy to install
- It can bear the weight of heavy textiles
- It reduces distortions in the textile
- It allows the textile to be detached from its display position quickly and safely, which is especially useful in emergencies
The Velcro method is suitable for tapestries, wall hangings, rugs, quilts, and other large, flat textiles that are in good condition and can bear their own weight. It is not suitable for very thin textiles or those that are too weak or too fragile to bear their own weight. Velcro is available in widths from 1.9 to 5 cm. Choose an appropriate width based on the weight and size of the textile.
Velcro is too stiff to be stitched directly onto a textile without causing stress; therefore, the following method of attachment is recommended.
Instructions
-
Step One: Cut strips of Velcro that are 2 cm shorter in length than the width of the top edge of the textile.
-
Step Two: Machine stitch a sleeve from prewashed cotton fabric. The sleeve should be 0.5 cm wider all around than the Velcro. Iron the sleeve flat (Figure 1a) Machine stitch the looped Velcro onto the sleeve using a zigzag stitch along the selvedges and then across the two cut ends (Figure 1b).
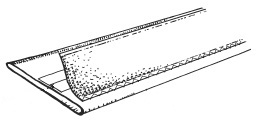
Figure 1. a, Cotton sleeve machine stitched and ironed flat.
b, Looped Velcro machine stitched onto cotton sleeve.Alternatively, a prewashed, undyed, cotton tape can be substituted for the cotton sleeve.
-
Step Three: With the textile face down on a clean, flat surface, pin the cotton sleeve or tape about 1–1.5 cm below the top edge of the textile (consult Figure 2 for placement).
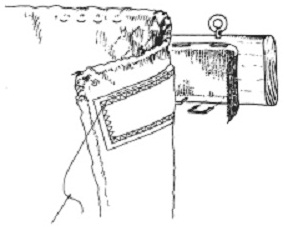
Figure 2. Mounting the textile. -
Step Four: Starting at the centre and working out to the sides, use a running stitch or herringbone stitch with the occasional backstitch to hand sew the cotton sleeve or tape to the textile (CCI Notes 13/10 Stitches Used in Textile Conservation for further information). The stitches should be quite small on the face of the textile, yet still span over at least 2–3 threads. They can span a longer distance on the back of the textile. If the textile has a protective lining, the stitches should penetrate both the lining and the textile to prevent sagging, but should be as unobtrusive as possible from the front.
Very heavy textiles may benefit from having an additional strip of Velcro, prepared as described above, stitched across the centre back of the textile. This will reduce the weight borne by the top strip. For exceptionally heavy textiles, consult a technical specialist at Velcro.
-
Step Five: Cut a strip of wood (planed smooth on both sides) 1 cm thick and 0.5 cm larger all around than the Velcro. Seal the wood using acrylic latex paint. Allow time for it to dry and off-gas completely. Attach the hooked Velcro to the wood using stainless steel staples at 1 cm intervals along the four edges.
-
Step Six: Insert screw-eyes into both ends of the wood. Hang the wooden support with the hooked Velcro in its display position. Mount the prepared textile onto the fixed support by pressing the hook and loop tapes together. Begin at the centre and work outwards toward the ends. If adjustments are necessary, slide your hand between the hook and loop tapes to separate them. Do not pull on the textile to remove it from the mount.
Suppliers
Note: The following information is provided only to assist the reader. Inclusion of a company in this list does not in any way imply endorsement by the Canadian Conservation Institute.
Wide, undyed cotton tape:
fabric stores
Velcro and cotton or cotton-polyester fabric:
fabric stores
Stainless steel staples (Monel):
specialty hardware stores or construction supply outlets
Further Reading
-
Finch, K., and G. Putnam. The Care and Preservation of Textiles. London, UK: Batsford, .
-
Landi, S. The Textile Conservator's Manual. London, UK: Butterworths, .
-
Mailand, H.F., and D.S. Alig. Preserving Textiles: A Guide for the Nonspecialist. Indianapolis, IN: Indianapolis Museum of Art, .
By the staff of the CCI Textile Lab
Originally published
Revised ,
Copies are also available in French.
Texte également publié en version française.
©Minister of Public Works and Government Services Canada,
Cat. Nº NM-95-57/13-4-2008E
ISSN 0714-6221
Printed in Canada