
Designated Learning Institution Portal: Student Compliance Reporting
Features
Table of contents
- 1. Introduction
- 2. Student compliance verification requests
- 3. DLI Portal
- 4. Receiving compliance verification notifications
- 5. Accessing compliance verification requests
- 6. Reporting directly through the DLI Portal
- 7. Downloading and uploading the compliance verification report
- 8. Completing and submitting the compliance verification report to Immigration, Refugees and Citizenship Canada
- 9. Help and support
- Glossary
- Frequently asked questions
Note: This guide was last updated on November 1, 2024.
Mandatory compliance reporting
Starting November 8, 2024, student compliance reporting is now mandatory. Find out more about the verification process and your new obligations as a DLI.
1. Introduction
This guide provides step-by-step instructions for completing student compliance verification requests from Immigration, Refugees and Citizenship Canada (IRCC) in the Designated Learning Institution (DLI) Portal, otherwise known as compliance reporting.
International Student Program Regulations
Regulations came into effect on June 1, 2014, to
- limit the issuance of study permits to those accepted to an institution designated by one of Canada’s provinces or territories to host international students
- require study permit holders actively pursue their studies
- facilitate entry to Canada for foreign nationals who sincerely want a Canadian education
Learning institutions in Canada play an active role in the promotion, recruitment and admission of international students. DLIs are a key source of information on the enrolment status of international students. DLIs support the objectives of IRCC’s regulations by completing and submitting compliance verification requests through the DLI Portal.
2. Compliance verification requests
DLIs may be asked to complete 2 types of student compliance verification requests:
- Periodic verification – Twice per year, in the spring and fall, DLIs report on the enrolment status of their international students, as of the date IRCC sends the compliance reporting request. DLIs have 60 days to complete the compliance report through the DLI Portal.
- Ad hoc verification – IRCC may send an ad hoc verification request. DLIs must respond to the request within 10 days of receiving the request from IRCC.
DLIs must complete both types of student compliance verification requests by completing and submitting them through the DLI Portal.
3. Designated Learning Institution Portal
The DLI Portal lets post-secondary DLIs complete compliance verification requests sent by IRCC. The DLI Portal was developed in consultation with a working group made up of representatives from
- IRCC
- provincial and territorial authorities
- learning institutions
These representatives provided valuable input on the frequency and timing of reporting as well as on the portal design.
Information collected from the DLI Portal helps IRCC identify students who may not be complying with their study permit conditions. The DLI Portal lists international students who meet both of the following conditions:
- have applied for a study permit as of June 1, 2014, and currently hold a valid study permit
- are enrolled in a program of study of at least 6 months in duration
Post-secondary DLIs must complete compliance verification requests for these students.
3.1. Types of users
Primary and secondary users can complete and save ad hoc and periodic compliance verification reports, and they can also submit these reports to IRCC.
The primary user is the main contact for IRCC and is
- the employee who is the authorized primary representative, by the province or territory
- responsible for managing their DLI’s secondary user access (it is recommended that primary users add secondary users to the account by assigning them personal identification numbers [PINs])
- responsible for keeping their contact information (such as their email address) up to date, so DLIs receive all notifications sent by IRCC
Note: When a learning institution is designated by their province or territory, the primary representative receives an invitation from IRCC to enrol their DLI through the DLI Portal. Only the primary representative can submit an enrolment request. DLIs should not be creating a DLI Portal account without an invitation from IRCC. Enrolments in the DLI Portal that have not been authorized by IRCC will not be actioned.
The secondary user receives a PIN from the primary user to create an account that is linked to their institution through the DLI Portal. Secondary users can complete and save compliance verification reports, and they can also submit these reports to IRCC. However, they are not able to assign DLI Portal access to others.
Primary and secondary users are responsible for keeping a good record of their GCKey username and password. Usernames and passwords cannot be recovered. If a portal user loses their GCKey log in credentials, they will need to contact the DLI inbox for a PIN reset.
Note: DLIs must notify their province or territory, which then notifies IRCC, if there are any changes to the contact information of a DLI, primary representative or both. You can contact the provincial or territorial government to obtain authorization to change the DLI’s primary representative.
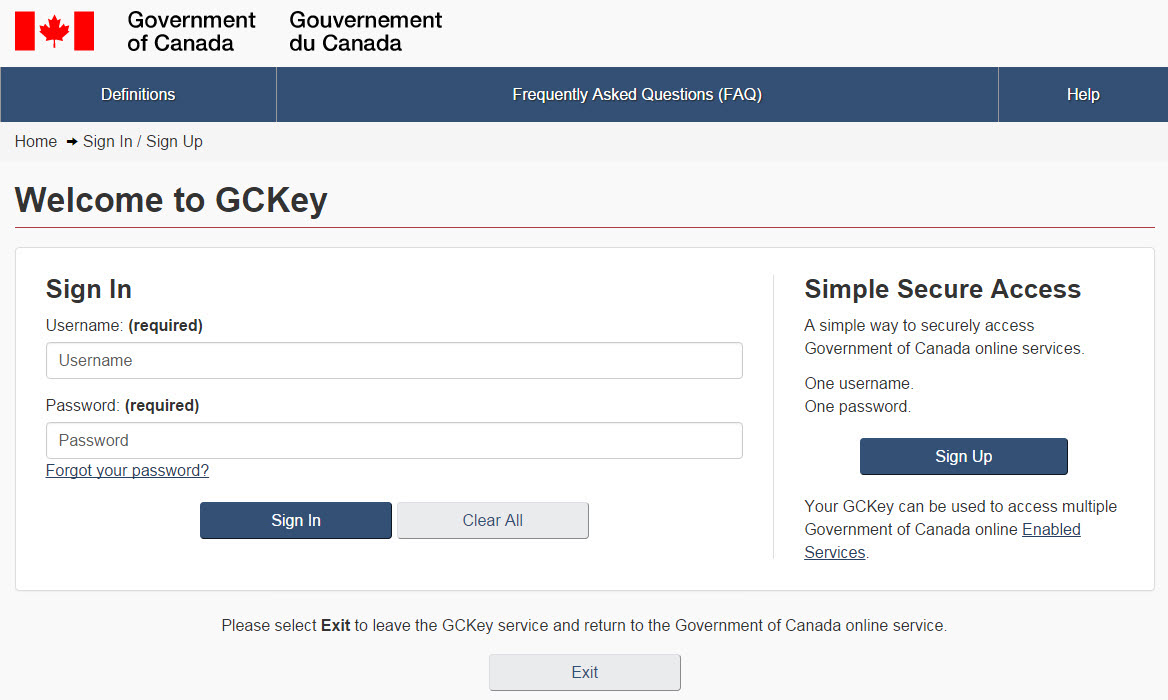
3.2. Accessing the Designated Learning Institution Portal
All users require a DLI Portal account to access the DLI Portal. Follow these step-by-step instructions to create an account if you do not already have one.
To access the DLI Portal, we recommend using Google Chrome. Before signing in to the DLI Portal, you must clear your browser history and cache.
Use the following instructions to sign in to the DLI Portal:
- Go to the DLI Portal.
- Click Continue to GCKey.
- Sign in with your GCKey username and password.
- Click Continue.
- Review the Terms and Conditions.
- Click I Accept.
- Answer the identity validation questions you provided during enrolment.
4. Receiving compliance verification notifications
IRCC sends an email to the DLI’s primary user when a new pending verification request is in their DLI Compliance Reporting Queue.
5. Accessing compliance verification requests
Use the following steps to access verification requests:
- After signing in, click Continue.
- Review the Terms and Conditions.
- Click I Accept.
- Answer the identity validation questions you provided during enrolment.
- Click Access Compliance Reporting, under What would you like to do today?

6. Reporting directly through the Designated Learning Institution Portal
You can complete compliance verification requests either directly through the DLI Portal or by downloading a file to complete locally and then uploading it to send back to IRCC. Further instructions on how to report directly through the DLI Portal can be found below. For instructions on how to complete compliance verification requests by downloading and uploading files, see Downloading and uploading the compliance verification report section below.
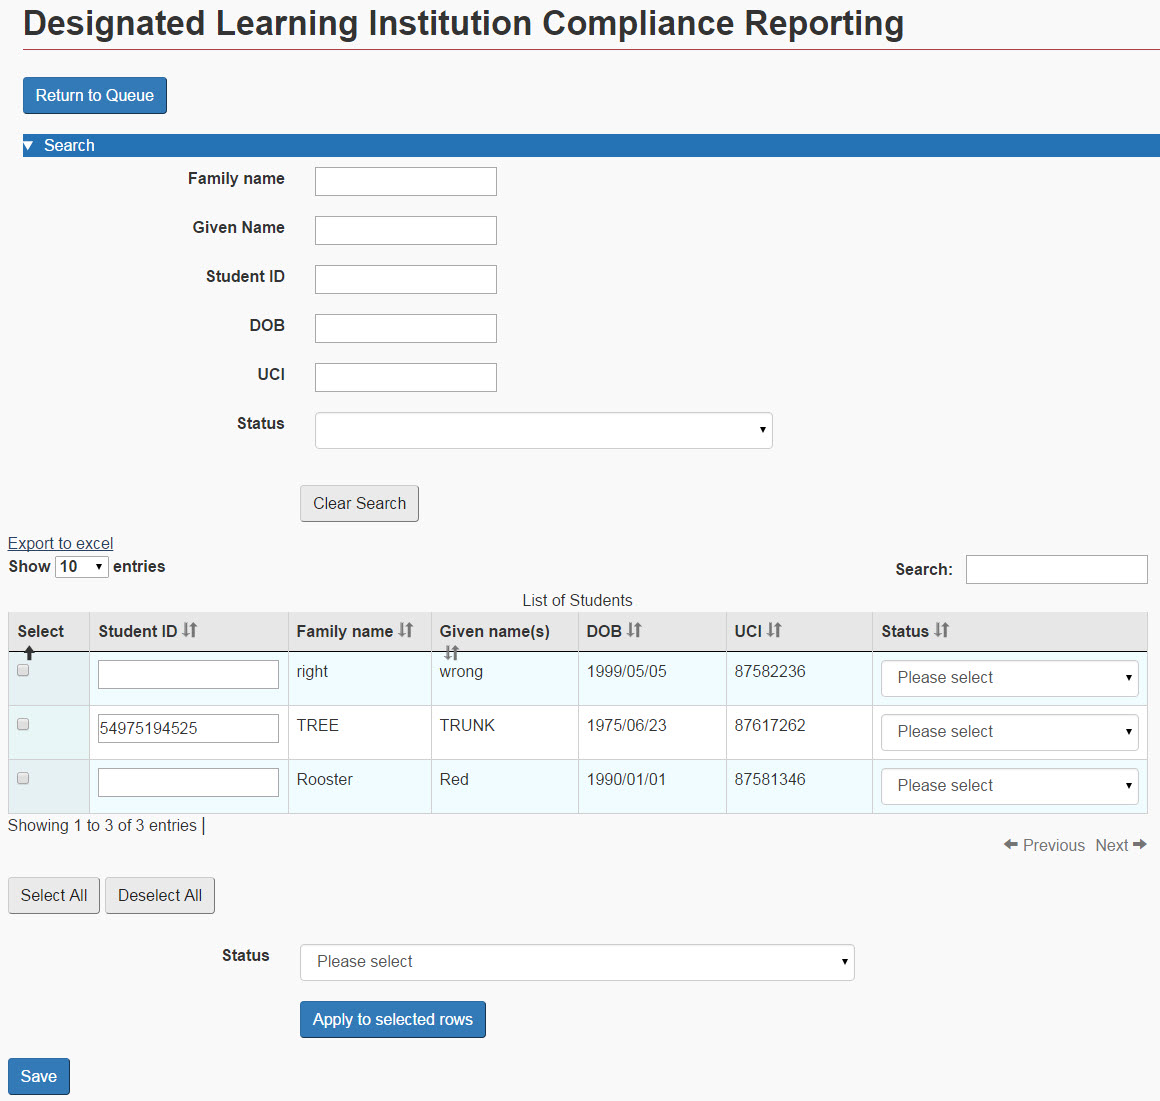
On the DLI Compliance Reporting page, under Request Type, you can find Ad Hoc Verification and Periodic Verification links to choose from, depending on what type of request yours is.

Once you click the verification link under the Request Type column, the system displays a list of students. Enter a status for each student by using the drop-down menu.
Notes
- DLIs cannot add students to this list. DLIs report on only the students who appear on the list.
- If the list includes more than one record for the same student, select the same status for each record.
- If your institution has 2 or more students with the same name and date of birth, ensure that the correct status is selected for each. If you require further assistance, contact the DLI mailbox.
In the Search section, you can find a student record by using the
- Family Name
- Given Name
- Student ID
- DOB
- UCI
- Status
Users can
- sort search results by clicking the arrow at the top of the column
- add or modify the student identification (ID) number of each student
Note: Student ID numbers are stored in the system. The Student ID field is not mandatory and is not validated by IRCC if provided on a study permit application form. Student ID numbers may contain only the digits 0 to 9 and letters A to Z. Remove any special characters in the Student ID field before saving.
Tip: Users can change the number of records displayed on the table by clicking Show … entries, above the Select column.
6.1. Entering the status of a student
Primary and secondary users must select the value that best describes the students’ academic or enrolment status at the DLI. The value must reflect the status on the day you receive the compliance verification request.
Options include the following:
- Academic break
- Academic suspension
- Authorized leave
- Deferred enrolment
- Full-time studies
- No longer registered/enrolled
- No show
- Not started
- Part-time studies
- Program/degree completed
- Unknown/no record
Note: Students who have been reported on previously by the DLI, the system automatically populates the Status and Student ID fields with the information submitted by the DLI in the previous request. To ensure this information is still accurate, select and save the populated statuses.
If you are unsure of which status to choose for a study permit holder after reading the definitions of the academic or enrolment status, email the DLI mailbox for assistance.
Use the following instructions to enter the status of a student:
- In the Status column, select a value.
- Click Save.
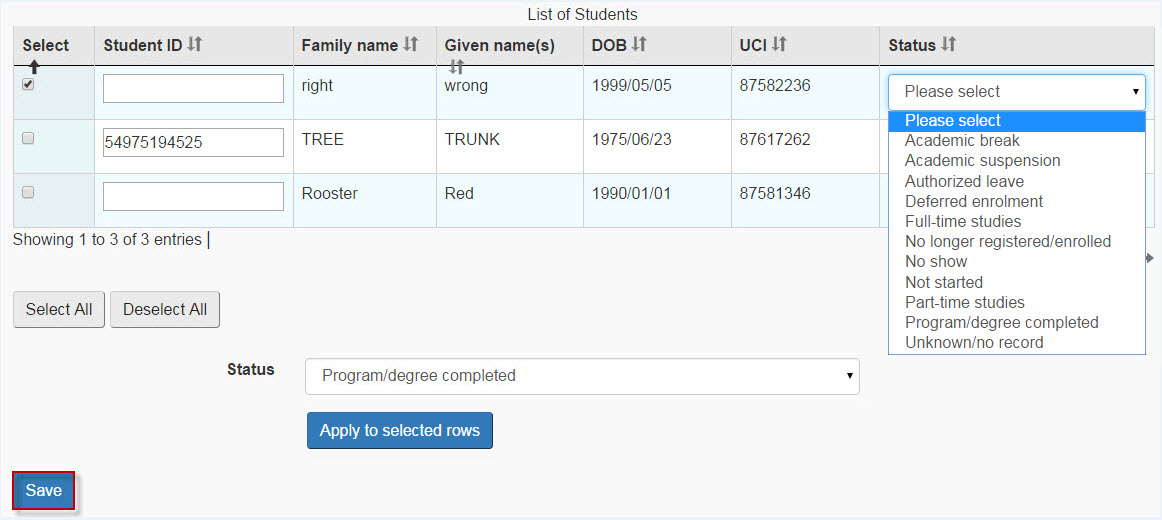
To enter the same status for more than one student
If the same status applies to all the students who appear in your current search results, see the following instructions:
- Scroll down to the bottom of the page.
- Click Select All.
- Select the Status field and select a value.
- Click Apply to selected rows.
- Click Save.
Tip: DLIs can use the Select All function to choose the status that reflects that of the majority of their students, and then manually change the status of the students who have a different one.
The system then applies the status to all the selected students. Results appear in the Status column.
After updating all the student records being displayed, do the following:
- Click Select All.
- Click Save.
If the report includes more than 250 records, click Next to view the following page of student records.
6.2. Saving your report
Save your compliance verification report by doing the following:
- Click Select All.
- Click Save.
- Click Return to Queue to return to the Compliance Requests from IRCC page.
Note: Saving the compliance verification report allows users to make changes to student enrolment statuses but does not send the report to IRCC. Users must submit the compliance verification report to IRCC to complete the compliance verification request. See Completing and submitting an ad hoc or periodic compliance verification report to Immigration, Refugees and Citizenship Canada for instructions on how to submit the compliance verification report.
7. Downloading and uploading the compliance verification report
You can download the compliance verification report and make changes directly, as required. After completing your changes, upload the updated file. You can download and upload the report multiple times.
7.1. Downloading the compliance verification report
You can download the compliance verification report as 1 of 3 file types: .xlsx, .csv or .xml.
If you choose to download the report as an .xlsx file, you will be unable to upload your report using the same format. You will be required to upload the report as a .csv file instead.
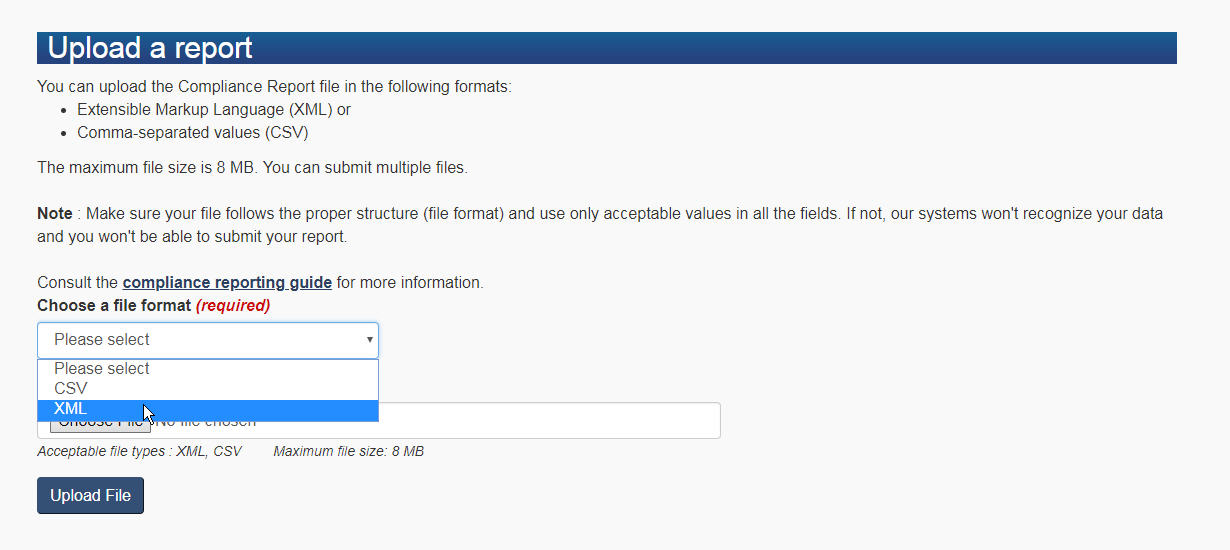
- On the DLI Compliance Reporting page, click Download/Upload the Report.
- In the Download the Report applet, in the Choose a File Format field, select a value.
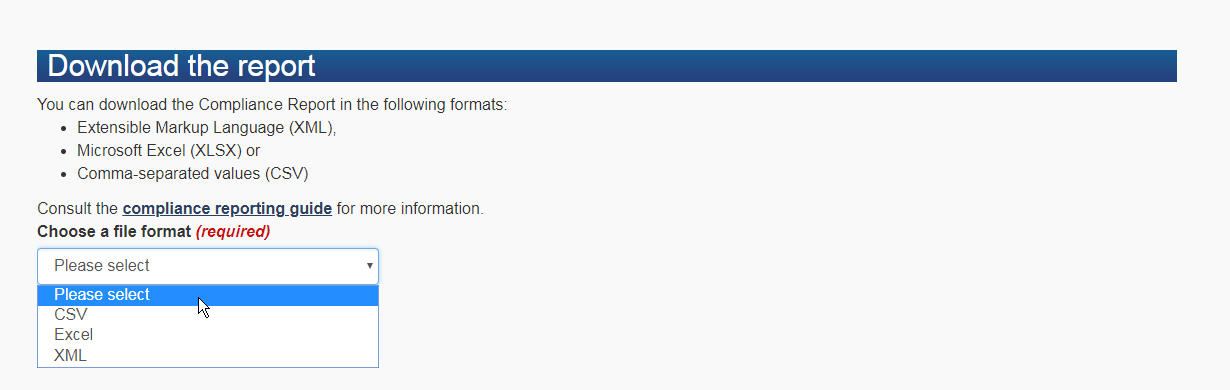
- Click Download the Report. A browser window then prompts you to open the report.
Note: If you intend to use the .xml format, you will need to submit it using the following schema:
-
Download the schema to upload in .xml format
<?xml version="1.0" encoding="UTF-8"?>
<xs:schema xmlns:eserviceShared="http://cic.gc.ca/gol.eservices" targetNamespace="http://cic.gc.ca/gol.mycic.model.dli" xmlns="http://cic.gc.ca/gol.mycic.model.dli" xmlns:xs="http://www.w3.org/2001/XMLSchema">
 <!-- Activity ID -->
 <xs:element type="xs:string" name="aID" />
 <!-- Student ID, maximum length is 25 characters-->
 <xs:element name="sID">
 <xs:simpleType>
 <xs:restriction base="xs:string">
 <xs:maxLength value="25" />
 </xs:restriction>
 </xs:simpleType>
 </xs:element>
 <!-- Last Name -->
 <xs:element type="xs:string" name="ln" />
 <!-- First Name -->
 <xs:element type="xs:string" name="fn" />
 <!-- Date of Birth Year -->
 <xs:element type="xs:string" name="y" />
 <!-- Date of Birth Month -->
 <xs:element type="xs:string" name="m" />
 <!-- Date of Birth Day -->
 <xs:element type="xs:string" name="d" />
 <!-- Date of Birth -->
 <xs:element name="dob">
 <xs:complexType>
 <xs:sequence>
 <xs:element maxOccurs="1" minOccurs="0" ref="y" />
 <xs:element maxOccurs="1" minOccurs="0" ref="m" />
 <xs:element maxOccurs="1" minOccurs="0" ref="d" />
 </xs:sequence>
 </xs:complexType>
 </xs:element>
 <!-- Unique_Client_Identifier -->
 <xs:element type="xs:string" name="uci" />
 <!-- Status Code -->
 <xs:element name="stCd">
 <xs:simpleType>
 <xs:restriction base="xs:string">
 <xs:enumeration value="12886" />
 <!-- Full-time studies - Études à temps plein -->
 <xs:enumeration value="12887" />
 <!-- Part-time studies -Études à temps partiel -->
 <xs:enumeration value="12888" />
 <!-- Academic break - Congé scolaire -->
 <xs:enumeration value="12889" />
 <!-- Program/degree completed - Programme complété/diplôme obtenu -->
 <xs:enumeration value="12891" />
 <!-- No longer registered/enrolled - -->
 <xs:enumeration value="12892" />
 <!-- Unknown/no record - Plus inscrit -->
 <xs:enumeration value="17231" />
 <!-- Authorized leave - Congé Autorisé -->
 <xs:enumeration value="17232" />
 <!-- Deferred enrolment - Inscription différée -->
 <xs:enumeration value="17863" />
 <!-- No show - Défaut de se presenter -->
 <xs:enumeration value="17864" />

 <!-- Not started - Non commence -->
 <xs:enumeration value="17865" />
 <!-- Academic suspension - Suspension académique-->
 </xs:restriction>
 </xs:simpleType>
 </xs:element>
 <!-- Status English Description -->
 <xs:element type="xs:string" name="stEn" />
 <!-- Status French Description-->
 <xs:element type="xs:string" name="stFr" />
 <!-- Status -->
 <xs:element name="st">
 <xs:complexType>\ <xs:sequence><xs:element maxOccurs="1" minOccurs="1" ref="stCd" /><xs:element maxOccurs="1" minOccurs="0" ref="stEn" /><xs:element maxOccurs="1" minOccurs="0" ref="stFr" /></xs:sequence></xs:complexType>
 </xs:element>
 <!-- Activity -->
 <xs:element name="act">
 <xs:complexType>
 <xs:sequence>
 <xs:element maxOccurs="1" minOccurs="1" ref="aID" />
 <xs:element maxOccurs="1" minOccurs="0" ref="sID" />
 <xs:element maxOccurs="1" minOccurs="0" ref="ln" />
 <xs:element maxOccurs="1" minOccurs="0" ref="fn" />
 <xs:element maxOccurs="1" minOccurs="0" ref="dob" />
 <xs:element maxOccurs="1" minOccurs="0" ref="uci" />
 <xs:element maxOccurs="1" minOccurs="1" ref="st" />
 </xs:sequence>
 </xs:complexType>
 </xs:element>
 <xs:element name="Activities">
 <xs:complexType>
 <xs:sequence>
 <xs:element maxOccurs="unbounded" minOccurs="1" ref="act" />
 </xs:sequence>
 </xs:complexType>
 </xs:element>
 <xs:element name="ComplianceReport">
 <xs:complexType>
 <xs:sequence>
 <xs:element maxOccurs="1" minOccurs="1" ref="Activities" />
 </xs:sequence>
 </xs:complexType>
 </xs:element>
</xs:schema>
Once you have downloaded the report, enter a status for each student. See Entering the status of a student for the academic or enrolment status used for reporting. Upload your compliance verification report once all students have received a status.
7.2. Uploading the compliance verification report
You can upload the compliance verification report as 1 of 2 file types: .csv or .xml.
Uploading as a .csv file
Note: You cannot upload your report as an .xlsx file. If you have downloaded your report as an .xlsx file, you need to save the .xlsx document as a .csv file. Use this format to upload your report if you have downloaded your report as an .xlsx or .csv file.
- On the DLI Compliance Reporting page, click Download/Upload the Report.
- Navigate to the Upload a Report applet.
- In the Choose a File Format Field, select a value.

- In the Choose a File from Your Computer field, click Browse.
- Find the file on your computer and click Open.
- Click Upload File.
You can upload as many files as you require, but you cannot submit the report until all students are uploaded.
If the report contains any mistakes, the system displays a page with a link to the list of errors.
Uploading as an .xml file
Note: See Downloading the compliance verification report for the schema you need to use when uploading an .xml file.
- On the DLI Compliance Reporting page, click Download/Upload the Report.
- Navigate to the Upload a Report applet.
- In the Choose a File Format Field, select a value.
- In the Choose a File from Your Computer field, click Browse.
- Find the file on your computer and click Open.
- Click Upload File.
8. Completing and submitting the compliance verification report to Immigration, Refugees and Citizenship Canada
Make sure that the numbers in the Total Records and Records Ready to Transmit columns are the same. If the numbers are different, you must go back to the report and look for records that were not updated.
- In the Action column, click Transmit to IRCC when you are ready to submit the report. If you upload your report through the DLI Portal, you must also click the Transmit to IRCC button to complete the submission of your report.
- You are then brought to a confirmation page and must click Transmit to IRCC again.
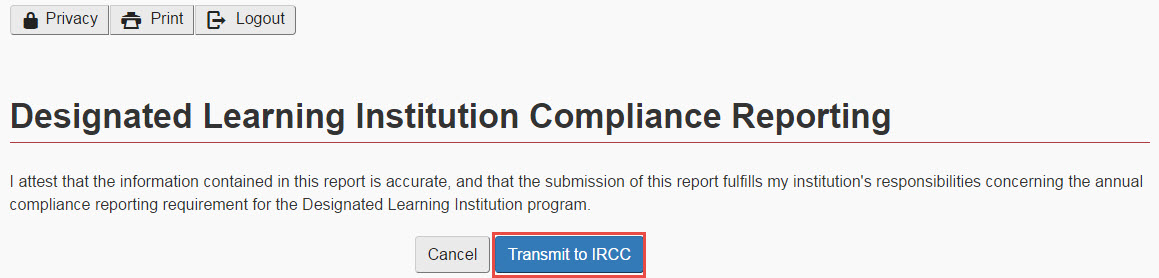
Note: If you click Cancel, the system returns you to the Compliance Requests from IRCC page.
- Once you have successfully submitted your report to IRCC, the DLI’s primary user receives a confirmation email.
- You can also confirm the successful submission of your report to IRCC by viewing your report page in the DLI Portal. If the report you completed for the current compliance reporting period has the word Submitted under Days Left to Transmit, then IRCC has received the report.
- If the number of days is still showing under Days Left to Transmit, then you still need to submit your report by ensuring all records have been completed, and then clicking Transmit to IRCC.
- Once the report has been successfully submitted to IRCC, DLIs can no longer make changes by using the DLI Portal. If you need to change the information in your submitted report, you can email the DLI mailbox.
Note: Compliance verification requests expire at midnight Coordinated Universal Time on the final day of reporting. DLIs cannot submit their report later than this deadline.
9. Help and support
Email the DLI mailbox for technical support, additional instructions and questions about the DLI Portal. If your request cannot be processed within 10 business days, you will be advised of the expected resolution date.
Glossary
Academic break (regularly scheduled break)
The student is on a regularly scheduled break between academic sessions (such as summer holiday), as determined by your institution.
Any leave from a program of studies in Canada should not exceed 150 consecutive days from the date the leave started. If a student exceeds 150 days of leave from studies, they will need to change their status with IRCC or will be considered non-compliant with their study permit conditions.
Academic suspension
The student is suspended from your institution, due to poor academic performance or violation of the institution’s policies. The student is allowed to return after the period of suspension.
Any leave from a program of studies in Canada should not exceed 150 consecutive days from the date the leave started. If a student exceeds 150 days of leave from studies, they will need to change their status with IRCC or will be considered non-compliant with their study permit conditions.
Authorized leave
The student has formally requested and been approved to be temporarily absent from your institution for reasons that include the following:
- medical or maternity leave
- family emergency
- death of a friend or family member
- change of program of study within the same institution
- any other type of leave your institution has formally authorized for the student
Any leave from a program of studies in Canada should not exceed 150 consecutive days from the date the leave started. If a student exceeds 150 days of leave from studies, they will need to change their status with IRCC or will be considered non-compliant with their study permit conditions.
Deferred enrolment
The student is registered at your institution, but they are not currently studying because their program start date has been postponed. The delayed start date must have been one of the following:
- set by your institution
- requested by the student and approved by your institution
If the study permit holder is in Canada at the time of deferral, and they wish to remain in Canada, they must begin their studies the following semester or within 150 calendar days from the date the deferred enrolment is confirmed, whichever comes first.
Any leave from a program of studies in Canada should not exceed 150 calendar days from the date the leave started. If a student exceeds 150 days of leave from studies, they will need to change their status or will be considered non-compliant with their study permit conditions.
If the conditions of the deferred enrolment status are not met by the student in question, please refer to the definitions for “No longer registered or enrolled” or “No show”.
Full-time studies
The student is registered at your institution and enrolled in a program of study. Institutions must ensure that the conditions (for example, minimum number of hours and/or course load) required for a student to have full-time status abide by the guidelines set by their respective provincial or territorial educational authorities. This can include a co-op work placement.
No longer registered or enrolled
Your institution sent the student a letter of admission, but they are no longer registered or enrolled because they have
- been dismissed
- withdrawn voluntarily
- transferred to another institution
This status should not be used for students who are academically suspended (please refer to “Academic suspension”), or have never been sent a letter of acceptance from your DLI (please refer to “Unknown or no record” for definition).
No show
Your DLI sent the student a letter of acceptance, and they should be enrolled, but they
- never confirmed acceptance
- registered but never attended class
- registered and presented themselves in class but stopped attending without notifying your institution
This status should not be used for students for whom your institution has no record of being registered, please refer to “Unknown or no record”.
Not started
The student is registered at your institution and is enrolled in a program of study that begins the following semester. They have not yet started their studies.
This status should not be used for students whose start date has been deferred. Consult more information on deferred enrolment.
Part-time studies
The student is registered at your DLI and is enrolled in a program of study on a part-time basis. Institutions must ensure that the conditions (for example, minimum and maximum hours or course loads) required for a student to have part-time status abide by the guidelines set by their respective provincial or territorial educational authorities. Institutions must ensure that the conditions (e.g.for example, minimum and maximum hours or course loads) required for a student to have part-time status abide by the guidelines set by their respective provincial or territorial educational authorities. This can include a co-op work placement.
Program or degree completed
Your institution sent a formal confirmation to the student, informing them that they have completed their program of study and will receive their degree, diploma or certificate.
The student has completed the program of study and is waiting for formal confirmation that they have completed their degree, diploma or certificate.
Unknown or no record
Your DLI does not have a record of a letter of acceptance issued to this person or any record of this person being enrolled in your institution.
This status should only be used for students who are completely unknown to your DLI. It should not be used for students who have received a letter of acceptance, but have not confirmed or responded to the offer. If a student has received a letter of acceptance for your DLI, please refer to the definitions for “No show” or “No longer registered or enrolled”.
Unique client identifier
A unique client identifier (UCI) may also be referred to as a client identification number. The UCI is on official documents sent to clients from IRCC and contains a string of 8 or 10 numbers.
Frequently asked questions
I reported during the last round of DLI compliance reporting. Do I have to report this round?
Yes. Since Fall 2016, all post-secondary DLIs except those located in Quebec are required to complete their reports every period (spring and fall). Post-secondary DLIs in Quebec will not be asked to submit reports until the framework for submission has been established.
There are international students attending my DLI who do not appear in the compliance report. How can I add them?
DLIs cannot add students to their report. For this report, we need only information on the enrolment status of the students who appear on your list. If there are students studying at your DLI that should be reported on, please contact the DLI inbox.
There are international students attending my DLI who do not yet have a new study permit with my DLI’s name on it. What should I do?
Like with the previous scenario, DLIs cannot add students to their report. For this report, we only need the information on the enrolment status of the students who appear on your list.
Post-secondary study permits issued as of November 1, 2024 will include the DLI name. As of November 8, 2024, students need to apply for a new study permit to change DLIs. In certain cases (the student’s former DLI closed or the program was discontinued; the former DLI was placed on the suspension list; or the former DLI lost its designation status), students may be authorized to attend the new DLI while their study permit application is being processed.
Some student records appear multiple times in the DLI compliance report. Can I delete these duplicates?
No. DLI Portal users cannot delete duplicate records. If you find a duplicate, provide the same status for each record.
I cannot complete and submit my DLI compliance report before the due date. Can I get an extension?
DLIs are expected to complete and submit their compliance reports within the 60- day period allocated.
As of November 8, 2024, compliance reporting is mandatory for all DLIs who receive a report request via their DLI Portal. Make sure you have access to your account before the start of the compliance reporting session. Primary users can add as many secondary users as needed to help with the reporting process.
If you are unable to submit your report within the 60 days due to exceptional circumstances, please email the DLI inbox and explain your situation, and an extension will be considered.
The Transmit to IRCC button is greyed out. How can I submit my report?
Reports can be submitted only by clicking the Transmit to IRCC button.
To make the button clickable, ensure all student records have a status, and none have a special character in the student ID field (such as a comma, hyphen or semicolon). If these steps resolve the issue, all the student records should be ready to transmit, and the Transmit to IRCC button should no longer be greyed out.
If these steps do not resolve the issue, email the DLI mailbox and provide screenshots to receive further assistance.
There is a change of primary representative or a change to the contact information for my DLI. Whom should I contact?
Contact your designating province or territory as soon as any changes in information happen, including the following:
- primary representative or user
- location and address
- DLI name
If your institution wants to become a DLI or has stopped operating, contact your province or territory.