
Storage and Display Guidelines for Paintings – Canadian Conservation Institute (CCI) Notes 10/3
Introduction
The basic principle of storing and displaying paintings is to keep them in a secure and stable environment. This Note will address the physical aspects of storage and display and will describe the best preservation practices for paintings in these situations. For related information on environmental factors of light, relative humidity, temperature, pollution and biological activity in storage and display, consult CCI Note 10/4 Environmental and Display Guidelines for Paintings.
The recommendations in this Note refer primarily to the safe storage and display of framed paintings and paintings on stretchers or strainers. Unframed paintings on card or panel (without stretcher or strainer) should be stored horizontally using suitable boxes or drawers (consult CCI Note 11/2 Storing Works on Paper). Paintings on canvas that are not tacked to stretchers or strainers can be stored flat on shelving or in drawers. Oversized paintings will require specialized storage. When confronted with oversized artworks, seek advice from a conservation professional for storage and display guidelines. Recommendations for storing miniatures and paintings on other supports are given in CCI Note 10/14 Care of Paintings on Ivory, Metal and Glass. Before designing your own storage unit, it is always advisable to consult other institutions for different options and solutions that may help you to meet your needs.
Storage room
A storage room for paintings has specific requirements for the safeguarding of artworks. This room should be dedicated only to the storage of heritage and art collections. Storage for non-collection items (e.g. tools, workshop materials, mounts, display shelving, cleaning equipment, etc.) should be in a separate storage area.
The following are key considerations for choosing a location for storing paintings:
- The main requirements of any storage system are physical security and accessibility.
- Collection storage rooms should be kept locked and accessible only to authorized personnel.
- Collection storage should be environmentally controlled by a heating, ventilation and air conditioning system capable of providing a safe range of temperature and humidity year round.
- Avoid attic and basement storage locations because attics can experience extremes of heat and dryness, while basements can be damp and vulnerable to flooding (from ground water leaks and overhead pipes).
- If considering a location adjacent to an outside wall, be aware that a building’s perimeter walls can often experience fluctuations in temperature and relative humidity. Perimeter walls can be a source of moisture, particularly if the walls are poorly insulated or lack proper vapour barriers.
- The travel route between storage rooms and display areas should be as direct as possible, avoiding tight corners and stairs.
- There should be enough clear space in the storage room to move artworks (swing space).
- Do not place storage units in areas that are subject to vibration.
Locating and retrieving artworks from storage
Implement a registration system to clearly record the contents of each storage unit by rack or shelf, and put labels on each screen to identify its holdings or contents. This will reduce much unnecessary handling to locate or identify artwork. Many institutions have adopted a bar code system for locating, identifying and retrieving artworks in storage. This is an inexpensive and yet very effective locator system.
Preparing a painting for storage
Framing
Before paintings enter storage, it is preferable to fit them with frames and protective backing boards (as described in CCI Notes 10/10 Backing Boards for Paintings on Canvas and 10/8 Framing a Painting). Some modern and contemporary paintings are left unframed because the painted edges are considered to be an integral part of the artwork which can be seen while on display. For storage, such paintings should be protected with a handling-travel-storage (HTS) frame (refer to Figures 2, 3 and 4 in CCI Note 10/16 Wrapping a Painting). The HTS frame will eliminate the possibility of contact with the painting’s edges or surface during handling or when in storage.
Wrapping or securing in a container
Paintings and frames are best stored in such a way as to protect them from damage caused by physical force, dust, dirt and water. The last three agents can be addressed by wrapping and sealing the painting in polyethylene or Mylar sheeting. This allows for visibility while protecting the works of art. If wrapping is not an option, especially if this is due to condition issues or fragile impasto, then smaller-sized artwork may be stored in a container. Containers can be customized using stable materials such as Coroplast and acid-free multi-ply matboard or purchased as ready-made boxes through conservation suppliers. Larger works can be secured, as described above, in an HTS frame. This can be sealed with polyethylene sheeting either wrapped around the frame or attached, by stapling, to the edges of the HTS opening.
Temporary vertical storage against a wall
Leaning paintings against a wall, especially as this often turns into a stack of paintings, is not recommended as a storage strategy. Stacked paintings are vulnerable both to physical damage from contact with each other and from collision damage from passers-by. If stacking must occur, as a temporary measure, paintings may be placed on skid-proof padded blocks to prevent slippage (as described in CCI Note 10/2 Making Padded Blocks) and stacked using sheets of cardboard as separators (Figure 1). Further considerations include:
- Paintings must be supported at least 7–10 cm (3–4 in.) above the floor to protect them against dirt, dust and possible contact with water. This spacing can be provided by the padded blocks.
- No more than four to five paintings should be stacked together in this manner.
- Cardboard, or other rigid board material, must be placed, as separators, between each artwork.
- Separator boards must be slightly larger than the artworks against which they are placed.
- Ideally, paintings or frames of similar size can be stacked together. If the paintings are of different sizes, place the largest against the wall followed by the next in size and so on down to the smallest.
- Face the last painting on the outside of the stack inward towards a separator to avoid accidentally damaging the painting surface.
- Stack ornate frames face outward, away from the wall, to ensure that as little weight as possible rests on fragile ornamentation. In all cases, the angle of stacking must be secure enough so that the paintings do not slip.
- In any temporary storage space where overhead pipes may be present, the paintings and frames should be covered with polyethylene sheeting to protect them from overhead water drips.
- If paintings are to remain stacked for more than a short period of time, and especially if there is pedestrian traffic, cordon off or isolate the immediate area using temporary barriers or markers.
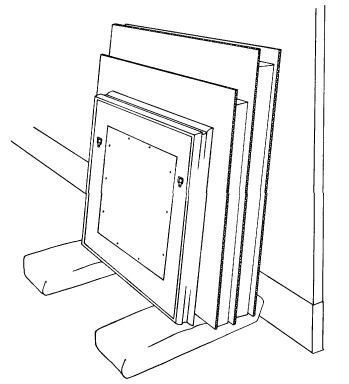
Figure 1. Temporary storage against a wall.
Storage units and strategies
Slotted multi-purpose storage shelves (static storage)
Slotted multi-purpose storage shelves provide a simple, low-cost method for compacting storage of artworks in either a vertical or horizontal orientation. Figure 2 shows two such units. One unit contains vertical shelves that accommodate different sizes of paintings. Vertical storage slots are normally designed to accommodate more than one artwork, and stacking of paintings should follow the guidelines described in the previous section. The middle unit shown in Figure 2 has horizontal shelves for storing fragile or damaged paintings (paint side up) or unframed artwork. Normally, these shelving units are static, meaning that it is the works of art that must be placed onto the shelves and then lifted and/or pulled out. Flat storage shelves could be made extendable and retractable with appropriate fittings. This would improve their function; works of art could be lifted up and off the shelf surface without the risk of striking the next shelf up.
Units can be purchased ready-made or constructed from plywood. If building with plywood:
- Select a medium density overlay (MDO) plywood, such as Crezon, which is an excellent shelving material.
- Sand any wood surfaces and seal with two coats of high-quality exterior or interior grade acrylic latex paint.
- Use acrylic latex varnish if a clear coating is desired.
- Attach a smooth cushioning material (e.g. corrugated twin-wall plastic) to the bottom of the shelves to prevent scratching the back edges of mouldings as frames are moved in and out of the slots.
- Use sheets of cardboard to separate paintings grouped together in the same vertical storage slot.
- Do not overcrowd the shelves.
- Reduce handling by labelling the edges of the cardboard separators in order to easily identify works.
- Drape storage units with plastic sheeting to protect them from dust and overhead water leaks.
- Reduce unnecessary handling by numbering and documenting the contents of each shelf.
Flat pull-out storage shelving units are available as map cabinets. These cabinets are normally constructed of powder-coated metal and contain a series of stacked, pull-out drawers of depths capable of housing smaller frames and most easel-sized paintings. These units provide a degree of protection against water damage and rapid fluctuations of relative humidity.
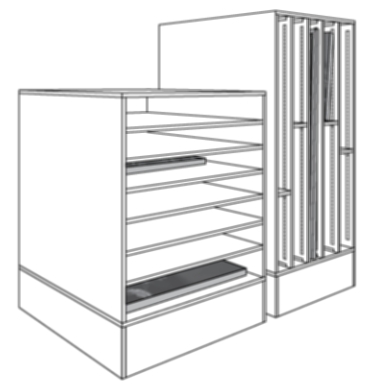
Figure 2. Multi-purpose storage with vertical and horizontal slotted shelves.
Sliding screens
Sliding screens are the safest and most convenient storage method for “suspendable” paintings (Figure 3). Sliding screens are an efficient use of space and permit easy viewing, examination and retrieval of the paintings. Pull-out screens are a high-end storage strategy. Purchase of these units must take into account not just the cost of the equipment, but also that of modifications to the floor and ceiling to accommodate the pull-out feature of the screens, as well as installation. Screens made of rigid wire mesh supported on a metal frame can be purchased from commercial suppliers. The suspended racks can be operated easily, and the screens can be slowed and stopped manually. Each screen should be attached to an overhead track and a floor track on wheels. This allows each screen to be pulled out, giving easy access to the paintings. Systems using only a single overhead track without a floor track may tend to sway.
Two people are required to hang or to remove medium- to large-sized paintings or frames from the rack. Paintings and frames are attached to the screen by means of different hangers depending on the screen type (Figures 4, 5 and 6). Both sides of each screen can be occupied, and paintings and frames can be suspended virtually anywhere given the open rigid metal wire mesh construction of the screens. Before ordering sliding screens, prepare a layout plan for your collection to maximize the use of space.
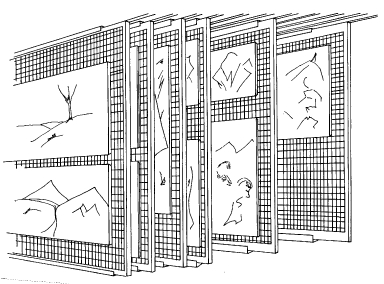
Figure 3. Storage system using sliding screens.
Hanging frames and paintings on sliding storage screens
The following hanging devices can be used to attach paintings and frames to an open-mesh sliding screen. Always secure the hanging devices to the heaviest element, which is normally the frame (as shown in Figures 4, 5 and 6 below). If the auxiliary support for the painting (stretcher or strainer) is heavier or more robust than the frame, then the hanging devices should not be secured to the frame.
A shortened C-shaped hanging hook with a bolt end
As illustrated in Figure 4a, a C-shaped hook with bolt end (or an eye-bolt cut to produce a C-shape) is firmly attached to the sliding screen using nuts and washers on both sides of the screen. Screw eyes or D-ring hangers installed on the back of the frame can then be hung from these hooks. All fittings need to be lined up exactly in order to match hangers to hooks. Ensure that there is enough curvature to the “C” hook to prevent the painting from slipping off if jostled or moved slightly. Cut off the protruding end of the bolt so that this end does not extend much beyond the back of the screen. This system requires two people to hang anything other than small paintings because some manipulation (tipping) of the painting is required to hang the screw eyes or D-rings over the “C” hook.
Similarly, C-shaped hooks can be used to hang works of art on a solid display surface, as illustrated in Figure 4b. It is always necessary to ensure that the point of attachment into the wall cannot be easily dislodged, especially if there is no means of securing it behind the display wall (as in Figure 4a). An anchoring system (as seen in Figures 10a and 10b) will prevent loosening of the screw end of the “C” hook from the wall.

Figure 4a. A frame attaches, by means of a screw-eye, to a “C” hook secured into an open mesh sliding screen through an opening in the rack.
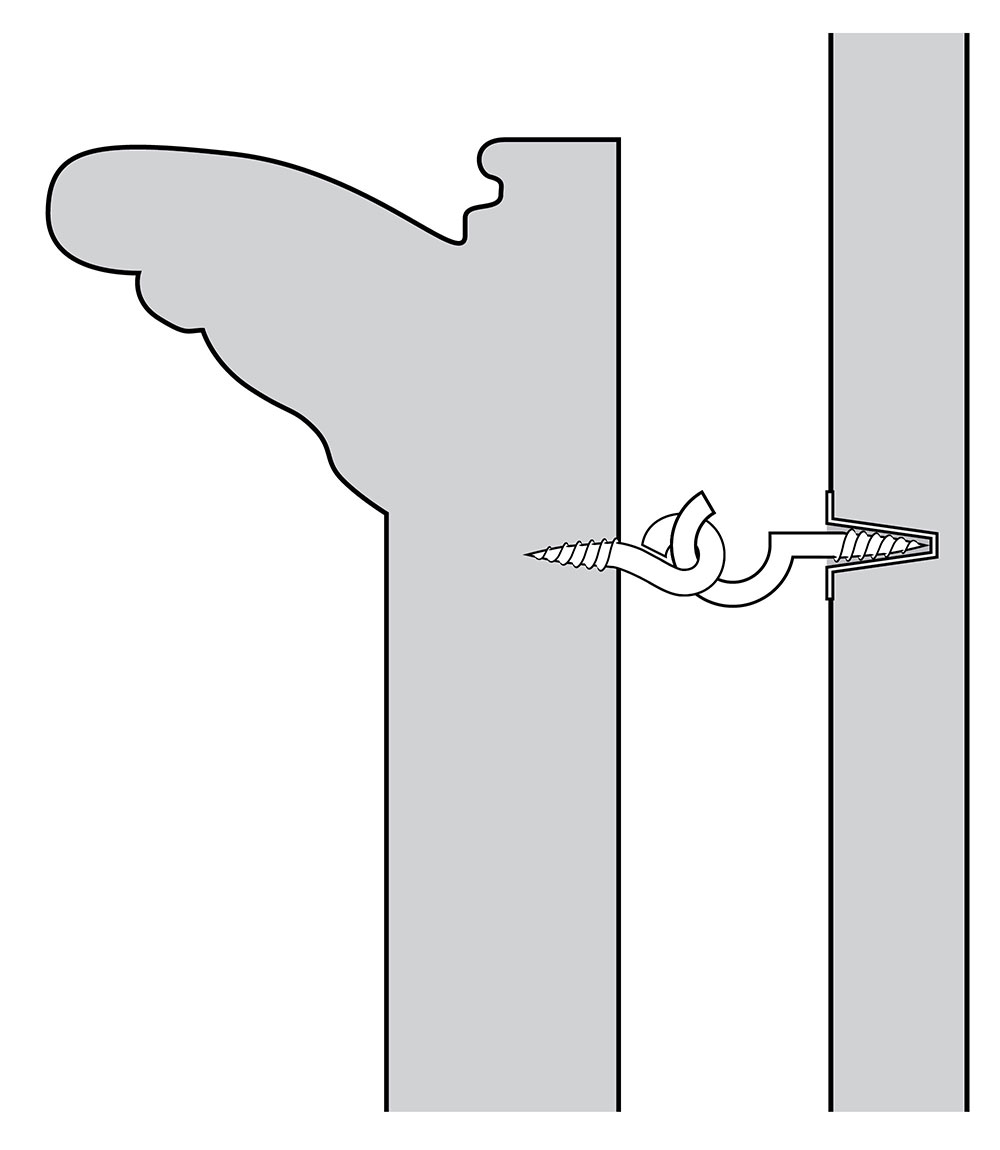
Figure 4b. An anchor secures a “C” hook into a wall. The hook attaches to the frame by means of a screw-eye.
L-shaped hook
An L-shaped hook is essentially identical in concept to the C-shaped hanging hook with a bolt end. It differs in that the L-shaped hanger makes it easier for one person to hang a painting from a sliding screen storage system (Figure 5a). These two hanging systems (C- and L-shaped hooks) are often used in storage areas that are large enough to assign a dedicated storage spot for each painting.
As with the “C” hook, if an “L” hook is used to hang a work of art from a solid display wall, it is important to ensure that the screw end is secured into the wall. In the case of Figure 5b it is secured through an anchor (as seen in Figures 10a and 10b).
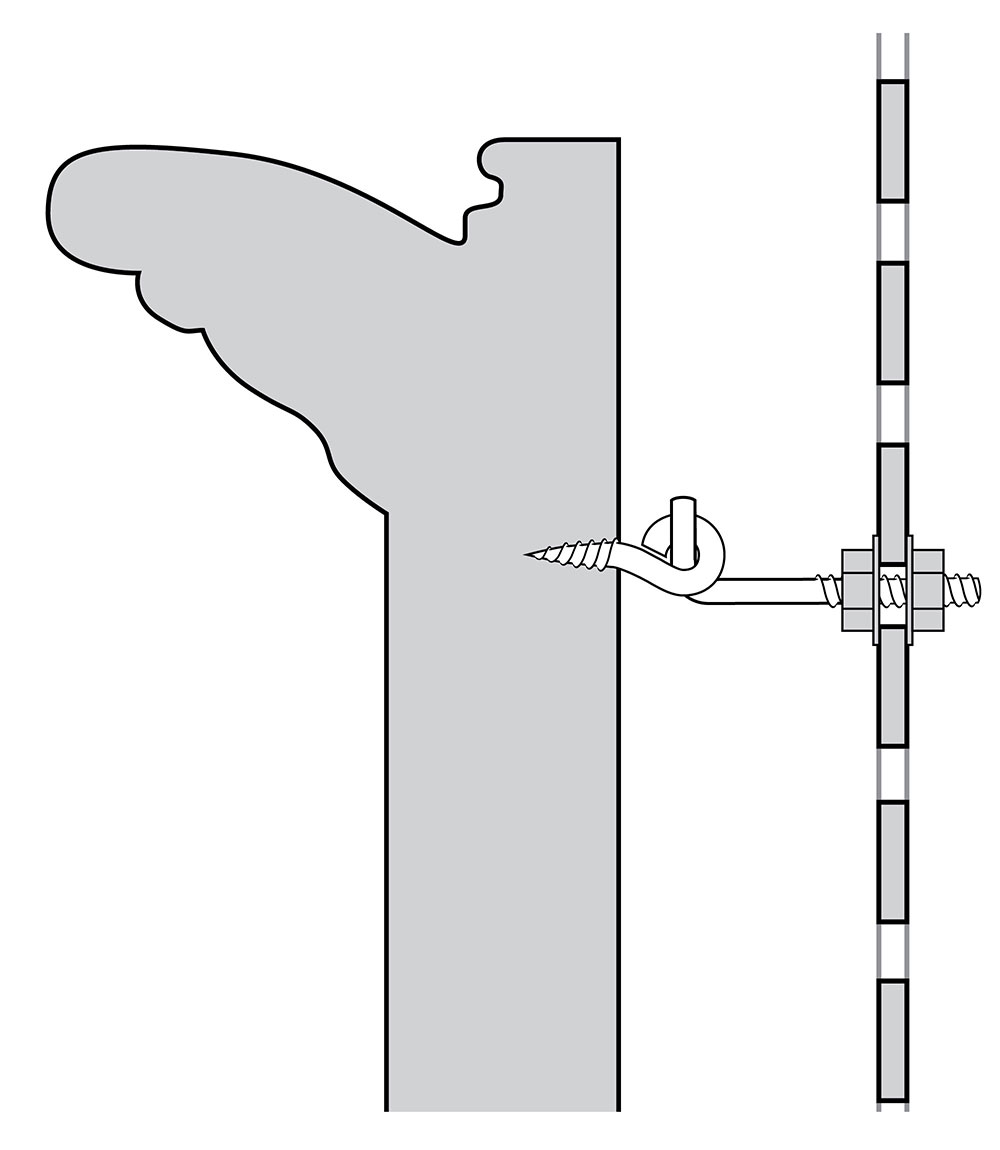
Figure 5a. A frame attaches, by means of a screw-eye, to an “L” hook secured into an open mesh sliding screen through an opening in the rack.
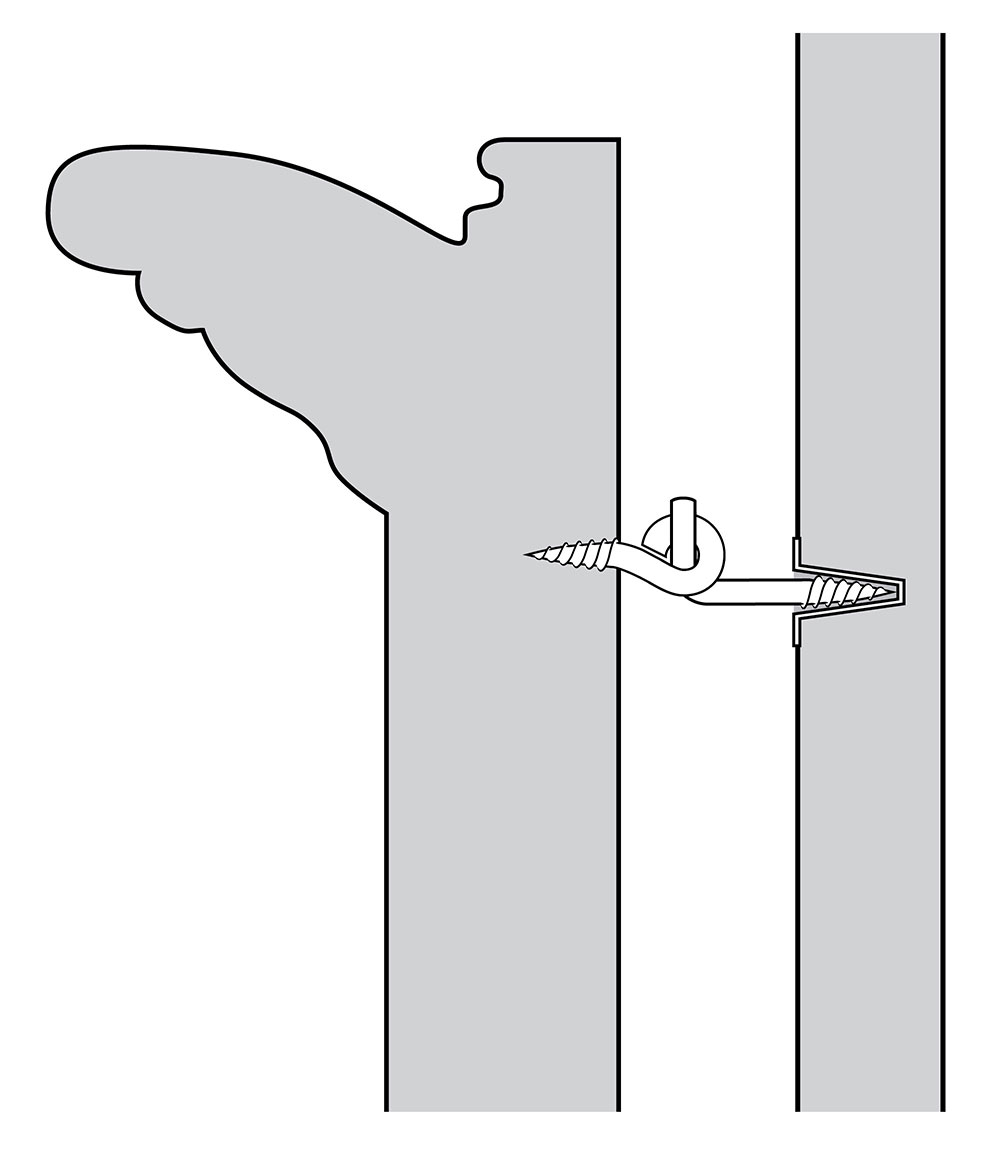
Figure 5b. An anchor secures an “L” hook into a wall. The hook attaches to the frame by means of a screw-eye.
S-shaped hook
An S-shaped hook (Figure 6) is used both for temporary and long-term storage on sliding storage racks. The relative ease with which these hooks can be removed and relocated allows for flexibility in storing paintings. Only one side of the screen needs to be accessed to install the hooks, which can be done by looping them through openings in the screen. Care must be taken, however, when removing or replacing a painting on the screen because these hooks are not firmly attached to the screen and can easily become dislodged. When replacing or removing paintings from the screen, ensure that the S-shaped hooks do not become loose, fall and strike other paintings below. Two people are required to install and remove paintings from this hanging system.
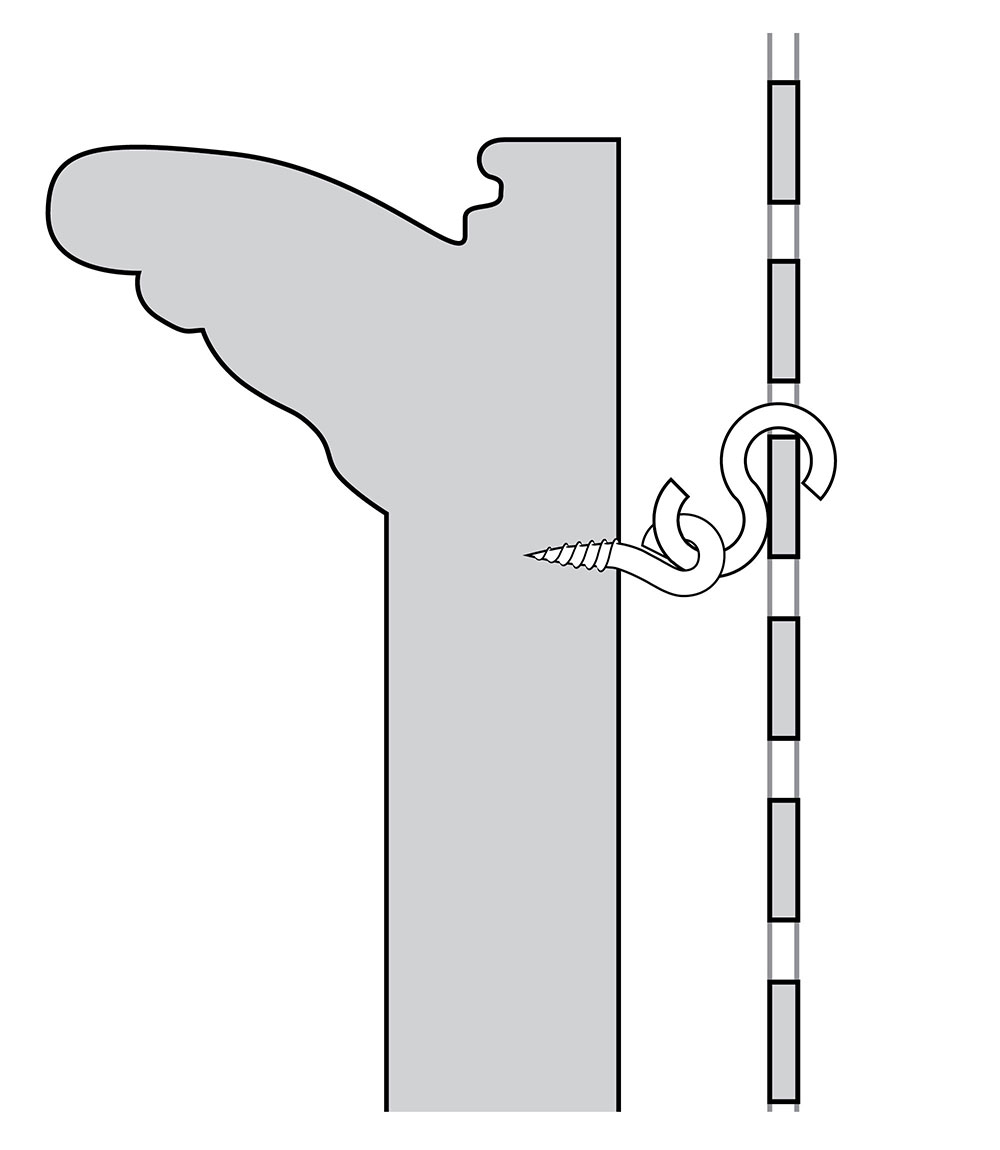
Figure 6. A frame attaches, by means of a screw-eye, to an “S” hook secured into an open mesh sliding screen through an opening in the rack.
Hanging devices for display
There are several options for hanging hardware for installation on frame backs. It is important to determine the maximum weight that each hanging device can support to ensure that it can handle the combined weights of the frame, the painting and glazing, if this is in place.
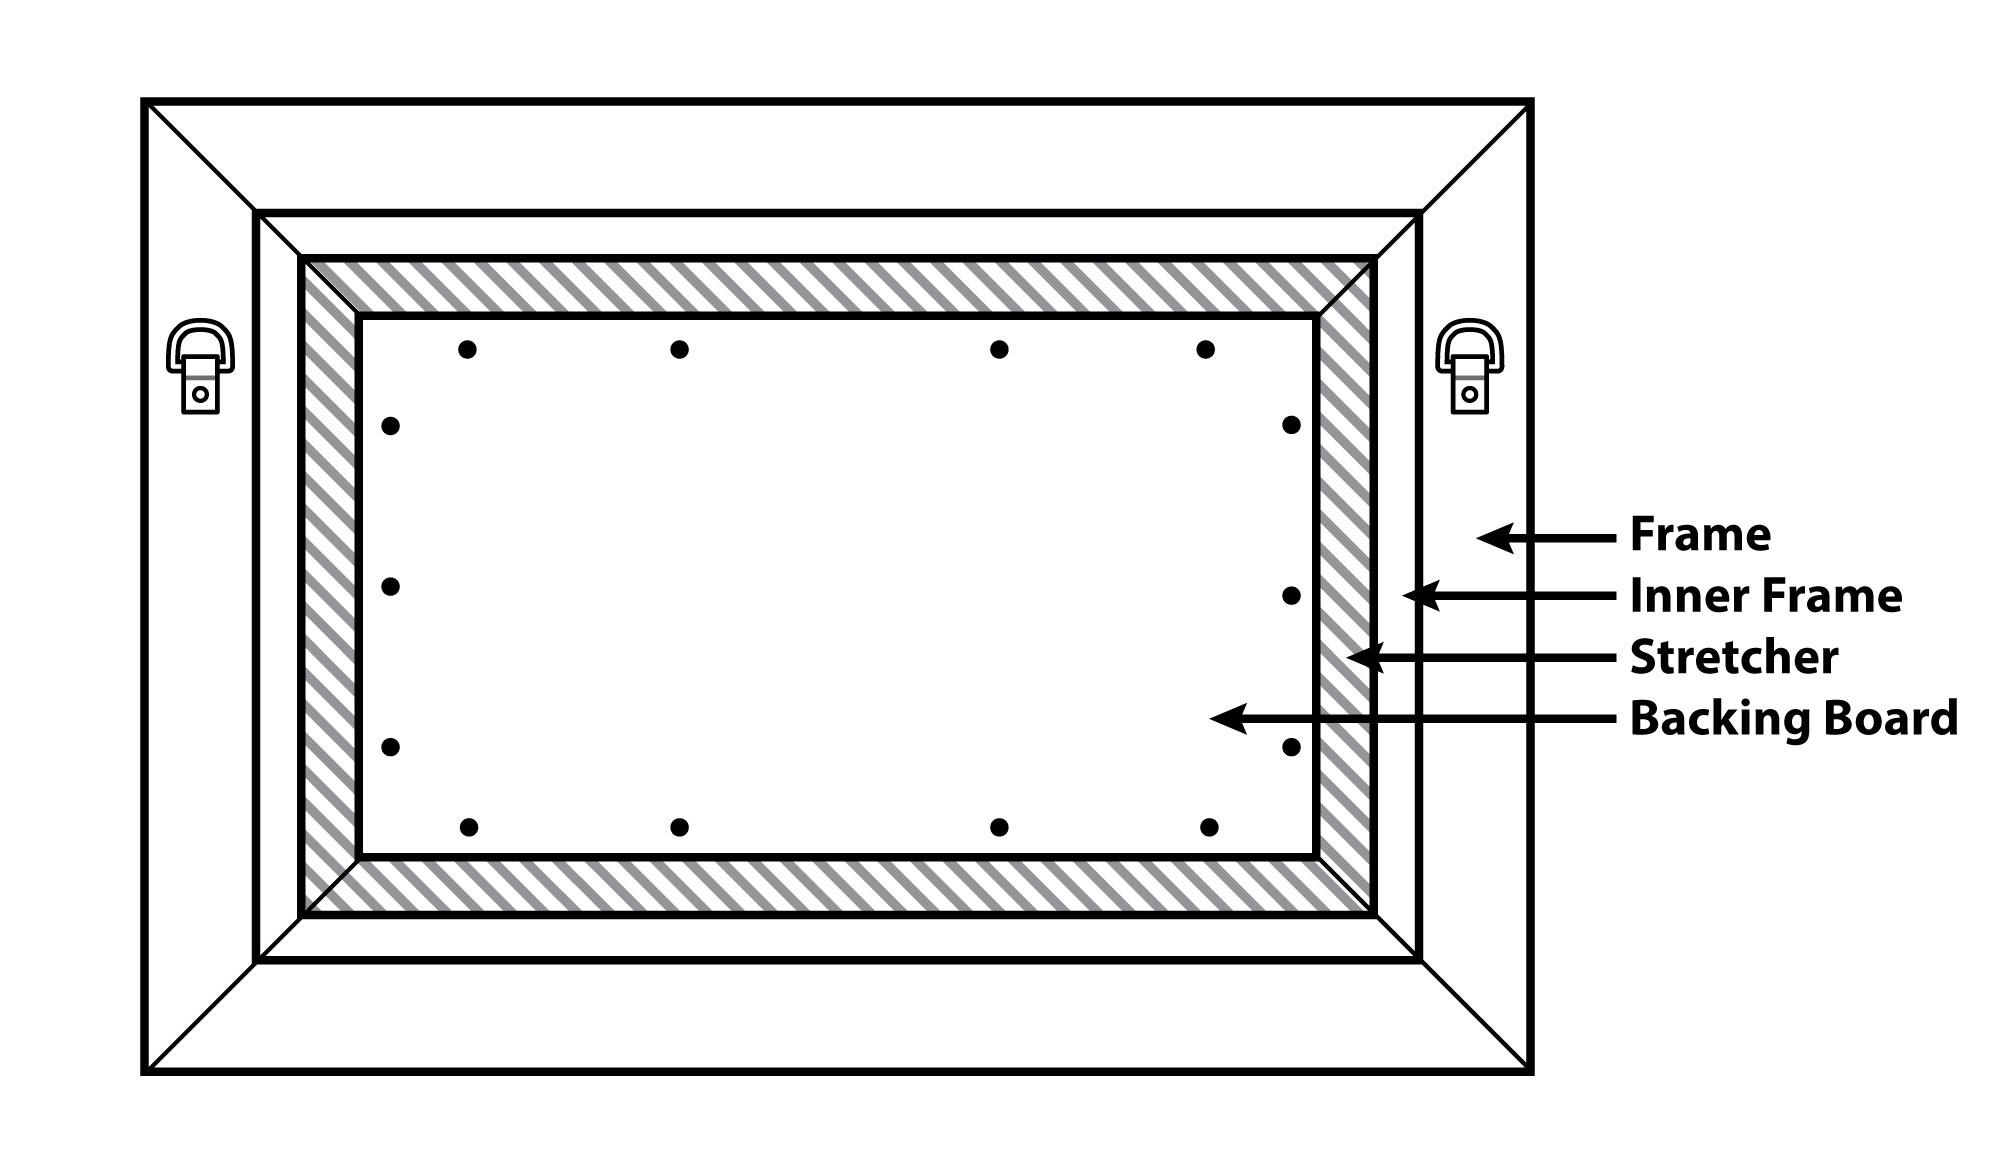
Hardware attached to frame
It is always best to attach hanging hardware to the back of the frame rather than to the back of the painting’s auxiliary support (stretcher or strainer) because, as previously stated, the frame is normally heavier and stronger. Choose the principal frame rather than the liner or an inner frame. Liners and inner frames are not always well attached to the principal frame and are often shallow or narrow and may crack with the introduction of screws. Always be sure to gauge the thickness of the frame element into which you place a screw. Choose a screw (or screw eye) of an appropriate size that will not pierce through to the face of the frame causing damage to the wood and surface finishes. When measuring for length of screw, allow a minimum of 1.5 cm clearance between the tip of the screw and the face of the frame element. The tips of screws, even if these do not pierce through to the front of the frame, can cause raised dimples to form on the decorative surface if the screw tip comes too close to the face of the wood. This will eventually result in cracking and loss of decorative layers above the dimple.
Screw eyes
Two screw eyes are typically installed on a frame to accommodate a picture wire that is then looped onto hanging hardware on the display wall. Alternatively, and preferably, screw eyes installed on the frame can be attached directly, at two points, to hanging hardware on the wall (or onto a sliding screen in storage). This latter hanging strategy has a great advantage in that it eliminates the risk of wire failure. As picture wire ages, this can fray and break. Screw eyes come in different sizes and weights. The choice of which to use depends on the size and weight of the painting and frame as well as the depth of the frame. Drawbacks to using screw eyes include the length of the screw, which is often long and cannot be used on a shallow frame, and the size of the screw eye, which often protrudes noticeably from the back of the painting and frame.
D-rings
D-rings, also known as “mirror hangers” or “ring hangers,” are D-shaped rings threaded through a flat fold of metal (Figures 7a and 7b). The D-rings sit flat to the frame when not in use, but flips up for mounting onto the hanging hardware on the wall. D-ring hangers come in various sizes. The smallest ones have a single hole for screw attachment. Larger ones have two or more holes. Each particular size is designed to bear a certain maximum weight. Exceeding this weight may break the D-ring. The rings are positioned to face each other if wire is used, or placed in parallel, as shown in Figures 7a and 7b, if these are to be hooked onto hanging hardware installed on a wall or on a sliding screen.
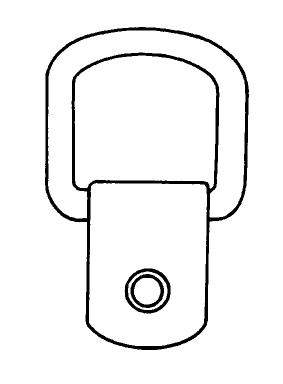
Figures 7a and 7b. A single screw D-ring hanging system.
Hanging devices for heavy paintings
Very heavy paintings will exceed the weight limit of conventional screw eyes and D-rings. In these cases, special-order oversize screw eyes can be bought. The hangers should be fitted directly to hardware secured to studs in the wall, or chains can be used to connect hanging hardware with S-hooks. For exceptionally heavy paintings, use metal cleat hangers or traditional French cleats (Figure 8) that support the painting’s weight across its whole width.
French cleats can be made by cutting several short sections of 18 mm (3/4 in.) plywood sized to fit within the width of the top edge of the frame back. A 45° angle is cut along the long axis of the plywood and one half of the cut section (labelled as “A” in Figure 8) is secured to the frame using long screws. This half is aligned to match the second half that is attached to the display wall (labelled as “B” in Figure 8) over a supporting beam. Several French cleats must be attached along the back of the top edge of the frame. Once the French cleats have been installed, the painting is simply lifted so that the part of the cleat attached to the frame fits over and onto the cleat on the wall. Spacer bars, the same thickness of plywood as the cleats, can be attached either to the frame or to the wall along the bottom edge to ensure even spacing from the wall between top and bottom edges of the painting.
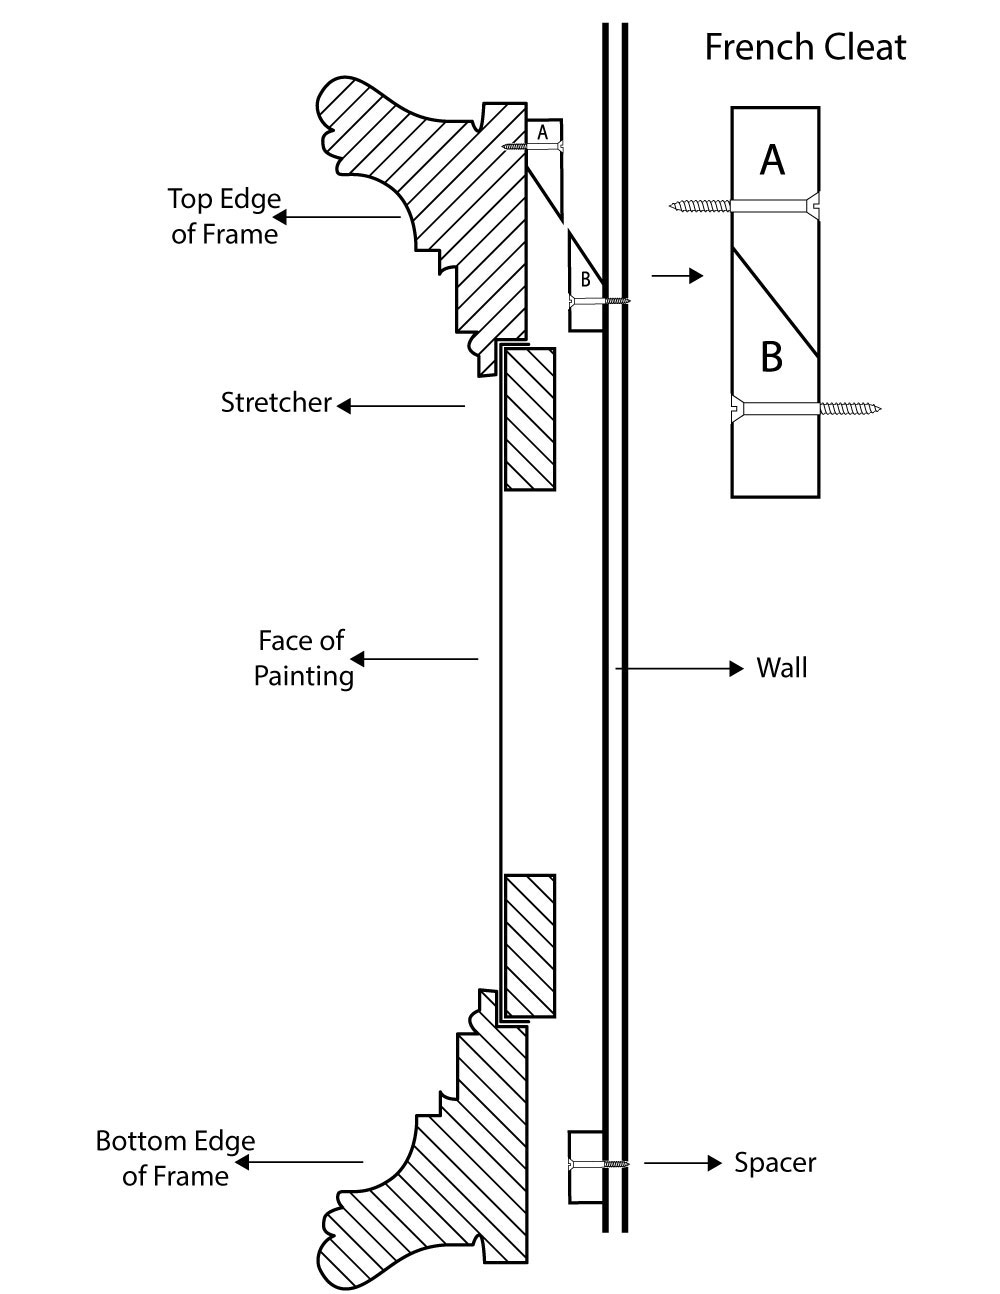
Figure 8. Diagram of a French cleat.
Picture wire
As described above under the Screw eyes section, picture wire is not the best choice to hang paintings, especially oversize or heavy paintings and frames. Wire may become rusty, weakened or worn and broken at points of contact with wall hangers; paintings can easily move off centre; and excess picture wire can damage paintings by pressing against the back of the canvas. If picture wire is chosen for smaller paintings (easel-size and smaller), use plastic-coated cable wires that will not wear and rust easily. Ensure that the painting’s backing board will protect the painting from any possible contact with the wire (consult CCI Note 10/10 Backing Boards for Paintings on Canvas for details on backing boards).
Like screw eyes and D-rings, wire is rated for weight loads. Know the weight of your painting and frame so that you can choose the correct wire. Do not double up the wire in order to extend the weight limit. One of the multiple strands will invariably be stretched tighter and become overly stressed under the full weight load, making breakage, one wire at a time, highly probable. Ensure that the wire, when placed through the screw eyes or D-rings, is securely attached by winding some excess wire back onto itself. Allow enough slack in the wire so that it may be attached to the wall at two points. This will make levelling the painting easier and will prevent the painting from falling if one of the hangers comes loose.
Know your wall before hanging a painting
It is important to ensure that the hanging system you choose is compatible with the wall system in your display space. It may be necessary to install special exhibition walls or to modify existing walls to better accommodate hanging paintings. If the wall is made of plywood, hanging hooks secured with nails (Figure 9) or hanging hooks with screw-threaded ends will hold paintings without anchors or plugs. To safely attach hanging hardware to hollow-core walls, such as drywall and hollow block, drill holes and insert wall plugs or expandable wall anchors (Figures 10a and 10b). Walls made of brick, plaster, stone or poured concrete will also require drilled holes lined with wall plugs into which threaded hanging hooks can be secured.
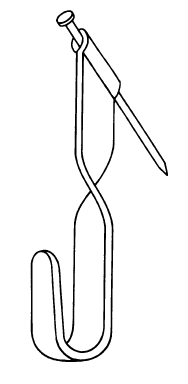
Figure 9. Hanging hook and nail.
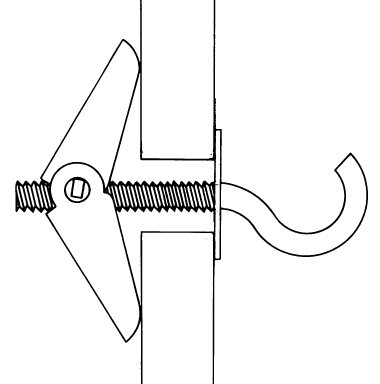
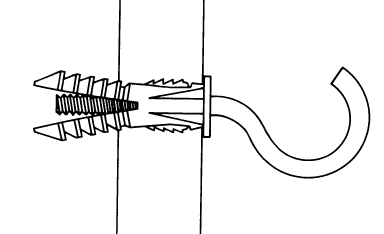
Figures 10a and 10b. Two examples of wall plugs and anchors.
Alternative hanging systems are available that are fixed to the upper part of the wall. These are based on traditional wooden picture rails that incorporate metal tracks. Paintings can be suspended from these tracks using metal or plastic wire (metal is more durable and therefore safer) or metal chain. The advantages of such systems are:
- versatility in positioning on display
- no need for making and patching holes in the wall each time paintings are changed
Factors to consider when choosing display location
For more information on this subject see CCI Note 10/4 Environmental and Display Guidelines for Paintings.
Do not hang paintings in areas where they might be brushed against or touched by passers-by (e.g. in narrow corridors or in stairwells). Rope barriers, platforms or floor markings in exhibition galleries are often used to discourage visitors from getting too close to paintings. Signs can also help to instruct visitors not to touch artwork. Many galleries have installed motion detectors that are triggered at a certain distance from a display object. Never hang a painting at a height at which it can be easily bumped into (by feet, knees, handbags, hands, etc.) without adequate barriers present. Many large contemporary artworks are often installed with their bottom edges near foot or knee level. Preventive measures (e.g. monitoring by a security guard, non-tip barriers, floor markings or choosing an alternative location) should be considered to avoid damage.
Do not hang paintings where they might come in contact with furniture, doors, curtains, blinds or other objects. Cafeterias, kitchens and areas where cooking fumes or foodstuffs are present are not appropriate for displaying paintings. Drafty locations or areas near heat radiators, air vents or fireplaces are also not recommended.
The inside surfaces of exterior walls can be cold in the winter. Unprotected artworks displayed on these walls will be prone to condensation damage. If such walls must be used to display paintings, ensure that there is a backing board installed on the painting (as described in CCI Note 10/10 Backing Boards for Paintings on Canvas) and adequate space for air to circulate between the back of each painting and the wall. Cork or plastic spacers can be attached to the back of a painting to hold the painting away from the wall to create this airspace. Ultimately, fluctuations in temperature and ensuing changes in humidity can be reduced by ensuring that exterior walls have adequate insulation. Exhibit walls may also be installed in an existing room to create an insulating airspace between the exterior wall and the wall used for displaying artwork. Consult with environmental engineers, architects and museum staff to ensure that exterior walls are safe for display purposes.
Additional measures to protect the artwork
Theft can be discouraged by assigning security staff to exhibition areas, by installing video camera surveillance of display spaces, by equipping alternative exits (e.g. fire exits) with alarm systems and by using security hanging devices that make removing the works difficult. Avoid placing paintings in locations where they can be removed quickly and inconspicuously (e.g. close to exits). Do not allow visitors to enter with large bags, knapsacks or other containers that could conceal an art work.
Installing glazing (glass or acrylic) in frames protects against vandalism as well as theft. The glazing will also reduce dust and dirt accumulation on the painting and will help buffer the painting against fluctuations in humidity, as well as exposure to airborne pollutants. Glazing can act as an ultraviolet (UV) filter (the efficiency of the UV filter will depend on the variety of glass or acrylic chosen). For more information on glazing artworks, consult CCI Notes 10/8 Framing a Painting and 11/3 Glazing Materials for Framing Works on Paper.
Suppliers
Note: The following information is provided only to assist the reader. Inclusion of a company name in this list does not in any way imply endorsement by the Canadian Conservation Institute.
- Anti-theft devices:
- Hanging hooks and security hardware:
- Wall track hanging systems:
- Canadian supplier for museum storage systems:
- Montel Incorporated
- (specializes in high-density mobile storage systems, cabinets and painting storage screen systems and related hardware)
- Common hanging hardware:
- local hardware stores
- Recommendations for:
- plywood walls: picture hangers (nails plus hanging hooks)
- brick, plaster, stone or poured concrete walls: wall plugs, screws, threaded hooks, bolts
- hollow-core walls: wall anchors, threaded hooks or eyelets
- Crezon plywood (a medium-density overlaid Douglas fir plywood):
- local lumber suppliers or contact the manufacturer
Bibliography
Bachmann, K., ed. Conservation Concerns: A Guide for Collectors and Curators. Washington, DC: Smithsonian Institution Press, 1992.
Fall, F.K. Art Objects — Their Care and Preservation: A Handbook for Museums and Collectors. La Jolla, CA: Laurence McGilvery, 1973.
Gerard S., ed. Protecting Works of Art. Washington, DC: American Society for Industrial Security, 1978.
Graham-Bell, M. Preventive Conservation: A Manual. Victoria, BC: British Columbia Museums Association, 1986.
Johnson, E.V., and J.C. Horgan. Museum Collection Storage. Paris, France: UNESCO, 1979.
Keck, C.K. A Handbook on the Care of Paintings. New York, NY: The American Association for State and Local History: Watson-Guptill Publications, 1965.
Keck, C.K. How to Take Care of Your Paintings. New York, NY: Charles Scribner’s & Sons, 1978.
Kelly, W. Security Hardware and Security System Planning for Museums. Technical Bulletin 19. Ottawa, ON: CCI, 1998.
Liston, D., ed., Museum Security and Protection: A Handbook for Cultural Heritage Institutions. London, UK, and New York, NY: International Council of Museums in conjunction with Routledge Inc., 1993.
Ministère de la Culture et de l’Environnement, Direction des musées de France, Comité technique consultatif de la sécurité. Prévention et sécurité dans les musées. Paris, France: Imprimerie nationale, 1977.
Pomerantz, L. Is Your Contemporary Painting More Temporary Than You Think? Chicago, IL: International Book Company, 1962.
Schultz, A.W., ed. Caring for Your Collection. New York, NY: Harry N. Abrams Inc., 1992.
Shelley, M. The Care and Handling of Art Objects: Practices in the Metropolitan Museum of Art. New York, NY: The Metropolitan Museum of Art, 1987.
Snyder, J. Caring for Your Art: A Guide for Artists, Collectors, Galleries, and Art Institutions. New York, NY: Allworth Press, 1990.
Stout, G.L. The Care of Pictures. New York, NY: Columbia University Press, 1948.
Witteborg, L.P. Good Show! A Practical Guide for Temporary Exhibitions. Washington, DC: Smithsonian Institution Travelling Exhibition Service, 1981.
By Robert Arnold
Revised by Wendy Baker in 2016
Originally published in 1986
Également publié en version française.
© Government of Canada, Canadian Conservation Institute, 2017
ISSN 1928-1455