
Digitization Plan Framework
Ern Bieman
Disclaimer
The information in this document is based on the current understanding of the issues presented. It does not necessarily apply in all situations, nor do any represented activities ensure complete protection as described. Although reasonable efforts have been made to ensure that the information is accurate and up to date, the publisher, Canadian Heritage Information Network (CHIN), does not provide any guarantee with respect to this information, nor does it assume any liability for any loss, claim or demand arising directly or indirectly from any use of or reliance upon the information. CHIN does not endorse or make any representations about any products, services or materials detailed in this document or on external websites referenced in this document; these products, services or materials are, therefore, used at your own risk.
Table of contents
- List of abbreviations
- Introduction
- Overview
- Plan components
- Cover page
- Plan development team
- Reference to the digitization policy
- Requirements
- Constraints
- Proposed solutions
- Chosen solution
- Triggers for re-evaluation
- Glossary section
- Appendix: Chosen digitization solution
- References
- Bibliography
- Further reading
List of abbreviations
- CCI
- Canadian Conservation Institute
- CMS
- collections management system
- FADGI
- Federal Agencies Digital Guidelines Initiative
- IT
- information technology
- NHDS
- National Heritage Digitization Strategy
- NPTAC
- National, Provincial and Territorial Archivists Conference
- ppi
- pixels per inch
Introduction
Use this framework, developed by the Canadian Heritage Information Network, to guide you through the development of a digitization plan for your heritage institution.
In your digitization plan, you will provide detailed information about which cultural heritage objects will be digitized, when they will be digitized, to what standards, and using what equipment, labour, skills, and other resources. You will also provide information on related activities, such as object selection and treatment, object documentation, digital preservation and publication of digitized objects. Next, you will describe possible solutions for completing this work and justify your chosen solution. Finally, you will provide budgeting information and lay out a work plan with timelines.
Overview
Before creating a digitization plan, which focusses on how to implement digitization work, you should first develop a digitization policy, which focuses on broader questions, such as what you want to digitize and why you want to digitize it. The policy is a short, high-level document that helps justify your digitization work, defines goals and objectives and sets the scope of work to be done. In other words, the policy helps guide the development of the plan.
Also before developing a digitization plan, you should consult Capture Your Collections: A Guide for Managers Who Are Planning and Implementing Digitization Projects. This document provides a solid basis for the work that you will do to develop your plan. Other documents that will help you understand what digitization work entails include:
- How to Scan Reflective Objects Using a Flatbed Scanner
- How to Scan Photographic Transparencies and Photographic Negatives – Supplement
- A Museum’s How-to Guide for Digitizing Audio
- Technical Guidelines for Digitizing Cultural Heritage Materials
- National Heritage Digitization Strategy – Digital Preservation File Format Recommendations (PDF format)
For additional information, consult the “Further reading” section.
A digitization plan is more detailed than a digitization policy document. It focuses on how to implement the goals and objectives that were set out in the policy. By laying out milestones with due dates, the digitization plan is time-sensitive. It considers more detailed questions such as whether work will be carried out in-house or contracted to third parties. It provides details of how standards and best practices identified in the policy will be followed. It describes activities in the digitization workflow, who will carry out the work, the skills they will require and how those skills will be evaluated. It also indicates the equipment, the software and the materials that will be used, the workspace that will be needed, the funding required and how and when these needs will be met within the timelines of the work plan.
The plan provides guidance for all involved in the digitization process and allows management to be aware of and approve the resources that will be invested. For that reason, the digitization plan (as with the digitization policy) must be developed as a joint effort by all affected, and it must be signed by the members of management responsible for ensuring resources are in place.
Finally, the digitization plan is developed in the same manner as a business case. That is to say, not only does the digitization plan provide a solution for digitizing your institution’s collections, but it also includes all the work that went into developing that solution. It documents the information that was gathered, all the possible solutions that were considered and justifies the chosen solution. By documenting all of this work in the plan, not only is the chosen solution justified, but future work is reduced, should the plan need to change. Any disruption in circumstances (for instance, a new mandate, changes to funding or changes to technology) will require less effort to accommodate.
Plan components
The following is a summary of the components that should be found in any digitization plan.
Cover page
Include the following information on the cover page:
- The document’s title
- The date the plan comes into effect
- The current version
- Any superseded versions (struck out)
- Signatures of those who have signing authority to put the plan into action, and signature dates
Plan development team
List who is involved in the development of the digitization plan. Clearly indicate a lead who is responsible for ensuring the plan is developed on time, for organizing and chairing meetings and for gathering and integrating any work produced by other team members. Typically, the lead is a manager who will oversee digitization work, but it may be anyone else familiar with digitization practices who is capable of driving the development of the plan.
If the lead is not a manager, your development team must include members of management who will be responsible for providing and overseeing resources. The lead should be involved in all steps of plan development and should chair all meetings. Management should attend all meetings where decisions affecting resources or major acquisitions are likely to be made.
Further to this, other members of the team will include anyone who is affected by the resulting digitization plan. This includes employees and volunteers who may have expertise in the field, who may be expected to execute the work outlined in the plan and who will work with the resulting digitized objects. These team members must participate in meetings and activities relevant to their needs or contributions, but (in the interests of their own time) may not be involved in all steps of plan development.
Reference to the digitization policy
Draft a few sentences to refer to your institution’s digitization policy, which in turn outlines the justification for the digitization plan, goals and objectives of the plan, scope of work and funding sources.
Requirements
Summarize the wants and needs that drive the plan. The following questions can help to define the plan requirements:
- What needs to be digitized (types and quantity of objects), when should it be digitized and to what standards and best practices?
- To what level of quality should objects be digitized?
- What is the basis for selection and prioritization of objects to be digitized?
- How will the digitized objects be used, and by whom? (This may involve listing some use cases.)
- How will the digitized objects be preserved? (This may tie into a digital preservation policy and plan, and if these exist, the documents should be cited here.)
- How will digitized material be published (if at all)?
- How will digitized material be shared (for example, within the institution, with partners or with the public)?
- Are there any other considerations regarding what must be digitized, by when, for whom or for what purpose?
Requirements can be obtained from a number of sources, including the following:
- The digitization policy (goals and objectives outline what must be digitized, the selection criteria, priorities, etc.)
- Standards and best practices documents (such as those produced by CHIN or the Federal Agencies Digital Guidelines Initiative [FADGI], or resulting from the National, Provincial and Territorial Archivists Conference [NPTAC] or the National Heritage Digitization Strategy [NHDS])
- Staff and volunteers (interviews with staff and volunteers can reveal how digitized objects will be used, how often they will be accessed, what sorts of queries are typical when accessing content, etc.)
- External stakeholders (if content is shared or is accessed online)
- Related plans, policies or other documents that may affect what or how objects must be digitized
The level of quality to which an object should be digitized will be a key requirement. When determining this, one should, at the very least, meet the needs of target users, that is, those who will access the content. Better still, would be to digitize to a prescribed standard (FADGI two-star quality, for instance). Ideally though (and for the sake of future-proofing your digitization work), one might strive to capture all relevant information contained in the original object. For example, target users may require still images of slides to be digitized at 2000 pixels per inch (ppi), so that the 5 x 7 print reproductions they intend to produce are relatively sharp, and this resolution would be in keeping with FADGI two-star quality. But film contains enough detail that a full 4000 ppi is necessary to capture all information about the picture being conveyed by the original slide. It may therefore be ideal to digitize the slides at the higher resolution, but constraints (discussed below) may make this impractical. These needs, wants and constraints will have to be balanced when arriving at a final solution.
In any technical project, it is also common for requirement gathering to be incomplete; take extra time to ensure this step is done properly, as it guides the path of the entire project. In a best-case scenario, you will discover missing requirements at later stages of the planning process, causing delays in the project and increasing the anticipated budget. In a worst-case scenario, incomplete requirements will result in the deployment of a plan that does not suit the needs of the institution.
Constraints
Whereas requirements help define what must be accomplished, constraints represent barriers or limitations faced by an institution when trying to meet these requirements. Constraints include but may not be limited to:
- time (both labour and deadlines)
- money (operational budgets and external sources)
- equipment (to which the institution has access, as well as limitations of current technology)
- software and hardware (presently used by the institution, and what is currently available)
- skill sets (including present skill sets, and those that can reasonably be attained)
- legal limits (including limits imposed by copyright, ownership and usage rights)
You can find constraints by reviewing operational budgets and collections documentation (for copyright and usage rights) and by reviewing or interviewing other sources. Some constraints such as legal limitations may be inflexible, whereas others such as money may be more flexible; for example, management may reallocate internal funds from another priority, or external funding might be possible. As you identify constraints, the project lead should start to consider creative solutions to overcome them.
Proposed solutions
Weigh a number of possible digitization solutions in light of the requirements and constraints identified.
Key questions to consider
At a minimum, you should consider three solutions. When summarizing each solution, focus on its key features. Some key considerations for each solution include the following.
What will be digitized and when?
You may have already answered these questions in the “Requirements” section. However, you may wish to reconsider your answers if funding is an issue or if some items have a higher priority than others. A solution that has minimal funding, for instance, may focus on the digitization of priority objects.
Should work be done internally or contracted out?
Doing work internally offers many advantages, as does contracting out work. In many cases, you will choose a hybrid of both these methods. For detailed information on how to assess the value of contracting out digitization work versus performing it in-house, consult the “Digitizing images in-house versus contracting out” section in Capture Your Collections: A Guide for Managers Who Are Planning and Implementing Digitization Projects.
How will storage needs be met?
The Still Image File Size Estimator Tool (Excel workbook) can help you determine how much storage is necessary when various forms of media are digitized to various levels of quality. You can find additional information on storage space for audio in A Museum’s How-to Guide for Digitizing Audio. There is also an excellent discussion on the types of files to create for preservation and access of digitized content, which you can find in How to Scan Reflective Objects Using a Flatbed Scanner.
How will access to digitized assets be ensured now and in the long term?
In addition to storage space requirements are the larger questions of how to ensure that content is preserved for long-term access (consult the Digital Preservation Toolkit) and how it will be made accessible. In the simplest case, you may not publish content immediately but will store it until a publication solution is found. In other cases, you may upload content to a third-party service (for example, publish it to an external location such as Artefacts Canada or Nova Muse) or publish through a service or application managed by your own institution (such as a collections management system [CMS] or digital asset management system with online publishing capabilities).
From where will funding come?
Look to internal budgets as a primary source of funding, but you may also consider external funding opportunities at the provincial, territorial or federal level, or from the private sector. You can find information on federal funding sources for cultural heritage institutions on the Funding – Culture, history and sport page.
What alternatives are there to funding?
You might also explore creative solutions to purchase equipment if funding is insufficient. These can include bartering, leasing equipment, pooling resources with other institutions that are undertaking similar projects or approaching larger institutions that may have idle equipment.
If two solutions are similar (for instance, two solutions are identical but are looking at two different types of hardware or software), it is not necessary to repeat all the information for the second solution. Instead, simply indicate how they are similar and what is different.
As you propose these solutions, the relative advantages and disadvantages should come to light, and these should be summarized to help facilitate evaluation. One way of doing this is to lay out a pros and cons table, but there may be other methods for comparison that you prefer. An example set of headings and subheadings for this section might therefore appear as follows.
Solution 1
Provide an overview of the proposed solution. Include key details such as what will be done, when it will be done, and what funding, equipment and labour will be required.
Solution 1: Pros and cons
Draft a table of pros and cons.
Solution 2
Provide an overview of the second proposed solution. If it is similar to one where key details have been provided, simply state this, and indicate any differences.
Solution 2: Pros and cons
Draft a table of pros and cons.
Solution 3
Provide an overview of the third proposed solution. If it is similar to one where key details have been provided, simply state this, and indicate any differences.
Solution 3: Pros and cons
Draft a table of pros and cons.
Chosen solution
Indicate the solution you chose, justify the selection, identify known weaknesses and provide recommendations for mitigating the weaknesses. As the chosen solution requires a large amount of information to be fleshed out and is often treated as a standalone document, it is typically laid out in detail in an appendix. Accordingly, in this section, you only need to write a sentence or two, identifying the chosen solution and referring readers to the appendix for further information. Then, move on to the two subheadings below.
Justification for the chosen solution
In this subsection, explain how the chosen solution is the one that best meets the stated requirements within the confines of the stated constraints. Cite the pros that were identified and show how these outweigh the cons better than any of the other solutions considered.
Known weaknesses and disadvantages of the chosen solution
In this subsection, identify any issues with the chosen solution (for example, does it involve letting a third party handle objects or does it assume funding that is not yet obtained) and provide any recommendations to mitigate the possibility of these issues occurring or to reduce their impact.
Triggers for re-evaluation
In this section of the plan, identify any reason that the plan may be revisited. Examples of such triggers include a change to the digitization policy, a change to financing or a discovery that the plan can be improved after a trial period. Summarizing these triggers here will enable you to quickly review them on a regular basis (such as annually), without having to review the entire plan to determine if the plan needs to be modified.
Glossary section
Include in this section any terms or abbreviations used in the document so that those without expertise are capable of understanding it.
Appendix: Chosen digitization solution
Include a detailed description of the digitization plan that will be followed. Start with a broad description of the plan in this main section, followed by more detailed information in the subsections below.
Key elements of the solution
Provide more detailed information about the plan, such as the following key elements:
- Objects to be digitized, including what is excluded (reference the digitization policy, if available)
- How digitization will be carried out (for example, by in-house or external contractors)
- Location where digitization activities will take place and staff involved
- Standards and guidelines to be followed (reference the digitization policy, if available)
- Documentation and metadata to be captured during digitization
- Plans for publication and making digitized objects available
- Preservation plan or policy to be used (if none, add a subsection below to describe preservation activities)
- Time constraints or other important considerations
Details of the digitization workflow
Outline the details of your chosen digitization workflow. Every workflow will differ, but the following is an example of the main activities that you must consider.
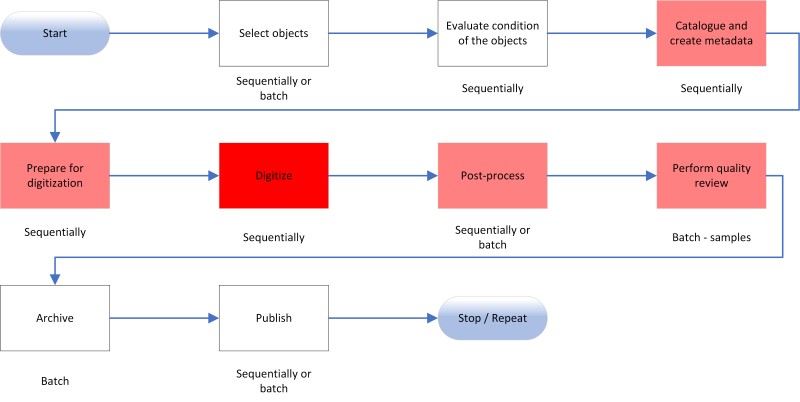
© Government of Canada, Canadian Heritage Information Network. 136376-0001
Figure 1. Example of a digitization workflow.
Description
The diagram outlines nine steps in a digitization workflow:
- Step 1: Select objects
- Step 2: Evaluate condition of the objects
- Step 3: Catalogue and create metadata
- Step 4: Prepare for digitization
- Step 5: Digitize
- Step 6: Post-process
- Step 7: Perform quality review
- Step 8: Archive
- Step 9: Publish
Figure 1 outlines an example workflow for the digitization process. You may wish to modify or add to these steps to suit your needs. For more information, consult the “Workflow” section of How to Scan Reflective Objects Using a Flatbed Scanner and the “Digitization workflow overview” section of A Museum’s How-to Guide for Digitizing Audio.
Following a diagram or description of your chosen workflow, provide detailed information for each step. This should include at least the following information:
- The purpose of the step and an overall explanation of what is accomplished.
- What best practices, guidelines or standards will be followed.
- Who will carry out the work.
- How will each step be carried out within the workflow (for example, sequentially, in parallel with other work or as a batch).
Example of a digitization workflow
The following is an example of a workflow description for the above diagram using a fictitious institution, Anytown Museum (as such, all references to people or to the museum’s internal documents are also fictitious).
Step 1: Select objects
In this step, the museum determines which objects will be digitized and which ones will be digitized first. While this work could be done by inspecting objects one at a time (sequentially), Anytown Museum’s curator and collections manager carry out this work in batches, by selecting and prioritizing either all objects or a large number of objects at once, and by selecting objects according to the priorities set out in the Anytown Museum Digitization Policy, dated February 12, 2024:
- Objects donated by the Willis family, which will be digitized and published prior to August 30, 2024, in accordance with the Willis Museum Contribution Agreement (August 3, 2023).
- All analog audio on electronic carriers where copyright has been cleared will be prioritized for digitization, particularly when additional staff is available in summer months.
- Museum objects dated prior to 1920 where copyright has been cleared will be prioritized over more recent objects, except where more recent objects are chosen based on The UNESCO/PERSIST guidelines for the selection of digital heritage for long-term preservation, as per the Anytown Museum Digitization Policy.
Step 2: Evaluate condition of the objects
In this step, the collections manager and conservator evaluate the condition of each object individually (sequentially) to determine its readiness for digitization. They ensure that handling, evaluation and any potential treatment of an object are done in accordance with the following best practices and guidelines:
- For mould: Technical Bulletin 26 Mould Prevention and Collection Recovery: Guidelines for Heritage Collections
- For general issues related to bound and unbound paper: Paper and books
- For magnetic tape degradation: Caring for audio, video and data recording media
- For film, slides and negatives: Technical Bulletin 35 Care of Plastic Film-based Negative Collections
Step 3: Catalogue and create metadata
In this step, the collections manager and other designated staff ensure that original (physical) objects have been documented in Anytown Museum’s online CMS. If this has not already been done, it will be completed prior to the actual digitization process. While it is common to catalogue several objects in one sitting, staff must enter each record one at a time (sequentially). A second step of cataloguing and creation of metadata will take place after the digitization step to document the digitized object and link that documentation to its original object. When this second documentation step takes place depends on the software being used, and for Anytown Museum, it will be done during the Archive step. If more than one record is needed for any grouping of digital reproductions (as with images on a roll of film, for instance), staff will create and organize records according to Rules for Archival Description (PDF format). They will establish links between the original object and the digital reproductions by adding the object identification (ID) of the related record to the “Related Object ID” field.
Step 4: Prepare for digitization
The collections manager and designated staff prepare individual objects prior to their digitization. This includes labelling physical objects according to the procedures developed by the collections manager, and this labelling must be done one object at a time (sequentially). For the most part, they will organize objects by collection, then media type, with each media type being placed in the staging area appropriate to that particular media (unbound reflective objects in the flatbed scanner staging area, slides in the slide scanner staging area, audio tapes in the AV staging area, etc.). They will digitize selected objects for a given collection prior to moving on to a subsequent collection.
Step 5: Digitize
Staff appointed by the Anytown Museum collections manager complete this step, which is the process of creating the preservation master file (or archival master file), an unedited digital reproduction of the original object. This process is usually done sequentially, meaning that objects are digitized one at a time, although some technologies will allow digitization in small batches. Staff will digitize objects according to the order of objects organized in the staging area. Procedures for each object to be digitized will be developed based on the following documentation:
- For general unbound reflective objects: How to Scan Reflective Objects Using a Flatbed Scanner
- For small transparencies including slides, film and negatives: How to Scan Photographic Transparencies and Photographic Negatives – Supplement
- For audio tapes: A Museum’s How-to Guide for Digitizing Audio
Step 6: Post-process
Staff appointed by the collections manager will complete this step. It involves limited editing (sometimes treating each digital object separately and sometimes treating several digital objects at once) to produce a usable production master file. This master file will be produced at the highest quality and will typically be used as the source file for creating access files (which in turn are developed with a specific purpose in mind). Procedures for the creation of a production file will follow practices laid out in the documents cited in “Step 5: Digitize.”
Step 7: Perform quality review
Staff appointed by the collections manager will complete this step. It involves reviewing the documentation of records in the CMS, as well as reviewing the archival and production master files for the appropriate content, content quality, file naming and file locations. Initially, this work will be done for all digital objects produced, with frequent inspections to review batches of objects. Eventually, as quality proves acceptable, inspections will be done only on a sampling of the batches produced. Procedures will vary according to media type, and procedural documents will be created based on the practices laid out in the documents cited in “Step 5: Digitize.”
Step 8: Archive
While it does not use a formal digital archive, Anytown Museum does carry out digital preservation based on its Digital Preservation Policy (June 6, 2023) and Digital Preservation Plan (August 20, 2023). The collections manager and IT support staff will follow the digital preservation practices according to the digital preservation procedures that were laid out in the Digital Preservation Plan. At this stage, archiving simply refers to ensuring that files are stored in their correct locations, that they are properly documented within the CMS and that basic preservation metadata has been recorded (as per the museum’s digital preservation procedures). This work is generally carried out on batches of files at once.
Step 9: Publish
In this step, the collections manager will make digital images available online through the public-facing portal of Anytown Museum’s CMS. They will also complete the CMS record entries by adding digital reproduction file information to the digital reproduction records (as described in “Step 3: Catalogue objects and create metadata”). While some publishing systems require that objects be published one at a time (sequentially), the system used by Anytown Museum allows the collections manager to do all of this activity in batches, at regular intervals.
List of procedural documents
After the workflow section, in which you have laid out general workflow steps, you can flesh out the procedures involved (such as how to operate scanning equipment or how to perform post-processing work). Because each of these procedures is best explained in a separate document, you can create additional appendices, or sub-appendices, for each one. While it is common to draft these procedures based on guides (how-to guides for instance) and best practices, you may then need to revise your procedures once you have actually attempted them (for example, once the digitization workflow is up and running). Be sure to list each procedural document and its current status (for example, whether it is projected to be created, in draft mode or has been signed off on).
Work plan for implementing the solution
In this section, outline in detail what work must be done to carry out the solution. A work plan differs from a workflow, which describes ongoing digitization (and related) work once a system for digitization is in place. The work plan, by contrast, describes all the work that is needed to implement that system. It includes information such as the people required for each task, the tasks, time invested per task, milestones, deliverables, and start and completion dates of each task. You could display this information as a Gantt chart, or as a simple table.
Work plans are typically bound by time, meaning that all tasks in them have an anticipated end date. For this reason, you should exclude from your plan any work that is not time sensitive (such as ongoing digitization activities) and that does not have a specific due date. Activities that are typically found in a digitization work plan include the following:
- Any work to secure resources for digitization (funding, staff, volunteers)
- Any work to procure a workspace, equipment, software, services and supplies
- Work related to training
- Fleshing out and testing workflows (either for in-house digitization or contracting out)
- Fleshing out and reviewing procedures documents
- Any work within the digitization workflow (either done in-house or contracted out) if, and only if, it is work that needs to be done by a specific time
| Activity or milestone | Person responsible | Hours required | Resources needed | Start date (YYYY-MM-DD) | End date (YYYY-MM-DD) | Deliverables |
|---|---|---|---|---|---|---|
| Project kickoff meeting |
|
|
None | 2024-06-10 | 2024-06-10 | None |
| Acquire and set up flatbed scanner and scanning software |
|
|
FADGI technical guidelines and funds for scanner and software | 2024-06-11 | 2025-06-30 | Flatbed scanner and software installed |
| (MILESTONE): Test and approve workflow procedures |
|
|
Draft procedures | 2024-08-12 | 2024-08-23 | Approved procedures |
List of resources needed
List the resources needed as inputs into the project. These may include equipment, materials, software and software services. Note that some deliverables produced within the project may serve as resources for subsequent steps (approved digitization procedures, for instance). Such internally produced works need not be listed here.
Budget
The budget shows all financial needs and how they will be met. It must therefore have two sections with numbers that balance. The first section lists all items required for the project that have a dollar cost to the institution. The second section lists funding sources and the anticipated dollars available from each funding source.
Digitization projects may also have a time-based component, and a component that is indefinite. For example, the initial setup costs for a digitization project (largely found in the work plan) are one-time costs. Likewise, digitization work that must be completed by a certain date is time-based work. Conversely, labour for core digitization work (day-in, day-out digitization that will become a regular part of operations) is not necessarily time-based work. If a cost is linked to time-based work, then funding can come from a one-off source (a grant for instance). However, funding for ongoing work should come from regular, more reliable sources: the institution’s operational funds for instance. You should break up your budgets to clearly show one-time costs versus ongoing costs to ensure your plan is financially sustainable.
Finally, some resources may not have a financial cost associated with them, either because the resource is already available (or declared as part of an operational budget) or because it has been donated in kind. You should declare these resources as footnotes, rather than as line items. Note that some funding agencies have different rules about financial statements (allowing you to declare in-kind donations in a funding application, for instance). It is acceptable to have two separate budgets that report the same information differently for different audiences, as long as the differences in information can be accounted for (usually included as footnotes).
Example budget
Expenses (Note: a used computer capable of running the flatbed scanner, scanning software and post-processing software is being contributed in kind by a museum volunteer.)
- Flatbed scanner: $1,200
- Scanning software: $200
- Tables: $400
- Scanning supplies: $400
- Intern salary for summer of 2024: $14,000
- Total: $16,200
Funding sources
- Funds from institution’s operating budget: $6,400
- Young Canada Works Grant: $9,800
- Total: $16,200
References
In this final section of the plan components, include any references to internal and external documents. Internal documents will include any institutional budgets, policies, strategy documents or agreements affecting the work. External documents will include, at a minimum, the standards, best practices and guides considered.
This concludes all components that should be found in a digitization plan.
Bibliography
Bieman, E., Capture Your Collections: A Guide for Managers Who Are Planning and Implementing Digitization Projects, revised. Ottawa, ON: Canadian Heritage Information Network, 2020.
Bieman, E. How to Scan Photographic Transparencies and Photographic Negatives – Supplement. Ottawa, ON: Canadian Heritage Information Network, 2023.
Bieman, E. How to Scan Reflective Objects Using a Flatbed Scanner. Ottawa, ON: Canadian Heritage Information Network, 2023.
Bieman, E. A Museum’s How-to Guide for Digitizing Audio. Ottawa, ON: Canadian Heritage Information Network, 2024.
Bieman, E. et al. Still Image File Size Estimator Tool (Excel Workbook). Ottawa ON, Canadian Heritage Information Network, 2023.
Bureau of Canadian Archivists. Rules for Archival Description (PDF format), revised. Ottawa, ON: Canadian Council of Archives, 2008.
Canadian Heritage Information Network. Digital Preservation Toolkit, revised. Ottawa, ON: Canadian Heritage Information Network, 2021.
Choy, S., et al. The UNESCO/PERSIST guidelines for the selection of digital heritage for long-term preservation. [N.p.]: UNESCO/PERSIST Content Task Force, 2016.
Department of Canadian Heritage. Funding - Culture, history and sport, [n.d.].
Hill, G. Care of Plastic Film-based Negative Collections. Technical Bulletin 35. Ottawa, ON: Canadian Conservation Institute, 2020.
National, Provincial and Territorial Archivists Conference Audiovisual Preservation Working Group and the National Heritage Digitization Strategy Steering Committee. Recommendations on Preservation Files for Use in the Digitization of Analog Audio and Video Recordings and Motion Picture Films. [N.p.]: National, Provincial and Territorial Archivists Conference Audiovisual Preservation Working Group and the National Heritage Digitization Strategy Steering Committee, 2018.
Rieger, T. et. al. Technical Guidelines for Digitizing Cultural Heritage Materials (PDF format) 3rd edition. Washington, D.C.: Federal Agencies Digital Guidelines Initiative, 2023.
Further reading
Bieman, E., and W. Vinh-Doyle. National Heritage Digitization Strategy – Digital Preservation File Format Recommendations, revised. Ottawa, ON: Canadian Heritage Information Network, 2019.
Canadian Heritage Information Network. Capture Your Collections 2012 – Small Museum Version. Ottawa, ON: Canadian Heritage Information Network, 2012.
Canadian Museum of Civilization and Canadian War Museum. Digitization Standards for the Canadian Museum of Civilization Corporation (PDF format). Ottawa, ON: Canadian Museum of Civilization and Canadian War Museum, 2006.
Guild, S. Caring for Paper Objects. Preventive conservation guidelines for collections. Ottawa, ON: Canadian Conservation Institute, 2018.
Iraci, J., R. Hess and K. Flak. The Digitization of Audiotapes, revised. Technical Bulletin 30. Ottawa, ON: Canadian Conservation Institute, 2020.
McNair, C. Basic Care of Books, revised. CCI Notes 11/7. Ottawa, ON: Canadian Conservation Institute, 2022.
Oetzmann, T., D. Mazzoni, et al. “Sample Workflow for Tape Digitization” [Tutorial]. Audacity 3.3 Reference Manual. [N.p.]: Audacity, 2023.
Roemer, C. “Cleaning Tips Before Digitizing Slides and Photos.” Aperture [blog], [n.d.].
© Government of Canada, Canadian Heritage Information Network, 2026
Published by:
Canadian Heritage Information Network
Department of Canadian Heritage
1030 Innes Road
Ottawa ON K1B 4S7
Canada
Cat. No.: CH44-192/2026E-PDF
ISBN 978-0-660-97788-1