
Caring for paintings
Debra Daly Hartin and Wendy Baker
Caring for paintings is part of CCI's Preventive conservation guidelines for collections online resource. This section presents key aspects of managing the care of fine arts paintings in heritage collections based on the principles of preventive conservation and risk management.
Table of contents
- Understanding the structure and materials of paintings
- Causes of damage to paintings and preventive conservation strategies
- Examples of preventive conservation practices
- Bibliography
List of abbreviations and symbols
Abbreviations
- ASTM
- American Society for Testing and Materials
- BCE
- before common era
- CCI
- Canadian Conservation Institute
- CE
- common era
- HDF
- high-density fibreboard
- HTS
- handling-travel-storage
- ISO
- International Organization for Standardization
- LED
- light-emitting diode
- MDF
- medium-density fibreboard
- RH
- relative humidity
- UV
- ultraviolet
Symbols
- °C
- degree Celsius
- µW/lm
- microwatt per lumen
- CaCO3
- calcium carbonate
- CaO
- quicklime
- Ca(OH)2
- calcium hydroxide
- nm
- nanometre
- pH
- potential of hydrogen
Understanding the structure and materials of paintings
What constitutes a painting?
Paintings are complex, three-dimensional structures composed of a variety of materials combined in many different ways. Paintings are meant to convey meaning (spiritual, religious, political, symbolic, decorative, conceptual, etc.) through the thoughtful and deliberate application, by the artist, of a fluid, pigmented (colour-bearing) medium onto a flat support surface. The following section will outline a number of the materials used to produce paintings along with a brief explanation of how these different materials can behave.
Support systems
Supports for paintings are enormously varied and can range from stone, plaster, concrete and brick to fabrics (such as linen, cotton or synthetic fabrics), wood, laminated wood, compressed wood fibreboards (such as Masonite) and paper-based boards (referred to as paperboard, card or canvas board). Artists have also used a variety of other materials such as metal, ivory, glass and porcelain. The support has a major influence on the behaviour and deterioration of a work of art and is often the determining factor in choosing the best handling, framing, storage and display methods for the painting.
Stone
Likely, the earliest support system which could provide a durable surface on which to apply a painted image was stone. Given the inherent stability of stone, especially in sheltered locations, works of art produced on these surfaces have endured over centuries and millennia. Prehistoric images of animals, human figures and handprints as well as esoteric symbols remain as evidence of artistic endeavors from multiple civilizations across virtually all continents.
Limestone, granite and sandstone rocks were commonly chosen as paint support surfaces. The paint was applied directly to the rock surface using a multiplicity of tools and methods (fingers, brushes, feathers, blown-dry pigment). The penetration of the paint binder into a porous rock guaranteed adhesion. Where the rock face is exposed, gradual weathering of painted images over time causes fading or, in extreme cases, obliteration. Where the rock face is in a protected location and is subject to ground water seepage, water-borne minerals deposited on the surface of the rock seal the painted images under a semi-opaque coating.
Stone continued to be used as a durable paint surface, as evidenced by portraits painted directly on thin sheets of (mostly) limestone in the north of Italy during the 15th and 16th centuries. Given the brittle nature of thin sheets of stone, the most common damage to this kind of painting is breakage of the support.
Plaster
Another very ancient painting support is plaster, specifically lime plaster, which is applied to wall surfaces. Fresco paintings are created on these surfaces using either pigments suspended in water on damp to partially dry plaster or pigments suspended in a medium onto fully dried plaster. The Minoans, Greeks and Romans used this technique, as did, most famously, Italian artists of the Renaissance. In the latter case, the plaster was prepared by calcining (burning) limestone to make quicklime (CaO). The quicklime was then slaked with water to produce calcium hydroxide [Ca(OH)2], and when thoroughly slaked, the plaster was trowelled onto the supporting wall in two to three layers. The first layer (arriccio) was the rough coat and the final layer or layers (intonaco) made up the fine coat or coats. As the intonaco dried, it absorbed ambient carbon dioxide and converted the quicklime to calcium carbonate (CaCO3).
Three different painting techniques can be used on this plaster surface: buon fresco, mezzo fresco or fresco secco. With the buon fresco and mezzo fresco techniques, the plaster should be finished to a smooth surface. Fresco secco can be applied directly to a dried plaster or above buon fresco or mezzo fresco surfaces. To ensure a better adhesion of a fresco secco layer applied directly to the plaster, this plaster surface should be roughened. For a description of these techniques, refer to "Fresco" in the section Binders for paint media.
Concrete and brick
Both concrete and brick have ancient lineages. An early form of concrete was used by the Romans for building. This concrete contained lime, volcanic ash and water. Modern concrete utilizes Portland cement as the binding agent, combined with gravel, sand and water. It is possible that Roman concrete could have been painted on; certainly modern Portland cement-based concrete can be stained or coloured, and it is an attractive support for sprayed graffiti art. Due to its porous nature, concrete can absorb binder; the pigments are then drawn into the surface and/or sit on the surface, and if the binder is not water-sensitive, the dyes, stains or pigments can remain reasonably undisturbed even in outdoor environments.
Bricks (or clay mud surfaces) have long been used as painting supports. Painted walls built of clay or baked clay–straw bricks can still be found in protected interior environments. Meroitic temple paintings from the Kingdom of Kush dating between 800 BCE to 350 CE and Chinese temple paintings dating from 600 BCE to the 13th and 14th centuries CE, for instance, both used a clay mud mixed with organic matter on which to paint. The clay mud surface was prepared with a lime wash above which distemper-type paints were employed.
Today, artists are commissioned to create designs on exterior brick walls using acrylic paints, for example. Exterior-grade acrylic paints with high ultraviolet (UV) resistance have been specially formulated for painting outdoor murals. When painting exterior brickwork for artistic purposes, it is necessary to keep in mind that the brick surface needs to be in good condition and unaffected by salt efflorescence. Any paint layer applied to the surface must also allow the brick to absorb and give off moisture. Even given these precautions, exterior painted brick is subject to weathering, fading and potentially spalling in response to outdoor conditions.
Wood
Wood as a support for decorative layers probably has a very ancient lineage, but given its organic nature, the risk of loss is reasonably high through decay and destruction by pests or fire, among other agents of deterioration. Nevertheless, exquisite paintings on wood have been preserved since antiquity—the Fayum portrait paintings being a case in point.
Before the advent of fabric supports, wood or panels constructed of wood were the major support system for painterly artistic expression in Europe. Smaller scale paintings, such as icons, could be made from a single plank, while large-scale paintings were made by joining numbers of planks together and/or hinging planked assemblages to make diptychs or triptychs. Panel makers chose quarter-sawn planks, as these were less likely to warp or to twist with fluctuations in relative humidity (RH). When ready for painting, the artist would apply a layer of gesso, normally made of chalk and animal glue, to the surface of the wood. This was applied in multiple coats, first rougher coats and then finer coats, before the application of a size layer and then the paint. A layer of fabric could be glued to the wood prior to the application of gesso layers to assist with the keying-in of the gesso.
Wood species used for panel paintings depended largely on the region: northern Europe favored the use of oak; Spanish paintings were executed predominantly on pine; and poplar was used in Italy. Small-scale paintings or paint sketches became very popular with artists in the 20th century, especially for artists undertaking plein-air painting away from the studio and often on long trips involving treks into rugged landscapes. The small, thin panel could be easily transported and stored in a painter's box. These panels were most often made from birch ply but could be manufactured from oak, cedar, walnut or mahogany.
Wood can provide an excellent support for paintings. It is a hygroscopic material, however, and will swell and shrink across the grain with uptake and loss of moisture. Given that the coefficient of swelling for wood is greater than that of chalk and glue-based gesso, when the underlying wood expands in response to an increase in humidity, then gesso and overlying paint layers crack along the grain. This results in the characteristic crack pattern seen on most wood panel paintings, with fine craquelure all oriented in the same direction in the paint and ground layers.
The production of hardboard panels began in the late 19th century (Salazar 2013). These were engineered wood boards, which have the advantage of being less reactive to RH fluctuations than solid wood planks or panels. There are a number of varieties of engineered boards, from laminated plywood to wood-fibre compressed hardboards. Laminated plywood is a very stable material since the plies are stacked with their grain running perpendicular to the previous veneer. Plywood can vary in thickness and in the number of layers. The thicker the ply, the less likely it is that the board will warp.
Compressed hardboards are manufactured to different densities. High-density fibreboards (HDF) are less susceptible to moisture absorption than medium-density fibreboards (MDF). The hardboards MDF and HDF are made from two processes: wet/dry and dry. Masonite is an example of a wet/dry process in which wood fibres are ground, steamed and heat-pressed. Lignin, released from the wood fibres during the processing, acts as the only binding agent. Hardboards made using this process can be smooth on one or both sides.
Dry process fabrication involves breaking down the wood fibres and then binding them using urea-formaldehyde (or other synthetic binders) and heat-pressing. Tempering can also be used to adjust the nature of the hardboard. Tempering involves the application of a layer of pH-neutral oil (originally linseed oil) to one or both sides of the board. This results in a board with higher moisture resistance and strength. Often, the presence of an oil layer on the surface of a hardboard panel can result in problems of adhesion between ground layer or priming layer and board surface. Special preparation is required with tempered boards in order to ensure good adhesion to this surface.
Paperboard or card
Paperboards can be made from a variety of materials. Wheat or rice straw can be boiled and then heat-set to form plies for lamination. Wood pulp and paper waste, or a combination of the two, can also be used to manufacture paperboard or card. The wood pulp is chemically treated to break down the wood fibre and to delignify the pulp in order to reduce the colour. Paperboard based on waste paper recycling can often have a grey appearance given the presence of inks and adhesives. These paperboards are frequently blended with wood pulp to increase strength. To fabricate paperboard, plies are formed singly and then bonded together to achieve different caliper thicknesses. Often, boards are coated with white pigments and a binder to produce a brighter surface finish.
Paperboards were developed for a number of commercial and industrial uses rather than as artists' materials. Paperboards were designed for the packaging industry, for food containers and bookbinders' covers, among many other applications. Given the presence of wood pulp and the potential acidic residues left from bleaching processes, many of these paperboards are not durable. Paperboard or card can be painted on directly with a water-based paint or a primed canvas adhered to the surface to provide a more stable support for the application of oil, acrylic emulsion or other paint (artist canvas board).
Fabric
This is the most commonly known of painting supports. Fabrics began to be used in the 15th century in northern Europe as a support for oil-based paintings. They gradually displaced wood supports. Fabrics allowed for large-scale, lightweight paintings which could be easily transported, as canvas can be rolled and then relocated, unlike large paintings on wood. Fabric supports, until the mid-20th century, were made largely of bast fibres, primarily linen, but also jute.
Before the design of industrial machines which could spin threads of consistent size and looms which could produce consistent weaving, fabrics tended to be heavyweight with a somewhat loose weave pattern. The most common fabric pattern was plain weave with one-to-one weft and warp ratios. With the industrial revolution, fabrics with higher thread counts and tighter and more consistent weave were available to artists. Cotton fabric has now overtaken linen as a primary support for paintings, as it is much more commonly available and a less expensive commodity than linen.
All fabrics based on organic materials have the characteristic of responding to humidity fluctuations. Fabric takes up and loses moisture in response to ambient RH conditions. This causes movement in the fabric that can result in tightening at high humidity and then gradual slackening at low humidity. Ripples along the edges and draws at all four corners of a stretched canvas can develop during low humidity cycles given differential movement across the face of the canvas, with the edges of the canvas shrinking less than the centre. Organic materials also undergo oxidization over time. As a result of this oxidization, the canvas becomes acidic and begins to break down. This degradation is evident in yellowing and embrittlement of the canvas, as seen in older paintings.
New synthetic fabrics such as acrylics or polyester, which do not respond to shifts in humidity and are not prone to acid degradation, are not yet popular. One advantage to natural fibres over synthetics is the ability of the natural fibre to rebound from stretching. If a painting on linen or cotton develops a bulge, or is forced out because of a blow or applied pressure, the fabric can often correct this deformation given its ability to change dimensionally (swell and shrink) in response to ambient humidity levels. Synthetic fabrics, on the other hand, as they are not hygroscopic materials, will not recover from any structural alteration.
Canvas, which is the primary painting support, must be stretched over a framework in order to maintain tension. This framework is referred to as the auxiliary support and is made of a system of thin wooden bars or members secured together at the four corners.
In a strainer, corners are fixed with adhesive and/or nails and are unmovable (Figure 1).
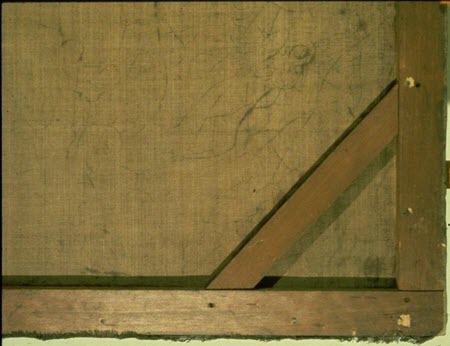
© Government of Canada, Canadian Conservation Institute. CCI 122309-0003
Figure 1. The non-expandable corner of a strainer. This corner is a butt joint with possibly a half-lap assemblage and diagonal bracing for added structural stability.
A stretcher, conversely, has corners that may be opened through mortice and tenon joints. These joints are controlled by a system of keys that can be pressed and tapped into the corner to force the joint apart and increase tension on the painting (Figures 2a and 2b).
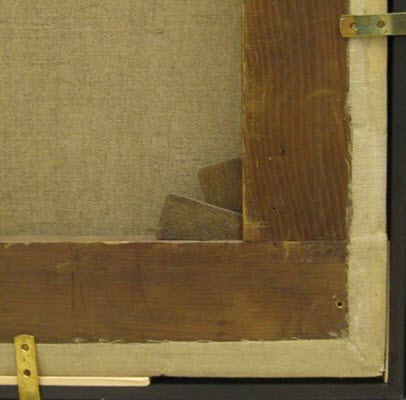
© Government of Canada, Canadian Conservation Institute. CCI 122308-0001
Figure 2a. Expandable stretcher, butt joint, mortice and tenon corner (consult 2b) with keys.
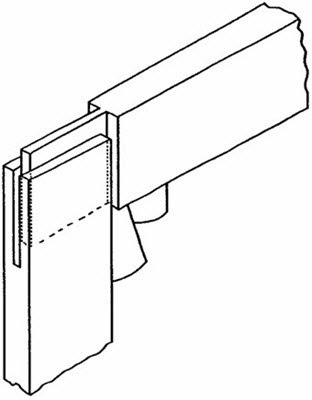
© Government of Canada, Canadian Conservation Institute. CCI 122308-0003
Figure 2b. Schematic of an expandable, butt-end, open mortice and tenon joint.
Another form of stretcher is based on turnbuckles. The turnbuckle-style stretcher is made by placing a threaded turnbuckle across the corner joint. The portion of the turnbuckle visible in Figure 2c can be rotated. The flange on the end of the turnbuckle set into the adjoining corner is stationary so that as the head of the turnbuckle is rotated, the corner opens. Metal dowels drilled into the wood across the joint keep the corner stable. The advantages of the turnbuckle stretcher as opposed to the keyed stretcher include:
- The turnbuckle stretcher can be both opened and closed with ease and without contacting the back of the canvas, as the rotation of the turnbuckle is on the back of the stretcher.
- The turnbuckle stretcher does not have elements that can protrude into the tacking edge of the painting (as can happen with keys that are too forcefully tapped into corners or with edges of butt-end tenons).
© Government of Canada, Canadian Conservation Institute. CCI 122308-0002
Figure 2c. Turnbuckle hardware.
When a painting is larger than portrait size, additional transverse wood members are added to stabilize the stretcher or strainer. Some stretchers or strainers carry information, in the form of labels, inscriptions and stamps, which can be relevant to the provenance of the painting.
The canvas is traditionally stretched over the stretcher or strainer, and the edges of the canvas (known as the tacking margins) are secured to the stretcher by means of tacks or now, more commonly, staples.
In order to paint on canvas with oil-based paints, the fabric must first be sized through the application of a glue layer. The glue coats the fibres and makes them resistant to the oil binder. If the oil were to penetrate the canvas fibres, these would degrade at a rapid pace, owing to the acidic quality of the oil. The oil would also be wicked out of the paint and deprive the paint of its primary binder.
In the case of acrylic emulsion paintings, it is not necessary to apply a size layer, and the paint itself can be applied directly to the canvas in a technique that is partly painting and partly staining. These works are known as "colour field" paintings. Where necessary, or desired, to create a uniform mass tone, a coloured (or white) ground or imprimatura layer is applied. This was, historically, an oil ground containing linseed oil and lead white pigment. Now, more frequently with the advent of new white pigments, it contains zinc or titanium pigments in an oil or acrylic emulsion binder.
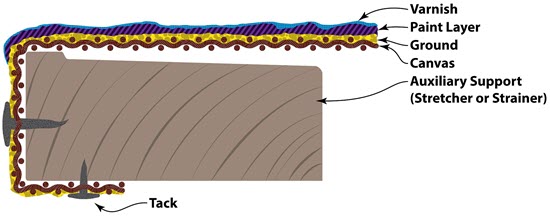
Figure 3 shows a typical layered structure for a painting on canvas. This includes the stretcher or strainer with a bevel, the stretched canvas tacked to the stretcher or strainer, a ground layer (acrylic emulsion or oil), followed by a layer of paint and finally a coat of varnish.
© Government of Canada, Canadian Conservation Institute. CCI 130103-0002
Figure 3. Cross-section of a stretched painting on canvas.
Paintings on canvas are vulnerable to damage due, in large measure, to the number of disparate materials that make up these works of art. Given that both the primary and auxiliary supports (canvas and stretcher/strainer) are hygroscopic materials, the combined and sometimes opposed movements of these two can cause damage, such as distortion to the canvas. Additionally, as coefficients of expansion differ dramatically among the various materials (canvas, wood, glue size, ground and paint layers), structural damage ranging from cracking to paint loss will occur with fluctuations in ambient humidity. Canvas is also subject to intrinsic deterioration as it ages and, unless protective measures are taken, will eventually fail as a support system for ground and paint layers.
Metal
Small format, thin metal sheets were used historically as painting surfaces (consult CCI Note 10/14 Care of Paintings on Ivory, Metal and Glass); these sheets were made of copper or copper coated with silver, lead, tin and, most recently, aluminum. Metals were first painted with enamels, but oil paints became popular after the 16th century. Prior to the application of paint, the surface required cleaning and scuffing, as adhesion to a slick smooth metal could be problematic. Frequently, no ground was applied as the metal surface provided a warm undertone to the paint.
Paint can, likewise, be applied to ferrous metals. As with other metals, the surfaces have to be carefully cleaned and roughened. It is important to remove any oxidized layer on the surface of the metal as this can both impede adhesion and result in corrosion appearing through the paint layer (in the case of copper and ferrous metals). Traditionally, copper was rubbed with garlic as a corrosion preventative prior to the application of paint.
Since it is non-hygroscopic, metal provides a dimensionally stable support system for paintings. However, thin sheets of metal can be dented or bent, and the paint layer can be scratched. Metals can corrode with subsequent staining to the paint layer.
Ivory
Miniatures were frequently painted on very thin ivory sheets (consult CCI Note 10/14 Care of Paintings on Ivory, Metal and Glass). The thinness of the ivory sheet imparted a translucency to the painted surface. Due to the very fragile and reactive nature of this material, the ivory was invariably backed onto a white or light-coloured card. Traditional painting on ivory was done directly on the surface using watercolour paint or gouache. After painting, the miniature was framed and placed under glass. Ivory is extremely responsive to changes in RH, and the most common damages seen in these works of art are cracking and splitting of the support. As stress is released through one or two break points, the overall paint layer is usually not affected. However, more heavily applied paint (e.g. gouache) can delaminate and flake away from the surface of the ivory as the smoothness of the material does not provide for the keying-in of these paint layers.
Glass and porcelain
Both glass and porcelain have been employed as painting surfaces (consult CCI Note 10/14 Care of Paintings on Ivory, Metal and Glass). The usual paint medium for both is oil or enamel paints. Often, with porcelain, the paint is thinned out to a glaze-like consistency to allow for the underlying surface to provide luminosity to the work. Neither glass nor porcelain provide for good adhesion of paint layers, as these cannot be keyed into the surface. Although fluctuations in RH will not affect the support, moisture uptake in the paint layer can cause sufficient movement to provoke delamination and paint loss, which are the most common forms of damage seen on these surfaces. There are relatively few paintings on glass and porcelain that have successfully survived the passage of time. Even if paint layers retain adhesion to the support, given the brittleness of glass and porcelain, breakage and loss of these works of art often occur.
Binders for paint media
Paint is composed of pigments ground into a binder, which produces the paint medium. Pigments ground into a glue protein binder produce the paint medium distemper; egg protein binder combined with pigments produces the paint medium tempera. Other binders such as milk protein give us casein paints and wax, encaustic paints. Binders combining drying oils and natural resins produce oleo-resinous paints. Synthetic resins are the basis for alkyd paints, acrylic resin paints as well as latex and acrylic emulsion paints. In addition to having unique visual properties, different binders along with additives that make up the paint media such as resins, drying oils, etc. have characteristic aging and deterioration properties and thus have their own peculiarities in terms of basic care.
Distemper
Distemper refers to a paint made up of pigments held in a glue (traditionally, animal glue binder). Many very early paints were based on distemper, as glue was a readily available binder in which to mix pigments. Manuscript illuminations used distemper occasionally for their decorations since this medium was readily available, very fluid, dried rapidly and did not disturb the vellum (parchment) support. This quick-drying quality also made distemper paints a good choice for theatre flats in the 19th and 20th centuries because the paints could be mixed in large batches to cover many square metres of canvas. Modern poster paints are distemper-based. Distemper paints, while easy to prepare and apply, are prone to cracking because of the strong contractive forces exerted by glue at low humidity. These paints are normally very matte and remain water-sensitive.
Tempera
Tempera, as opposed to distemper, refers to a paint containing an emulsifying agent that acts as a binder to render oil and water miscible. Egg tempera uses the egg yolk as the binding agent. The paint is mixed with both water and additions of oil (tempera grassa); milk or honey can be added, the nature and ratios of which can alter the working properties of the paint and its final appearance. As with distemper paints, tempera is a historic paint medium.
Egg tempera is normally mixed by the artist in small batches prior to use, as it does not keep well and dries rapidly. Traditional application of this medium is through small, repetitive brush strokes as opposed to the application of fluid paint delivered with a medium to large-size brush over large areas at once. Many egg tempera paintings, as a result, have very distinctive surfaces. Egg tempera has been used for millennia and was the medium of choice for European paintings prior to the advent of oil paints. Northwest Coast artists continue to use an egg tempera paint based on salmon roe to execute their striking works of art directly on cedar wood.
Egg tempera is normally associated with wood panel supports. Tempera paint is brittle when dry and, although painting on canvas was not contemporary with the use of this medium in Europe, a non-rigid support for these paintings would have resulted in cracking of the paint. The wood panels were prepared with a low-absorbency chalk and glue gesso layers prior to painting. Modern artists continue to use this technique, replacing wood planks with hardboard. Once dry, the egg tempera has a low lustre. When completely dry, it can be varnished to saturate the colours and to provide additional lustre. This paint medium is very stable and behaves much like an oil painting but without the same propensity to darkening or sensitivity to solvent.
Casein
Casein is another historic binder. Based on a protein of milk, its availability and ease of production ensured its common and prolonged use by artists. Casein can also be emulsified by the addition of oil. In this latter form, the paint is now available, commercially, in a pre-mixed formulation (and sold as artist paint in tubes). Traditional or true casein required time-of-use manufacturing by the artist, as the paint could not be kept without spoiling. This paint is water soluble and dries to a water-insoluble, durable and matte film.
Both the true casein and emulsion paint can be applied with brushes in methods similar to that of oil painting, with a slightly longer drying period than egg tempera paints. The dried paint film is brittle, so support surfaces should be rigid (e.g. stone or wood panel). In 1941, Sherwin-Williams' Kem-Tone became the first commercially available water-based paint combining casein, corn protein, rosin and linseed oil (Croll 2009). Casein combined with oil is used by artists as either an underpainting for oil, given its absorbent nature, or as the design layer itself. Emulsified casein can resemble oil painting but with a far more rapid drying time. Even in an emulsion form, however, casein paint layers remain brittle and should only be executed on rigid supports.
Encaustic (wax)
Wax has a very ancient history as a paint binder. Surviving examples of encaustic art come from the Greeks, Egyptians and Romans. Egyptian-inspired Roman funerary masks used melted beeswax (bleached) with additions of pigments to create semi-translucent images. The wax was melted, blended with the pigment and then applied to a wood support, often with a chalk-glue ground. The hardening wax could then be worked into the surface using heated tools. The working and setting properties of the wax could be altered by the addition of resins or other waxes (plant or animal).
Encaustic has experienced a modern-day revival. It can be worked into thick expressive and colourful layers that duplicate heavily applied oil and acrylic works. Encaustic is normally applied to rigid supports, especially as the thickness of the paint can add weight and the wax can be brittle; however, thinly executed encaustic or encaustic within mixed media can be found on non-rigid supports today.
Although durable, encaustic paintings are vulnerable to extreme temperatures. Extreme heat, even that of direct sunlight, can cause melting and extreme cold can cause cracking or separation from the support. In addition, mechanical damage to the surface, such as scratches and cracking, can be difficult to treat.
Fresco
Buon fresco is likely the most ancient of the three fresco techniques, which also include mezzo fresco and fresco secco. In buon fresco, a pigment slurry made up with alkali-insensitive pigments and water is applied directly to the wet or damp plaster intonaco layer. The artist has about one working day (seven hours) in which to paint out the design before the plaster becomes too dry to absorb the pigment slurry. The pigments sink into the wet plaster and are chemically "locked in" the plaster surface as this is transformed to calcium carbonate through the absorption of atmospheric carbon dioxide during drying.
Mezzo fresco became very popular beginning at the end of the 16th century. This technique is very similar to buon fresco, but the pigment slurry was applied to a slightly drier plaster layer. This allowed for a wider range of pigments to be used but also resulted in pigments which were not so intimately bound into the plaster substrate.
Fresco secco was executed either above a completely dry fresco layer (buon or mezzo fresco) or else was applied directly to a plaster wall. In all cases, pigments were ground into a binder: distemper, egg tempera or oil. A fresco secco layer could be applied at the artist's leisure and was used to add a range of colours unavailable in either the buon or mezzo fresco techniques (e.g. blues) or to correct mistakes in the other fresco techniques. Fresco secco surfaces do not adhere well to a smooth plaster surface, and so, in many cases, this paint layer has fallen away.
Apart from the adhesion problems of fresco secco-applied layers, fresco is a very durable technique. Frescoes are, however, prone to deterioration through the action of chemically mobile salts. Often, salts can be found within the supporting wall structure (bricks) or either the rough or the fine-coat plaster. Salts can also be found in the ground and move up into the wall, or they can be transported through the air and absorbed into the wall through water infiltration. The salts, once in the wall, will be activated by changing humidity levels and will crystallize below and onto the surface of the fresco, where they can cause severe loss to the painted plaster surface.
Drying oils
Oil paint consists of pigments dispersed in a drying oil such as that produced by flax (linseed), poppy seed, walnut or safflower. Each of these oils gives the paint a particular quality, and specific oils were chosen to accomplish certain effects or to manipulate working and drying times. This painting technique was known and practised outside of Europe prior to the 15th century, but around this time its use and development expanded significantly, starting in the Low Countries of Western Europe.
Painting in oils allowed artists to modify their painting technique from that of tempera painting where the paint is applied in short, thin brush strokes. The oil binder has an extended drying period that allowed the artist to work over many days, to work wet-in-wet and to change the design over a period of time.
The first oil paints were made by grinding pigments into the oil and thinning with solvents or essential oils. The ensuing oil paint was fluid and could not be worked up into impasto layers. Artists worked in thinly applied layers and glazes. Gradually, additives such as lead and natural resins (mastic) were incorporated into the oil, giving it a heavy body and allowing it to be built up in thicker applications.
The active drying component in these oils is provided by unsaturated fatty acids: oleic, linoleic and linolenic. These last two fatty acids (linoleic to a much lesser extent and linolenic to a greater one) provide the most reactive sites for oxidative reactions. Oils rich in these fatty acids dry faster and more effectively. Of the oils previously mentioned, linseed has the highest percentage of linolenic acid and produces, as a result, the fastest drying and most durable paint film. Poppyseed and safflower oils, on the other hand, have a lower percentage of linolenic to linoleic fatty acids and are slower to dry. Although they result in less yellowed paint films, paints made from these oils are less polymerized and less durable than those made from linseed oil.
Oil paint dries by polymerization rather than evaporation. Initial drying can take several weeks or months, depending on the paint—the nature of the pigment, the type of oil, the presence of additives and the thickness of the paint layer(s). A general rule of thumb is to wait at least six months to allow for polymerization of the paint film to occur. If the paint is heavily applied, the painting could take years to dry, and paints containing small quantities of non-drying oils (such as castor oil) can, in fact, never dry completely. When applying multiple layers of paint, it is important to heed the "fat over lean" instruction. A lean paint is considered to be 50% oil to 50% solvent. Subsequent layers can increase the proportion of oil to solvent. Using the fat over lean technique, the underlying paint dries first and subsequent layers dry at a slower pace. This allows the paint to dry through the layers without cracking or wrinkling. Often, disrupted paint layers occur as a result of the top layers drying more rapidly than the underlying layers.
Drying rates are affected by certain metals found in specific pigments; for instance, the manganese present in brown umber has a siccative effect on a drying oil and will cause accelerated oxidation (promoting drying), whereas a pigment containing phenols, such as genuine Vandyke brown, acts as an antioxidant and results in a paint that is notoriously slow in drying. Vandyke brown is often found mixed with faster-drying colours to mitigate this effect. The presence of dryers added by manufacturers to decrease the drying time of certain pigments can also affect the durability of the paint film, as can extenders added to paints to bulk these out and reduce cost. It remains essential that the artist be aware of a paint's behaviour, components and durability in order to ensure a stable end product.
Although durable, oil-based paints become increasingly brittle with age. If the support is flexible (canvas), then the oil paint will crack in response to movement of the canvas that exceeds the paint's capacity to flex or expand. Oil-based paints have a tendency to yellow as the oil binder ages. Oil paint also increases in translucency with time, especially in combination with lead-based pigments. Metals such as lead, zinc, calcium and magnesium, present either in ground or paint layers, can combine with oil in the medium to form metal soaps, and under certain circumstances the combinations present themselves as lumps on or extrusions through the paint surface. The formation of these soaps may be exacerbated by environmental factors.
Synthetic resins
Oil paints modified with natural gums and fossil resins were available ready-made in the early 1920s and were used for a number of applications, including interior and exterior house paints, coatings for appliances and automobile finishes. Gums and fossil resins such as copal and dammar were added to the paints in order to speed drying, level paint (remove brush strokes) and increase gloss. These paints were often referred to as "enamels" or "lacquers" due to their high gloss. Ripolin, one such product, was widely marketed as a house paint and came in a range of surface finishes. This brand of oleo-resinous paint was exploited by a number of artists who appreciated its working properties (Standeven 2013, p. 130). The addition of natural resins, although conferring good working properties and gloss to the paint, resulted in paint films that did not age well. A need for reduced drying times and more durable and less costly products helped to drive the development of synthetic alternatives.
Nitrocellulose-based pyroxylin paints
Finishing coats on Ford vehicles, in the early 1900s, were based on oil-resin paints. Multiple coats needed to be applied, by brush, and took up to a week for each layer to dry. This caused a bottleneck in production. Not only did this process cause delays and backups in production, but cars were only available in black, as this was the fastest drying colour.
In 1923, DuPont developed a synthetic lacquer, a nitrocellulose-based pyroxylin that addressed many of the problems related to the oil and natural resin coatings. This lacquer, Duco, could be sprayed, took hours rather than a week to dry (as the drying was through solvent evaporation) and came in a multiplicity of colours. Nitrocellulose-based pyroxylin paints were used, experimentally, by artists attracted to the possibilities of this new medium. Of special note are the Mexican muralists who used the spraying capacity of this paint to cover large surface areas. The fluidity of the paint also allowed for a number of other techniques to be employed such as dribbling, splattering and dropping of paint onto canvas surfaces. A workshop for artists organized by the muralist David Alfaro Siqueiros in New York City in 1936 introduced a number of American artists, such as Jackson Pollock, to the possibilities offered by this new synthetic resin. Problems with nitrocellulose-based pyroxylin lacquers include yellowing over time, cracking and pigment fading.
Alkyd paints
Duco lacquers did address many of the problems encountered by oil and natural resin paints with respect to industrial applications; however, they were difficult to apply by brush and were costly. Alkyds, formed through the condensation polymerization of polyols, diacids and siccative oils (polymerized polyester with fatty acids), first appeared shortly after the First World War and became viable as a paint coating when they were combined with natural drying oils.
In 1926, DuPont marketed an alkyd-modified oil paint that, unlike Duco, could be easily brushed out without leaving marks. This new paint, sold under the name Dulux, was slower to dry than the nitrocellulose-based paints but faster than unadulterated oil paints. Alkyd-based paints behave much like oil paint but are thinned using low aromatic hydrocarbons such as mineral spirits. This paint undergoes an initial drying (within several hours of application) through solvent evaporation. The final drying, as with oil paints, is through auto-oxidation. The end product creates similar effects as those achieved by oil paints, with drastically reduced dry-to-the touch time.
By the early 1930s, Dulux was used extensively as a coating for home appliances, railcar and vehicle finishes. By the 1940s, alkyds were widely marketed as house paints. Artists such as Willem de Kooning, Jackson Pollock and Frank Stella took advantage of these commercially available paints provided by various companies like Sherwin-Williams and Benjamin Moore. Problems with alkyd paint can include wrinkling of paint films, migration of additives to the surface of the paint, brittleness and yellowing over time (Ploeger and Chiantore, p. 91).
Acrylic resins
At the turn of the 20th century, the first synthetic acrylics were developed, and by the 1930s, both Rohm and Haas in Germany and DuPont in the U.S. were producing Perspex and Lucite, respectively. These products were rigid plastic sheets based on methyl methacrylate. Between 1946 and 1949, Sam Golden in association with Leonard Bocour developed artists' paint based on acrylic resins that were mineral spirit-based. These paints, marketed as Magna, required thinning in either turpentine or mineral spirits. The paints could be applied directly to a canvas, and they dried very quickly. Artists such as Barnett Newman, Mark Rothko and Roy Lichtenstein used the Magna acrylic resins in their paintings dated from this period. Since acrylic resins could be challenging to work with, production was eventually discontinued. Within a few years, water-based acrylic emulsion paints and varnishes were formulated for both commercial and artistic applications. Golden now makes an acrylic resin paint, mineral spirits acrylic (MSA), which can be diluted with mineral spirits, along with a line of varnishes for these paints.
At the beginning of the 1950s, acrylic polymer emulsions were formulated as an artist's paint by Rohm and Haas, and by the mid-1950s, acrylic emulsion paints were widely available to artists. These paints have been associated with the development of art movements such as abstract expressionism and pop art. Their ease of use, flexibility, quick drying time, resistance to fading and yellowing as well as low toxicity make them excellent paints. Acrylic emulsion paints are used on many different support types and are commonly used for large modern paintings intended for public areas. New products to meet the varying demands of artists are continuously being added to the product lines of acrylic paint manufacturers.
Acrylic paints (both acrylic resins and acrylic emulsions) are not easily distinguishable from oil paints despite having very different properties. The most obvious feature is their sensitivity to solvents, which can easily break down the acrylic polymer. While acrylic paint remains flexible, it is still prone to cracking when painted onto non-rigid (canvas) supports. As acrylic emulsion paints dry, they release surfactants from the body of the paint. These can form on the surface of the acrylic and attract dirt and dust. Aqueous cleaning, if done improperly, can either encourage an increase in migration of surfactants to the surface or drive dirt into the paint layer. Cleaning of acrylic surfaces is an ongoing area of research.
Colourants
Coloured materials, or colourants, can be derived from organic sources—in their earliest forms, from plants and animals—or from inorganic minerals (or now their artificial substitutes, if the mineral is rare or impermanent). Colourants have also been synthesized, starting in the mid to late 1800s with the advent of aniline dyes and pigments. The invention of new, organic-based colours continued through the 20th century with the development of colours based on, for example, azo dyes and pigments—yellows, reds and oranges; phthalocyanine—blues and greens; and quinacridone—red-violet.
Colourants fall into different categories, the first of which are pigments. Pigments are particles held in suspension in a binder. Mineral-based pigments, such as the yellow, brown and red ochres, are some of the earliest colourants to be employed for artistic and decorative purposes. They are also among some of the most lightfast of pigments.
Dyes fall into a second category of colourants and derive from plant or animal sources (e.g. madder from the ground roots of Rubia tinctorium, carmine from the cochineal insect and woad from the plant Isatis tinctoria). These natural dyes are organic, water-soluble only materials and are absorbed into surfaces to be coloured. Many dyes are not lightfast (fugitive or non-permanent). This was certainly the case for the early aniline dyes produced in the mid-1800s, as well as the artist pigments that were derived from them. Dyes can be converted into pigments through precipitation of the dye onto inert binders or mordants (metallic salts). This process is known as "laking," and the resultant colourant, as a "lake pigment." These colourants can then be dispersed in an oil binder. The lightfastness of lake pigments is largely related to the light stability of its dye, the concentration of the colorant, and to some extent, the nature of the mordant.
Artist pigments are rated, by the manufacturer, on their lightfastness, and artists who wish to produce stable works of art are conscious of their choices. Over the course of time, certain pigments demonstrated instability to light (such as the lake pigments and smalt, among others) and instability to atmospheric pollutants such as hydrogen sulfide, which causes lead-based paints to darken. Certain pigments perform better in particular media, and fresco painting (buon fresco and mezzo fresco) demand pigments that are not alkali-sensitive.
Many of the more unstable colourants have found replacements, such as cadmium-based paints, which are far more durable than the colours which they have supplanted. In some cases, the coloured element of a natural dye can be synthesized to produce a more stable product, as is the case for the highly light-sensitive rose madder lake, whose synthetic analog, alizarin crimson, has only a moderate sensitivity to light.
For a comprehensive description of pigments, please refer to volumes 1, 2 and 3 of Artists' Pigments: A Handbook of their History and Characteristics.
Varnishes
Many artists choose to apply a layer of varnish to the surface of the painting (egg tempera, oil paintings, acrylic resin and acrylic emulsion paintings). The varnish traditionally serves to saturate the colours of the pigments and helps to unify the painting in appearance (giving the same or similar lustre across the surface). The varnish is also considered a protective layer inasmuch as any dirt, dust or insect accretions are isolated from the paint.
Traditional natural resin varnishes composed with dammar, copal, mastic and amber provided high reflectance: they were glossy and thick, and application by brush required skill to produce an even coating. Natural resin varnishes will yellow over time, the degree of yellowing, or even browning, depending on the specific resin, its method of preparation and additives such as oils and essential oils. Some of these resins become less soluble with time, and removal, if this action is chosen, can be problematic.
Modern varnishes are mostly composed of synthetic resins that are designed to be more light stable and more easily reversible in fairly mild solvents. Often these varnishes are designed specifically for a particular medium; for instance, in the case of acrylic emulsion paintings, the varnish, also an acrylic emulsion, has been formulated to permit removal without causing damage to the paint layer. Varnishes are available in both gloss and matte formulations—the latter by the addition of waxes and silica. With the availability of spray equipment, all varnishes can be applied in very fine coats, as was not the case with hand-brushed varnishes. Whether a naturally occurring resin or synthetic resin, a varnish layer should only be applied to a paint once the painting has completely dried. If applied too early, especially in the case of oil paintings, the varnish can be partially absorbed into the paint layer with unfortunate consequences for both the surface appearance of the painting and the removability of the varnish.
Often, in the case of oil paintings which took many months to reach sufficient dryness, artists would, for the sake of displaying the work, apply an egg-white varnish. These were often not removed and were eventually varnished over. These egg-white coatings can be very problematic, as they become highly insoluble over time and take on a visibly grey tone.
Causes of damage to paintings and preventive conservation strategies
For a comprehensive description of specific agents of deterioration, please consult Agents of deterioration.
Are paintings inherently stable or unstable? How vulnerable are they to damage? Given the plethora of materials used in the creation of paintings, there is no one answer to these questions. A very small number of paintings could be described as stable, but the majority of paintings should be considered as fragile objects whose well-being is determined by a number of factors, both intrinsic to the painting and extrinsic to it. An important and fascinating factor in the survival of paintings is the degree to which they are valued. Needless to say, an object of value is cared for, and its care is entrusted to future generations. If the artwork should fall out of favour, then the chances of its long-term survival are significantly reduced. Conversely, the rarer the painting, the more demand there is to make this object publicly accessible, with the potential for damage increasing with greater accessibility.
The action of applying a variety of coloured media to different support systems has occurred since time immemorial. What survives, from the distant past, are those works of art placed on stable and durable surfaces such as stone, clay or plaster and where available pigments (normally, mineral-based) are inert. These works of art are intrinsically stable, and they will likely continue to exist, presuming that they are not placed under significant stress by extrinsic factors owing to catastrophic changes in the environment such as floods, fires, earthquakes or through theft and vandalism. Paintings produced in the past, by artists trained through long apprenticeships in workshops and, at later periods, through art academies, were based on tried-and-true techniques that have withstood the test of time. Artists chose materials which were stable; they employed well-prepared supports combined with the informed and precise production and application of size, gesso, paint and varnish layers. Changes in materials, production methods and processes happened gradually. In some cases, paintings have been comprised of materials with only moderate intrinsic stability, such as canvas supports, but provided that extrinsic factors could be controlled, these works of art could expect to survive many generations.
This section will outline causes of damage which can occur as a result of intrinsic factors, but which is most often due to extrinsic agents, and address strategies for preventive conservation.
Inherent vice
Poor artist technique and poor quality materials are responsible for a number of defects in paintings, which can compromise the stability of the painting and complicate its care. With the rapid expansion of modern materials and processes, combined with an emphasis on innovation and novelty, materials are sometimes used in ways in which they were not intended and under circumstances for which they were not designed. This can result in premature failure of the painting due to what is termed "inherent vice."
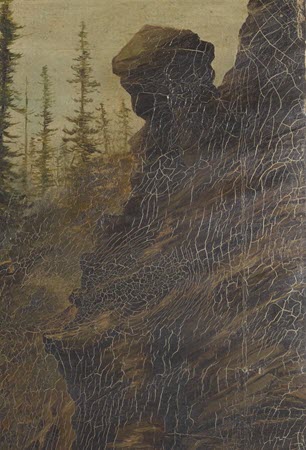
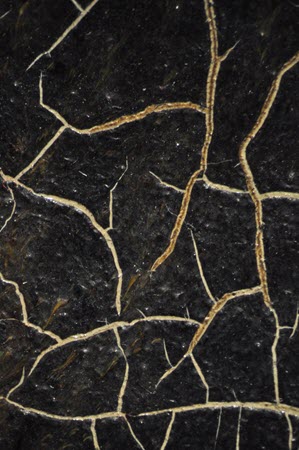
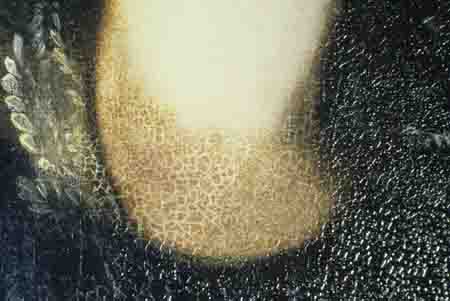
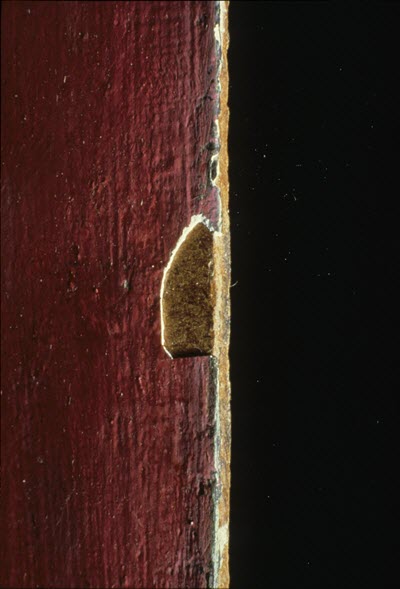
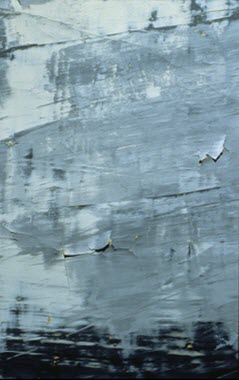
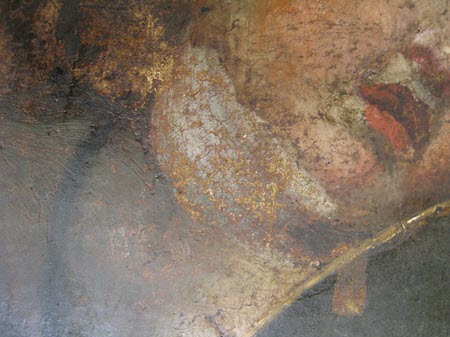
Most inherent vice shows up as defects or damages to the paint layer. Some of these defects are stable; others are unstable and require treatment intervention. For example, though unsightly, the wide drying cracks in Figures 4a and 4b, resulting from the use of a fast-drying paint, are not considered to be damage, as the condition will not alter and is due to improper technique. When drying cracks appear, as in Figure 5, these are known as "alligatoring," given their resemblance to an alligator skin. This condition can have a number of causes, the most common of which is an underlying paint layer that has not dried completely before the application of the second layer. The top layer dries and hardens while the underlayer remains soft and malleable. Movement in the underlayer causes the hardened top layer to crack and retract. The edges of the cracked paint are smooth and firmly attached to the underlying paint layer.
© Government of Canada, Canadian Conservation Institute. CCI 92190-0007
© Government of Canada, Canadian Conservation Institute. CCI 92190-0056
Figures 4a and 4b. Inherent vice. In this case, the paint that has cracked upon drying remains firmly attached to the exposed white ground below and is not in danger of flaking. Detail shown in Figure 4b.
© Government of Canada, Canadian Conservation Institute. CCI 130103-0009
Figure 5. Close-up of an area of paint where the rule of fat over lean may not have been followed. This type of cracking is sometimes referred to as "alligator cracking."
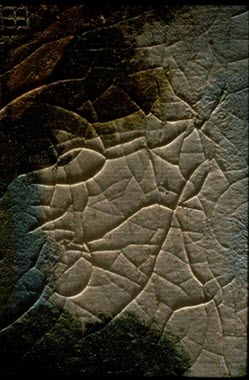
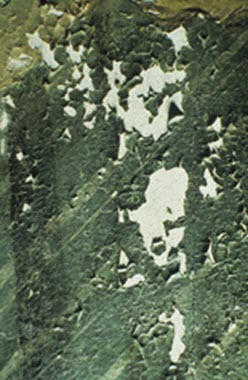
Other defects, such as flaking owing to incompatibility of layers, can be a source of ongoing instability (Figures 6, 7a, 7b and 7c). Some works require immediate precautionary measures and ongoing preventive care. This is the case for those works of art illustrated in Figures 7a, 7b and 7c.
© Government of Canada, Canadian Conservation Institute. CCI 2003501-0001
Figure 6. Detail of paint and ground loss exacerbated by poor adhesion to the slick hardboard support.
© Government of Canada, Canadian Conservation Institute. CCI 125773-0154
© Government of Canada, Canadian Conservation Institute. CCI 122309-0006
© Government of Canada, Canadian Conservation Institute. CCI 130103-0012
Figures 7a, 7b and 7c. All of these examples show inherent vice (poor adhesion to an underlying paint layer) combined with the exacerbating force of inappropriate RH, which have contributed to cracking and then delamination and cupping of paint.
Inadequate or poor supports can also cause problems. For example, a fabric is incapable of providing sufficient support to paintings executed in a heavy impasto technique, especially where the painting is oversized. The paint layer then becomes self-supporting, with negative consequences for its overall stability.
Other painting supports contain acidic materials as part of their makeup or from the production processes. This can be the case with certain cellulose paperboard supports which contain sulfite-based wood pulp. Acid hydrolysis causes these paperboards to become very brittle and susceptible to breakage (consult Incorrect temperature).
Inadequate auxiliary supports are problematic as well. A sharp bevel on an inside edge of a stretcher or strainer will eventually cause cracking of the overlying paint layer, and twisting of too thin stretcher or strainer members will distort the canvas.
Recommendations
Often, inherent vice is evident fairly early in the life of a painting, although changes related to the problematic material may continue over time and be exacerbated by environmental conditions such as fluctuations in RH. This is especially the case with delamination of paint from supports, where any movement in the support or between layers of paint will provoke further changes in condition. In order to slow down the process of change, where inherent vice is provoked by changes in environmental conditions, it is essential to ensure a stable RH in the vicinity of the painting. If possible, enclose the painting by installing a glazing layer into the frame and a backing board on the painting verso to create a stable microenvironment. Do not place the painting in direct sunlight nor focus spotlights or picture lamps over the painting, since that would increase stresses by raising the temperature around the painting.
When the damage to the painting from inherent vice is ongoing (as in the case of delamination of paint layers), an intervention by a conservation professional will be required. This intervention can often fix the problem, but in some cases, as with delaminating paint, interventions will likely be ongoing.
Summary of preventive conservation strategies:
- Stabilize RH (avoid extremes and fluctuations).
- Create a stable microenvironment within a framing system using glazing and a backing board.
- Avoid exposure to direct sunlight and sources of heat from lighting systems.
- Consult a conservation professional for treatment options.
Restoration
It is unusual for a painting on canvas older than fifty years not to have undergone some form of restoration intervention, if not for surface cleaning or removal of a discoloured varnish layer, then possibly because of degradation of the canvas, tears or losses to the paint layer itself. Similarly, many paintings on wood panels have undergone restorations to correct warping. Some of these interventions have resulted in severe thinning of the panel or even removal of the paint layers to transfer these to canvas supports. Many structural interventions can add new materials to the original or subtract from the original, and all bring about changes to the artist's intention.
Although most restoration aims to use reversible materials, this is not always the case. For instance, adhesives used to attach a canvas backing to a degraded painting on canvas (lining) can penetrate the original fabric support and begin to exert their influence in ways that may be destructive to the original. This is often the case with paintings that have been lined using glue or glue-starch adhesives. These extremely reactive and brittle materials contract strongly during cycles of low humidity and can cause a distinctive cracking of the original paint layer.
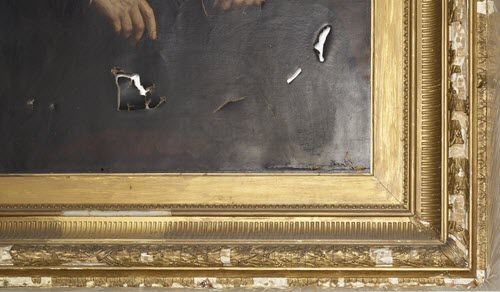
Cutting away the original tacking margins was an early lining practice in order to facilitate stretching and tacking. Often, attempts to repair tears involved the application of localized adhesion of patches of paper or fabric. The adhered patch ensured that the painting canvas in this area was immobilized and could no longer follow the movement of the surrounding canvas. The patched area gradually becomes visible as the differential tensioning of the fabric causes distortions. The same effect can be seen when labels are glued directly to the back of a painting canvas (Figure 8).

© Government of Canada, Canadian Conservation Institute. CCI 130103-0005
Figure 8. A paper label glued on the reverse of this painting is visible as a rectangular deformation from the front.
Inpainting, a procedure undertaken to replace missing paint, is often carried out in order to restore the surface of a painting. This should be done using a material that can be distinguished from the original on analysis and one that will not discolour rapidly. The retouch paint must be reversible so that when there are differences in tone between the restoration and the original, the former can be removed safely without harm to the surrounding paint. Often, retouching materials cannot be easily removed without damage to the original paint layer, or they have been placed above original material (this action is described as overpainting). Overpainting, often done with a heavy hand to disguise crack patterns or to improve upon or adjust an original design, is not easy to remove, is sometimes difficult to distinguish from original materials and is always a major conservation challenge (Figure 9). The presence of excessive inpainting or overpainting can also cast doubt on the integrity of the painting, calling into question how much of it is original and how much is reconstruction.
© Government of Canada, Canadian Conservation Institute. CCI 98601-0088
Figure 9. The child's face has been largely overpainted in order to disguise paint loss and cracking to original paint layers. Overpaint has been removed from the lower face and neck.
Often, well-meaning individuals undertake what might appear to be simple operations such as surface cleaning to remove dirt and dust. Even dusting can be hazardous on a sensitive or damaged surface, and aqueous or solvent cleaning when done in an uninformed manner can have major negative consequences.
Recommendations
Much of the damage caused by degraded or poor restoration can be mitigated by removal of the restoration materials. This must be carried out by a professional conservator, as reversal of old restoration can be challenging. The best strategy for preventing damage through poor or inappropriate restoration is to ensure, if restoration is required, that it is carried out by a professional paintings conservator.Footnote 1 Never attempt to remove discoloured resin layers or effect repairs. A professional paintings conservator will examine the painting and prepare a condition report and treatment proposal.
Ensure that the treatment proposed is well explained and that the treatment report lists both the processes and materials so that there is a permanent record of what has been done. If in doubt, seek a second opinion.
Physical forces
Damage from physical force commonly occurs and is often very serious. The effects of physical force can damage works of art that are vulnerable to shocks from drops or vibration and to percussive damages such as strikes. All paintings will be affected by physical force, but the most at risk are paintings on canvas and paintings that have been executed on inherently brittle supports such as glass, porcelain, ivory and thin stone.
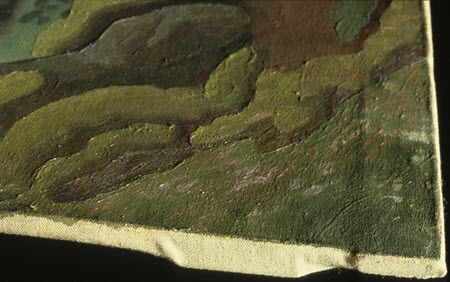
Moving vulnerable paintings either within a short distance or over long distances is one of the most hazardous activities. Paintings can be dropped or bumped into sharp edges even when moved over short distances. Any blow to the front or the back of a painting on canvas can result in tearing (Figure 10).
On older paintings with very oxidized canvas supports, this can happen with surprisingly little force. Hits to the canvas can also initiate cracking. This cracking may not be immediately evident but will develop over time in response to movement of the canvas and from fluctuations in humidity.
© Government of Canada, Canadian Conservation Institute. CCI 129472-0023
Figure 10. Physical damage such as these tears can result from improper handling, inadequate display conditions or overcrowded storage.
Over long distances, paintings that are inadequately packed can be damaged through vibration or dropping. Additionally, all works of art are at risk if not properly installed for display. Works of art can and do frequently fall off display walls as a result of the failure of hanging hardware—inadequate hardware or improper installation of that hardware in either the frame or the auxiliary support. It is not always the paintings with heavy supports (wood) or heavy frames that are at risk of falling, as normally, extra precautions are taken to ensure their safety. It is the lighter-weight works of art that are often the victims of poor hanging practices, as insufficient attention is paid to their requirements.
Damage from physical forces includes breakage of brittle supports composed of glass, porcelain, card and thin stone; tears, punctures or bulges in canvas paintings; cracking of paint layers from corner drops and direct blows; and loss of loose or powdery paint surfaces. Physical forces can also result in deformation of rigid supports such as metal, which can bend or accordion on a corner drop. On solid supports with little give, chipping can occur (hardboard panels) and both the support and paint layers can be scratched, gouged and abraded through physical forces (Figures 11 and 12).
© Government of Canada, Canadian Conservation Institute. CCI 130103-0006
Figure 11. Weakened paper-based board supports are prone to physical damage at their edges. This type of damage is visible on the lower right-hand side. Note, also, the abrasion marks from the rabbet of the frame parallel to the edges, which appear as a faint white line across the image.
© Government of Canada, Canadian Conservation Institute. CCI 120292-0001
Figure 12. Scuffs to paint layer on a hardboard support from contact with chairs and tables. Mural by Daniel Riel, oil on plywood, in C.D. Howe Building, Ottawa.
Damage to a painting on canvas can occur as a result of physical force during procedures such as keying out (consult CCI Note 10/9 Keying Out of Paintings). This is an action that is not recommended because it can cause damage to paint and ground layers as well as to the canvas. In the example in Figure 13, a butt-end mortice and tenon stretcher has been over-expanded through excessive keying out and one butt-end has overstretched the canvas at the corner. The canvas in this corner will eventually break.
© Government of Canada, Canadian Conservation Institute. CCI 125773-0155
Figure 13. Protruding parts or uneven edges of stretcher corner joints can cause damage to the tacking margins of the painting.
Bulging out of the canvas along the lower edge over the stretcher bar is caused by the trapping of dirt and debris between the wood member and canvas back. This dirt can contain loose stretcher keys, dust particles, insect bodies and other foreign objects, such as spruce tree needles from the practice of draping garlands over paintings on festive occasions. Not only can this debris cause distortions, but there is an increase in damage from higher humidity as the debris will hold moisture.
Damage to paintings can occur as a result of improper framing. While frames can provide significant protection to a painting, improper installation in the frame will cause damage such as abrasion to paint from unprotected rabbet edges, compression of the primary or auxiliary support from inadequate space within the frame, improper hardware for securing the painting into the frame and potential contact of the painted surface with a glazing layer. In this last instance, there is a high risk that the paint layer will fuse onto the glazing.
Recommendations
There are a number of strategies that can be put in place to prevent damage by physical force. The strategies include:
- Installation of backing boards and glazing
- Adequate and proper framing
- Proper handling
- Careful wrapping and packing
- Adequate display and storage
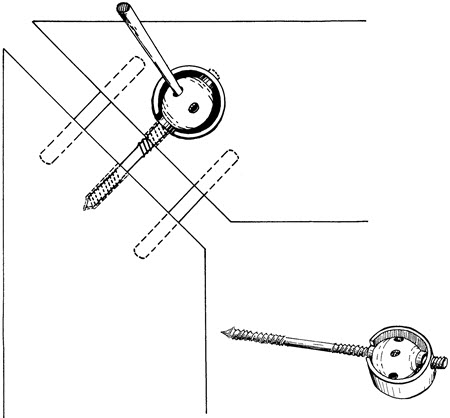
Application of a backing board and glazing
Before applying a backing board, check to make sure, on a keyed stretcher, that the keys are secured. This will prevent them from loosening, falling and lodging between the lower stretcher bar and canvas. Securing keys can be a delicate operation. This can most simply be achieved by placing a daub of acid-free silicone rubber at the base of the key, or a small screw can be screwed in directly behind the head of the key to prevent it from working its way out. If keys are loose, a small hole can be drilled in the thickest part of the key and a thread placed through the hole. Once the key is reinstalled, the thread ends can be stapled to the stretcher back. Do not hammer the keys into the stretcher corners to tighten them.
A backing board consists of a rigid material such as hardboard, Coroplast or Gatorfoam that can be cut to fit over the back of the painting. These boards can be attached directly to the stretcher via screws or clips or to the verso of the frame. They should provide a seal; therefore, cutting openings in these boards should be avoided. The presence of a backing board, especially if this is coupled with a glazing layer, can mitigate many of the damages caused by physical forces and other agents of deterioration. The back of the painting is now protected from physical damage and from accumulations of dirt and debris between the lower stretcher bar and the canvas. In addition, the paint, canvas and auxiliary support are buffered against fluctuations in RH, and vibrations of the canvas during handling and in transit are reduced in severity. Even if it is tempting, the practice of adhering labels to, or writing on, the canvas back is discouraged (Figure 14).
© Government of Canada, Canadian Conservation Institute. CCI 120728-0002
Figure 14. A backing board of fluted plastic sheet is attached to the reverse of the stretcher with screws and cup-washers. In this case, two sheets of fluted plastic have been installed, making use of the partition created by the central cross bar.
Contrary to popular belief, a glazing layer placed in front of the painting in the framing system will not damage the painting by trapping harmful vapours given off by the work of art, although some oily volatiles can leave deposits on the inside surface of the glass or Plexiglas. These can be cleaned away if and when the glazing is removed. The glazing helps to prevent physical damage to the front of the painting, especially if the glazing is a tempered glass or acrylic. Used in conjunction with a backing board, glazing mitigates rapid fluctuations in humidity. The presence of a glazing can also reduce the UV radiation reaching the surface of the painting. Glazing is now available in glass and acrylic options that are very unobtrusive (non-glare) (Figure 15).
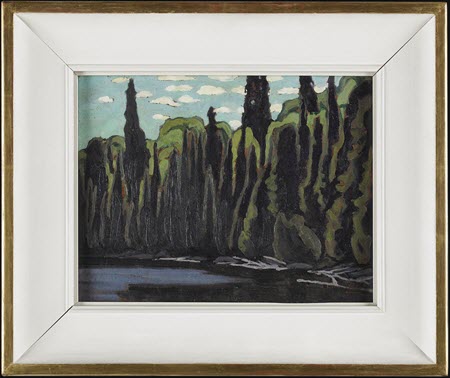
© Government of Canada, Canadian Conservation Institute. CCI 124932-0048
Figure 15. This painting has been framed behind a non-glare acrylic sheet. Near Mongoose Lake, Algoma by Lawren Harris, gift of John and Georgia Parsons, 2009, McMaster Museum of Art.
For additional information on backing boards and glazing, please refer to CCI Notes 10/10 Backing Boards for Paintings on Canvas and 10/8 Framing a Painting.
Adequate and proper framing
A frame is important aesthetically and can also protect and support a work during handling, storage and display. In addition to providing a surface on which to attach a backing board, a frame can incorporate protective glazing. Used in combination with a glazing layer and a sealed backing, the frame can address many of the vulnerabilities of the painting and prevent unnecessary damage. Many modern frames are meant simply to cover the tacking edges (sides) of the painting and cannot be adapted for glazing layers. These frames still provide protection along the edges and, if sufficiently wide, will prevent touching of the face of the painting during handling. Poor framing techniques, such as improperly sized frames, frames with weak corner joints and the use of nails to secure the painting into the frame, can all place the painting at risk.
Although often seen as secondary to the painting, the frame is, in and of itself, significant. If original, it is reflective of the period in which the painting was created, possibly reflective of the artist's choice or creation and often a work of art in itself. Frames require their own special care and attention.
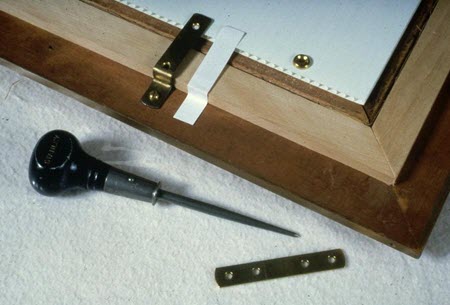
For guidance on framing, please refer to CCI Note 10/8 Framing a Painting. This Note provides step-by-step instructions on padding the frame rabbet, installing glazing and a spacer, installation of a backing board and securing of the painting into its frame using metal plates (mending plates). Mending plates can either be shaped (bent) for installation across an uneven back (Figure 16) or placed flat if a back build-up on the frame brings it level with the installed work of art. Mending plates are secured to the frame and can also be screwed to the stretcher, if additional security is advisable.
© Government of Canada, Canadian Conservation Institute. CCI 120729-0006
Figure 16. The painting and backing board are held in the frame using brass mending plates bent, if needed, to the profile of the frame and attached with screws to the frame only.
Handling
Knowledgeable handling of paintings is essential in order to prevent damage from physical forces. CCI Note 10/13 Basic Handling of Paintings gives a comprehensive description of proper handling methods. Highlights include:
- If a painting must be moved, plan the move carefully in advance.
- Ensure that there are adequate handlers to carry out the move. This will require two people for easel-sized paintings (Figure 17).
- If the painting is heavy or oversized, a transport A-frame cart or dolly should be used. Ensure that there are enough handlers to lift the painting onto the transport and to act as spotters (Figure 18).
- Remove furniture and other impediments out of your line of travel.
- Ensure, before handling, that the painting and frame are stable enough to be moved (check for unstable frame elements). Do not move a painting that is insufficiently robust. Check with a conservation professional for stabilization interventions before moving.
- Provide a padded surface on which to support the painting or frame prior to hanging, and ensure that any temporary holding area is protected from passersby.
- Wear non-slip gloves and ensure that your grip on the artwork does not touch either the painted face or open back.
- If the artwork has no frame or proper support system, it should be placed on a rigid card or within a secure container in order to be safely moved.
- Use handling-travel-storage (HTS) frames for heavy or oversized paintings, for paintings with elaborate frames and for those with minimal or no frames. The temporary HTS frame will protect the artwork during handling, storage, wrapping and crating for transit. Use of an HTS frame reduces physical contact with the vulnerable edges and surface of the painting and holds wrapping materials away from the paint surface. The painting should be placed within its handling frame whenever it is not on display (Figure 19). Refer to CCI Note 10/16 Wrapping a Painting for more information on HTS frames.
© Government of Canada, Canadian Conservation Institute. CCI 94969-0001
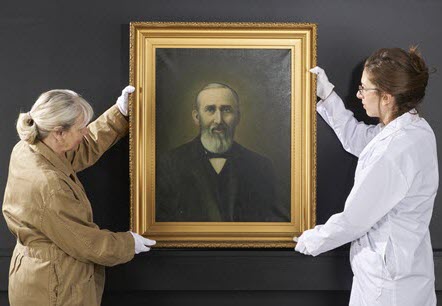
Figure 17. Medium-sized paintings should be handled by two persons, each with one hand holding the lower edge or corner and the other hand holding the side or top corner to balance the weight of the painting.
© Government of Canada, Canadian Conservation Institute. CCI 86568-0005
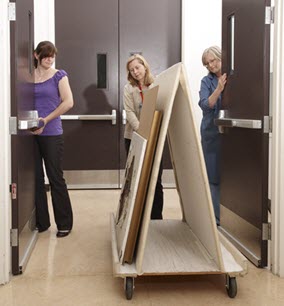
Figure 18. Padded trolleys can be used to move heavy, large and oversized paintings or multiple paintings (using suitable rigid sheet material between each painting). Obtain assistance to open doors, and notify others that an art move is taking place.
© Government of Canada, Canadian Conservation Institute. CCI 120554-0006
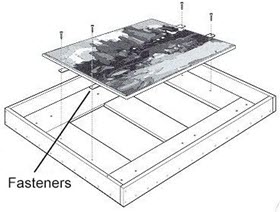
Figure 19. Schematic of an HTS frame, showing placement of a painting on a stretcher. HTS frames are used to protect unframed and framed paintings as well as ornate frames. Fasteners (mending plates) attached to the verso of the stretcher allow for attachment of the work of art in the HTS frame.
Wrapping and packing
Proper wrapping and packing is essential to ensure that the painting arrives at its destination safely. Depending on the fragility of the artwork, the length of travel, the environmental conditions during travel and the handling requirements, use appropriate packing and crating methods with suitable insulation and proper foam to absorb shock and vibration.
- Ensure that the painting is in sufficiently stable condition to travel.
- Photograph the painting prior to travel and note any condition issues.
- The packaging must provide physical security to the painting during transit. This means, in most cases, the provision of a well-constructed wooden crate with wooden bumpers and handles to allow for safe handling.
- The packaging must also ensure that the painting is well secured within the outer crate. The painting must not shift in the crate.
- Compressible padding must be fitted into the crate both to prevent the painting from shifting and to act as shock absorbers.
- If a painting is glazed behind glass, some protection is provided by applying a low-tack protective tape in a grid pattern to the outside glass surface to keep shards in place in case of breakage. The tape should be removed as soon as possible after travel. A non-breakable glazing (e.g. non-glare acrylic) is less risky for a painting that will travel.
- Shock-absorbent material can be used as a first wrap layer around the painting (Mylar sheet followed by bubble wrap or thin polyethylene foam).
- Following this, the painting can be protected against RH fluctuations during transit by wrapping and sealing in a waterproof layer such as polyethylene sheeting or Mylar film. Ensure that all seams are sealed with adhesive tape.
- Layers of cardboard can be placed above the painting and below (especially if there is no backing board). These layers can also be secured by wrapping (Figures 20a and 20b).
- Place twill or heavier fabric strips in the crate opening with excess tape on two sides. The wrapped painting should be placed on top of these, as they will provide a method for lifting the painting from the padded crate.
- Use screws to secure the crate lid, not nails.
- Fix proper labelling to the exterior of the crate.
- Hire a transport company with experience in art handling.
- Request that works be transported in well-maintained, air ride vehicles equipped with temperature control in addition to air ride suspension and proper hardware to secure cargo.
- Ensure that the crate will not be left outside or in an unheated or uncooled location.
- Should a crated and wrapped painting be exposed to cold conditions, before opening and unwrapping, allow 24 hours for the crate and contents to acclimatize to indoor conditions to prevent condensation of moisture upon cold surfaces.
- Ensure that the recipient is provided with all shipping information.
Figures 20a and 20b show some of the stages of wrapping of a small framed painting. This painting is first wrapped with thin Mylar sheet, which is then sealed with adhesive tape. Rigid cardboard sheets cut to the size of the frame are then placed above and below the wrapped painting. If the frame has protruding decorative elements, then it is recommended that the painting be further packaged in bubble wrap to ensure sufficient padding. A final sealing in polyethylene film will ensure that the cardboard remains in place and provide protection against possible water infiltration and RH fluctuations. The painting, wrapped as shown in Figure 20b, can now be safely handled and placed in a secure, hard-sided crate with padding for safe transit.
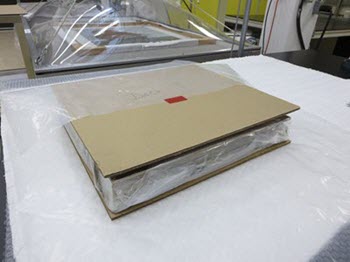
© Government of Canada, Canadian Conservation Institute. CCI 120554-0009
Figure 20a. A framed painting has been wrapped with thin Mylar sheet and sealed with adhesive tape. Rigid cardboard sheets cut to the size of the frame are placed above and below the wrapped painting.
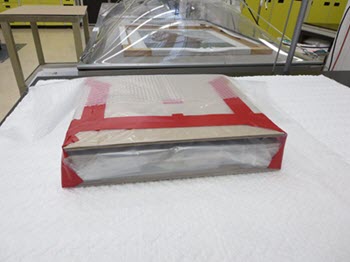
© Government of Canada, Canadian Conservation Institute. CCI 120554-0010
Figure 20b. A complete wrapping of polyethylene holds the cardboard securely in place. All edges and folds are taped to provide basic protection against fluctuations in RH and to help maintain a stable moisture content within the package.
For additional information on wrapping, packing and transit of paintings, consult:
- CCI Note 10/15 Paintings: Considerations Prior to Travel
- CCI Note 10/16 Wrapping a Painting
- CCI's PadCAD (cushion design software)
- Six Steps to a Safe Shipment
Proper display and storage
Display
It is not uncommon for a painting to fall from a wall during display and to suffer from breakage, crushing, tearing and loss of paint. This situation occurs for a number of reasons: old and loose hanging devices on the painting or frame, frayed wires and failure of the hanging mechanism inserted into the wall support.
CCI Note 10/3 Storage and Display Guidelines for Paintings gives a comprehensive overview of safe methods of hanging. In brief:
- Ensure that the painting is kept safe as it waits to be installed. This may involve placement of the painting against a wall (if it is not on a cart or dolly). Ensure that it is supported on padded blocks and that it is protected from passersby.
- Ensure that you have chosen the right hanging hardware for the weight of the painting and frame. D-rings with two points of attachment are recommended for most paintings of moderate weight.
- Do not attach hanging hardware to the stretcher or strainer back if the frame is heavier than the painting.
- Verify and replace the wire if it appears thin or worn. Plastic-coated wire graded for the weight of the frame and painting should be used. Ensure that the ends of the wire are well secured.
- Place two points of hanging contact in the wall. If one should fail, the second will prevent the painting from falling.
- Check that you have the right hangers for the display wall.
- Use a hanging mechanism such as a French cleat for heavy works of art.
Storage
Many paintings suffer from physical damage in crowded storage areas. CCI Note 10/3 also offers a number of possible storage options that will help to protect paintings from physical damage in storage. Here are three examples:
- Sliding racks (Figure 21)
- Slot storage in vertical cabinets
- Slot storage on horizontal shelves
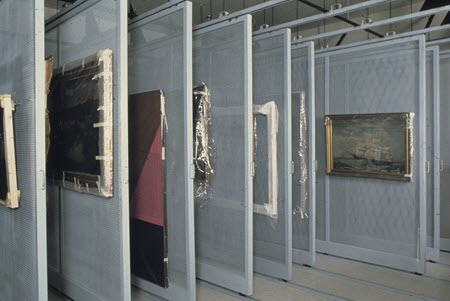
© Government of Canada, Canadian Conservation Institute. CCI 130103-0011
Figure 21. A sliding screen storage system which allows excellent visibility and access to the artworks. Paintings are hung using two D-ring hangers on the back of the frame, hung on corresponding hooks attached to the screens.
Paintings should not be crowded together. If works of art are stacked in a vertical storage cabinet, spacers are required between each to prevent rubbing and scraping. Good recording of the locations of paintings must be maintained in order to be able to locate a particular object quickly and without having to disturb surrounding objects. Small, delicate objects such as miniatures are best stored in shallow pull-out drawers (map cabinets) where they can be placed into custom-made depressions on a polyethylene padded surface. Securing small items prevents any movement while drawers are being opened and closed.
For more information on the safe display and storage of paintings on ivory, metal and glass, consult CCI Note 10/14 Care of Paintings on Ivory, Metal and Glass.
For further information on controlling physical forces in museum collections, consult Agent of deterioration: physical forces.
Thieves and vandals
Vandalism can involve direct physical damage, such as tears; chemical damage, such as that caused by a corrosive substance; and permanent disfigurement, such as in the case of damage by paint or other permanent media. Some vandalism, as well as theft, can result in total loss.
Recommendations
Where it can be predicted that an object might be a target for theft or vandalism, whether because of the location, size, image, notoriety of the artist or value, additional security and other protective measures should be put in place.
Protective measures should include:
- Placing the work of art behind tempered (safety) glass or Lexan (unbreakable plastic glazing), at a minimum.
- Adding barriers and a proximity alarm.
- Attaching security hardware so that the framed work cannot be removed easily from the wall.
- Employing security staff.
- Informing security staff of emergency procedures in the case of a spill. Even if the painting is glazed, corrosive substances can ruin a frame and run behind the frame and glazing.
- Installing video cameras.
- Informing the local police department so that a pre-arranged plan of action can be acted on, as required.
- Formulating a loan and travel plan that will minimize risk to the object.
For information on preventive conservation strategies related to protecting heritage collections from vandalism and theft, consult Agent of deterioration: thieves and vandals.
Dissociation
This is one of the saddest of the agents of deterioration because it can have serious ramifications on the understanding, appreciation and valuation of a painting and because it is so easily avoidable. Dissociation results in the loss of objects, parts of objects or object-related information. It separates the object from its original context.
Dissociation is often the result of the lack of inventory and documentation policies or of a breakdown in such policies. Loss of object-related information can occur as simply as losing a label or the information on the label, or it can occur if parts of an object become separated without adequate documentation. Causes of dissociation with paintings are inadequate documentation and filing of information on the provenance of the object (origin and ownership history), fading of ink on labels or deterioration and loss of labels leading to loss of information, and changing or replacing an original frame. Relocation of an artwork commissioned for a specific location can also result in loss of context and, therefore, loss of value and appreciation of the artwork. Failure to record the relocation of a painting can result in misplacing the object and in its eventual loss.
Recommendations
Preventing the loss of value of the object through dissociation requires effective policies and procedures. Policies and procedures need to be put in place to document all transactions, uses and movement of objects (including acquisition details). Furthermore, this documentation must include a description of the structure, identifying marks and labels on an object. Adherence to these policies and procedures will minimize the risks of dissociation. Documentation should be written and photographic. Ensure labelling standards are systematically and correctly applied. Initial and periodic examination and condition reporting will allow recording of inscriptions and labels and will alert one to the potential deterioration or loss of this evidence. Keep all information on an object within a file devoted to the object. With respect to paintings and their frames, make every attempt to keep the original frame with the painting and to retain labels and inscriptions on the frame or to otherwise retain the information.
For further information on collections in general, consult Agent of deterioration: dissociation.
Fire
If fire does not result in complete destruction, the intense heat can cause blistering and charring of varnish, paint and ground layers. Even if the artwork is isolated from the flames, smoke from the fire can travel through the ventilation system, depositing a greasy layer of soot on unprotected surfaces. Damage can also result from fire suppressants such as water.
Recommendations
- The presence of a fire alarm system can alert the local fire department and ensure that the fire is suppressed before it can take hold.
- Keep fire extinguishers on hand.
- If possible, install a fire suppression system (wet or dry pipe). Even though water can cause damage, it is far less catastrophic than fire.
- Ensure that the fire department is aware of the collection and the layout of the building. Provide them with a list of priority works to be removed from the building in case of fire.
- Ensure that wiring is up to date.
- Check that the building is up to code with respect to the fire suppression build and materials.
- Install valuable works of art behind Plexiglas glazing. Plexiglas will not prevent burning; however, it does not transmit heat as rapidly as glass. Glazing with either glass or acrylic will protect the surface of the painting from soot deposition.
Soot and smoke deposits require the immediate attention of a conservator to remove as much of the deposit as possible without permanent disfigurement.
For information on preventive conservation strategies related to protecting heritage collections from fire, consult Agent of deterioration: fire.
Water
Water can cause softening, swelling and, finally, destruction of hygroscopic materials. The panel painting in Figure 22 was likely exposed to flood waters, and the lower edge became soaked. This caused severe losses to the ground and paint layers and culminated in the replacement of the wood in this region. The grey-painted band visible along the lower edge is part of an old restoration of this damage. Water can cause unsightly staining and tide lines as the moisture picks up water-soluble elements in the canvas or paint layers (Figure 23). Swelling of many support materials results in distortion and delamination of card supports as the adhesive holding the layers together dissolves (Figure 24). Water damage can also cause varnishes to become milky and opaque. In instances of flood, sewer back-ups or leaks, the water will carry other material and debris that can be deposited on the surfaces of affected objects.
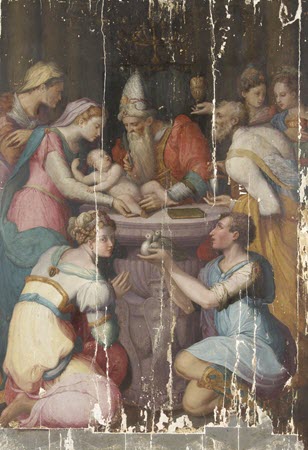
© Government of Canada, Canadian Conservation Institute. CCI 78635-0122
Figure 22. Water damage to lower edge of a panel painting likely exposed to flood water.
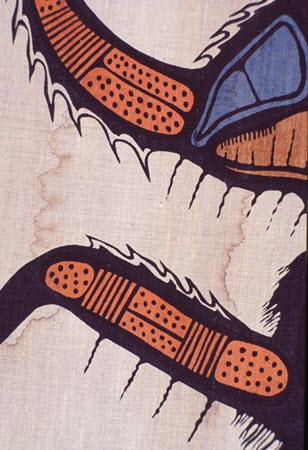
© Government of Canada, Canadian Conservation Institute. CCI 73982-0004
Figure 23. Water damage caused an unsightly tide line on the exposed fabric support of this silkscreen on linen, Legend of Red Lake.
© Government of Canada, Canadian Conservation Institute. CCI 130103-0007
Figure 24. This card support has distorted and the layers have delaminated after exposure to water.
Apart from physical damage caused by the effects of water, the aftermath of wetting normally incurs mould contamination once the object begins to dry out. Managing drying of the objects becomes one of the major concerns for preventing further damage.
Even small amounts of water or moisture can cause damage to paintings if their exposure is persistent. Dust and debris trapped between the reverse of a canvas and the wood stretcher bar attract and hold moisture. This often occurs along lower stretcher members where dust and debris can easily settle. Paint and ground layers are affected by this moisture and will delaminate along the lower edge. Damp can also develop if the painting is displayed against a cool exterior wall and condensation occurs on the back of the canvas. Moisture builds up, and the canvas becomes moist. As the canvas absorbs moisture, glue layers soften along with ground and paint layers, which swell and delaminate. Mould can grow under these circumstances, adding to the overall degradation of the support and decorative layers.
Recommendations
- Have an emergency plan in place which identifies individuals to contact and outlines action steps.
- In an emergency situation (flood, burst pipe), begin emergency response procedures and call a conservator as soon as possible.
- Have a protocol in place for handling mouldy objects. This will require the wearing of personal protective equipment and a face mask. Mouldy materials that can be discarded should be discarded. Items that are mouldy should be dried and then sealed and isolated until conservation services are available.
- Have emergency supplies available at all times.
- Do not place storage units under overhead water pipes. If pipes are present, cover the top of the unit with a waterproof material.
- Raise storage units 3–4 in. above the floor to protect the artworks from possible water accumulation.
- To prevent mould from growing, it is essential that drying begin as soon as possible. If there are too many items to deal with at once, placing them in a cool area with temperatures below 20°C will considerably slow the development of mould. Install fans and keep the air circulating at all times, as this appears to interfere with the settling of mould spores.
- Physically blot excess moisture from items using soft paper towel, blotting paper or cotton sheets. If paint is delaminating and will not tolerate blotting, ensure a good circulation of air.
For further information on preventive conservation strategies related to protecting heritage collections from water, consult CCI Note 10/5 Emergency Treatment of Water-Damaged Paintings on Canvas and Agent of deterioration: water
Pests
It is not uncommon to see the effects of insect damage on paintings. Wood-boring insects can eat through wood panels, creating open channels. Small round "flight holes" are often visible through the support and paint layer, as shown in Figure 25, and the insect frass and larvae can be visible in open channels on the reverse. Insects such as flies and spiders, who feast on the flies, leave accretions, which can pockmark a surface. If paintings are stored in an area where mice might have access (attics, rooms with low occupancy), canvases can be chewed or made into nesting surfaces. Bird droppings can also be highly problematic if paintings are stored in areas with openings to the outdoors such as attics, barns and warehouses.
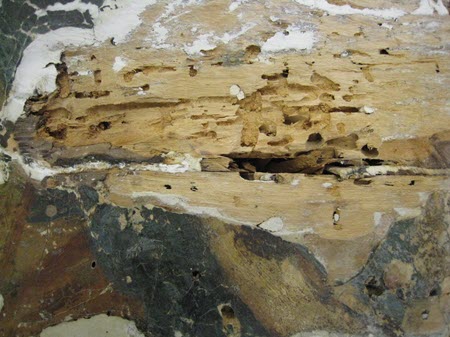
© Government of Canada, Canadian Conservation Institute. CCI 78635-0257
Figure 25. Flight holes and channels in a wood panel from wood-boring insects.
Recommendations
- Ensure that display and storage areas are sealed (windows closed) and that food and beverages are not allowed in proximity to collections.
- Practise good housekeeping and good building inspection and maintenance procedures.
- Inspect objects in the collection and incoming objects for signs of insect activity.
- It is important to determine if an insect infestation is still active to prevent further damage and to prevent other objects from being affected.
- If an insect infestation is suspected, the object should be isolated from the collection and wrapped. If a fresh sawdust-like material (frass) is present within the wrapping or at the end of channels after a period of days or weeks, live insects may be present and treatment is required by a conservator or conservation scientist familiar with eradication techniques that do not damage museum objects.
- Implement a full integrated pest management system, including monitoring, housekeeping, building and equipment features, as discussed in Agent of deterioration: pests.
Pollutants
Pollutants can refer to noxious gases carried in the air from industrial sources as well as to other airborne agents such as tobacco smoke, oils from combustion sources, dirt (Figure 26), spilled liquids, foodstuffs, insect accretions, also known as flyspecks (Figure 27), and fingerprints, among others. Accretions become very problematic when they are acidic, as is the case with flyspecks, spider specks and fingerprints. The organic matter from insect accretions can eat into a paint layer, destroying the surface. The oil from fingerprints is especially harmful to unvarnished acrylic paintings, as it will affect the surface, becoming more visible over time and increasingly irreversible.
Spills of alcoholic beverages onto a painting surface are also a hazard. This is especially the case for acrylic paintings that are highly solvent-sensitive and have been known to experience irreversible colour shifts when exposed to liquids containing even low levels of alcohol. Industrial emissions, such as sulfur dioxide, will convert lead-based pigments to lead sulfides, which are black. When combined with moisture in the air, nitrous oxide and sulfur dioxide become highly corrosive agents if they land on painted surfaces and exposed canvases. Fabric supports will undergo acid hydrolysis, which can reduce the strength of the canvas and result in loss of support for paint layers (Figure 28).
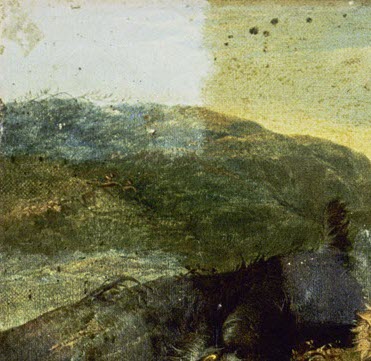
© W. Baker
Figure 26. In this detail of a partially cleaned painting, the change in appearance due to a layer of surface dirt and nicotine is clearly evident.

© Government of Canada, Canadian Conservation Institute. CCI 69323-0016
Figure 27. The dark circles are the result of the residue left from flies (flyspecks). In addition to being unsightly, the accretion can corrode the paint surface and cause paint loss.

© Government of Canada, Canadian Conservation Institute. CCI 98601-0009
Figure 28. Weakening of cellulose-based fabric due to oxidation and acid hydrolysis can result in damages such as tearing and loss of material. This is always most evident along the tacking margins where the canvas is most manipulated.
Recommendations
- Do not handle sensitive surfaces directly. Use gloves if moving paintings.
- Choose suitable display locations without exposure to smoke, greasy deposits and gaseous pollutants.
- Keep food and drinks away from the vicinity of paintings.
- Frame particularly fragile, unvarnished surfaces behind a suitable glazing material. Non-glare (anti-reflective) glass and acrylic sheets are recommended.
- Inform security staff of emergency procedures in the case of a spill. Even if the painting is glazed, corrosive substances can ruin a frame and run behind the frame and glazing.
- Encourage visitors to remain at a distance from works of art by placing markers on the floor.
For more information on preventive conservation strategies related to protecting heritage collections from pollutants, consult Agent of deterioration: pollutants.
Light and ultraviolet
Exposure to light can cause fading or darkening of pigments as well as discolouration and embrittlement. It also contributes to the weakening of support materials such as fabrics and paper through photooxidation. Many pigments are stable, such as the inert mineral pigments (iron oxides and a number of modern pigments), but others are sensitive to light, such as lake pigments, and can fade or change colour (consult Table 1 for the different sensitivity levels of different colourants).
| Sensitivity | Types of colourants at risk |
|---|---|
High sensitivity |
|
Medium sensitivity |
|
Low sensitivity |
|
| No sensitivity |
|
Note: Table 1 is based on Table 3 in CCI's Agent of deterioration: light, ultraviolet and infrared.
Paint layers will fade depending on the sensitivity of the pigment and the thickness of the paint layer. More thickly applied paint will take longer to noticeably fade since there is more pigment present. Thin pigmented oil glazes and watercolours are particularly sensitive to light, as they are, by nature, very thinly applied. No particular medium is more protective as a light barrier than another. Light damage is often visible when the area of the image protected by the rabbet of the frame is compared with the adjacent area exposed to light (Figure 29).
© Government of Canada, Canadian Conservation Institute. CCI 130103-0010
Figure 29. Detail, showing light damage. The light sensitive red pigment is still visible at the edge where protected by the rabbet of the frame but has faded almost entirely where exposed to light.
While Table 1 provides the light sensitivities of colourants used in paintings, Table 2 proposes time estimates for expected fading in visible light for materials of different sensitivities exposed to different lighting scenarios. Please note that 50 lux as described in Table 2 represents low-light level viewing under which many light-sensitive objects are displayed. This light level does permit viewing but could be described as "dim." Often, conditioning of the museum or gallery viewer to even lower levels prior to entry into exhibits set to 50 lux is required for the eye to adjust to these levels. Light levels of 150 to 250 lux are closer to normal museum light levels for general collections, where light-sensitive objects are not displayed. Light levels of 500 lux represent "office" lighting.
Damage by light is proportional to light intensity multiplied by exposure time. Essentially, the higher the light level, the more rapidly colour is lost, and the longer the exposure, the greater the fading. While the UV component of light is responsible for a significant portion of fading, visible light also plays an important role. For highly sensitive pigments or dyes, even low-level light will cause these colours to just noticeably fade over a matter of between 1 to 10 years in the presence of UV, and 1.5 to 20 years without. As shown in Table 2, in all cases, removing the UV component will, to some degree, extend the length of time for fading to occur. Dropping light levels for medium-sensitivity materials from 30,000 lux to 150 lux (daylight to museum exhibition light level) will increase the time it takes for just noticeable fading to occur, from two weeks to a year to between seven to two hundred years.
For a visual estimate of the fading of colourants when exposed to visible light, with or without UV, and the influence of various lighting or exhibition scenarios on the future appearance of the object, consult CCI's Light damage calculator.
| Sensitivity Table 2 note 1 | Visible light level | Time Table 2 note 2 for just noticeable fade Table 2 note 3 | |
|---|---|---|---|
| With UV Table 2 note 4 | No UV Table 2 note 5 | ||
| High sensitivity (Materials rated ISO Blue Wool 1, 2 or 3) |
30,000 lux (average daylight) |
0.8 to 7 days | 1 to 14 days |
| 5000 lux (light from a window or study lamp) |
4 days to 1 month | 5 days to 2 months | |
| 500 lux (office lighting) |
5 weeks to 1 year | 7 weeks to 2 years | |
| 150 lux | 20 weeks to 3.5 years | 6 months to 7 years | |
| 50 lux | 1 to 10 years | 1.5 to 20 years | |
| Medium sensitivity (Materials rated ISO Blue Wool 4, 5 or 6) |
30,000 lux (average daylight) |
5 days to 10 weeks | 2 weeks to 1 year |
| 5000 lux (light from a window or study lamp) |
3 weeks to 17 months | 2 months to 7 years | |
| 500 lux (office lighting) |
8 months to 14 years | 2 to 70 years | |
| 150 lux | 2 to 40 years | 7 to 200 years | |
| 50 lux | 7 to 140 years | 20 to 700 years | |
| Low sensitivity (Materials rated ISO Blue Wool 7, 8 or higher) |
30,000 lux (average daylight) |
1 to 14 months | 6 months to 10 years |
| 5000 lux (light from a window or study lamp) |
0.5 to 8 years | 3 to 70 years | |
| 500 lux (office lighting) |
5 to 84 years | 30 to 700 years | |
| 150 lux | 17 to 240 years | 100 to 2000 years | |
| 50 lux | 50 to 840 years | 300 to 7000 years | |
Table 2 notes
- Table 2 note 1
-
Consult Table 1 for materials at risk.
- Table 2 note 2
-
Each day of exposure is assumed to be 8 hours; each year, 3000 hours.
- Table 2 note 3
-
Time for "just noticeable fade" is given as a range based on the doses for the range of ISO Blue Wools in that sensitivity category. Note that the time for "almost total fade" may be conservatively estimated as between 30 to 100 times longer than the "just noticeable fade" time (fading often slows down, so that an estimate of 100 times the "just noticeable fade" is probable for many colours).
- Table 2 note 4
-
Data based on lightfastness studies in which the UV content is that of daylight through one layer of ordinary window glass or of equivalent light sources.
- Table 2 note 5
-
These estimates are averages calculated for a perfect UV filter that blocks radiation below 400 nm, equivalent within error to light sources that measure 75 µW/lm.
Note: Table 2 is based on Tables 3 and 4 in CCI's Agent of deterioration: light, ultraviolet and infrared.
UV radiation, from daylight and some light sources, contributes to colour fading (as shown in Table 2) and is also responsible for other types of damage, such as paint chalking, yellowing of media and varnish (Figure 30), embrittlement of exposed canvas and weakening and discolouration of exposed paper-based supports.
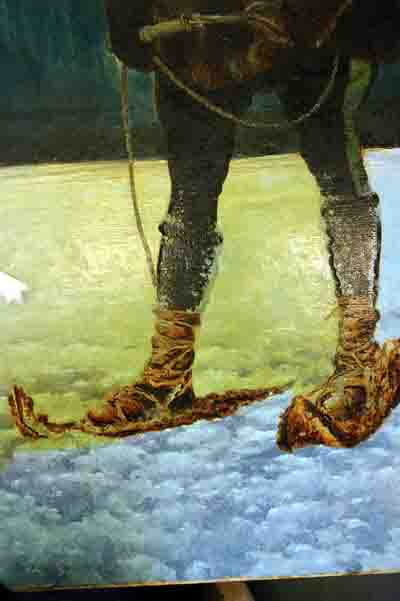
© Government of Canada, Canadian Conservation Institute. CCI 120113-0055
Figure 30. The discolouration of varnishes over time due largely to chemical changes in the resin from exposure to UV radiation can change the original appearance of the painting. The appearance of the snow in the lower half of this image, where the yellowed varnish has been removed, is quite different from the area yet to be cleaned.
Table 3 provides a snapshot of the effects of UV radiation on different materials and various types of physical damage that UV can cause, such as chalking of media, while Table 4 presents the time required for these damages to occur under different lighting scenarios. (For UV's contribution to the fading of colours, consult Table 2).
| Sensitivity level | Types of materials & damage caused by UV |
|---|---|
| Very high sensitivity | Low quality papers, such as newsprint: yellowing |
| High sensitivity | Oil paints with photosensitizing pigments (zinc white, early titanium white): chalking of the paint Pale woods: yellowing Wool, cotton, silk, paper, if photosensitizing dyes present: weakening and eventual fragmentation. |
| Medium sensitivity | Wood: turns grey, erodes |
| Low sensitivity | Modern plastics, rubbers, paints that contain UV stabilizers, designed for outdoor exposure: cracking or chalking of the material |
| Not sensitive to light | Inorganic materials: metals, stone, ceramics, glass: no perceptible effect |
Please note: This is based on Table 5 in CCI's Agent of deterioration: light, ultraviolet and infrared.
| Lighting | UV content Table 4 note 3 | Visible light Table 4 note 3 | Sensitivity category Table 4 note 2 | |||
|---|---|---|---|---|---|---|
| Low | Medium | High | Very high | |||
| Outdoors (Daylight spectrum) |
~600-1000 µW/lm | Daily average: 30,000 lux | ~10 years | ~1 year | ~1 month | ~3 days |
| Daylight through window glass | ~400–500 μW/lm | 30,000 lux | ~30 years or more | ~3 years or more | ~2 months or more | ~1 month or more |
| 50 lux | ~20,000 years or more | ~2000 years or more | ~100 years or more | ~50 years or more | ||
| Daylight through window glass with good UV filter | ~75 μW/lm or less | 30,000 lux | ~300 years or more | ~30 years or more | ~2 years or more | bleaching by blue light overrides any residual UV yellowing; thermal agingTable 4 note 4 may eventually prevail (likely in 100–1000 years at 20°C) |
| 50 lux | ~many millennia (thermal aging aging Table 4 note 4 likely in 100–1000 years at 20°C) | ~many millennia (thermal aging aging Table 4 note 4 likely in 100–1000 years at 20°C) | ~many millennia (thermal aging aging Table 4 note 4 likely in 100–1000 years at 20°C) | |||
| Dark | No UV | none | thermal aging aging Table 4 note 4 likely in 100–1000 years at 20°C | thermal aging Table 4 note 4 likely in 100–1000 years at 20°C | thermal agingTable 4 note 4 likely in 100–1000 years at 20°C | thermal agingTable 4 note 4 likely in 100–1000 years at 20°C |
Table 4 notes
- Table 4 note 1
-
These time estimates are derived from estimates based directly on observations of outdoor exposures (30,000 lux, natural UV levels of ~600–1000 µW/lm), by considering the lux level together with data on the wavelengths that cause the damage. The numbers provided are cautious. The phrase "or more" means that the actual time for most material–lighting combinations may be much longer. Each day of exposure is assumed to be 8 hours; each year, 3000 hours.
- Table 4 note 2
-
Consult the list of materials at risk in Table 3.
- Table 4 note 3
-
When UV is measured as a ratio—microwatts (of UV energy) per lumen (of visible light)—then the total UV exposure, and the damage that it causes, depends on both this UV measurement and the intensity of visible light. Therefore, preserving materials from UV damage requires not just UV filtering (which only affects the ratio of UV within the light), but also reducing visible light levels (in lux).
- Table 4 note 4
-
Thermal aging (yellowing, weakening, cracking) will become predominant. Thermal aging refers to chemical decay processes that are not driven by UV (though sometimes initiated by a little UV), but which occur even in the dark at room temperature.
Note: Table 4 is based on Table 5 in CCI's Agent of deterioration: light, ultraviolet and infrared.
Recommendations
The overriding recommendation for reducing light damage in collections, especially for the most rapidly fading materials, is to reduce light exposure. This involves both reducing the intensity of the light and the exposure time. Eliminating UV radiation is also important as it plays the major role in the yellowing of varnish and paint binder, the fading of certain pigments, lakes and dyes and the discolouration and/or disintegration of exposed fabric, paper and wood supports. Some recommendations for managing damage from light and UV are given below.
Recommendations include:
- Exhibit paintings under the lowest light level that allows for their proper appreciation.
- Tables 1 and 2 provide information on the important role that reduced light intensity plays in extending the lifetime of materials.
- Eliminate UV and direct daylight from display, storage and examination areas.
- Reduce exposure time:
- turn off lights when display area is closed or not in use,
- use timed and viewer-activated lights on sensitive works and
- rotate objects on display.
- Eliminate bright lights, particularly the kind that attaches to frames.
- Choose appropriate lighting fixtures and placement. Ceiling track systems are optimum. LED lamps that can be dimmed without change in their colour temperature are best.
- Monitor and control the intensity and UV content of the light as well as the duration of exposure to minimize light damage. Keep records of cumulative light exposure, particularly for light-sensitive objects.
- Attempt to establish the light sensitivities of the pigments used in the artwork in order to determine the amount of fading over specific time periods and under specific light levels. Knowing the actual pigment may only be possible in the case of modern paintings or where analysis has been undertaken. (For older paintings, reds are often light-sensitive, particularly those that were used as glazes in flesh tones.)
- Based on the light sensitivity of the object, design a lighting scheme and an exposure (exhibition) time that maximize the lifetime of the artwork.
For further information on the sensitivity of museum objects to light and on preventive conservation strategies related to protecting heritage collections from light, consult Agent of deterioration: light, ultraviolet and infrared.
For further information specific to paintings, consult CCI Note 10/4 Environmental Guidelines for Paintings.
Incorrect temperature
Most paintings do best when displayed and stored at room temperatures (between 16°C and 25°C is an acceptable range). At higher temperatures, chemical degradation processes can speed up, causing weakening and embrittlement of many primary supports. In the case of low-quality sulfite-based wood pulp boards, elevated temperatures can accelerate the destructive action of acids originating from chemicals used during the production process (Figure 31).
© Government of Canada, Canadian Conservation Institute. CCI 98231-0005
Figure 31. The reverse of a small painting on a deteriorated card support which has broken in several pieces. Though seemingly strong, paper-based boards can become so brittle from acid-degradation, especially if exposed to elevated temperatures, that they will snap and break if mishandled or dropped.
Some media, such as paints based on or containing waxes and certain resins, and mixed media are very sensitive to heat. These paintings can soften and deform if exposed to heat as low as between 30°C and 45°C. Most conventional oil paintings require higher temperatures to cause rapid damage, but blistering is possible with exposure to strong sunlight or hot lamps (Figure 32).
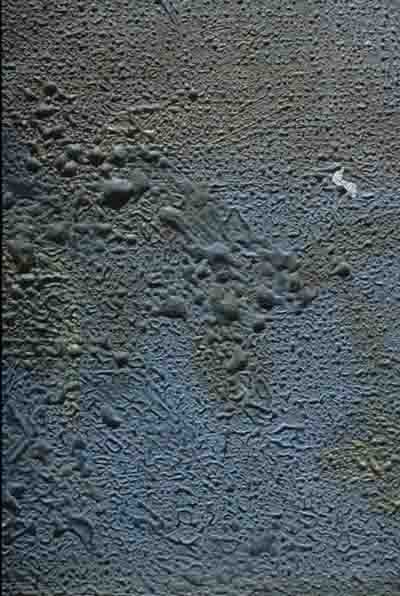
© Government of Canada, Canadian Conservation Institute. CCI 130103-0008
Figure 32. Blisters can be caused by intense heat from sunlight or from a hot lamp in close proximity.
Heat can also be delivered by hot light bulbs directed at the painting (and often attached to frames). Materials soften at higher temperatures and are likely to become sufficiently tacky to get stuck to adjacent objects if there is contact. When packing or storing works of art, it is essential that these be physically separated in case of a rise in temperature of the storage area or in the packing crate. At very low temperatures, below -5°C, oil and alkyd paints become brittle. Consequently, the risk of cracking at low temperatures is higher, especially if the painting is handled.
Acrylic paints are durable but also have specific vulnerabilities. Acrylic paint layers become increasingly susceptible to cracking as the temperature goes below 5°C. Neither oil paintings nor acrylic paintings should be handled if they reach these cold temperatures. If temperatures drop overnight, inside surfaces of exterior walls may be subject to condensation. Often, flaking paint is a sign that condensation has occurred on the verso of the painting.
Recommendations
- Avoid extreme temperature conditions.
- Avoid attic storage, and avoid display near heating and cooling units or on poorly insulated exterior walls.
- Avoid direct sunlight and close proximity to incandescent lamps.
- Do not fix spot lamps on the painting frame.
- Do not transport paintings in extreme hot or cold temperature conditions. If there is a risk of short-term exposure to low temperature, provide adequate insulation in the crate.
Incorrect relative humidity
Table 5 summarizes three levels of sensitivity to RH fluctuations. Damaging effects that are specific to the low end and to the high end of RH are discussed after the table.
| Sensitivity level | Type of painting | Effects |
|---|---|---|
| High sensitivity | Any hygroscopic support that is thin in cross-section such as ivory, small wood panels, hardboards. Highly sensitive water-based paints such as heavily applied distemper on paperboard card or loose-weave canvas. Paintings lined onto glue or glue-paste canvas, or paintings having a strong glue size layer. Heavily applied paint on tempered hardboard. Thin gesso layers on wood support. |
|
| Medium sensitivity | Paintings in all media on canvas supports, heavier wood panels, paintings on glass, frescoes. |
|
| Low sensitivity | Paintings on stone and porcelain, provided that the surface of the porcelain is rough. |
|
Low relative humidity
At low RH, hygroscopic materials like wood, paper and fabric release moisture and contract. Movement in the supporting layer is complicated by the fact that one face of the support, wood, fabric or paper is covered with design layers which absorb and desorb at different rates and to different extents than the verso. Thus, in low humidity conditions, a painted wood panel loses moisture much more quickly from the unpainted side and can develop a temporary convex curve. The effect of low humidity on paintings with fabric supports is to cause draws to develop in corners. High humidity, on the other hand, causes ripples and bulges across the centre of the work. Figure 33a shows the surface of a painting that has been exposed to many cycles of humidity fluctuations (photographed under normal lighting conditions). Figure 33b shows the same painting photographed in raking or oblique lighting conditions. This lighting accentuates surface distortions due to the canvas response to fluctuating humidity. It is not unusual for out-of-plane distortion such as the overall bulging, corner draws and rippling to develop over time as the overall painting tension slackens. Distortions such as those illustrated here will require the attention of a conservator.
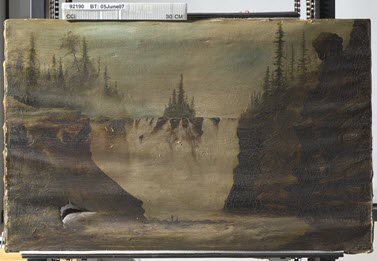
© Government of Canada, Canadian Conservation Institute. CCI 92190-0002
Figure 33a. Normal illumination of a painting on canvas with structural deformations due to movement of the canvas from RH fluctuations.

© Government of Canada, Canadian Conservation Institute. CCI 92190-0065
Figure 33b. Raking light photograph of the painting shown in Figure 33a with surface deformations accentuated by the lighting.
Thin sheets of ivory used in miniatures, which are very sensitive to humidity fluctuations, will deform in response to the moisture of a person's hand. Mounts that restrict the movement, especially at low humidity, of a thin and fragile support such as ivory will almost certainly cause breakage.
The size, ground and paint layers experience a change in stiffness and strength with RH fluctuations. Oil paintings are particularly vulnerable to low RH, which results from central heating during Canadian winters when no humidification is present. As RH drops below 50%, the size, ground and paint layers become more brittle and experience increasing levels of stress. Below 35% RH, they are more likely to develop cracks, which in turn can lead to lifting paint and paint loss. Also, in a brittle condition, these layers are less able to withstand the mechanical stresses of handling without cracking. Paints, such as distemper, that are bound with glue as the binder are also very vulnerable to low humidity. Stress builds up because of the strong contractive force of the glue at low RH and severe breakage can occur (Figure 34).
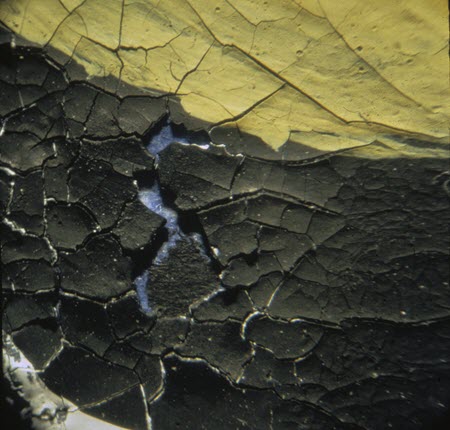
© Government of Canada, Canadian Conservation Institute. CCI 130103-0004
Figure 34. Thick applications of glue tempera or poster paints are prone to cracking and subsequent flaking, especially when exposed to low RH.
Acrylic paints can also become less flexible with decreases in humidity, and paintings on fabric supports, especially cotton duck which is very sensitive to humidity fluctuations, show signs of cracked paint after these works have experienced several low RH cycles.
For paintings on plaster, such as frescoes, periods of low humidity cause moisture to be drawn from the wall, encouraging the migration of damaging salts with it. As these salts transfer to the surface, they can move from a liquid state to a solid state. Not only are these salt crystals disfiguring, but they will also cause crumbling of the surface of the fresco (Figure 35).
© Government of Canada, Canadian Conservation Institute. CCI 124706-0001
Figure 35. Salt efflorescence can be seen as a white deposit above a layer of buon fresco. The fresco secco layer painted above the buon fresco is flaking away due to the presence of the salt between these two layers. The expansion of the salt as it transitions from a liquid to a solid state causes crumbling and flaking in and between the paint layers.
High relative humidity
As humidity levels move from low to high, size, ground and paint relax and become less brittle. As wood absorbs moisture, there is an expansion across the grain. As the wood expands, the gesso and paint layers, with different coefficients of expansion, cannot keep up with the swelling in the support, and so ground and paint form a series of small cracks primarily in the direction of the grain.
Between 85% and 100% RH, canvases with a tight weave will shrink. Simultaneously, the glue size softens. The ground and paint layers buckle and lift away from the canvas in a phenomenon called "tenting."
For fresco paintings with salt contamination, higher humidity causes certain salts to deliquesce (go from a solid to a liquid). When the humidity returns to moderate or lower values, the salts will recrystallize and can destabilize the plaster and paint layer.
The great risk of high humidity is that of mould growth. Most materials from which paintings are composed will readily support mould. As the humidity rises above 65% RH, the probability of mould growth increases. The time for an outbreak to develop will shorten at higher RH levels. For example, mould may take 100 days to develop at 70% RH, 10 days at 80% RH and only 2 days at 90% RH. Consult Agent of deterioration: incorrect relative humidity, which provides a chart indicating the rate of mould growth by humidity level.
Since mould will develop most rapidly where air circulation is low and where there is less exposure to sunlight, it will likely first develop at the back of a canvas near stretcher bars where the humidity will be most consistently high (given that wood is slow both to give up and to gain moisture). Paint layers most susceptible to mould growth are those composed of protein-based binders such as distemper. Distemper paintings can often be found covered with mould. Works of art shipped in less than stable conditions, where temperatures and humidity were high, have made for very unhappy travellers when they have unwrapped completely mouldy paintings.
Mould can produce dark spots or larger areas of staining, or it can be visible as a feathery deposit. Toxic volatiles released by mould are a health and safety concern. For this reason, mould-contaminated objects should be treated with special precautions—isolation from the collection, containment such as wrapping and sealing, and the wearing of protective clothing and face masks by anyone who is handling or examining the object. Consult Technical Bulletin 26 Mould Prevention and Collection Recovery: Guidelines for Heritage Collections.
Fluctuations in humidity
Fluctuations can occur seasonally with a gradual change in RH as well as on a daily day-night cycle. Fluctuations can also be triggered by proximity to drafts, air vents, radiators, heating ducts, working fireplaces, etc.
Very serious stresses occur during rapid day-to-night fluctuations in humidity as materials are constantly expanding and then contracting. Fluctuations will exacerbate cracking and will cause rapid delamination in unstable paint layers.
The risk of crack development is negligible with fluctuations of 10% RH or less, but with larger fluctuations, the risk increases (Figures 36a and 36b).
© Government of Canada, Canadian Conservation Institute. CCI 130103-0013
Figure 36a. A light is shone from the reverse of this painting (transmitted light) to visually accentuate cracks caused by RH fluctuations. The crack network shown here is at 35% RH.
© Government of Canada, Canadian Conservation Institute. CCI 130103-0014
Figure 36b. RH has been dropped from 35% to 25% and then to 5% over the course of several days. An increase in cracking and widening of existing cracks are visible using transmitted light.
For example, with fluctuations of 10%, 20% or 40% RH, the risk of damage increases from tiny to small to severe, respectively. Fluctuations at lower RH levels present a much higher risk to paintings than fluctuations at a higher RH. The risk of cracking also increases with multiple fluctuations. It is not uncommon to see the area of a painting over the stretcher bars to be less cracked, due to the buffering capacity of the wood, than the area in the centre of the stretcher, which experiences all day-night cycles.
Permanent convex warps (convex in relation to the painted surface) can develop in painted wood panels as a result of a complex process related to fluctuating humidity. Short periods of high humidity will cause the exposed wood on the unpainted side of the wood panel to absorb more moisture in relation to the painted side. Swelling of the verso, in response to the increase in humidity, is impeded by the slower swelling response of the painted side. The wood cells on the back of the panel are compressed as a result. This compression does not reverse, and as the panel is exposed to cycles of humidity, the painted panel takes on a permanent convex warp. This form of warping can only be removed through specialized treatment.
Recommendations
- Prevent high RH that can cause mould, corrosion and distortion. Consult Agent of deterioration: incorrect relative humidity for details.
- Avoid very low RH (below 35%) that can cause cracking and delamination of paint on canvas, on wood, on hardboard, etc.
- Avoid attic storage and displaying near heating and cooling units or poorly insulated exterior walls, which cause extremes in RH due to localized hot or cold air.
- For a more detailed discussion of guidelines suitable for buildings with environmental control systems, consult Climate Guidelines.
- Use airtight and impermeable backing boards on all paintings on canvas to reduce risks from daily RH fluctuations. Consult CCI Note 10/10 Backing Boards for Paintings on Canvas.
- Use airtight enclosures (such as glazed, backed, airtight frames for paintings on canvas, or metal and glass boxes for panel paintings) if paintings are housed in uncontrolled environments. Consult the section Long-term protection for a painting with ongoing flaking problems.
- Use airtight and impermeable polyethylene wrap around paintings when they are in transit or when they are housed in uncontrolled storage. Consult CCI Note 10/16 Wrapping a Painting.
For a description of preventive conservation strategies against mould, please refer to the Recommendations section under "Water."
Refer to CCI Note 10/4 Environmental Guidelines for Paintings for a comprehensive description of RH management in relation to paintings.
For more information on preventive conservation strategies related to protecting heritage collections from incorrect RH, consult Agent of deterioration: incorrect relative humidity.
Examples of preventive conservation practices
Installation of a backing board: a simple solution to many problems
The installation of a backing board to the verso of a stretcher or strainer is a simple solution which provides protection against damage from blows to the back and from vibration during transit. It also buffers against rapid changes in humidity, especially if a reasonably airtight seal can be achieved through the addition of weatherstripping foam applied to the backing board. Figures 37a and 37b show both the front and the back of a painting by Louis Dulongpré, Portrait of Jean Dessaulles (1825). The painting has a brittle, oxidized canvas and a cracked paint and ground layer. After treatment, a backing board of black plastic sheeting (Coroplast) was screwed to the back of the stretcher using weatherstripping to create a seal.
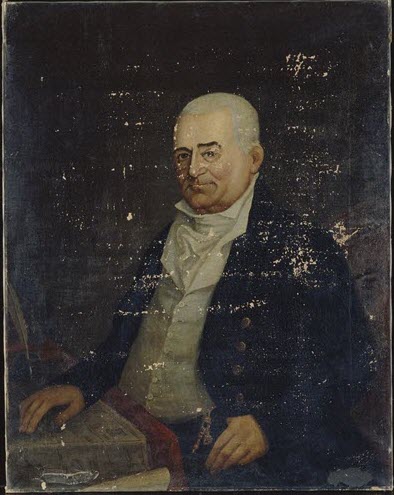
© Government of Canada, Canadian Conservation Institute. CCI 68478-0004
Figure 37a. The Portrait of Jean Dessaulles by Louis Dulongpré from the Séminaire de Saint-Hyacinthe.
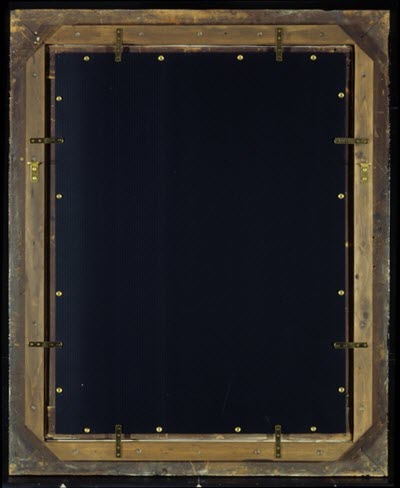
© Government of Canada, Canadian Conservation Institute. CCI 120728-0001
Figure 37b. The verso of the painting with a backing board. (Reproduced courtesy of the Centre d'archives du Séminaire de Saint-Hyacinthe, Quebec)
For further information on the materials and use of backing boards, consult CCI Note 10/10 Backing Boards for Paintings on Canvas.
Long-term protection for a painting with ongoing flaking problems
An area of flaking was observed during a routine inspection of The Buffalo Stampede painted by Frederick Verner (Figures 38a and 38b). The painting was removed from display and placed face-up to prevent paint loss until a conservator could examine it and provide advice. Upon close examination, microflaking and incipient cleavage over most of the painting were detected. Due to the presence of a glue paste lining used in an early treatment, the painting is vulnerable to fluctuations in RH and particularly to dry conditions common in centrally heated buildings during Canadian winters.
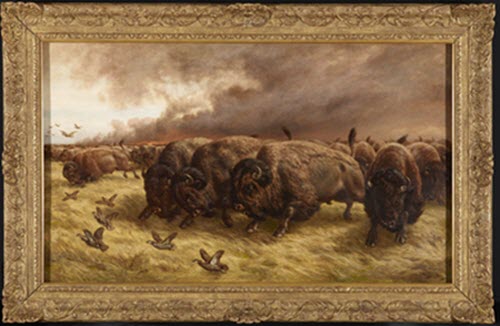
© Government of Canada, Canadian Conservation Institute. CCI 85733-0076
Figure 38a. Buffalo Stampede, painting by Frederick A. Verner, 1882. (Reproduced by permission of the Art Gallery of Alberta)
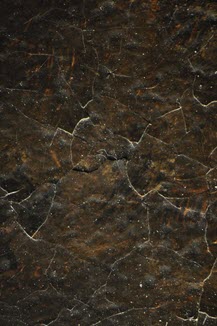
© Government of Canada, Canadian Conservation Institute. CCI 85733-0079
Figure 38b. This detail shows areas of lifting, flaking paint, which were noticed during a cursory inspection of the painting.
Treatment was undertaken to consolidate the flaking paint and cleavage between paint and ground. However, the painting is still vulnerable to fluctuations in RH due to the presence of the reactive glue paste within its structure. As a preventive conservation measure, the painting was placed within an enclosed frame designed to moderate the RH within its vicinity. With little modification to the original frame, a sealed enclosure was provided, one that could maintain a stable environment for the painting. A non-glare museum-quality acrylic sheet was added as a glazing layer, and a padded spacer introduced between the glazing and the painting's surface allowed for approximately 2.5 cm of clearance between the two. An extension or build-up using wood strips on the reverse of the frame brought it level to the stretched painting, as the painting had to be completely enclosed in the framing structure. The wood extension was screwed to the frame verso and the outside edges were painted black to integrate this addition to the frame. Finally, a backing board of black-coloured Gatorfoam was cut so as to be placed over the frame extension. Aluminized sheet material and framer's tape were used to seal hygroscopic surfaces in order to eliminate ingress or loss of moisture through the wood, backing board and gaps (Figure 38c). This enclosed design will reduce rapid RH changes in the vicinity of the painting and provide prolonged seasonal control. Periodic inspection of the painting, through the glazing, is still advised.
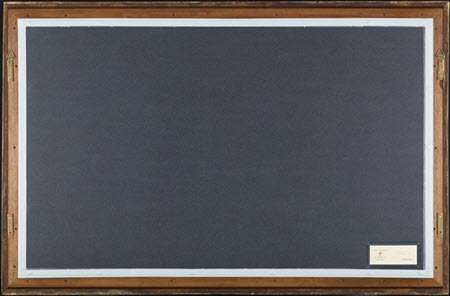
© Government of Canada, Canadian Conservation Institute. CCI 85733-0077
Figure 38c. Enclosed frame design seen from verso.
Providing a solution for strengthening an inherently weak auxiliary support
Many oversize modern and contemporary paintings are stretched over fairly flimsy wood strainers. These auxiliary supports are easily made, inexpensive and appear almost ubiquitously across paintings dating from the mid-20th century forward. These auxiliary supports are adequate, provided that the painting is not handled or moved. However, if transport becomes necessary, then the stability of the painting can be compromised.
One solution to this problem is to introduce a rigid backing material in direct contact with the canvas back—in other words, between the strainer and the canvas. This interleaf will reduce the flexing and torqueing of the auxiliary support and provide better overall support to a large and heavy canvas. This can help to prevent stretcher bar cracking, as the painting is isolated from the auxiliary support, and it will also reduce movement in the canvas as the entire back is now protected from sudden and rapid fluctuations in RH.
In the case of the painting Charlottetown Revisited by Jean Paul Lemieux (Figures 39 and 40), it was decided that rather than removing the painting from the original strainer, a system of 1/2 in. Gatorfoam boards would be inserted between the strainer members and held in place using mending plates (Figure 41a). This decision was made in the interest of minimal intervention. The Gatorfoam surface was faced with a polyester fabric applied with a heat-set seal. This would help to support the original canvas by providing a nap-bond. Finally, a second series of Gatorfoam panels was screwed to the strainer verso to completely seal the back of the painting (Figure 41b). The painting can now be more safely transported, and it is protected from serious damage from blows to both the front and the back.

© Government of Canada, Canadian Conservation Institute. CCI 96111-0048
Figure 39. Charlottetown Revisited by Jean Paul Lemieux, Confederation Art Centre.
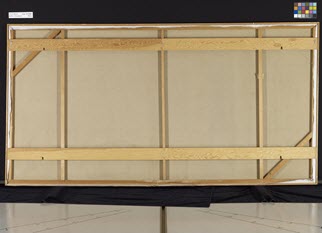
© Government of Canada, Canadian Conservation Institute. CCI 96111-0003
Figure 40. Verso of Charlottetown Revisited showing construction of lightweight strainer. Transverse bars added earlier in the history of the painting help to stabilize the lightly constructed auxiliary support.
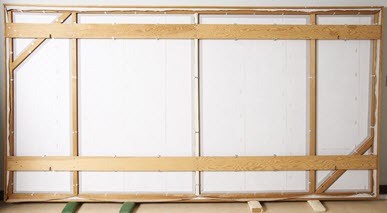
© Government of Canada, Canadian Conservation Institute. CCI 96111-0057
Figure 41a. Fabric-covered Gatorfoam inserts have been fitted between strainer members and are in contact with the back of the canvas. The Gatorfoam inserts are held by clips attached to inside edges of the strainer members.
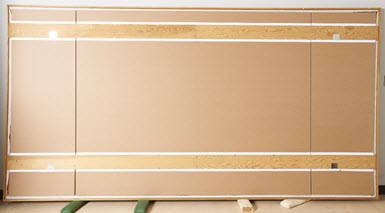
© Government of Canada, Canadian Conservation Institute. CCI 96111-0059
Figure 41b. Final backing boards of Gatorfoam close up the back of the painting, providing additional overall structural support and protection to the painting.
Bibliography
American Institute for Conservation of Historic and Artistic Works (AIC). Caring for Your Treasures – Paintings. Washington, D.C.: AIC, n.d.
Arnold, R., and W. Baker. Storage and Display Guidelines for Paintings, revised. CCI Notes 10/3. Ottawa, ON: Canadian Conservation Institute, 2017.
Arnold, R., W. Baker, J. Bourdeau, D. Daly Hartin, H. McKay, S. Michalski and J. Tétreault. Environmental Guidelines for Paintings, revised. CCI Notes 10/4. Ottawa, ON: Canadian Conservation Institute, 2017.
Ashok, R., ed. Artists' Pigments: A Handbook of Their History and Characteristics, vol. 2. Washington, D.C.: National Gallery of Art, 1993.
Canadian Conservation Institute. Emergency Treatment of Water-damaged Paintings on Canvas, revised. CCI Notes 10/5. Ottawa, ON: Canadian Conservation Institute, 2017.
Canadian Conservation Institute. Condition Reporting - Paintings. Part I: Introduction. CCI Notes 10/6. Ottawa, ON: Canadian Conservation Institute, 1993.
Canadian Conservation Institute. Condition Reporting - Paintings. Part II: Examination Techniques and a Checklist. CCI Notes 10/7. Ottawa, ON: Canadian Conservation Institute, 1993.
Canadian Conservation Institute. Keying Out of Paintings. CCI Notes 10/9. Ottawa, ON: Canadian Conservation Institute, 1993.
Canadian Conservation Institute. Condition Reporting - Paintings. Part III: Glossary, revised. CCI Notes 10/11. Ottawa, ON: Canadian Conservation Institute, 2016.
Canadian Conservation Institute. Basic Handling of Paintings. CCI Note 10/13. Ottawa, ON: Canadian Conservation Institute, 2015.
Carlyle, L., and W. Baker. Cleaning Paintings: Precautions, revised. CCI Notes 10/1. Ottawa, ON: Canadian Conservation Institute, 2016.
Croll, S. History of Paint Science and Technology (PDF format). Fargo, North Dakota: North Dakota State University, 2009.
Daly Hartin, D. Framing a Painting. CCI Notes 10/8. Ottawa, ON: Canadian Conservation Institute, 1993.
Daly Hartin, D. Backing Boards for Paintings on Canvas, revised. CCI Notes 10/10. Ottawa, ON: Canadian Conservation Institute, 2017.
Daly Hartin, D. Know Your Paintings – Structure, Materials and Aspects of Deterioration, revised. CCI Notes 10/17. Ottawa, ON: Canadian Conservation Institute, 2017.
Daly Hartin, D., and W. Baker. Making Padded Blocks, revised. CCI Notes 10/2. Ottawa, ON: Canadian Conservation Institute, 2016.
Feller, R.L., ed. Artists' Pigments: A Handbook of Their History and Characteristics, vol. 1. Washington, D.C.: National Gallery of Art, 1986.
FitzHugh, E.W., ed. Artists' Pigments: A Handbook of Their History and Characteristics, vol. 3. Washington, D.C.: National Gallery of Art, 1997.
Hurlburt, L. "The Siqueiros Experimental Workshop: New York, 1936." Art Journal 35,3 (1976), pp. 237–246.
Izzo, F., et al. "Modern Oil Paints – Formulations, Organic Additives and Degradation: Some Case Studies." In K.J. van Berg et al., eds., Issues in Contemporary Oil Paints. New York: NY: Springer Publishing, 2014, pp. 75–104.
Lamb, D. "A Brief History of Automotive Coatings Technology." CoatingsTech 14,2 (February 2017).
McKay, H. Care of Paintings on Ivory, Metal and Glass, revised. CCI Notes 10/14. Ottawa, ON: Canadian Conservation Institute, 2015.
McKay, H., A. Morrow, C. Stewart, R. Arnold, W. Baker and D. Daly Hartin. Paintings: Considerations Prior to Travel, revised. CCI Notes 10/15. Ottawa, ON: Canadian Conservation Institute, 2015.
McKay, H., W. Baker and D. Daly Hartin. Wrapping a Painting, revised. CCI Notes 10/16. Ottawa, ON: Canadian Conservation Institute, 2015.
McKay, H. "A Sealed Frame-Case for a Painting." Journal of the International Institute for Conservation-Canadian Group 15 (1990), pp. 9–11.
Ploeger, R., and O. Chiantore. "Characterization and Stability Issues of Artists' Alkyd Paints." In M. Mecklenburg et al., eds., New Insights into the Cleaning of Paintings: Proceedings from the Cleaning 2010 International Conference Universidad Politécnica de Valencia and Museum Conservation Institute. Washington, D.C.: Smithsonian Institution Scholarly Press, 2013, pp. 89–95.
Roy, A., ed. Artists' Pigments: A Handbook of Their History and Characteristics, vol. 2. Washington, D.C.: National Gallery of Art, 1993.
Salazar, E. "Understanding Wood Supports for Art: A Brief History." Just Paint 29 (2013), pp. 1–3 and 13–14.
Sands, S. "Weighing in on the Drying of Oils." Just Paint (Blog), 2011.
Smithsonian Museum Conservation Institute (MCI). Care of Acrylic Paintings. Suitland, MD: MCI, n.d.
Standeven, H. "Oil-based House Paints from 1900 to 1960: An Examination of Their History and Development, with Particular Reference to Ripolin Enamels." Journal of the American Institute for Conservation 52,3 (2013), pp. 127–139.
Stoner, J.H., and R. Rushfield, eds. Conservation of Easel Paintings. New York, NY: Routledge, 2012.
Strack, D. DuPont Paint Information, 2017.
© Government of Canada, Canadian Conservation Institute, 2018
Published by:
Canadian Conservation Institute
Department of Canadian Heritage
1030 Innes Road
Ottawa, ON K1B 4S7
Canada
Cat. No.: CH57-4/6-10-2018E-PDF
ISBN 978-0-660-28008-0